Zetsaz
-
Posts
856 -
Joined
-
Last visited
-
Days Won
17
Content Type
Profiles
Forums
Blogs
Events
Gallery
Downloads
Store
Everything posted by Zetsaz
-

A musician's therapist (The $300 Z)
Zetsaz replied to Zetsaz's topic in S30 Series - 240z, 260z, 280z
More recent purchases for the summer work: -T3 mustache bar: I ran the original for a long time, but it actually rubs against the dogbone for the drop mounts which concerns me -Kameari Engine Mounts: after consulting a lot of people and posts I decided against poly mounts since this is a full street car. RHDJapan with shipping was about the cost of buying OEM rubber units so I went for it. I'll report back on quality/comfort. -Adjustable engine mounts: for whatever reason my engine always sat high when first installed. I had to go without the front/rear isolators or my valve cover would rub the strut bar (it already put a notch in it). Lowering it slightly will fix that, PLUS hopefully fix my downpipe issue. When I added a spacer on the new turbo, the added angle on the downpipe to clear the floors made it just high enough to rattle against the trans crossmember. Hopefully I get a two-for-one on this part and don't have to redo the downpipe. -
If you're gonna get aftermarket that fit poorly and require a bit of work, just get the ones from Z Car Depot. At least they're $37 ea and you're not out so much and they're probably from exactly the same place originally. I believe I got mine from JDM Car Parts. Paid $140+ and they fit well, but I can't tell if they were OEM at the time. I thought they were only available OEM when I purchased mine. https://jdm-car-parts.com/products/rear-hatch-hinge-seal-set-240z-260z-280z-69-75?variant=766736517 Still need the plates, they definitely seem more important than you'd think.
-
The front end of these cars is already so questionable in terms of aero, that I'd be weary of doing anything that let even more air go places you don't want it. The hood in particular is already prone to lift due to the air flow. Sealing that top with the appropriate rubber strip can help mitigate some of the issue and make sure you're getting airflow to the intercooler and radiator where you want it. If your car is not done and you haven't driven it at highway speeds it's hard to grasp just how noticeable the front end lift is. Steering starts to feel very light above 75-80mph. Scarily light even. Enough that I was scared an avoidance maneuver on the highway would quickly make the car lose control and put in me in a ditch when I was trying to keep up with traffic through Idaho a couple years back. The difference in confidence I had when I finished my seals on the front and added a splitter was night and day. I'm not sure that upper area does anywhere near as much as the splitter, but I still don't want more air pressing up against the hood. Realistically, how much are you losing by bolting the intercooler to the bottom instead of the top of you cut it? 1/4"? Maybe 1/2" in some extreme situation where you add washers on top of the plate to avoid rubbing against the paint or something? If it creates tiny clearance issues with your intercooler piping just bend the plate out a tiny bit so it doesn't drop as much.
-
A musician's therapist (The $300 Z)
Zetsaz replied to Zetsaz's topic in S30 Series - 240z, 260z, 280z
Tiny updates and partially just a list for me to do over summer while I'm thinking of it: Recent purchases: -Floor mats (finally). We'll see if these even work, Between my sound deadening and carpet, I think the gas pedal might start rubbing against the carpet. -Engine lift hooks (mine were cracked). Important for lifting and replacing the crossmember and steering rack this summer -OEM brake booster check valve. Summer work in order of priority for this summer: -Replace glass fuel filter -Replace crossmember along with steering rack and re-align -Purchase correct size coupler for new throttle -Chamfer IAC inlet on throttle with a dremel (some serious whistling sounds happening, really obnoxious) -Redo intake side of intercooler piping -Tighten coolant lines and refill coolant. -Make power subharness from relay board on passenger side out to driver side where the ECU is under the seat -Install catch can (even if hose routing isn't super tidy) Lower priority -Redo center section of exhaust to improve clearance (would be high priority if I was driving more, but moving to mexico changed things haha. -Replace exhaust hangers with more rigid pieces to remove rattle. -Finally bother to build the AC hoses and charge AC system. - -
You always seem a few steps ahead of me and with better attention to detail haha. That RMS is a job I'm hoping to do this summer. I have a leak in the same area. Same with the Z Car Garage brakes.
-
Are you still running the original ammeter? There's a reason they switched to volt meters with the 280z, lots of current going through the dash harness.
-
Where did you get the flywheel tool? And any chance you can share the file for that seal tool? I've had a notorious leak that I'm almost positive is the rear main seal so I may be doing this next time I'm home. My brother wants the leak fixed so he doesn't have to have cardboard under the car when it gets stored at his new house haha. Debating going with a lightweight flywheel while I'm there, but since I'm making less money now (though saving as much with fewer expenses) I'm avoiding too many "mid cost" sort of items so I can save for a major brake upgrade down the road.
-
Do you already have the engine? If not I'm not sure why you would go through the trouble, when a VQ swap is probably more readily available and has more support now. If you already have the engine, Simtec Motorsports did a VG30DE a long while ago and could be of some help. More people have done the VG30E just due to space constraints. Biggest issue with V6 or V8 with DOHC is just the width. Lots of space in the engine bay on an S30, but it's not very wide.
-
Moving is no joke! I'm out of the country now. Just did some work on mine for the first time in 6 months and I thought that alone was long enough
-
A musician's therapist (The $300 Z)
Zetsaz replied to Zetsaz's topic in S30 Series - 240z, 260z, 280z
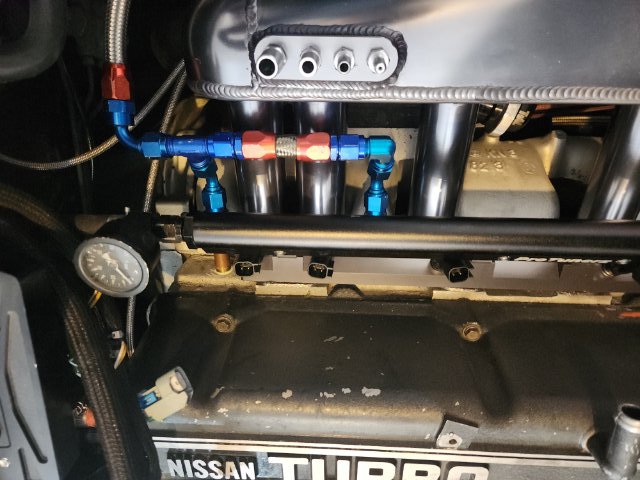
Heading back to Mexico tomorrow. First thing I got done was shortening the coolant line to the turbo. But also remembering the housings make this thing impossible to tighten. Need to find some low profile AN wrenches or something. Didn't quite get everything done, but DID manage to make a better wiring harness. It's not amazing but it's better than it used to be. Notable improvements are: -Actually reaching the new sensor location -More tucked up wiring around the thermostat housing -No more terrible grounds. Ecu grounds now run to an intake bolt near injectors 5+6 -Fewer crimped or soldered connections that were just temporary repairs of of PO's work to better suit what I was doing -Sensor ground connections and splits are more well thought out -Pre-ran required wiring for a fuel pressure sensor for extra security later -Now has boost controller wired, Owner had de-pinned a lot of the other harness. Notable wastes of time: -My longer harness may not even get me where I wanted. Planned for under driver seat, but may not work as well as I thought -Didn't improve the way I was running 12v lines for the injectors and coils. If I wasn't a total amateur I'd be rewiring the whole car same time and putting the ECU in a way better spot right next to relays. -Need to make a little sub harness to get power from driver side of the car to my relays on the passenger side, but it'll at least be better than the hack job I did last time -All that work meant I didn't replace the glass oil filter -Bought the wrong size silicone coupler for the throttle, but I may need to remake the intercooler pipe going from the IC to the throttle anyway, so this thing isn't moving soon.
-
A musician's therapist (The $300 Z)
Zetsaz replied to Zetsaz's topic in S30 Series - 240z, 260z, 280z
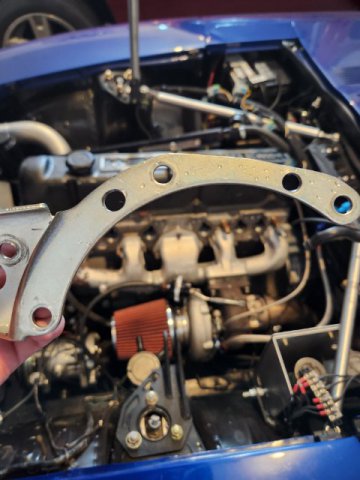
Didn't quite want to do that just yet but ended up having to clearance the exhaust housing just slightly so I wouldn't risk the rod rubbing and restricting the movement. So here's what I ended up with for now. I removed the bolts and clocked it over to a position that cleared the plenum then marked and drill new holes. Couldn't go the opposite direction without cutting and rewelding to change the mount. Most aftermarket billet pieces are only two bolts and slotted so you're not limited by the clock of the compressor housing, so I figured this will be okay. Compressor threaded hole that used to be occupied with the hole on the far left of the bracket will just be a washer now. Got the intake mounted and it clears fine! Did the throttle cable as well but not entirely happy with how much it has to flip direction with the skillard Lokar bracket. Seems to work fine for now, but I'll just run it through the firewall and direct to the pedal when I have more time. Next step is shortening the AN hose going to the turbo, but now that's it's looking so much tidier I'm tempted to start rewiring. I initially just used the partially completed harness from the previous owner but it's not as nice as I'd like.
-
A musician's therapist (The $300 Z)
Zetsaz replied to Zetsaz's topic in S30 Series - 240z, 260z, 280z
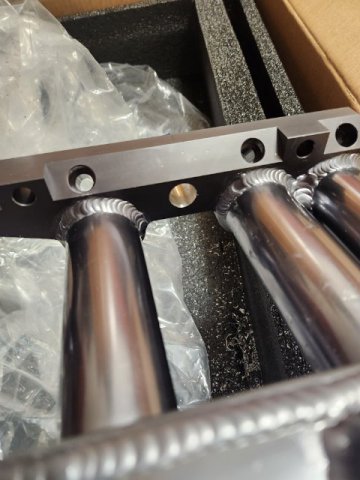
Drilling into that brand new flange on such an expensive part (even with black friday discounts) raised my blood pressure for a few hours haha. Especially on a part that's so Immediately visible when you open the hood -
A musician's therapist (The $300 Z)
Zetsaz replied to Zetsaz's topic in S30 Series - 240z, 260z, 280z
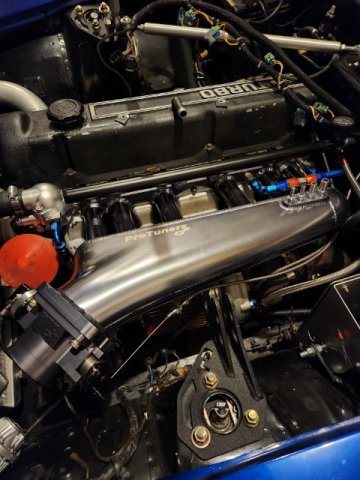
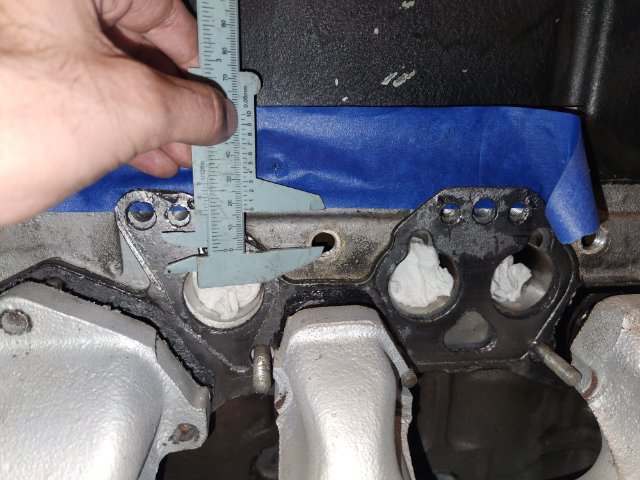
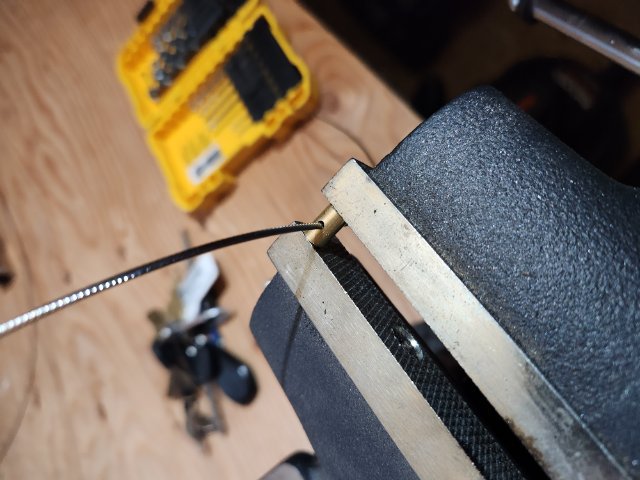
Yeah I just drilled a hole. Took a sec to figure out the most Ideal way. At first I did it with some tape, but then remembered it had to be reversed. Piece of paper then taped was easier to flip, but i tripled checked some distances just by using masking tape as a straight edge and measuring the distance (roughly) to the bolt holes. 3 different types of measuring and checking got me close enough. I drilled out to 5/8" which was big enough to account for small measuring errors (like the PO not drilling and tapping straight into the head for the cooling mod...). I'm juuuuust off center after checking. Might take the drill and just give it a tiny bit of extra clearance with the 5/8" bit. If I had better tools and a more proper workspace it would have been very Ideal to make some sort of U cut out from the top to pull it without disconnecting things, but as it stands I'll just have to deal with draining a bit of coolant and topping it off any time I need to service it Realistically it might be as simple as taking a saw and cutting down into the drilled portion from the top, but I don't want the exposed aluminum so visible against the anodized aluminum. Other mini project was a cable stop for the Lokar universal cable. I know one guy had issues with the cheaper one melting so I got the one with a stainless sleeve. They all come with cable ends for carbs though. I figured out the smallest cable end from a Dorman cable stop kit from any auto store is about the right size, but the hole was too small. Borrowed my brother-in-law's vise and drilled it out with his second smallest drill bit haha Currently the bigger hangup is my wastegate actuator bracket. The way I positioned it puts it right below the intake. I thought I could give it enough clearance by very slightly filing the threaded piece but it's still not enough. (my Tial piece is a bigger diameter than a more OEM style actuator). The intake is sitting right on the weld to the plenum in the center. Gonna check later if it might be possible to just reposition the mounting point by cutting it and rewelding closer to the exhaust. I still have enough room that I'm not worried about temps, but if I can move it maybe an inch and a half closer to the block It'll clear the weld and sit right between the runners for cyl 3 and 4.
-
A musician's therapist (The $300 Z)
Zetsaz replied to Zetsaz's topic in S30 Series - 240z, 260z, 280z
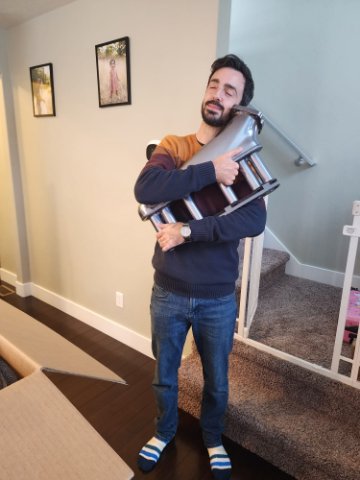
Home for the holidays! Seen here is me embracing my gift to myself haha. Assembled the throttle and got the correct IAC valve (forgot mine is a 4.0l Jeep valve which is just the right amount of different from a GM valve) Did all the preassembly on the new crossmember and bolted up the new steering rack. Current job is measuring for the hole I need to drill and making my current coolant mod a bit closer to the second pic which should flow better and clear the new solid flange on the Protunerz intake
-
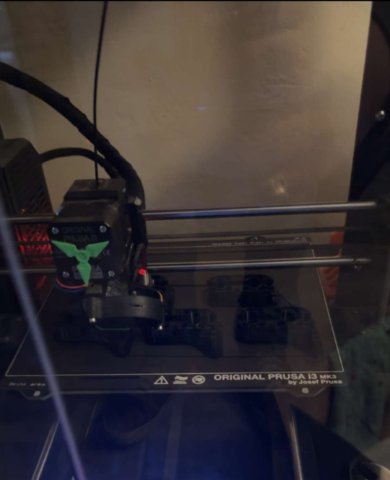
Cousin 3D printed one for me. I didn't bother smoothing it out. Didn't have to be red, just what he had available out of PETG for better heat resistance at the time. Could still be smoothed out more.
-
Top End Performance also does work on Datsun engines. Apparently they did most of the work on my block before I got it, but I also have a custom ground cam from them They have a lot of albums available so you can see some of their work. Their site says they do flow testing too, but I'm not sure many people have that much info out. https://www.flickr.com/photos/tep_icp/sets/
-
A musician's therapist (The $300 Z)
Zetsaz replied to Zetsaz's topic in S30 Series - 240z, 260z, 280z
PETG. Should hold up fine. Cousin said the biggest difference (since it's not in the trans tunnel like on a 240) will be UV resistance so it's fine since it's not exposed to sunlight really. We'll reprint in ABS if it's an issue. Apparently he would have just printed in ABS first time (even though he thinks it won't be necessary), but he only had neon green haha -
A musician's therapist (The $300 Z)
Zetsaz replied to Zetsaz's topic in S30 Series - 240z, 260z, 280z
New 3D printed fuel and brake line brackets done Hoping to get these while I'm home for the break. Cousin is shipping them out today. They're designed for stock, I'm hoping my situation is close enough that they're usable. Printed 10 just in case
-
A musician's therapist (The $300 Z)
Zetsaz replied to Zetsaz's topic in S30 Series - 240z, 260z, 280z
I'll probably take you up on this! I really appreciate it Bit of something happening at my cousin's right now, too 👀
-
Oh sorry, considering your location I should have been more clear haha. My paint job was done in Utah He did more full jobs when he lived in California. Since he hadn't done it in ages he was up for it.
-
I paid $6300 for my paint job a couple summers ago. To be honest it may have been low for the level of work done (the $300 over is from triple stage since I chose to go with Lexus "Ultra Sonic Blue Mica 2.0" but slightly adjusted to be a bit darker so it only really POPPED in daylight) I will second @JMortensen, jobs like this are the sort most places will just have in the back while they're working on insurance work. I got mine done by a Mexican guy that used to do customs in California but has basically exclusively done insurance work lately. I was lucky enough that he was up for doing a full car because he hadn't in a very long time, but at less than a month start to finish as that shops only project he probably actually lost a tiny bit of money on the hours. If we had taken more time with it and spent closer to 7k+ it would have been closer to perfect. It's a great job and I'm happy for the price, but certain things just take more time and imperfections on anything done relatively fast start to show. I saved some helping with assembly, but agree with Jon again. Do all your prep to your standards, take it in taken apart so they know exactly which parts you want apart and what you want sprayed, then assemble yourself slowly.
-
A musician's therapist (The $300 Z)
Zetsaz replied to Zetsaz's topic in S30 Series - 240z, 260z, 280z
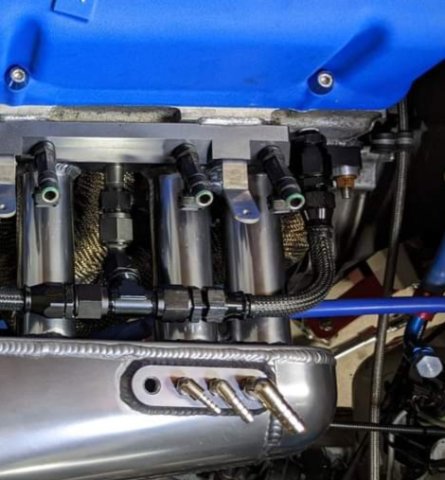
Black Friday sales plus an extra discount since I didn't need the fuel rail made me cave. Brother took a pic for me when it arrived. Lots to do when I get home for Christmas! A lot of my family will actually be out of town when I'm home, so it'll mostly be working on the car when I'm not hanging with my twin sister/brother-in-law/nieces. Sold my engine hoist to a friend when I left WA, so I'm not sure I'll be under the car much to install the Apex crossmember (plus I don't want to be on the cold floor much. I'll probably assemble the crossmember and steering rack so it's ready to install in the spring then focus my time on drilling out the hole on the new intake necessary to clear the head cooling mod. Super excited to have the cleaner setup, much improved IAC location, and an intake that'll actually work better with the ported head.
-
Looks about like mind did after sandblasting at @jpndave's place and having his son help me weld haha. I remember they just sort of handed me the little blast pot and let me go to town in the "yard" of the new property haha
-
Thanks! Also related, things you're mentioning are why I went with BC coilovers. I like that the full strut body adjusts without affecting the spring preload. In the future if I want much better performance I'd just go with KW but I can't justify it with how little I drive the car now that I'm out of the country
-
Where did you get your silicone sheet for the shifter? Did you just cut your own hole? I need to do something similar. I have a stock boot flipped 180 with the shifter hole opened up but since it's formed for the opposite direction it's pulling slightly while in gear which isn't good.