Zetsaz
-
Posts
856 -
Joined
-
Last visited
-
Days Won
17
Content Type
Profiles
Forums
Blogs
Events
Gallery
Downloads
Store
Everything posted by Zetsaz
-
Some confusion here... -Grey 5v+ Vref isn't what powers the board. It's a sensor output -You should be getting power to the board from pin 35. I don't know if it's the same for ms3pro but every megasquirt diagram/pinout I've seen shows it as a red wire. *TunerStudio will ONLY recognize megasquirt if it's powered up. Your computer might make a sound showing usb connection and you might be able to get a comm connection showing up in your drivers, but TunerStudio won't pick up anything if there's no power being supplied to megasquirt. If you have power and it's still happening there are a couple other possibilities: -Comm drivers not installed -Faulty board (very unlikely but not impossible I guess) -Faulty or incompatible usb cable. Some people with other versions have poor luck with the usb needed to connect and end up sticking to the DB9 cable with an adapter.
-

A musician's therapist (The $300 Z)
Zetsaz replied to Zetsaz's topic in S30 Series - 240z, 260z, 280z
Your goals definitely create space constraints. If I swapped, I'd probably choose a VVTi 1jz or maybe even a UZ engine. I've always preferred high revving or smooth torque and power delivery over raw torque and numbers. For now, I already have a turbo manifold and oil pan which are the parts I can't just get in the aftermarket short of making custom. My big concern trying to go turbo right away was small costs were adding up and I just want to be able to drive and enjoy it for a long while while I do things properly. I didn't want to risk breaking half shafts or transmissions and having to wait on fixing them or upgrading them at an inconvenient time due to budgeting and have the car just sit another while. Even if I went for turbo and babied it, I'd still have spent my budget on power instead of the sorts of things that make me enjoy driving it every day. So instead I'm going to build it from the rear end forward for reliability once it's a bit more presentable then upgrade the power later. When I sort of have an interior back together and it's getting me places I'll start with CV joints. The 3.9 R200 clsd will be far more than enough for my goals. -
Very jealous of the carbon fiber! Have always wanted to focus on weight and drivability over power. those nice tight bends against the engine bay on the intercooler piping look really satisfying.
-
A musician's therapist (The $300 Z)
Zetsaz replied to Zetsaz's topic in S30 Series - 240z, 260z, 280z
Honestly I overthought the whole process for so long while I accumulated all the parts I needed, and now that I've done it once I could probably do another one within a week as long as I had all the parts ready. No guarantees on how well it'll run though haha. I keep thinking "what if I'm not satisfied with the power" since I didn't go with a turbo, but honestly, considering how rarely I wind up even the g37 I'll be fine for a long while while I make it the sort of car I want to drive regularly. Plus the costs for small things to get it running in a state that I would enjoy driving add up fast so i'm not worried about it. -
A musician's therapist (The $300 Z)
Zetsaz replied to Zetsaz's topic in S30 Series - 240z, 260z, 280z
I don't run any pages for the Z, I just meant people that follow my personal account on instagram or facebook. Feel free to find me though - Omar Ordonez. Timing is tricky one since it's tough to properly dial it in for the best power without a dyno or some variety of knock sensor. I went through some shared maps from different people, but this is a less common mod for an NA car, so there were only a handful of close setups. Went with those for now and turned timing down slightly everywhere to avoid potential damage. TunerStudio's autotune will adjust VE tables, but I think that's not very helpful without the car moving. Once the rain stops again I can probably get the tank fitted and see what I can do. For now it's some fine adjustment settings like learning more about target AFRs and making sure the VE map is referencing them. Whole lot of new stuff to learn! -
A musician's therapist (The $300 Z)
Zetsaz replied to Zetsaz's topic in S30 Series - 240z, 260z, 280z
Forgot to update here, but we got a first start! #1 tooth angle was way off at the time I recorded for those who are friends on social media and saw my video. Got a timing light and was able to get the fixed timing within a few degrees so it wouldn't bog down and nearly shut off if I touched the gas. I have all my sensors calibrated, but the general timing map that tunerstudio loads in seems reeeaaally high. Low to high 30s almost everywhere. I'll try to run autotune today to at least get a closer idle and see if that helps, but I think I'm also pulling in more air than expected from the valve cover breather to intake. Seems like I'm getting some oil drawn in from there as well. Next steps before it drives will be -Trimming fuel filler neck opening (Is a couple mm from fitting through right now now matter how hard I try. -Tool finally arrived so I can depin the wires I'm not using and clean up the harness -Daisy chain the sensor grounds better than the previous owner had them, which was probably going to work for the way he planned it, but really far off for my plans. -Pull interior once I finalize wideband location to spray in lizard skin. When It's all moving I'll throw some plain carpet in to avoid flattening spots on the lizard skin, but the interior will stay mostly empty while I strip out excess wiring from the stock body harness -
Wow, that is looking GREAT so far. I have a 75. Engine questions you probably have figured out, but I might be able to help on chassis related questions. They're all pretty similar though, this is likely the same as your 75 260 in australia other than the bumpers. I'm not sure how many of the chassis changes we dfferent between countries. We only got the 280 to compensate for emissions regulations that bogged down the power. I started with a 76, have a 75 now, and have completely cut apart a late 70/early 71 model, but others here have even more experience with the changes.
-
A musician's therapist (The $300 Z)
Zetsaz replied to Zetsaz's topic in S30 Series - 240z, 260z, 280z
Thanks! It's satisfying. I've been in front of screens way more than I'd like for work, but I've committed so spending any time I'd normally have an evening commitment or performance to working on the car instead so there are a lot of hours available to me that normally would have been spent with students outside of the regular school day. I figured out the problem (I think). The last owner mostly had things set up on the board, but I'm missing the resistor on R57 of the 3.57 pcb. I don't have surface mount resistors on hand and would have to wait for delivery on them since every electronics supply store around me is closed. I have some pth resistors I can put on the harness by the distributor since i have more room for error there and still have lots of wiring slack, but the way this is phrased on the diyautotune page for the trigger disk I can't tell if the option in parentheses only applies to the 3.0 board or both. Not sure why it wouldn't work for the 3.57 board I have as well, but I'm also a novice with electronics. I've built my own computers, but that's basically just big boy legos by comparison. -
A musician's therapist (The $300 Z)
Zetsaz replied to Zetsaz's topic in S30 Series - 240z, 260z, 280z
I am so. freaking. close.... I now have rpm signal, accurate air/coolant readings, fuel pressure, and confirmed that the injectors are firing (somewhat by accident, the o ring wasn't totally sealed on one of them and I saw vaporized fuel coming out around the o ring every time it fired). I think it's a timing issue right now. My timing might be off, or the trigger disk isn't set up right. Will confirm tomorrow. Should have figured my roommate had a d sub pin tool. Mine is on the way but I was able at least get the fuel pump to work. Still want to remove the unused wires to tidy things up even while I'm working. Only downside right now is my starter solenoid is a goner. Was cranking okay until last night when suddenly all I got was a click when I turned the key. Bridged the posts with a screwdriver and It cranked, but would occasionally slip, so I think the gears aren't always engaging properly either. The thing was super crusty and old and probably on it's way out anyway, so it's a good thing I'm replacing it now before the car is moving, but still slows things down more. Might just get the engine fired up for the first time in almost 2 years before next week! -
A musician's therapist (The $300 Z)
Zetsaz replied to Zetsaz's topic in S30 Series - 240z, 260z, 280z
More progress! Wired the relay board with the materials I had on hand to test the MS3. Successfully got power to it (along with everything else on the stock harness... turns I'm at LEAST a good enough hobbyist mechanic to swap an entire chassis harness from one car to another and still figure out where everything goes nearly two years after the fact) Spent entirely too long wondering why I wasn't getting power. There was a wire creating a short that I had spliced when I removed the external voltage regulator. Once I untaped and moved stuff it seemed to fix the problem. Hopefully that's all it was or my headache will quickly return. Was able to connect to it with my laptop and flash new firmware with Tuner Studio. Special shoutout to @seattlejester for putting up with, not just questions, but often unnecessarily my entire stream of consciousness while talking myself through correct wiring principles and materials needed. Some of the shielded spade ends I need for the inputs on the relay board aren't available in stores, so I'll be redoing the ends soon for a closer fit and security down the road. My new roommate works on small aircraft so he was able to help me with certain tools and supplies. Not much help on actual wiring for the car though. Turns out aircraft are even more different than cars than I realized. Not necessarily in basic safe wiring principles, just the way the systems are organized is much different. Side note: Some are probably thinking, where are the pictures of lizard skin being applied. What about the taillights? Well I haven't made a decision on the tail lights, but I didn't want to spray the interior without everything being ready. That being, the PO chopped some stock brackets that I need back in. I didn't want to weld them in after spraying and some required the dash to be at least mostly in place to fit it properly. So I figured I'd take the 10 minutes or so it takes to set the dash in place with all the primary bolts and got carried away with wiring. Dash placement and removal is incredibly simple and fast when all the hvac things are gone. -
A musician's therapist (The $300 Z)
Zetsaz replied to Zetsaz's topic in S30 Series - 240z, 260z, 280z
Wow, yours look a lot neater than mine haha. That's actually close to where I ended mine! Mine go up about 6 inches more than yours for one more mounting point. They're "done" in that they're bent and in place. Wanted to just keep making progress. I'll make the more permanent mounting solution later. I didn't want to be held up by tiny things that aren't essential to getting it moving. Picked up some assorted wire terminals and but connectors today along with fuses I'll need. Hopefully I have most things now. No progress made though. Spent 8 hours getting the transmission back in my '92 hardbody now that the bearing shim I needed finally arrived. Need to connect the front driveshaft tomorrow and get the interior back together so I get the feeling the car is still a few days out before i continue progress again. -
A musician's therapist (The $300 Z)
Zetsaz replied to Zetsaz's topic in S30 Series - 240z, 260z, 280z
Dropping just the sway bar was helpful enough for me. I was okay with not routing things ALL the way to the top. Currently they're actually in a conventient spot to limit the length of soft line I'll need to use, but it's a good compromise to avoid uncomfortably having to reach way up high for too long if I need to disconnect before dropping the tank down the road. Made small bubble flares on the ends since I'm just running rubber efi hose. They're not perfectly level since I had to cut and correct, but I'm not worried about it since they're to help hold the hose on and don't need to be the perfect angle for sealed fittings. Was a little confused about how to go about that until I ready on a jalopy forum to just use a normal 45 degree double flare tool, but only go about halfway on the first step and ignore the second step (if you do a double flare your hose won't fit over the tubing). -
A musician's therapist (The $300 Z)
Zetsaz replied to Zetsaz's topic in S30 Series - 240z, 260z, 280z
Got more motivation today after feeling more mentally recovered from the transition to online teaching. Currently in what would be our spring break, so I'm fortunately not stuck staring at screens all day. Mini projects included: -More spots undercoated in the rear before the fuel tank goes in with the 3M stuff I've used -Bent stainless fuel lines The fuel lines are such a pain. I'd wondered how people get them so easily then realized most are on a 240z. I was placing them on stock location so bending up over the 280z sway bar creates more excessive bends that are tedious. Saved myself the trouble of routing to the exact stock locations in the rear which was adding to the complications since my feed and return are now at the top of the tank instead of in the center. Still in a good spot to avoid using more than 12"-16" of rubber efi line in each spot at most. -
A musician's therapist (The $300 Z)
Zetsaz replied to Zetsaz's topic in S30 Series - 240z, 260z, 280z
Haha. No resetable fuses on mine, but the LED indicators will be very useful! Will still take me a while to pair up everything. Pulled out my old wiring and trying to label things while I have it so I can removed stuff that is no longer needed and find things easier when it's in after doing the insulation. Will be a slower process than I hoped just based on how much time I'm having to spend in front of screens all day for teaching from home, but still much faster than a typical schedule since all my evening events for the rest of the school year are cancelled and I can't go anywhere. Doing what little bits and pieces I can when my brain isn't overloaded. EDIT: OH! It will also be a nice chance to move away from the fusible links and wire them in the same place as the stock relay area. The 4 relay leash board takes up less space than a populated stock "relay" bracket one the 280z. Cleans up the engine bay, and modernizes things all in one go. -
A musician's therapist (The $300 Z)
Zetsaz replied to Zetsaz's topic in S30 Series - 240z, 260z, 280z
Routing fuel pump and a couple other things through the relays. The old style nissan fuel pump relay is no longer available so it's a good time to modernize the few relays that came in the efi car before one goes bad. -
A musician's therapist (The $300 Z)
Zetsaz replied to Zetsaz's topic in S30 Series - 240z, 260z, 280z
Have been sidetracked trying to finally reaplce the input shaft and countershaft bearings in my truck. Finally managed to find the right front bearing (parts stores don't seem to carry the front counter bearing for the 71c transmissions so I had to pony up for OEM. Waiting on the right shims to arrive then I'll be able to move forward on the Datsun again. In the meantime, I ordered a Leash Electronics relay board per the suggestion of @seattlejester and I'll be doing some wiring prep work/planning while I wait for some rain to go away and a few days of warmth to properly apply the lizard skin and Eastwood internal frame coating. (side note: I was fully expecting more lenth on the tube that came with the frame coating. a bit disappointed, but I'll have to make due) -
A musician's therapist (The $300 Z)
Zetsaz replied to Zetsaz's topic in S30 Series - 240z, 260z, 280z
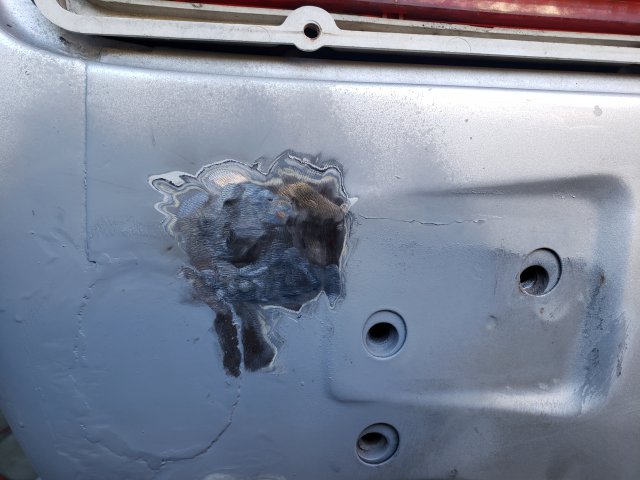
Been slightly unmotivated with how things are developing, but I've chunked away at a couple things. Done so far: -Welded large bumper shock holes (still debating if I want to weld the inner ones... I'm getting better, but they're dimple died and will be barely visible under the bumper) -Cut out and welded a small patch where there was a puncture on the valence. So difficult to get them even with the slight curvature of the valence on top of having overlapping metal on the outer holes where the bumper shocks went through. Will probably even out in the paint process down the road, but I might try to grind things a bit more even to use the lease amount of body filler possible. It's also amazing just how thick paint gets. you can see the uneven edges on the puncture repair just from grinding through the respray and original paint. There's also some slight pitting along seams, which goes to show that even the most "rust free" examples like this one have had issues. Next debate is whether or not I use the first year 240z lights (which will require a bit more cutting/welding) or stick with the 280z lights. Have always preferred the early style, but the later ones grew on me and surprisingly, a lot of friends are voting for the latter.
-
A musician's therapist (The $300 Z)
Zetsaz replied to Zetsaz's topic in S30 Series - 240z, 260z, 280z
Well... all schools in Washington are closed starting this Tuesday through April 24th. This is pretty unprecedented. Based on current info, I don't see it affecting my paycheck, but I will have a lot more time on my hands regardless. The car may be moving sooner rather than later. I've found the chassis harness. Was sitting in a plastic bin covered up by my roommate's stuff he'd put in the storage room. Considering the amount of time I'll be home, at a bare minimum from this Tuesday through next Sunday, or more depending on what kind of work the district will require from us, I've ordered a lot of items I need including jumpers and resistors for megasquirt, Eastwood internal frame coating, more 3M undercoating, and other small misc things. On the to-do list for this week while I wait for things to spray the interior with Lizard Skin are: -Weld rear valence holes and small puncture -Possibly cut/drill/weld for 240z tail lights -Drop rear suspension to more easily bend fuel lines -Fix more poorly applied seam sealer on floors -Wire wheel, clean, and tape interior to be ready to spray interior Once the interior is sprayed with lizard skin I'll be able to properly start the wiring process without worrying about redoing it all. If I have any leftover I'll also wire wheel and spray the fuel tank area. At a minimum I'll be wire wheeling that area and spraying it with 3M undercoating. -
What did you rewrap the harness with?
-
The Aston Martin definitely seems about as close as you can get, but it seemed a bit lighter to me. Like you said though, it's SO hard to tell from pictures and video. That being said, I knew it was something other than 115, but it's a really nice and similar color when properly cared for.
-
A musician's therapist (The $300 Z)
Zetsaz replied to Zetsaz's topic in S30 Series - 240z, 260z, 280z
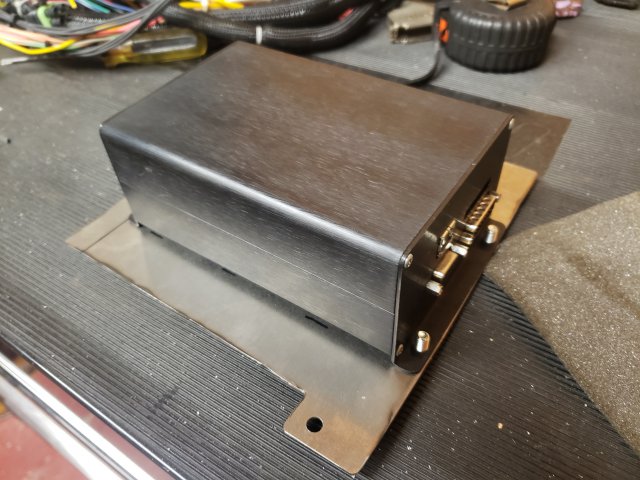
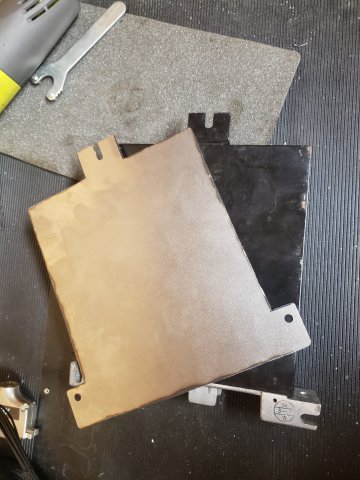
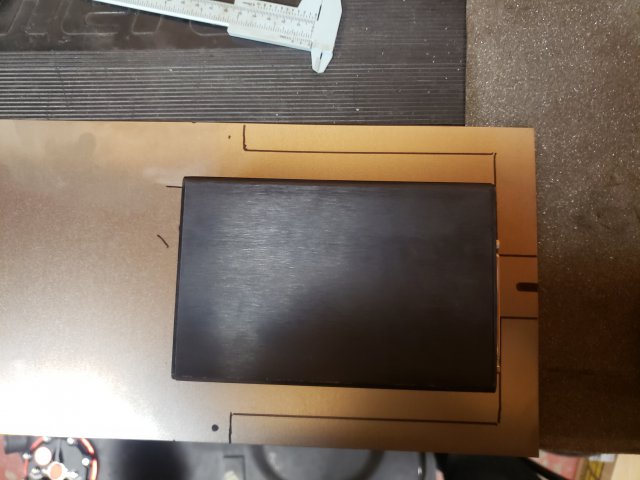
Ideas were percolating last night... A lot of people upgrading to standalone always put their ecu on the passenger side. I always wondered about that, but remembered they mostly have 240s. I decided to make a mount to adapt the megasquirt into the stock location to keep my wiring close to the original. Someday in the distant future I might rewire, but my chassis and dash harness and all relays are in great shape and proven working so I'm leaving things close to original where I can. The gauge metal I used wasn't stiff enough to have really long mounting tabs that I felt comfortable with, so I made it the same dimensions as the factory ecu. I carefull opened up the mounting holes on the MS box and tapped them M6x1.0 so I could use the same bolts pretty much the whole rest of the car is held together with. Will probably get the shortest M6 bolts I can find soon, so they're not sticking up too far. The MS3X is noticeably taller than the factory ecu, so I'll be using some rubber isolators between the mount and the brackets in the footwell which will pull double duty as vibration isolation like the original rubber screw grommets on the MS mounting tabs were for.
-
Is that confirmed? I love the color and would love to match it. Of the OEM colors, 115 blue metallic is my favorite.
-
A musician's therapist (The $300 Z)
Zetsaz replied to Zetsaz's topic in S30 Series - 240z, 260z, 280z
Not against it, just don't want to make any more holes underneath than I already have on the frame rail. I can have two going in opposite directions for the feed and return off one bolt, but I don't want to add another set of holes for the brake line. Tempted to just run it returnless for now and dead head at the fuel rail for simplicity since I have a built in regulator on the retrofit pump and don't need boost reference right now. -
A musician's therapist (The $300 Z)
Zetsaz replied to Zetsaz's topic in S30 Series - 240z, 260z, 280z
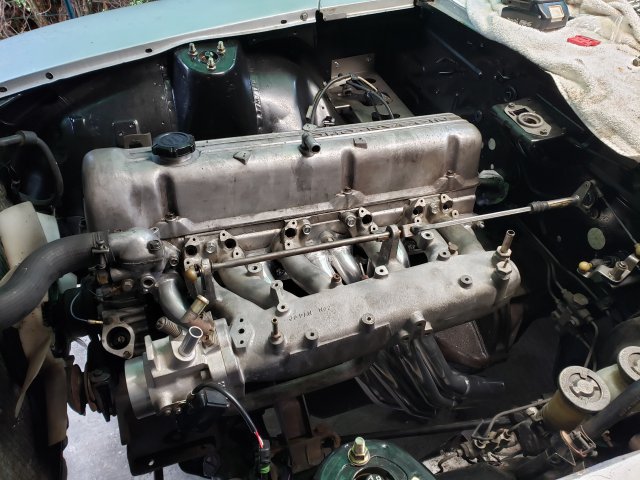
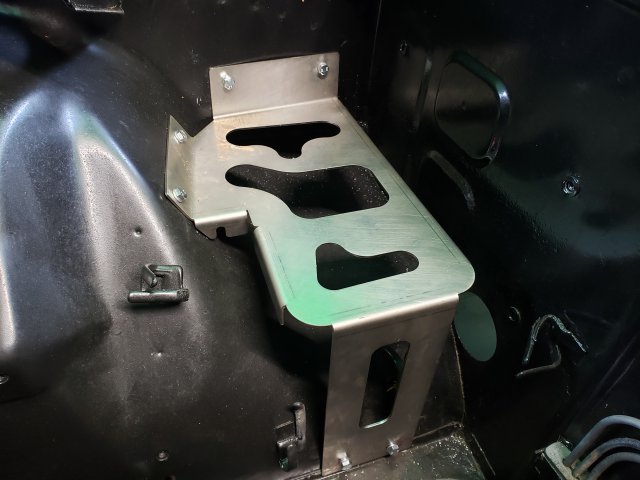
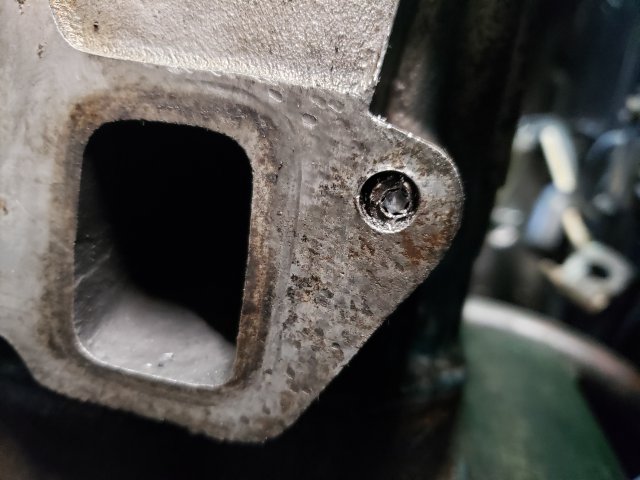
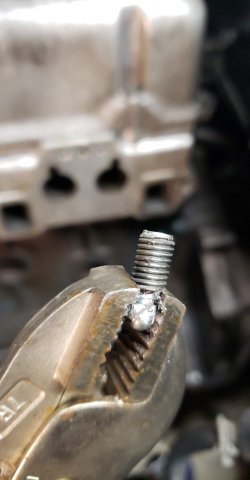
Some progress today. Now have more parts ready to go including header/exhaust. Before I could get to work, I had to remove a broken stud in the head. Spent a fair amount of time degreasing what I could and scraping off as much of the old gaskets from the manifolds and thermostat housing as I could. First I used an extractor... and then it promptly broke off in the stud. Took a lot tries to get it to come out, but enough heat cycles from welding and I think the metal annealed and was finally sticking after I turned up the heat. strangely the extractor came out first and I had to reweld the stud and do the same thing again. Once that was done I started test fitting things so I can start wiring soon. Had no place for a battery. For the cost of what the past owner was using I decided it'd be more cost effective to use the stainless zcardepot tray that I had and the OEM Batter tie down sitting on my shelves since it'll make it easy to remove the tray and clean occasionally to avoid rust. I drilled and tapped holes in place. Not trusting that the tapping would hold on such thin metal, I also put some nuts on the opposite side of the bolts just to ease the amount of stress on the couple threads actually present in the sheet metal. Engine is currently starting to come together. Purchasing a battery this afternoon and probably using regular line clamps for the fuel hardlines until my cousin comes up with a 3D printed solution to be able to clamp down feed, return, and the 3/16" brake line.
-
What IAC valve are you running?