New-to-240z
-
Posts
235 -
Joined
-
Last visited
Content Type
Profiles
Forums
Blogs
Events
Gallery
Downloads
Store
Everything posted by New-to-240z
-
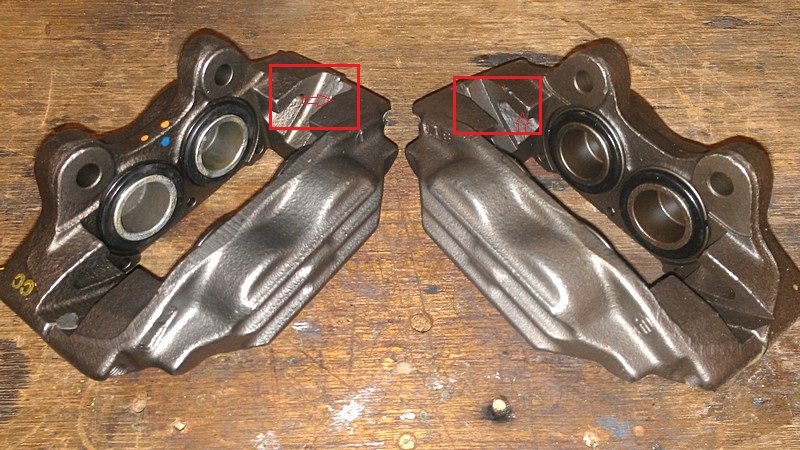
Fatigue or just BAD FABRICATION WORK?
New-to-240z replied to New-to-240z's topic in Fabrication / Welding
John C, you serious? You know the place? I've only found one other person who has dealt with them, and reported their problems. I'm going on google and yahoo anmd yelp to make sure that people know they are not what they claim to be. What's crazy is they have 100K cars in their garage having work done and yet they do this kind of work. Blows my mind!! -
Fatigue or just BAD FABRICATION WORK?
New-to-240z replied to New-to-240z's topic in Fabrication / Welding
Well guys, its been a long trip and the end is finally here. I just received my last payment for the judgement in my favor in the case I took these guys to court for. I didn't want to chance screwing up anything until everything was said and done. I just talked with my lawyer and since no confidentiality agreement was part of the judgement I can share with you the company that did this horrible work. Shutuko Engineering Inc. 18305 Bedford Cir, La Puente, CA 91744 So, it was a long journey and my car is finally up and running again after having Adrian (Vildini Motorsports)fix everything. Hopefully I save at least one person the pain I went through. Thanks everyone for your help and encouraging words. This community rocks! -
sorry to bring this thread back from the dead, but I had a quick question . . . When adding the 'plate' to the aerodam, would it make a big difference having the plate attached to the top part of that lip . . . Or should it be under that space? I want to make sure that the airdam doesn't flex at all and was thinking that it would be better to place the aluminum UNDER that lip instead of on-top of the lip. It may not look as clean but it would at least brace the airdam more (I would think). I'm guessing that this doesn't see a large amount of force so it really wouldn't make a difference . . . but I was just checking to see what the thoughts are on this.
-
Suspension configuration help...
New-to-240z replied to New-to-240z's topic in Brakes, Wheels, Suspension and Chassis
Just an update as I've been busy with family . . Worked with a friend that was able to help me with setting up my suspension system. . . Front : Swift 6Kg with 45lb helper springs Rear : Swift 5Kg with 45lb helper springs Sway bar is set to a softer setting. Also corner balanced the car with an outcome of 50.20% distribution. Cross weight of 1265 lbs with 1/4 tank of gas and me in driver seat. I have to get everything actually aligned now, but I feel pretty damn good about how the ride feels compared to the 8KG/6KG megans. -
S12W on 73' Z MM adapter plate issues
New-to-240z replied to New-to-240z's topic in Brakes, Wheels, Suspension and Chassis
Well guys. Just wanted to update everyone. Once the grinding was done and everything tightened down I got to take her out for a test drive. Everything looks to move freely and I have no wobble in the brakes at all. (I didn't push the car as I still need to do a few more things before i feel safe taking it up to 60 mph). I let Joe know that he should probably thin the spacers to 17.09 as that is what others have stated and what would have saved me from grinding down the calipers where i did. (Hopefully he does this to save this from happening in the future) The brake pedal pressure is VERY firm and to be honest I can see why some people would go with the bigger booster with the 1" MC. Once I bead in the brakes and get the car aligned I'll take it out for some spirited driving and see exactly how good everything works. Just wanted to say thank you for all your help here with this issue. -
S12W on 73' Z MM adapter plate issues
New-to-240z replied to New-to-240z's topic in Brakes, Wheels, Suspension and Chassis
@NewZed : I'm going to do a few more things first to make sure everything is correct before giving the finals to Joe. But, it seems everything is going to be ok. I'm just grinding down a bit more for safety sake and then re-fitting after making sure that nothing has any kind of uneven surface. The lip on the spacer really does seat the rotor perfectly and seems like it should be a better option then no lip at all. If you look on the first page you can see that the spacer is actually 17.26 mm wide which may account for the reason of the grinding. I'm going to let him know so that he can make the change on his side as well. (hopefully he'll even throw me a new set) -
S12W on 73' Z MM adapter plate issues
New-to-240z replied to New-to-240z's topic in Brakes, Wheels, Suspension and Chassis
@Miles : So, the bearings and races were replaced about a year ago, and when I took everything apart to put on the new spacers I took out all the grease and inspected everything. No marrs or marks on the races and the bearings looked in great shape. I tightened down the hub to the spindle per the FSM (tighten to soo much, then back off a 1/6 turn (i think that was it). But I also tested the amount of force needed to pull spin the hub/rotor combo with a fish scale (not the BEST method, but better then guessing) and it checked out. I'm worried about the grinding under cornering too, after thinking about it, I don't see a way for the rotor or caliper to bend one way or the other after everything is bolted up tight (as long as the bearings are good). Do you think that this could become a problem? I'm going to go home again and re-install everything and see what happens at that point. I was just wondering everyone's thoughts on the grinding. I wouldn't think it would cause a problem once everything is setup correctly, but I may be wrong in that assumption. -
S12W on 73' Z MM adapter plate issues
New-to-240z replied to New-to-240z's topic in Brakes, Wheels, Suspension and Chassis
@Miles : Any thoughts? -
S12W on 73' Z MM adapter plate issues
New-to-240z replied to New-to-240z's topic in Brakes, Wheels, Suspension and Chassis
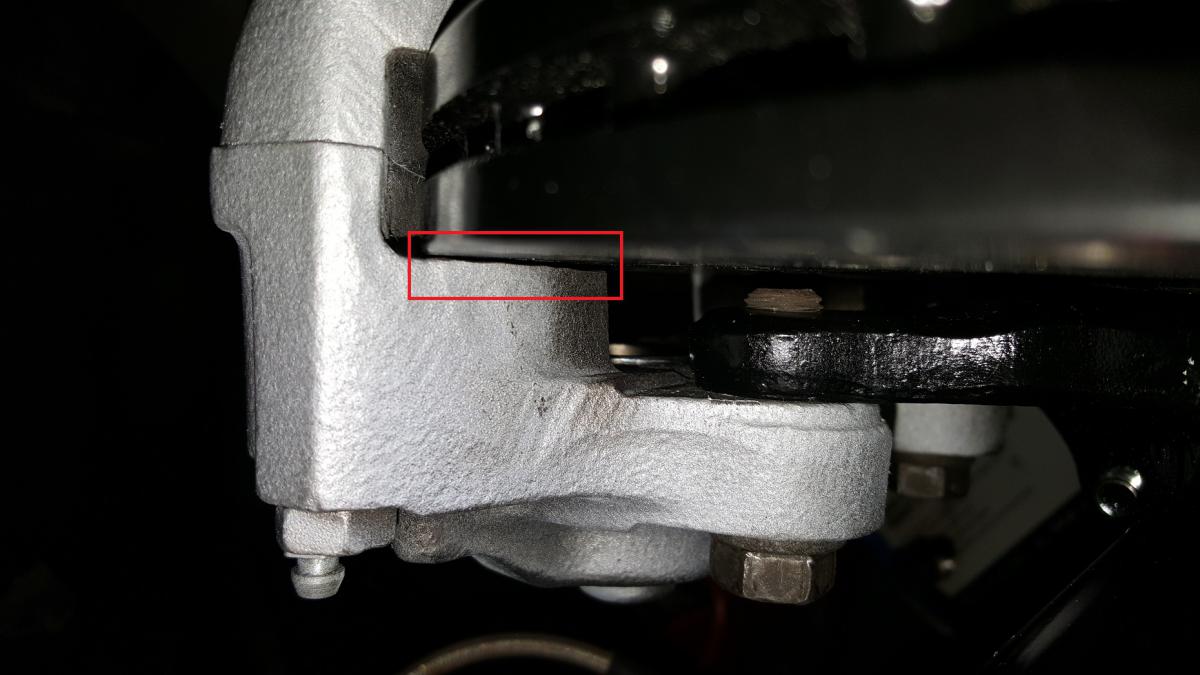
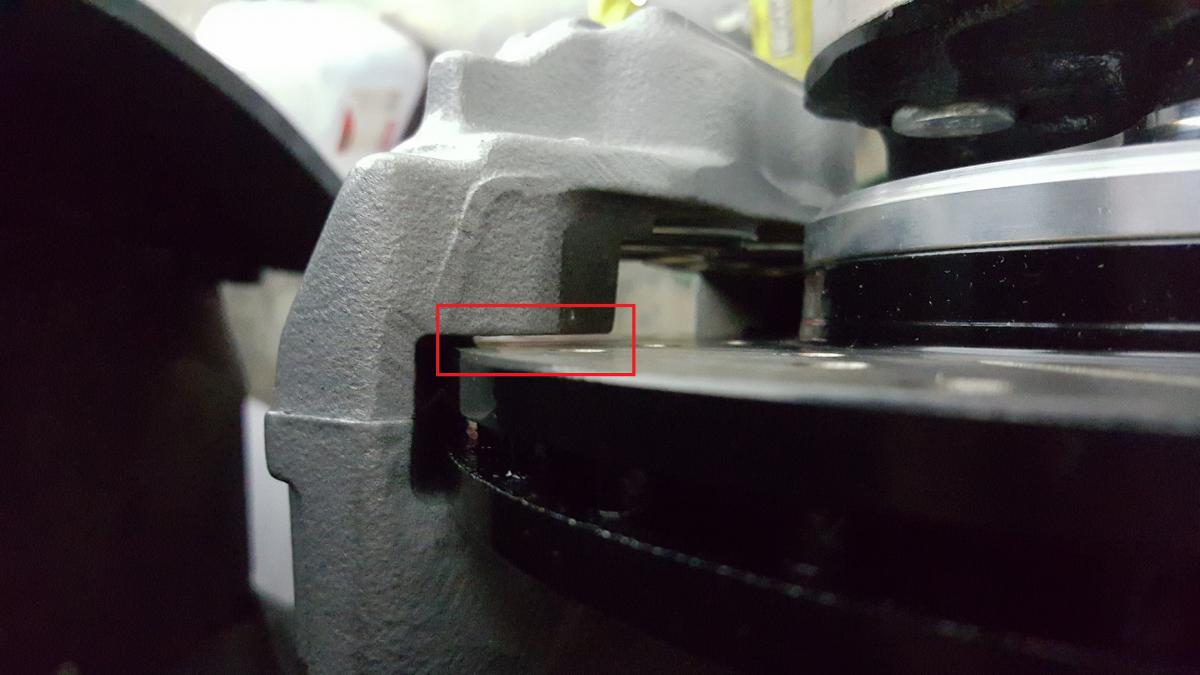
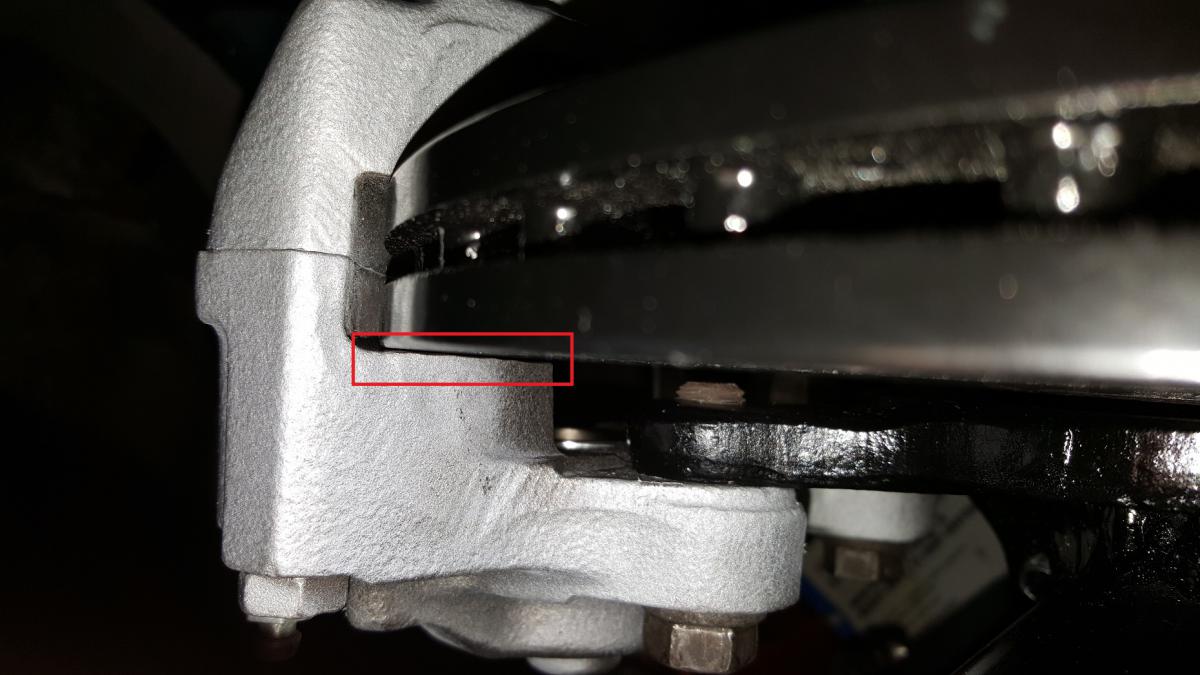
Here you can see the clearance of the rotor to the caliper sides. This was after making the necessary grinding. Everything fits without problem now, and the grinding really was minimal. Nothing is ever 100% perfect on these old cars. So, what do you think? Any issues? @Six_Shooter : That was my thought too. The piston on the side that may have to travel a tiny bit more will just have to extend out further on the first brake push. But after that, it shouldn't have any problem and should be equal pressure on both sizes.
-
S12W on 73' Z MM adapter plate issues
New-to-240z replied to New-to-240z's topic in Brakes, Wheels, Suspension and Chassis
I'll take a picture when I get home. Sorry, I'm at work at the moment. Sorry about the confusion, should have just taken some pictures (And Yes, my caliper and rotor look just like the picture) -
S12W on 73' Z MM adapter plate issues
New-to-240z replied to New-to-240z's topic in Brakes, Wheels, Suspension and Chassis
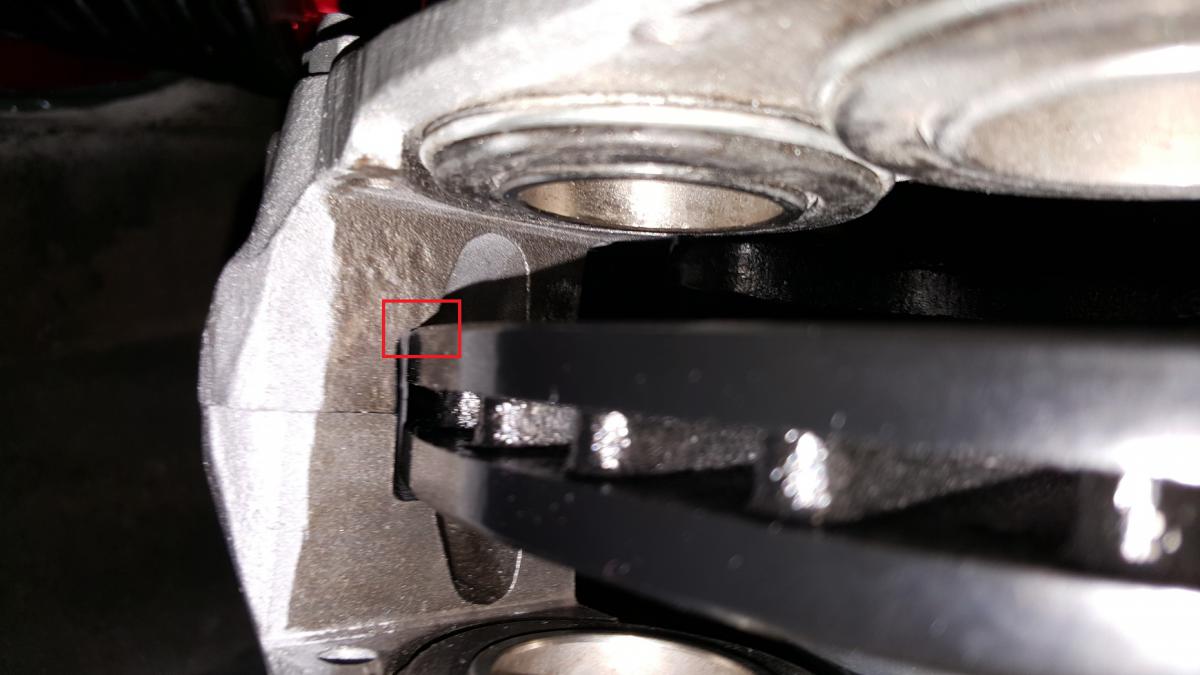
These aren't my calipers, but they will do Basically, where the rotors slot into the caliper body, one side of the slot touches the rotor. I just ground down a small amount of material off the caliper slot face. the rotor spins freely now but it sits closer to the face that I ground down then the other side of the slot.
-
S12W on 73' Z MM adapter plate issues
New-to-240z replied to New-to-240z's topic in Brakes, Wheels, Suspension and Chassis
So, got the plate on after some fussing and bolted everything up. I have read that there are some installations that require a little bit or grinding here or a small spacer there and wanted to check with you guys. After putting the hub/rotor assembled back on the car and bolting the calipers up I have clearance issues with the rotors and the calipers. Once the calipers were bolted onto the hub the slit that the rotor fits in to touches the rotor face on one side and only the top. I did a little grinding on the caliper slit (on the top inner side of the slit) and the rotor moves freely now. My question is, will this be a problem in the future? My thinking is that as long as the rotors clear the calipers and don't touch once everything is bolted down (as is the case now that I have made the corrections with a grinder on the calipers) that it should be fine. But, I want to make sure that this is the case. Since the rotors sit EVER SO SLIGHTLY (maybe 1mm) closer to one side of the caliper there will be a small difference in the distance the pistons are extended on one side of the caliper. My thoughts are that this should be ok since the distance is soo small, but I wanted to check with the board to get their thoughts. Sorry for the long winded explanation. -
S12W on 73' Z MM adapter plate issues
New-to-240z replied to New-to-240z's topic in Brakes, Wheels, Suspension and Chassis
@Six_Shooter : Nice idea! I like the bracket you made, but I think you are correct in the cost factor. I love the different ideas here that people go with. @Miles : I re-read my reply and it might have come off odd, but I truly do appreciate your help and information provided. You've been a great resource throughout this site and very knowledgeable in all matters Z. -
S12W on 73' Z MM adapter plate issues
New-to-240z replied to New-to-240z's topic in Brakes, Wheels, Suspension and Chassis
@Miles : Thank you for all the info and concern (that is why I post here and trust people's opinions.) I have already . . - switched to S13 240sx Rear brakes - Upgraded to 1" Wilwood brake MC (Removed internal residual pressure valves in MC since all brakes are disc now) - Installed Wilwood proportioning valve for rear brakes - Upgraded front and rear pads respectively Thank you for the Grade 8 recommendation for the bolts. I'll take one of the bolts to my local parts place and have them match the pitch and so forth to the stock bolts. As for the spacer, I am waiting to receive the new spacer from Joe. If this does not work, then both will be returned and I will just purchase the spacer from Silverline Motors (as it is a simple spacer itself without the 'steps' that MM's spacer has). -
S12W on 73' Z MM adapter plate issues
New-to-240z replied to New-to-240z's topic in Brakes, Wheels, Suspension and Chassis
The caliper ears fit behind the hub's caliper mounting points, so I don't think that is possible. The idea of the spacer is to push the rotor back,which means that it would sit farther forward without the spacer and the calipers would need to be moved from behind the hub mounting points to in-front of them(and possible have spacers to move them even further forward if needed). I don't know if this would work... Then again, I'm not looking at anything right now. Just kinda typing while thinking. On a side note, does anyone know where I can get new bolts to use? I'm guessing the stock bolts won't be long enough anymore with the spacer. @Miles : Did you reuse your stock bolts for mounting the rotor to the hub with the spacer? -
S12W on 73' Z MM adapter plate issues
New-to-240z replied to New-to-240z's topic in Brakes, Wheels, Suspension and Chassis
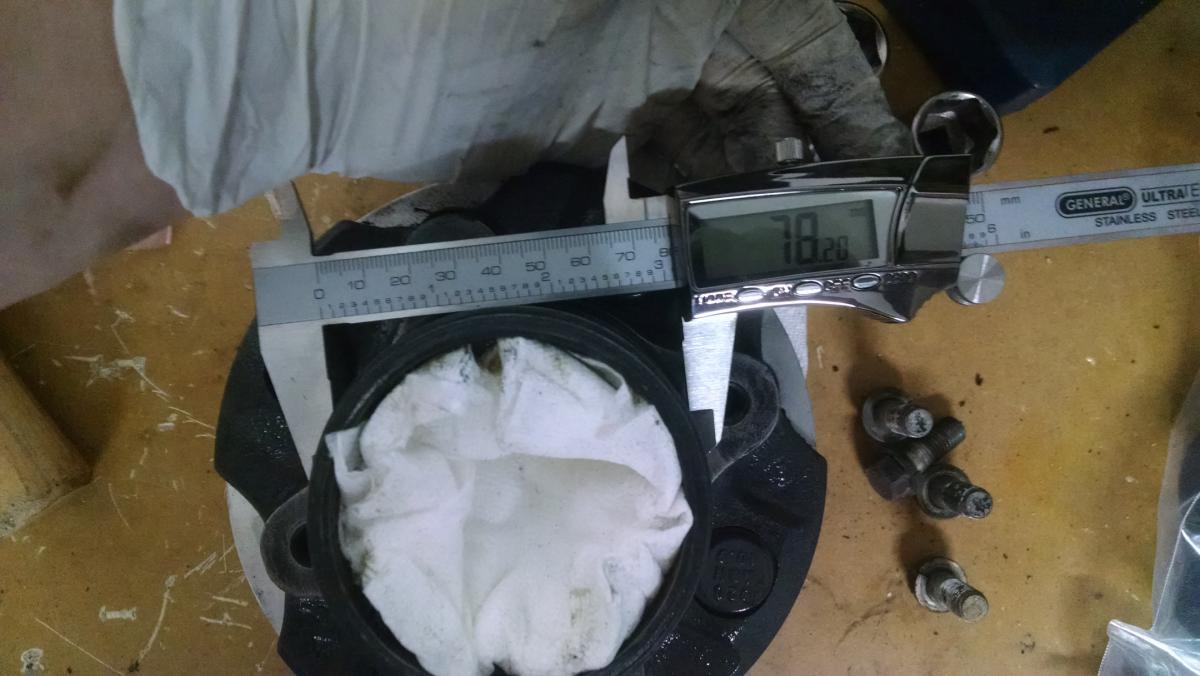
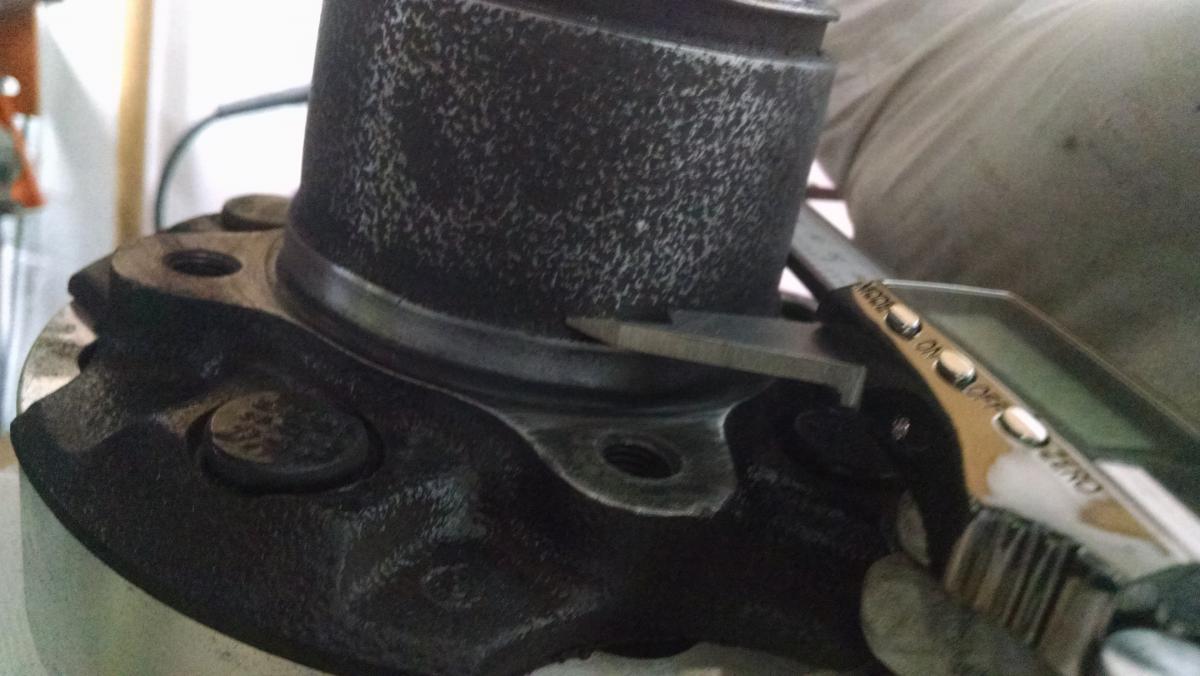
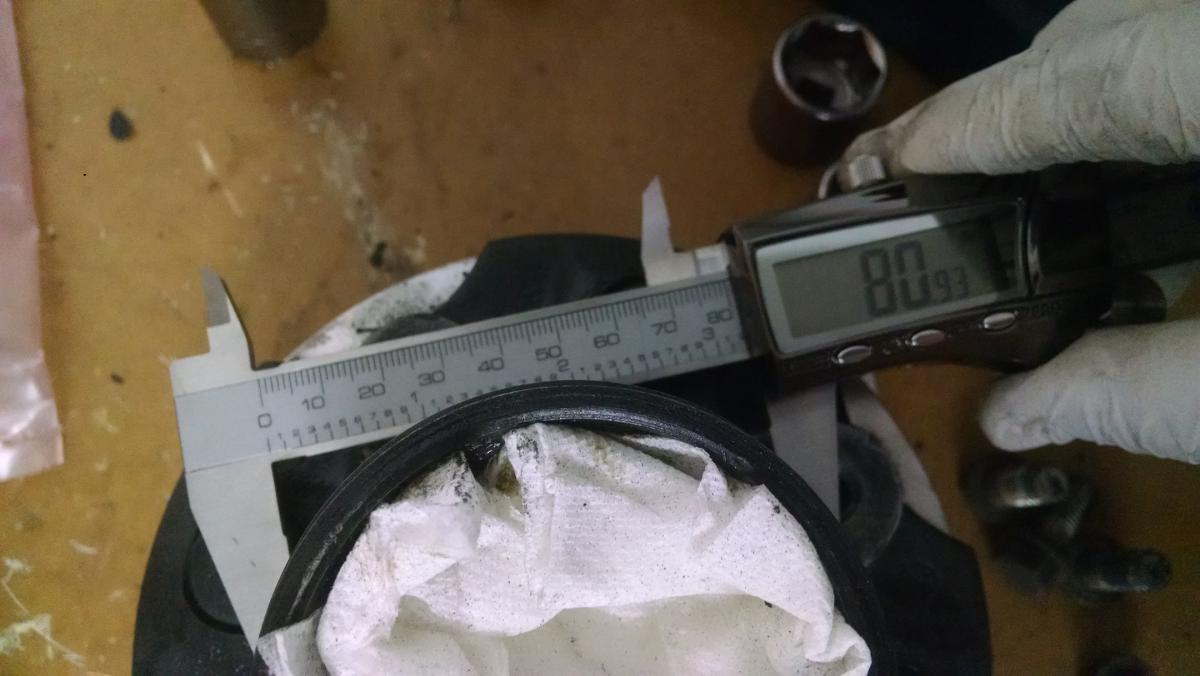
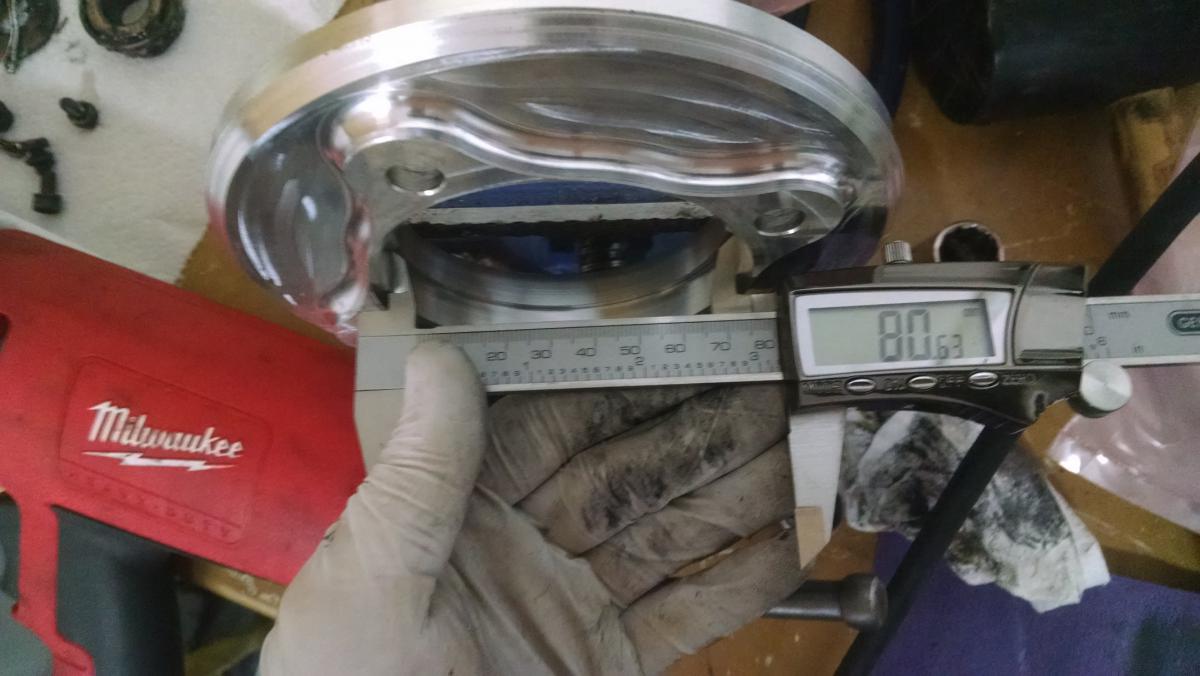
Didn't have either of those tools, but am doing the best I can (family issues last night. Had to take these this morning before work) Pic of the actual spacer showing double lip.. (The bottom lip portrudes out the back of the spacer a little bit to allow a mounting/seating point for the grooves cut out on the 300zx rotor mounting face) Thickness from back to front of spacer... Hub measurements . . I know I know, the measurement still isn't perfect. I'll try something else out today after work to be 100% certain of the diameter of the hub. The spacer looks to be about 0.20 mm thicker, but that is negligible I would think.
-
S12W on 73' Z MM adapter plate issues
New-to-240z replied to New-to-240z's topic in Brakes, Wheels, Suspension and Chassis
I told Joe this as well when talking to him on the phone. I will be finding a way to take new measurements when I get home. (Any Ideas?) -
S12W on 73' Z MM adapter plate issues
New-to-240z replied to New-to-240z's topic in Brakes, Wheels, Suspension and Chassis
I have re-worded my descriptions for you. (I thought the point was there, but your wording makes sense) These adapters/spacers are for the front brake setup. -
S12W on 73' Z MM adapter plate issues
New-to-240z replied to New-to-240z's topic in Brakes, Wheels, Suspension and Chassis
This is somewhat of a replica of another spacer Joe had. I will get more info next time I talk with him. He's a good guy and willing to help make things right. I would think he is correct in the benefit of having a 'seat' for the rotor face cutouts. -
S12W on 73' Z MM adapter plate issues
New-to-240z replied to New-to-240z's topic in Brakes, Wheels, Suspension and Chassis
Joe is having someone re-make the piece. This piece will fit the 240Z dimensions I provided, and I will test fit everything on my end. I contacted Silverline Motorsports and they make a spacer too, but it is flat only. Joe spoke to the design of his spacer in that it has a 'seat' for the mounting surface of the 300ZX rotor face. I'll be working with Joe to make sure the new pieces fit the 240Z hubs. Can someone with a 240Z and the old MM spacers do a simple thickness check? I would like to compare the two to make sure that the rotor will be seated in the same location after the spacer has been installed. As I've heard of people having to add 'hardened metal spacers' to make the alignment perfect between the caliper and rotor. Will update this post with more info as it progresses. -
So, I'm moving to install the S12W calipers and 300ZX rotors on my 240Z. I contacted Joe at Modern Motorsports and got his adapter plates for this project. However, when I went to throw on the adapter plates they wouldn't even make it past the top of the hub on my 240Z. I thought it was because I had painted the hubs after having them dipped, so i went ahead and sanded all the paint off, but it still doesn't even want to go down. I have contact Joe at MM and have pointed this out to him. Did some measurements and here is what I found . . As you can see, it looks like the ID is about 2mm less then what is needed to clear the hub down to the hub's lip. My question is, has anyone else put the S12W/300ZX/MM setup on a 1973 240z? I thought this had been done before and that there would be no issues, but now I'm running into this problem. Joe is looking into it on his end, and will be getting back to me soon.
-
**Edit** This is a bubble fitting, instead of our inverted. So, please excuse the information. Sorry to bring this back from the dead, but it looks like Wilwood now sells a prop valve that will fit our stock fittings . . http://www.wilwood.com/MasterCylinders/MasterCylinderProd.aspx?itemno=260-12627 Has anyone tried this new prop valve?
-
Toyota 4x4 Calipers sticking?
New-to-240z replied to New-to-240z's topic in Brakes, Wheels, Suspension and Chassis
It would seem that the amount of time required to troubleshoot bad calipers would negate the cost savings. I'll just buy some new Nugeon rebuilt calipers and test them out first before sending back the cores. Does anyone have any ideas or tests I can put the replacements through in order to verify they are working correctly before painting them and putting them on the car again? That way I can be sure that I don't run into this problem again blindly. **Update** Decided to just bite the bullet and pull everything apart and clean it out. If the pistons have any problems then I'll buy new sets, but the rebuild kits came out to only 14 total. So, will clean out cylinders and passages, and reflush everything. Side Note: Can I gravity bleed the lines to get out any particles? Or do I need to push bleed them? I'll be doing this with the calipers off to make sure that any particles don't get pushed into the calipers themselves. So, the fluid will just be coming out of the actual lines. -
Toyota 4x4 Calipers sticking?
New-to-240z replied to New-to-240z's topic in Brakes, Wheels, Suspension and Chassis
These are the solid rotor S12 4x4 pickups. i believe 79 - 85 year. (Gotta look over my notes again to find out for sure.) I haven't tried pushing the pistons back in yet. Are they the push back in or turn back in kind? What do you mean by the left/right bias problem? If the fluid isn't being held up in the lines, and the pistons aren't sticking, then what would be the cause of that? -
Toyota 4x4 Calipers sticking?
New-to-240z replied to New-to-240z's topic in Brakes, Wheels, Suspension and Chassis
Replaced lines with SS Earls. I also have bled the brakes about 3 times thinking air or something else. Should I make something to hold the one side of pistons in place while I press the brakes again to see if the other side's pistons move?