Shock_Strauss
-
Posts
31 -
Joined
-
Last visited
Content Type
Profiles
Forums
Blogs
Events
Gallery
Downloads
Store
Everything posted by Shock_Strauss
-
The only cutting I had to do was the original transmission mount and where the shifter comes up through. I tried finding a solution for the shifter to come up through the stock location but failed. I ended up getting a gktech shifter,
-
Are you using the stock ecu? I'm using Megasquirt pro so it was very easy to get timing from the distributor while using the lq9 coils for ignition. I remember seeing a kit that was being sold for around $600 on ebay but you can do it significantly less. You need 6x lq9 coils, 6x IS 300 coil boots with springs, and 6x gm coil connectors. If you have a gte, you can buy coil brackets from many different sites. The GE on the other hand I believe only has one site that sells a bracket. I'm just going to fabricate one myself.
-
Thanks, I'm using chevy truck coils with the built in igniter.
-
Been very busy with finishing up school/work and forgot to update my build thread. I've been slowly finishing up everything. I ended up ditching Microsquirt and went with Megasquirt Pro. This required me to redo the engine harness again. The shifter I ended up using is from gktech which still required me to cut the tunnel unfortunately. I'll also have to modify the center console as well. The rear end was removed, cleaned, painted, and fitted with urethane bushings. I also changed from the stock bottom differential mount to one that attaches from the top. I'm getting it tuned in the next week or two as I plan to go to Cruisin' Ocean City later this month with it. 15x10 295 60r 15
-
Awesome! I'll be using a Wilwood 7/8 master for my clutch and a custom stainless line connecting to the slave. Look up "clutch master swap / upgrade 280z" on google. Should be the first link showing how he did it. Also what are you using for your shifter?
-
Did not know this, thanks for the heads up!
-
Interesting, I think it's probably due to how far back my engine is then. Curious to see how yours comes out. Wasn't able to do much this last weekend due to the rain and probably won't have any major updates in the next two weeks. Started working on attaching the body harness to the bulkhead connector and noticed two wires for the headlights were severely corroded. This might have been one of the reasons I had issues with my headlights. I went ahead and disassembled each of the pins from there housings. Once that was done I submerged them in a vinegar salt mixture for about 15 minutes or so and wire brushed what remained. I then soaked them in water and baking soda to neutralize the vinegar/salt. This procedure has actually been working really well for me.
-
Thanks for the pictures. Honestly that would be perfect if it was moved up further forward. I believe that's when you start having problems due to the linkage. You don't have it installed in the car yet right? This would be perfect: https://scontent.cdninstagram.com/t51.2885-15/s640x640/e15/12728443_1032323470174624_271092311_n.jpg?ig_cache_key=MTE4NTEzMzc2MzQ1ODAyNDkzMQ%3D%3D.2.l I wonder how they did it? Possibly shortened the rod the linkage attaches too? When I have some free time, I'm going to pull the transmission and take a look what kind of modifications I can do.
-
Thanks for the suggestion, this was actually one of the relocation kits I was going to buy before I started the swap.
-
Trust me I have, there's plenty I've seen around the net. Here's a few notable one's I've saved. Club Lexus http://www.mitsustyle.com/photopost/data/656/medium/Shifter_1.jpg https://www.youtube.com/watch?v=ikMB8Ib1FgY -------------------------------------------------------------------------------------- dexter72, was this what you were talking about? http://i.imgur.com/x05pfR5.jpg https://www.youtube.com/watch?v=6GXd1gtxcCI https://www.youtube.com/watch?v=VQUEbNfvMZQ Supra forums http://i282.photobucket.com/albums/kk242/97dimedrop/0B57F535-43A5-4524-8BE2-895D6C8C302C_zpsvcivktxi.jpg Welding web http://i130.photobucket.com/albums/p245/Acidz1/CLM%20Project%20240sx/Dec%2013th%202010/IMG00098.jpg Hybrid Z VQ Swap (Similar Issue) http://forums.hybridz.org/topic/108450-vq35de-240z-almost-complete/ http://vq240z.weebly.com/uploads/1/1/5/0/11509127/6600838.jpg?698 (My trans looks like its further back) http://i218.photobucket.com/albums/cc42/tkaminsk/VQ35de%20240z/IMG_2150Large.jpg (The issue I'm trying to prevent) Options for sale----------------------------------------------------------------------------------------------------------------------------------- Serial nine's offering https://i.ytimg.com/vi/Z-0pZXw04r0/maxresdefault.jpg Hoke Performance ( I was actually considering this one before I installed everything) http://hokeperformance.squarespace.com/vq240z-build-blog/shifter-relocation http://static1.squarespace.com/static/53054f3be4b06b3a5cccd136/t/53434998e4b0aa2aaae1e86a/1396918693052/?format=750w (Same issue of cutting) Z Fever http://www.ebay.com/itm/VQ35-Swap-shifter-bracket-for-240Z-/261490739386?nma=true&si=7PIZp1gseTE3y1PtPEjiw04WnD4%253D&orig_cvip=true&rt=nc&_trksid=p2047675.l2557 LOJ Conversions http://loj-conversions-llc.myshopify.com/products/300zx-shortened-shifter-bracket-z32-manual-transmissions There's a few others as well. Sending off your shifter to get it shortened. ---------------------------------------------------------------------------------------- What it looks like with the shiftboot and console in place. Terrible rendition of the location I'm looking for.
-
I'm going to be running a Wilwood 7/8 master. Type this into Google, "Clutch Master Swap / Upgrade 280z". Should be the first result.
-
Thanks for the suggestions everyone. The problem with most of the kits I've seen or diy jobs is that they're not short enough. I know there's going to be a limit on how short you can go without extensive modifications like the cbf forward mount. Also to clarify, when I stated I hadn't seen anyone use the 350z trans on a 2jz, I meant specifically on the s30 chassis without cutting the tunnel. Didn't really make that clear on my part. I know the easiest route would be to cut the tunnel but I want to keep everything inside as stock as possible. Anyways, I figure I have a few options: Move the engine and trans forward in the engine bay. (Would have to redo my transmount and I'd rather not have it pushed further forward. Still have to get a shorter bracket or kit.) Cut the shifter opening further back and shorten the bracket myself or buy a kit. ( I want to keep the stock center console in place.) Use one of the cbf shifters. (Pricey/not sure if he's going to make more. $285 mid mount, $380 forward mount when they were on ebay) Drop the transmission and see what I can do. (I have some ideas on how to possibly get the shifter where I want it.) I'm really considering the 4th option and if that doesn't work I'll go with one of the cbf shifters. Any other ideas that might work?
-
Do you have a picture of this installed in the car? Here's the two options that I think would work: https://www.youtube.com/watch?v=mYsGvVwlySE https://www.youtube.com/watch?v=-yB37qPxzXY
-
Here's what it looks like in my case. Picture of bracket upside down to show about where it would be.
-
Not sure what kind of number I want to hit. I'm actually more worried about the chassis and rear axles. I'll be putting in a partial roll cage to stiffen up the car as well as a few other things. I don't know what I want to do about the rear axles though. The z31 turbo lsd and axles have been difficult to find locally and I'm not ready to drop the kind of money required on the 8.8 irs swap. I was thinking I'd just put an lsd in the stock r200 as well as upgrade the u-joints on the axles and hoping for the best. The shifter placement is another problem. I'm not going to cut into the trans tunnel as I want the shifter to come out the factory location. Nobody except one company I've seen sells one that'll fit in that location. That company however hasn't put anymore for sale on ebay. After contacting him, he stated to continue to check his ebay store for when he puts them back up (been a couple months). I believe he sold more then he could produce in that time so he took it down( price was around $300 I think ). Look up cbfperformance, its the midmount shifter that'll work (at least for my case). If anybody wants, I can take a picture of how far back the trans is. I'm probably going to drop the transmission out and fab up my own shifter bracket.
-
Thank you! This is my first build thread and I wasn't even sure if I was going to make one or not. I haven't seen a 2jzge-T with a 350z trans here (unless I missed it). It'll be nice having a log of everything that's being done to it. The cx racing mounts are alright but could be better. Quality and fitment were so-so which is probably why it has so many adjustments on it . It saved me the time of having to build some so that's a plus I guess.
-
Thanks! Small world haha. How's your Z doing?
-
Finished installing the throttle body and intake for good. I'm using the 90mm universal throttle body from ebay. Can't wait to see if it leaks or not. The ad never stated what tps it used but I found that a turbo z31's tps fit perfectly (got it off an 86). I also tapped a hole behind the throttle plate for my IAT sensor. Lastly I finished mounting the intercooler and started working on the ic pipes. I've decided to also use a bulkhead connector for the body harness as well. This will make removing and installing the harness extremely easy any time I have to remove it.
-
Thanks I'm using rci 1000cc injectors. Basically a modded Bosch ev14. Egr has been blocked as well. I remember seeing the distributor cap on drift motion I think. I'll definitely need to get one as it's in the way. I've read through your thread. That wiring you had to go through looked like fun. Are you going to weld the xs manifold to the runners? I've heard a few people say they highly recommend it.
-
Hello everyone, I figured I'd go ahead and start a build thread even though I'm at the tail end of the swap. Sorry for the long post hahaha. A little history, I first attempted this swap on a 260z I bought freshman year of college (2012). In that time I had an 05 Focus with a turbo kit I created and installed on my own near the end of high school. This was the car that initially got me working on cars due to the need of wanting something a little quicker and not having the funds to get something else. I learned as much as I could in that time with no real outside help minus the forums I visited and any research I did through google or talking to people. My other main drive was the fact I hated to pay for something I could possibly learn to do myself. I became obsessed with the s30 chassis after learning about them in high school. I checked ebay and craigslist constantly in that time. I eventually came across a 260z that was about an hour away from me. Well I became star struck and purchased it for $1k. Well a lot of time and money went into this car but the further I dug into it, the less of the car I found. I ended up parting it out but I did learn a lot such as how to weld and how to do body/metal work. So I guess it wasn't a complete loss. A major lesson I learned from this was to make sure you look at every inch of a classic car you are interested in. I didn't notice the many instances of tape covered in undercoating that was hiding massive amounts of rust. Well a couple years pass and I still had the 2jz that I was going to use in the 260z. Well I sent the engine off to get built before I had decided on what I wanted to put it in. The engine was originally going to be put in an e46 m3 shell I acquired. Well I decided against this and found another Z, this time a 78 280 that was about 20 minutes away. This one was practically perfect compared to the 260. I made a deal and drove the car home, its longest trip since it was put away. The car had 53k original miles and basically sat for some twenty years from what I was told. Now on to the good stuff. Well as I stated, I went ahead and rebuilt the 2JZGE. What was suppose to be a simple rebuild with arp head studs and a thicker headgasket ended up with completely building the block with a more or less stock head (will be built eventually. port/polish, cam, etc). So I started with the removal of the engine after driving the car for a couple of months. Test fitting the engine and 350z 6 speed with Collins adapter. I ended up having to cut the stock transmission mounting points in order to move the transmission where I wanted it. I was going to build my engine mounts but opted for the cxracing mounts as they were very adjustable. Quality was alright and not meant for a 350z trans but it worked. I had slightly modded the mounting plates to lower the engine further but ended up reverting back to the mounting points it came with. Next I built my transmission mount. I decided on utilizing the frame rails as the mounting point. I have 4, 1/2" bolts going through the rail and into the floor pan now. I'm going to go back and change this slightly as I don't feel it will hold up in the long run. I went a little overboard in purchasing parts. I wanted to get it done for a pretty big car show that's local. Well that same day is my brothers wedding so no real rush now. Next was some metal work. I was originally going to cut out the radiator support but just removed as much as I could. I'll probably go back and reinforce this once everything else is in place. The metal work isn't entirely done, but I believe I got the majority of the rust to stop it from spreading. I didn't fully finish up the areas where the headlight buckets attach because I'm not sure if I want to go back and media blast it when I send the car off or if I'm going to chemically dip the car. Tacked up both strut towers. Attaching the flywheel, clutch, and pressure plate. I put the engine back in. I have another thread explaining how I deleted the power steering and a/c portions. Turbo is a s366 Borg Warner with .91 A/R. I wish I would have bought the one with the 90 degree compressor housing. I bought an aluminum elbow but not sure if I'll have that welded or just use a silicone 90. Also I ended up having to use a 1" flange spacer for the turbo in order to have a 90 degree bend no matter which path I choose. If I didn't use the spacer I wouldn't really have any room as cylinder one's exhaust runner was hitting the compressors outlet. 3.5" downpipe. Next came the wiring portion and the step i'm currently at. I decided to go with Megasquirt and more specifically Microsquirt. I already had the ecu from a BMW I installed it on and it does everything I need it to do. I should have probably gone with Megasquirt 3 with all the expansions but whatever. What I made to hold my fuse holder, relays, and ecu. The main goal of this project was to make a vehicle that was extremely easy to work on. It's one of the main reasons I stuck with an inline 6. I wanted to be able to remove the engine quickly if the need arose. So I utilized a bulkhead connector that would contain every wire (minus the alternator's 12v to battery) the engine had going to it. Instead of having to remove the harness, all i'd have to do is remove the connection from the firewall and the harness would go with the engine. I utilized AN fitting's for the fuel lines for this reason as well. Really the only other things that would need to be undone would be coolant lines and the mounts. The engine and trans would then be more or less ready to be removed. Routing the wiring harness. I also removed all the tape from the body harness that is in the engine bay. Removing 40 year old tape was not fun. With some help we cleaned up the wires and removed any corrosion on the connectors we found. We utilized a mixture of vinegar and salt to remove the corrosion and baking soda and water to neutralize it. You see the ecu tray mounted to the firewall using existing mounting points in the background. Instead of covering both the engine and body harness with electrical tape again, I found this stuff at Home Depot. Its vinyl that only sticks to itself and fuses together after I think a day. I'll also be covering certain sections with a high heat resistant material since it'll be by the exhaust headers. I want to keep the interior as factory as possible. Therefore I wanted to have the factory center gauges work. Luckily the pressure gauge is the same threading as it is on the 2jzge. it just needed an extension to fit the sender in place. The coolant sender for the factory Datsun gauge had the same threading as the stock 2jzge gauge sender did. However it didn't fit through all the way due to the 2jzge sender being thinner. However, I carefully enlarged the hole and was able to thread in the l28's sender. Some more wire routing. Here's where i'm currently at. I'm using the gm truck coil packs with the built in igniter but utilizing the stock distributor for timing purposes only. I'll keep this as updated as possible with my progress. I really only work on the car on the weekends due to school and work. Thanks for reading!
-
Question about deleting accessories off 2jzge
Shock_Strauss replied to Shock_Strauss's topic in Toyota L6 Forum
Thanks, I highly doubt it and if I do I'll probably pony up the cash for the electric steering column. I will be adding A/C eventually though. -
Question about deleting accessories off 2jzge
Shock_Strauss replied to Shock_Strauss's topic in Toyota L6 Forum
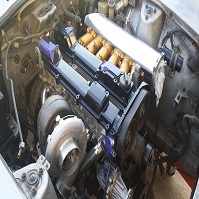
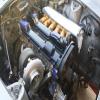
For reference sake here's what it looks like and the parts I used to delete A/C and Power Steering. No modifications were necessary in my case so we'll see once I have the engine running. However everything is tight and seems like it will work with no issues.
-
Question about deleting accessories off 2jzge
Shock_Strauss replied to Shock_Strauss's topic in Toyota L6 Forum
Will do, thanks again! I'll be running Microsquirt v3. I've installed/used it in the past on my turbo BMW and feel it should be able to do everything I want. I'll be getting timing through the distributor and will be running a wasted cop system using GM lq9 coils. Yeah I'm lucky that my house faces the sun throughout the whole day... so when it's hot, it's really hot out. -
Question about deleting accessories off 2jzge
Shock_Strauss replied to Shock_Strauss's topic in Toyota L6 Forum
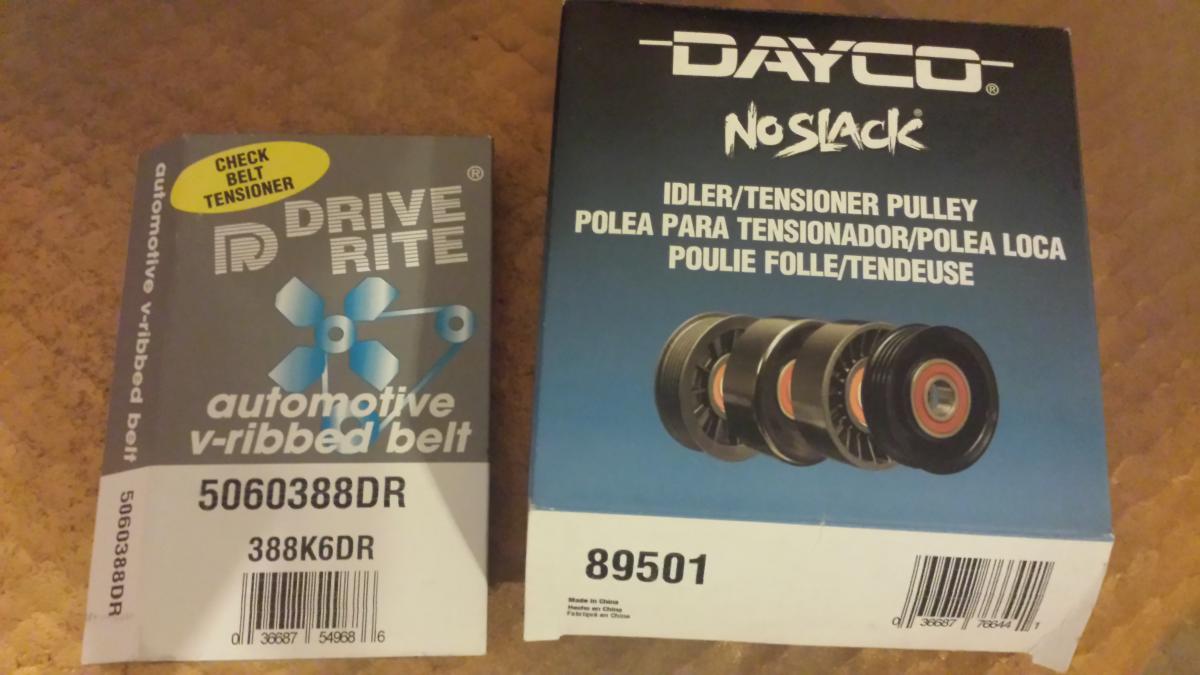
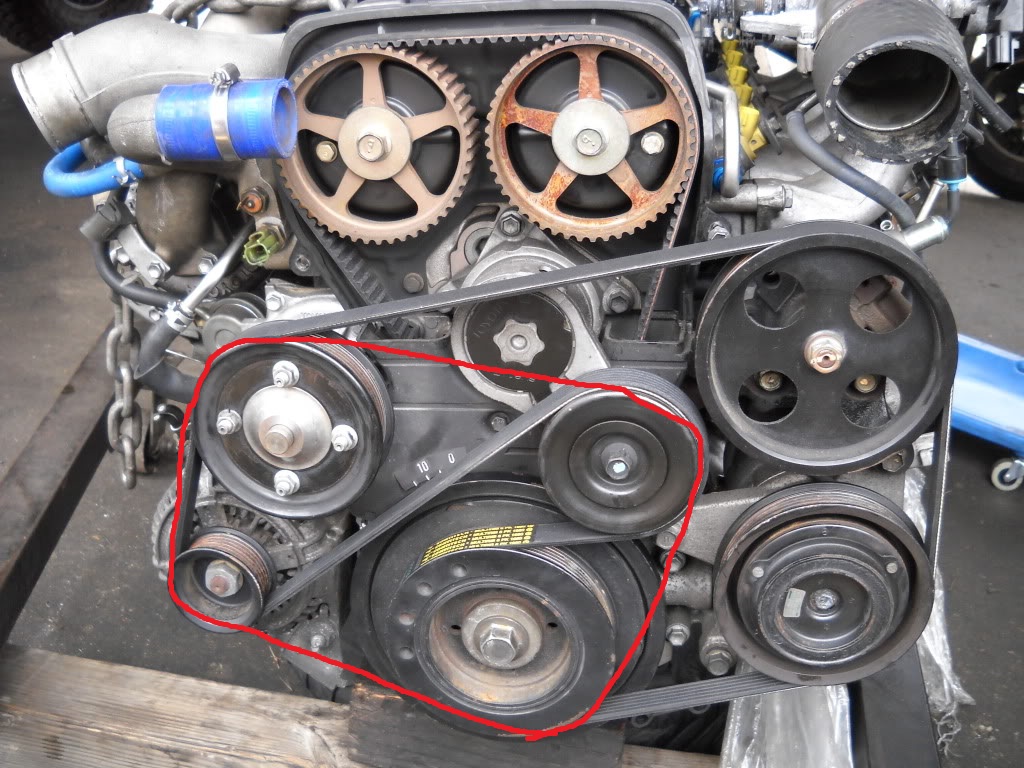
Awesome, I saw the post on supra forums before I posted but wanted a second opinion on someone who actually did it. Plus it didn't really explain the routing. Most of the posts I saw on Club Lexus were of people saying not to do it. For reference though, the part number for the pulley is dayco 89501 and the belt is 388K6("38.8in belt with 6 ribs"). GTE and GE have the same route for the belt plus it was the first picture that looked good on google images . Thanks for the help. My swap should be up and running in the next month just gotta finish all the smaller things. -
Hello all, I have a question on deleting the A/C compressor and P/S pump. I've done some research and the A/C delete has kits as well as many write ups on how to get rid of it off the 2jz. However, I haven't found much in the way of deleting the P/S pump as well. For the time being I only want to drive the water pump and alternator. Later down the road I will be adding back the a/c but not p/s. My idea so far is to remove the tensioner pulley and replace it with a ribbed pulley then route it like I have in the picture. Any thoughts on this? Thanks.