yellowoctupus
-
Posts
419 -
Joined
-
Last visited
-
Days Won
2
Content Type
Profiles
Forums
Blogs
Events
Gallery
Downloads
Store
Everything posted by yellowoctupus
-
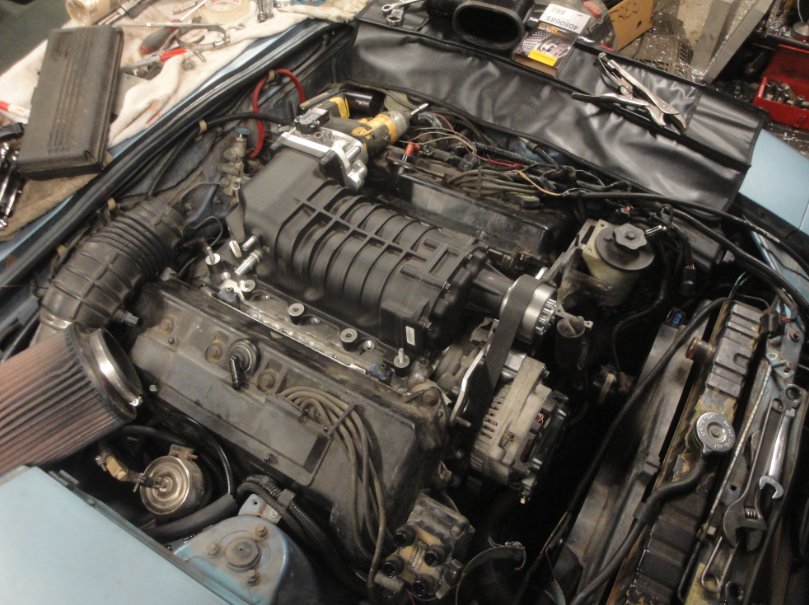
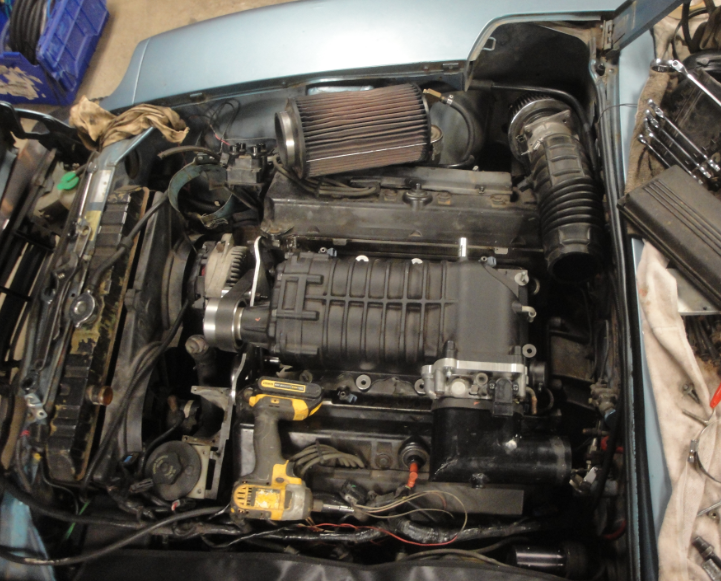
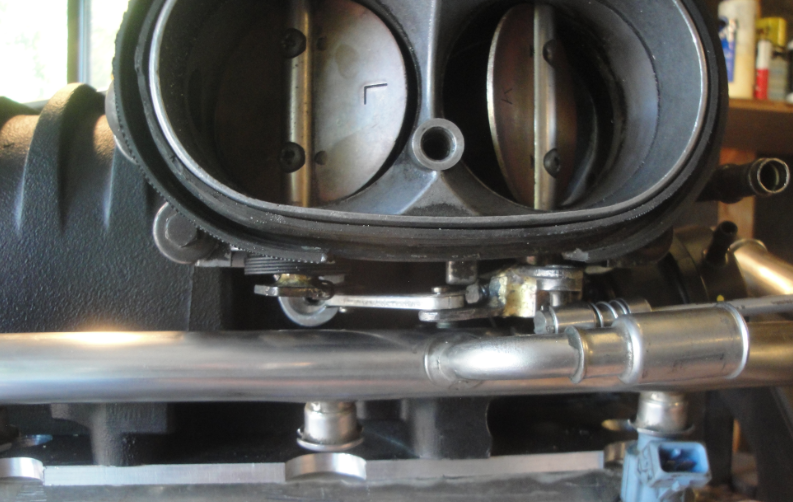
So, I had the car on the road for all of 1 day until I pulled it back in the garage and tore it apart again. Just can't drive it ever, right? Oh well. Gotta finish up that supercharger one of these days. It's coming along, but it's a serious case of 15# of crap into a 5# bag. Everything seems to interfere with everything else. BUT the hood closes, and I've got a solid 1/4" of clearance at all of the 'high points'. Modeling clay works wonders for checking hood clearance. Just like checking piston to valve or head clearances. Had to modify the dickens out of the throttle body which took a day or so of fiddling around, making new progressive links and brazing up all sorts of things. Otherwise it wouldn't fit with my fuel rail. Go figure. I'm using a returnless rail out of an '06 E150, but I'm still going to run it return style. That's an upcoming chapter.

-
T5s never came on a 4.6. IIRC the first year 4.6 in the Crown Vics still used the AODE bellhousing pattern, which is the same as the SBF pattern, after that Ford went to the Modular bellhousing (4.6/5.4 etc) . You'll need to source a T45, T56, 3650 etc.
-
Looking good! Yeah, so I went from no booster (or a bad booster, I should say) to the hydrobooster and the difference was huge. At least pull the booster and keep the power steering pump (+lines) etc for now. They do work really well, just in case you want to upgrade later, or if your stock vacuum booster goes on you. And no, I never bothered putting in power steering. I think the Subaru rack swap is very popular, as it's straightforard to swap. It's been years since I've read up on it though. Maybe I should look into it as I know my stupid bellows on the steering rack need replacing again. (and I bought replacements but I've never been impressed with how their quality in the past).
-
Did you notice you have a crack where the IAC tube comes into the intake piping? It's post MAF, so that will definitely throw off your readings ( maybe the cause of the stumbling?)
-
Nice job man! Glad to hear you got it up and running. Thanks for posting up the pictures.
-
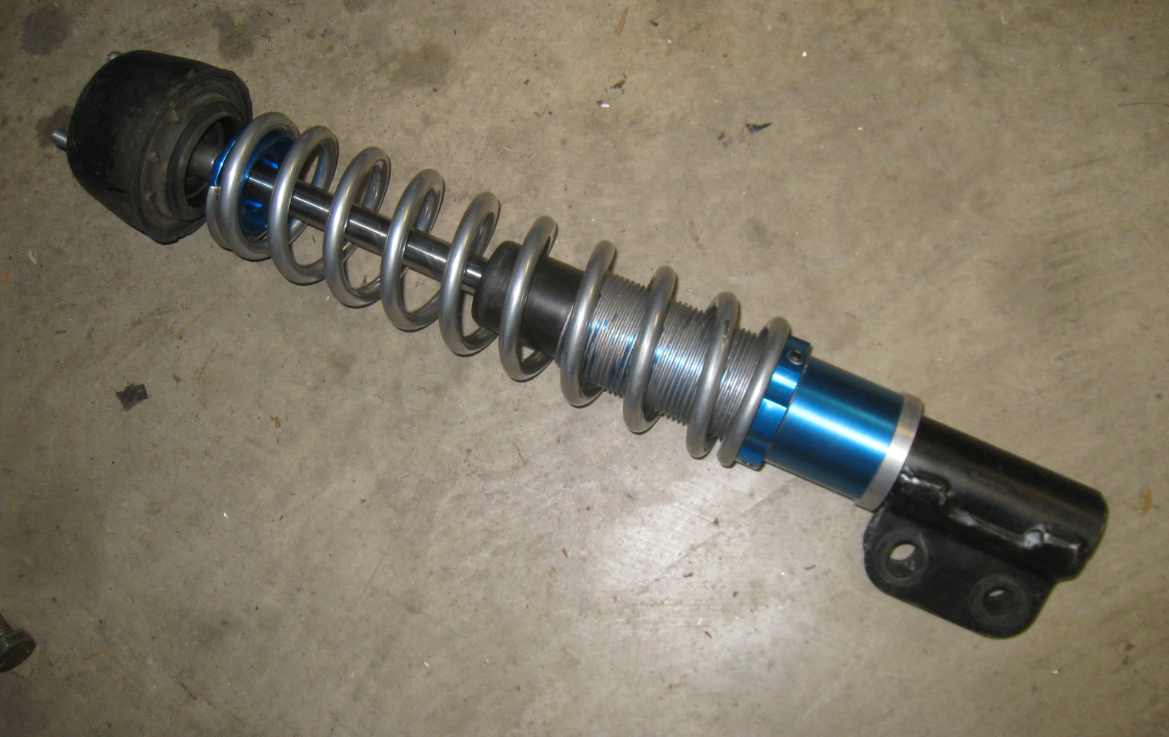
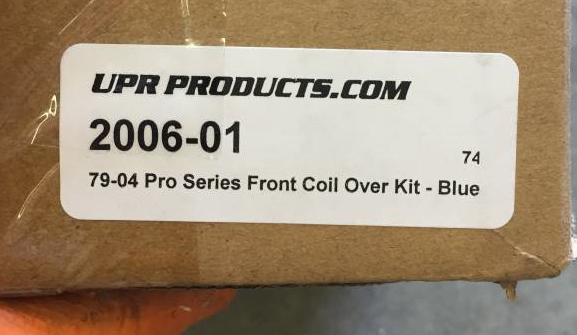
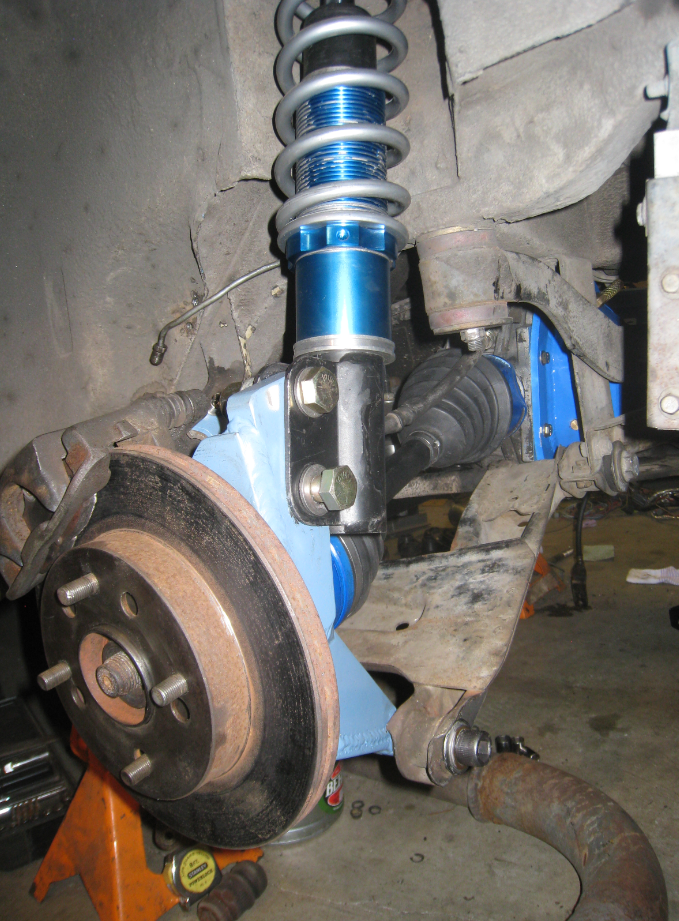
Assembled uprights. I'm running Viking 175# coils, and UPR Products 206-01 79-04 Pro Series Front Coil Over Kit. I think the "Pro Series" may have been for a larger diameter strut body, oops. I just made spacers and they work fine. Parts in the 'paint booth'. Keeps my fender from rusting so much. And it's all in the car, good to go. I had to remove the calipers to bleed them, unfortunately, but that's really not the end of the world. If I tried to flip them side to side then the E-brake mount would have been in the way of the frame. Small price to pay for glory, I guess. The springs are much stiffer than the stock ones, but that's probably in part to the fact that the new 175s are stiffer than the stock 150# springs and that my stock springs were pretty whipped out which gave it a mushy rear end. It feels like it's on rails now, even with the rear sway bar out (the mounts ripped out of the body about 2 months ago on me...)
-
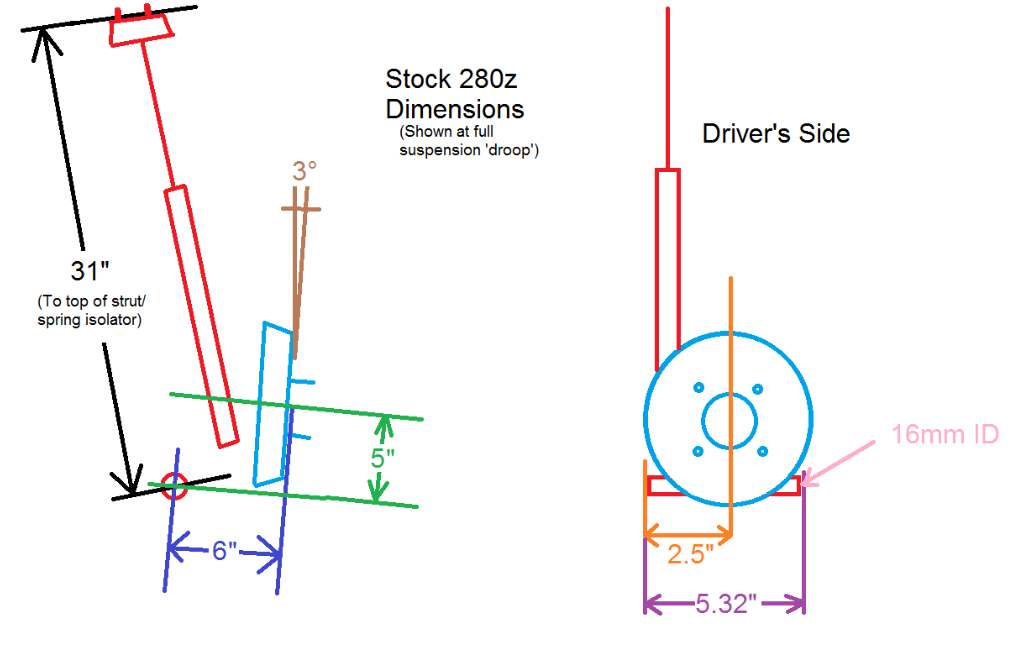
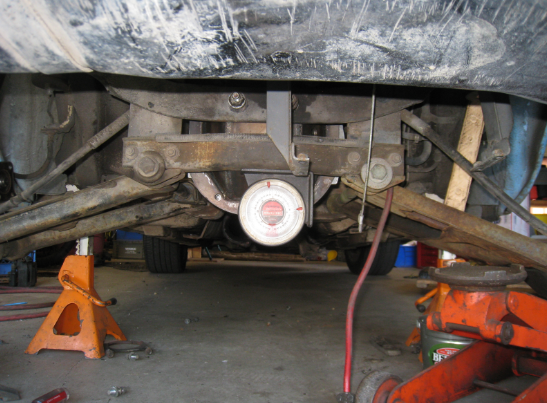
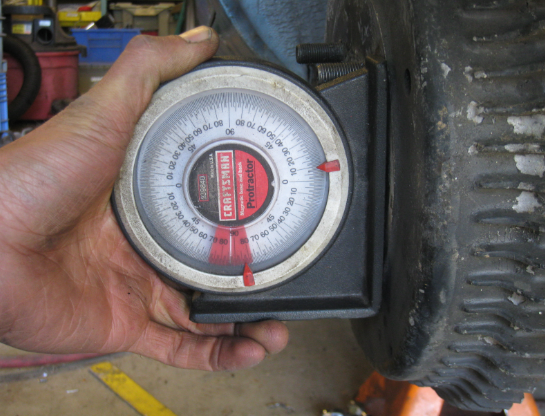
Some pretty important dimensions on the stock suspension geometry setup:
-
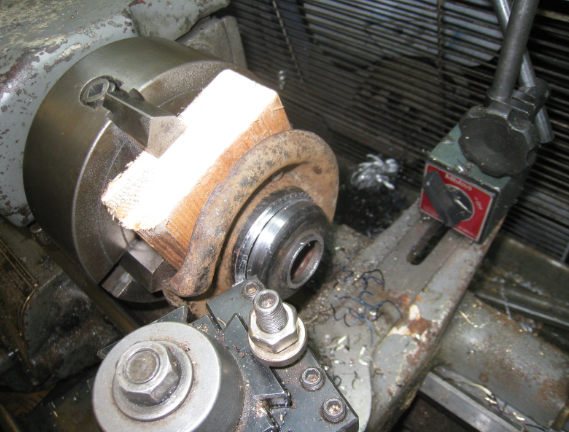
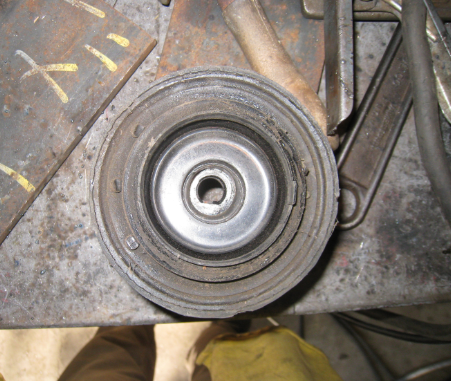
Rollin' 4 lug style again (used the stock 240z wheel studs, drilled the welded up Mk8 hubs to 31/64", pressed them in with my vise): Stock brake lines literally bolt right up, I did have to drill two holes on the pinch seam to mount them however. Legit lathe work, 101. Always mount your workpiece to a crappy 2x4 held on by tiny drywall screws. Check. And a more 'finished' view of the upright with my mockup hub (aluminum spacers) bolted on for quick assembly/disassembly.
-
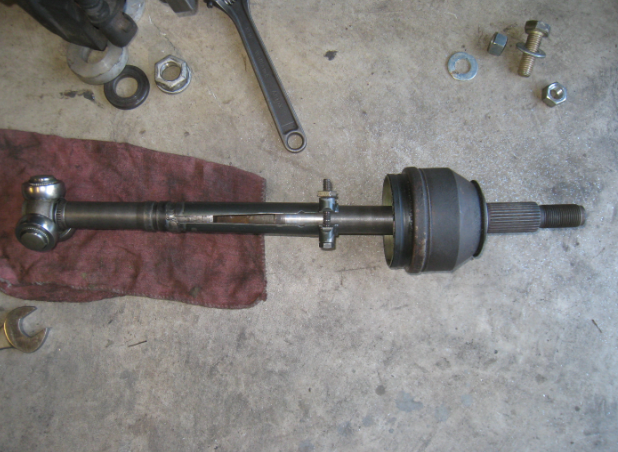
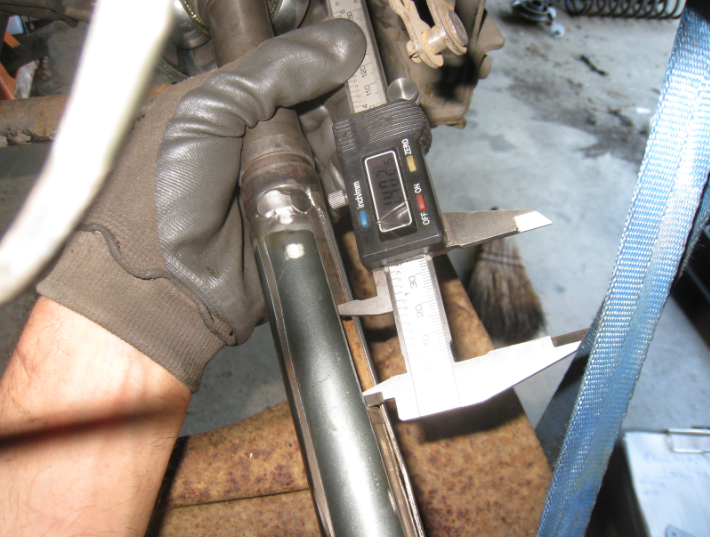
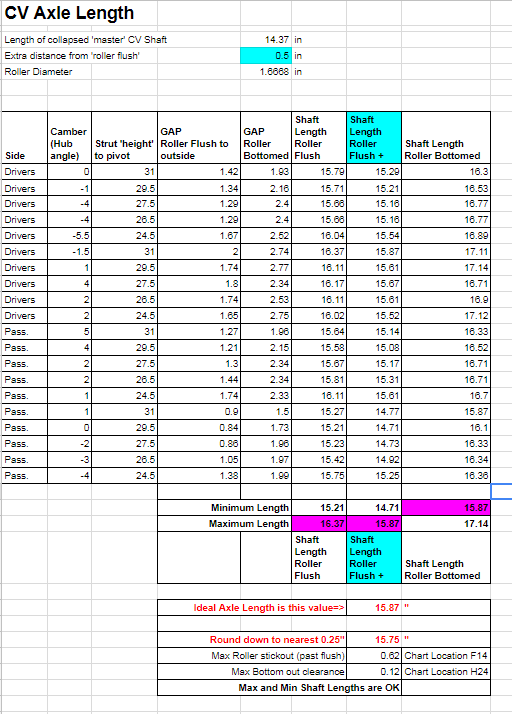
Determining CV axle length: I made an adjustable length CV axle by removing about 5" from a stock shaft, sleeving it with a bicycle frame seat tube, then installed it as is, measuring the bottoming point as well as the 'roller flush' position at 5 suspension heights. I measured the gap between the two shafts through the seat tube slot, and added it to the collapsed length to get the total length. There's too much plunging action to get away with a 'roller flush' setup, so just like the OEM configuration, a certain amount of roller stick-out is allowed. If anyone wants to use that shaft and the spreadsheet that goes along with it, just PM me. Flush condition: Gap recorded (see ratchet strap used to change suspension position. No spring was on the strut, of course.): Example of my spreadsheet. It's got lots of 'hub angles' as the strut to hub plate has adjustable camber, which changes your axle length. This makes sure the axle with ALWAYS work, at all suspension heights and max and min camber settings. Additionally, I repeated my measurements on both sides (pass/dvrs) and found the diff mounting was off-center by a tiny amount, so that's also taken into account. (Both sides still got the same length axles.)
-
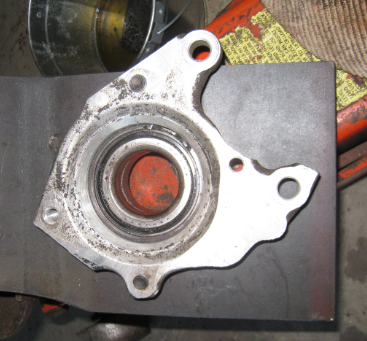
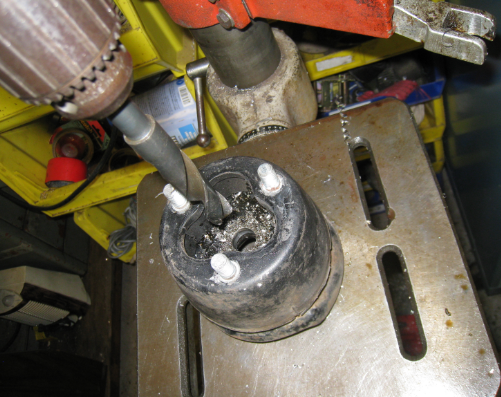
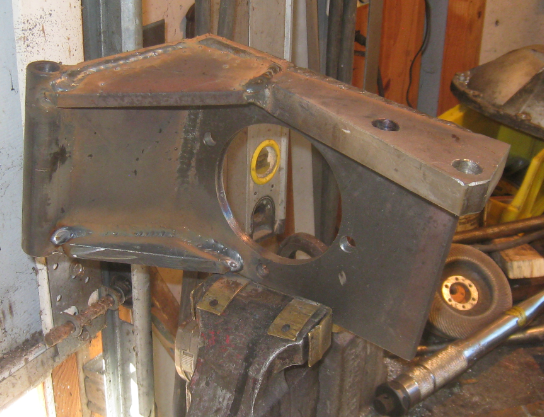
I used the holes in the knuckle which are normally for the rotor dust shield, and I added a fourth hole for mounting to my new 'knuckle plate'. After boring out the center hole, I simply used a transfer punch to get the rest of the holes positioned in the steel plate.
-
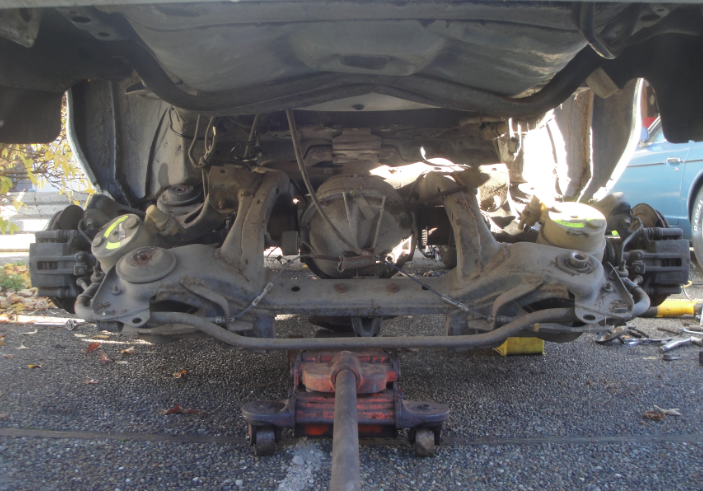
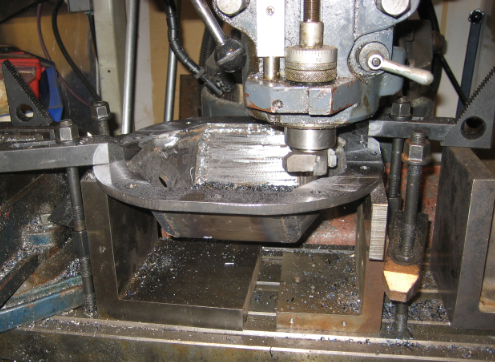
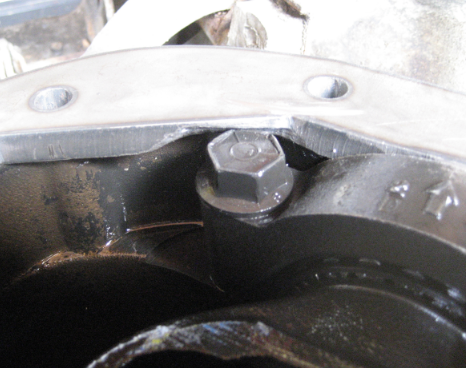
8.8 IRS Time.... Most parts in this build are from a '94 Mark VIII parts car I dragged home and stripped a few years ago. I used the engine for my supercharger mockup and kept the rear subframe for this project. The whole car was $300 (missing a transmission, no title) and I sold off about $800 worth of parts. So, parts are basically free at this point. You could probably get that whole subframe from a U-pull place for $200 I'd guess. They're relatively easy to pull, as long as none of the bolts that hold the subframe in are rusty or spin the nuts which are welded (blind of course) up in the unibody. Bring a battery sawzall with you, that would be my advice. Aluminum center section, 3.27 gears, open carrier. 28 spline - Mark VIII Hubs - Mark VIII, redrilled for Z pattern from wonky 5x4.25 Mark VIII pattern CV axle assembly, stock Mark VIII CV joints with custom length 300m axle shafts from the Driveshaft Shop. I was quoted $225 a piece (thankfully that's the only big $ item I had to buy, cause OUCH that's a lot of money for two pieces of metal...) I seriously considered making my own shafts out of 4340, but the strength would be way down (unless I also had them heat treated) and setup would be a pain, and I just don't have the time for a project like that right now. Crazy enough, they said they had the 15.75" shaft I needed IN STOCK. He said they basically stock these shafts from 14-30" in 0.25" increments. I meant to ask if they were used for other cars as well. I'm assuming they are, but it would be interesting to know. Struts - 2000 (1994-2004) Mustang Front Struts (they both have just over 6" travel, and are for a similar weight vehicle with a LOT of aftermarket options for coilovers, adjustable struts etc.) $35 shipped, eBay. (79-94 are very similar, and would probably work fine. 2005+ would be a pain as they have an OEM coilover setup that would not fit in the Z strut towers) The OEM struts I have have a body diameter of 2.015" (for coilover reference) Springs - Stock Z Top spring retainer, Z, redrilled to 5/8" for Mustang struts. Brakes, Rotors- Mark VIII Driveshaft - 1984-1996 (C4) Corvette Automatic. Aluminum, comes with 1310 joints. Shipped $39, eBay. Differential Cover/Rear Diff Mount - Stock Z Mustache Bar, Dr.Z Fabrication cover. (link) $65 shipped DIY kit. (Dr Z's unrelated to Datsun stuff, he does off-road parts.) Bearing Housing, brake caliper mount "Knuckle" - Mark VIII Knuckle + strut/suspension pivot piece. $50 in steel from local steel yard. (lots of work!) Would be about 500 times faster to make set #2 now that "I know what I'm doing". Front Differential Mount - tube steel, aluminum spacers and Jeep Cherokee sway bar bushings. Jeeps have a 1" sway bar, the Z suspension is 25mm. Close enough for now. Rear suspension coming out, about 2.5yrs ago. Guess it took a while before I dove in, huh? Stock picture from Dr.Z Fabrication's page. I had clearance issues on the outer ring itself, but I was able to grind the plate back. Post welding I also had to flatten out the gasket face on the mill. It would probably be worth just having them weld it up with all of the extra work I had to do to jig an mill it flat again. (Assuming they sent it to you properly flat, of course). Pre and Post OP Oh, and on the offchance that someone is wondering if you could jam a Mark VIII hub bearings into the Z spindle, yeah, you can't do it. All sorts of cavities and dimensions that will NOT play nice in the Z strut. That would have been cool though, right? Rockauto has the wheel bearings pictured below from $8 (generic) to about $25 for Timkens (OE), SKF $28. At 'full droop' the stock Z suspension has 3° positive camber. The distance from the top of the strut (measured above the rubber isolator) to the lower pivot point is 31". Although primitive, a wooden block set the height with a ratchet strap holding it tight worked well for the strut block positioning. Differential Mounting picture. I may have to reposition the front mount to above the differential as I think it might get in the way of the exhaust.
-
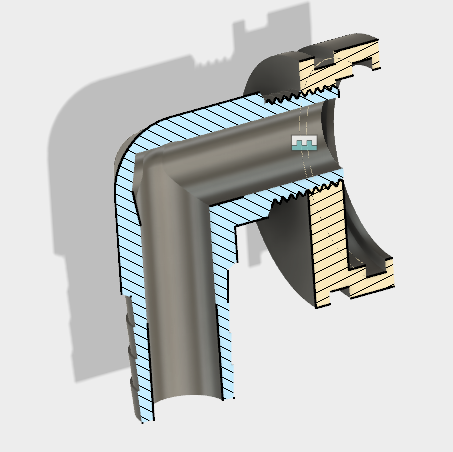
So cool! The new HybridZ allows for pasting screenshots directly into posts! No more indirect hosting for quick snapshots like these! The top picture is of the intercooler end cap (grey) the red tube is part of the manifold, and the blue thing is the laminova core itself. The bottom picture shows how I have to offset the water fitting because the tubes are so close to each other. And in case anyone's wondering, I'm using Autodesk's Fusion 360, which I highly recommend. It's FREE, and a very powerful tool. A lot of the free cad programs out there leave out features so you will purchase their full version, this one's all there. Anything from Motion analysis, to 3D printing file generation. Pretty cool.
-
Oh, and for my own note, the belt (Continental/Goodyear PN 4080685) fitment is for the following vehicles: INTERNATIONAL 3200 2004 INTERNATIONAL 4400 2002-2005 INTERNATIONAL 4400LP 2002-2005 INTERNATIONAL 8500 2002-2005 KENWORTH 22-210 1989 O-ring setup took a bit longer to design than I wanted, but size restraints, thermal expansion concerns for such a long cooler tube etc. all added time in. -126 & -123 o-rings will be used.
-
Well, today a bike gave it's life....to give life to my revised cooling system! Original tubes had to get 1" taller, and about 1.5" longer to clear the supercharger.
-
Belt mounting basically done. Just gotta finish up my new SC pulley, and get the belt length so I can order a belt for this guy. In America, engine drive alternator. In communist Russia, you mount alternator backwards and it drive engine!
-
Good link. It's one of the few links that still worked when I checked my old transmission bookmark folder! Looking back at it now in more detail however, I wonder where they got their information from. The chart shows all of the 3.8's as having a 265 rating, yet the text above the chart states: "Today's V-6 Mustangs sports the last of the T-5s. The T-5 behind the 3.8L is a 3.35 first gear set with a .68 over drive. What makes these different from the rest is the electronic speedometer trigger. No longer is there a mechanical driven cable system. It has the longer input shaft equipped with a steel front bearing retainer and reverse synchro brake assembly. Torque rating is 300ft/lbs." It's poorly cited/proofed articles like this that get people all wound up. And then, not to muddy these waters further, but the 2005-2010 4.0 used a T5 as well, but I don't know specifics of that one. From Modern Drivelines : Torque rating after the 2.95:1 gear set is installed is 350ft/lbs or about 450hp. 500ftlb is nothing to laugh at though from GForce, that's sick. I don't plan on ever hitting that in my Mustang (with the T5) but I'll keep those options in mind if I do.
-
Things are getting a little hairy as far as flat head mounting studs are concerned! I'm just trying hard to keep overall height down in the chance I can still use an unmodified hood...
-
This is one of those hotly debated topics in Ford circles. Supposedly, the V6 T5's are built to the same 300ft/lbs rating as the later 5.0 T5s. I even read a post a few years ago (maybe over in the vintage mustang forums?) that a guy got ahold of a design engineer for Ford or BW/Tremec who confirmed the V6=5.0 internally. Regardless of internet armchair debates, T5 integrity has a lot of variables (especially when considering the type of argument for or against that starts out, "I have xxhp behind my xxT5, and the car weighs xxxlbs and I drive it like a grandma/madman and it lasted forever/died prematurely"). That said, I have a stock '94 V6 T5 behind a 351w and it's still one of the smoothest shifting transmissions I've had in a car, but it's not like I'm on 15" drag tires with a 500hp 351w side stepping the clutch at every stoplight. Good gear ratio and aftermarket advice though, for sure. I wholeheartedly agree on 1st being useless in my Mustang, unless I'm starting on some wicked steep hill or pulling stumps or something.
-
Yes, 91/92 were Crown Vic only 4.6 engines. Mark VII were 5.0, Mustangs were 5.0, ETC, but the 91/92 Mod engines still used the old SBF bolt pattern to use the existing AOD bellhousing.
-
Sidetracking was my problem too. Moved across town, then was flipping Cherokees for a while, built one for my sister, and then did a 4x4 5sp conversion on my wife's. Glad to be back on this one.
-
No go on a T45. Completely different bolt pattern. That's what I'm running behind my Mod motor. Why do you want the production dates on 91/92 Crown Vics? They only ran an automatic behind them, and are rated almost the same hp/tq as a 5.0HO.
-
So I'm FINALLY making some progress again on the supercharger manifold. Most of it's welded up now, I decided not to make it a 'direct mount', but rather to have an intermediate plate where the plate bolts to the top of the welded manifold, but then has studs that stick up to mount the supercharger to. Pictures are somewhat self explanatory, the special drill bit is one I made on the lathe for doing injector bungs. I tested it out in one piece of scrap aluminum and it promptly snapped the end off, and it was all dark black inside, instead of being shiny like I would have expected. The only thing I can come up with is that it already coincidentally had a stress crack there that was internally corroded or there was a flaw in the steel or something?? Idk. Luckily the 0.540" part of the bit when resharpened drills very true, and smooth, so I should be able to just use it as a standalone drill bit and just cut the injector bungs in three steps instead of one. Oh well, it was a nice idea.
-

Just aquired - 73 240Z with SBF 306
yellowoctupus replied to ScramblerX's topic in Ford V8Z Tech Board
Just about any transmission cooler is going to work fine, ie, be better than nothing. I think I picked mine up on eBay for my old Cherokee for $35 shipped? There's a lot of rebranding on radiators/coolers like this. Ie, Uhaul sells a line of coolers, but they're just reboxed Hayden's. You can also get a junkyard unit out of a lot of cars that have tow packages, ie Explorers, pick-up trucks etc for $20 or so. Just make sure to flush it out prior to running it to get somebody else's potentially nasty atf out. -
Yessir. Same pattern for all of these: (stolen from Wikipedia-Ford Bellhousing Patterns ) 200 I6 1978-1983 only, partial (4 of 6 bolts) pattern. 250 I6 255 V8 289 V8 - (made after August 3, 1964) - had 6 bolts holding bellhousing to block 302 Cleveland (Australia) 351 Cleveland V8 (not the 351 Cleveland M-block engine) 351 Boss 351 Cobra Jet 302 Windsor V8 351 Windsor V8 400 Cleveland M-block V8 aka 400FMX (certain 1973 casting numbers D1AE and D3AE, mated to the FMX transmission) 3.8/3.9/4.2L Canadian Essex 90° V6 (RWD only) 240 I6 300 I6 4.6L Modular V8 (first two casting runs, numbers F1AE and F2VE) 5.0L Windsor V8 5.8L Windsor V8
-
Saw another 8.8 'conversion' with the sandwich design here from Ronin: http://www.hottubsippinbubbly.com/Ronin/fd88install.pdf