proxlamus
-
Posts
46 -
Joined
-
Last visited
Content Type
Profiles
Forums
Blogs
Events
Gallery
Downloads
Store
Everything posted by proxlamus
-
Super late seeing this. Is it too late to order?
-
I'm going to be fabricating adjustable front and rear control arms and I've read the stellar FAQ post about LCAs. My question is, should the new control arms (front or rear) start at OEM dimensions and the adjustability only increases the length rather than decrease the length? I ask because I understand the following: "Rod ends should never be set so that the amount of thread engaged is less than 1.5x the diameter of the end itself. So a 5/8" rod end would need 15/16" threads engaged in order to be considered properly installed. A typical 5/8" rod end has 1 5/8" of threaded shank, so that means that you have 11/16 available thread to adjust with. Subtract the thickness of the jam nut which is 3/8", and that leaves you with not a whole lot of adjustment--5/16" to be exact." I was going to initially "split the difference" and with the threads completely collapsed on the rod ends, the LCA will be shorter than OEM length, therefore I could adjust it out to OEM length and beyond for more adjustability. Would that be incorrect?

-
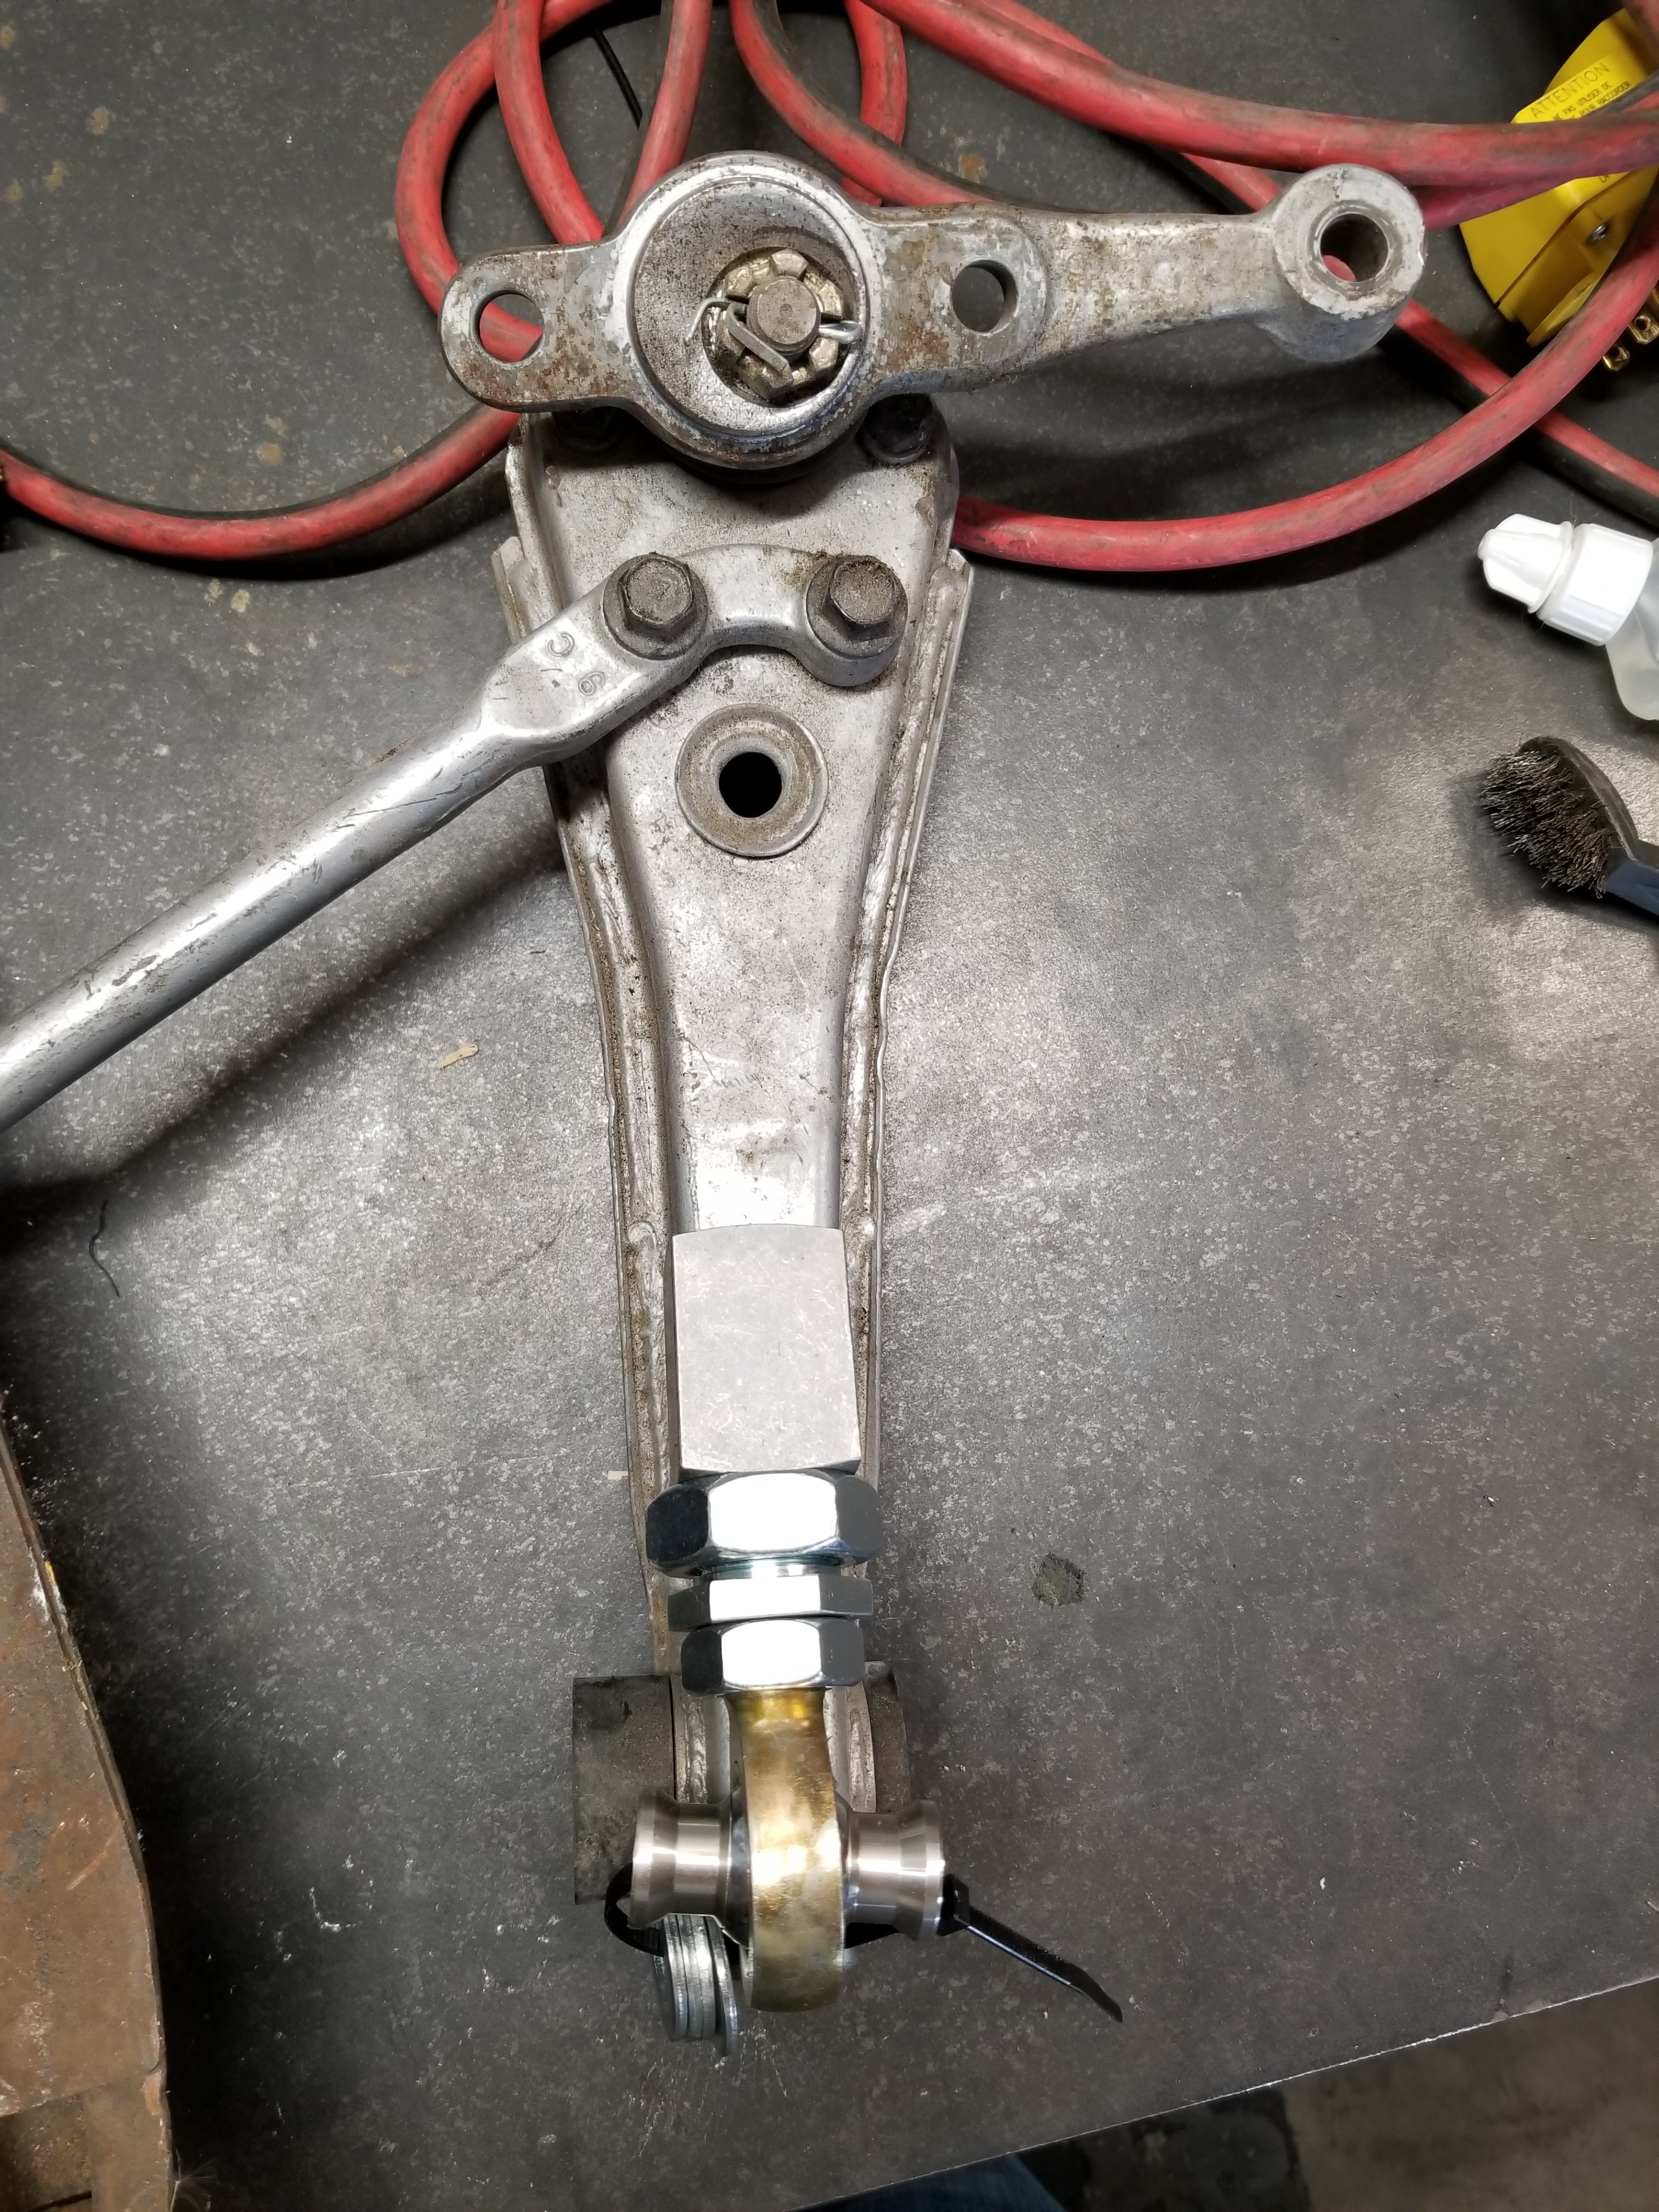
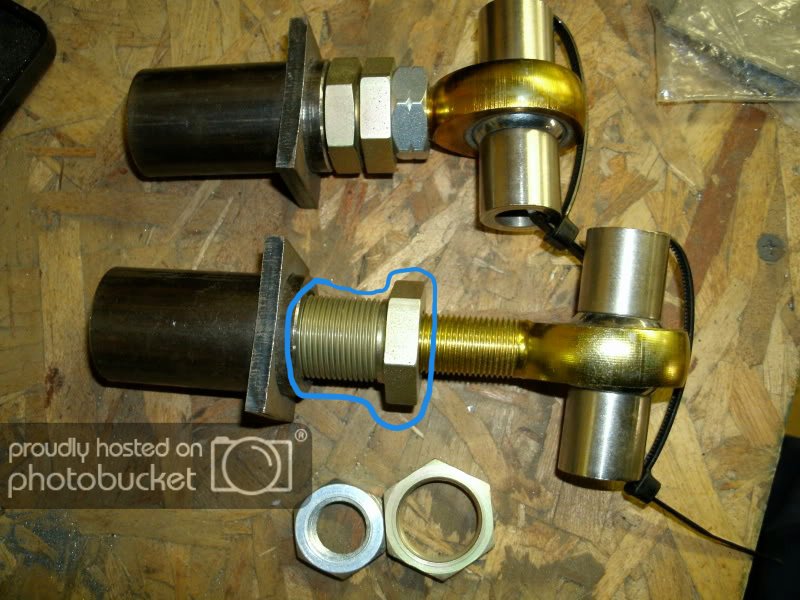
Double adjuster for control arms, where to source?
proxlamus posted a topic in Fabrication / Welding
I need help. I'm trying to fabricate front and rear control arms and I want the control arms adjustable while ON car. The secret is this "double adjuster" or "threaded adapter". I'm struggling and I've spent houuuurrsss on google, bing and several other forums. Does anyone know the proper terminology for the part circled in blue and do they have a source where I can get one?
-
Regarding those "Tesla" vents, those house the cameras on the Autopilot equipped cars. Since its easier to make one fender, the cars without the autopilot hardware and cameras use a blank plate which is what you see above.
-
Proxlamus - 11 year project now. 280YZ and RB
proxlamus replied to proxlamus's topic in S30 Series - 240z, 260z, 280z
Alright ran into some problems today swapping in my Greddy intake plenum... First off in the NEO, the fuel rail bracket has a different spacing so I had to modify that. In addition the NEO has a 4 bolt IACV instead of a 3 bolt. So I ordered a machined adapter to fit the 4 bolt IACV on the Greddy manifold... surprise surprise the holes weren't drilled properly . So I had to re-drill and countersink it.. I also had to re-tap most of the air and water fittings... All done -
Sectioning struts on a 240z vs a 280z
proxlamus replied to proxlamus's topic in Brakes, Wheels, Suspension and Chassis
Thank you for this -
Sectioning struts on a 240z vs a 280z
proxlamus replied to proxlamus's topic in Brakes, Wheels, Suspension and Chassis
I know I posted 2 pictures above but they were kind of blurry and hard to read.. I e-mailed Ground Control and they sent me some files.. Check this out... they even have a new "FAT tire" 8" spring setup. Crazy. So they list this for the rear. 280z with 12" Springs weld the ring at 8" from the bottom. 280z with 8" Springs weld the ring at 11" from the bottom. So 11"-8" = 3" difference. 12" Springs- 8" Springs = 4" difference. Find the middle with a 10" spring and it looks like I should raise the perch height by 1.5" bringing the total perch height at 9.5" from the bottom. -
Sectioning struts on a 240z vs a 280z
proxlamus replied to proxlamus's topic in Brakes, Wheels, Suspension and Chassis
Hey guys today I wanted to weld on the spring perch for the rear and I'm not sure where to weld it? I have 10" Springs. The only information I could find was from ground control regarding a 280z is the following.. This shows that the 280z should have the spring perch welded at 5" on the front and 8" in the rear using 12" springs... compared to the 240z showing 5" front and 7" in the rear using 10" springs. So I have 2 questions - depending on how much you section off the strut, does the spring perch remain same? If I am using a 10" Spring compared to 12" Springs should I move the weld ring in the rear up 2" to compensate? -
Sectioning struts on a 240z vs a 280z
proxlamus replied to proxlamus's topic in Brakes, Wheels, Suspension and Chassis
I just welded it back together and had the loss of 1/4" from the cuts from the blade. With camber plates I'm expecting to lose that 1". So let's see how this works. I probably won't have to use the spacers but just in case. -
Proxlamus - 11 year project now. 280YZ and RB
proxlamus replied to proxlamus's topic in S30 Series - 240z, 260z, 280z
As for the wheels I found a company called PS Vintage wheels... http://psvintagewheels.com/products.html I will be going with 15x12 with a 5.25" backspace. I'll add spacers if I want to add more width. -
Sectioning struts on a 240z vs a 280z
proxlamus replied to proxlamus's topic in Brakes, Wheels, Suspension and Chassis
Fixed... finally One of the struts fell out of the vice when I was hammering so it dented the top of the threads. Luckily it still threads the gland nut and life is good. Anyway.. I added a 3" spacer to the bottom to make the struts work properly. So 17-3/4" measured on the inside from the bottom of the tube to the top of the threads... or a total outside measurement of 16". I also ordered these from Techno Toy Tuning. https://technotoytuning.com/nissan/280z/riser-blocks-camber-plates. It's a rear riser plate that is 1" thick just I'm case I need it and it's too low on my car. Thanks for the help everyone -
Proxlamus - 11 year project now. 280YZ and RB
proxlamus replied to proxlamus's topic in S30 Series - 240z, 260z, 280z
Also have a competition clutch stage 3 clutch and pressure plate with a lightened 12lb flywheel. -
Proxlamus - 11 year project now. 280YZ and RB
proxlamus replied to proxlamus's topic in S30 Series - 240z, 260z, 280z
When I sectioned my struts.. I sectioned them wrong. Very wrong... http://forums.hybridz.org/topic/124937-sectioning-struts-on-a-240z-vs-a-280z/?do=findComment&comment=1168032 read more about it here.. Anyway... I went ahead and added pieces back into the strut tubes... what a pain. I am aware the strut tube is bent at the thread. It fell out of the vice. Luckily it still threads together with the gland nut. Thank goodness. -
Proxlamus - 11 year project now. 280YZ and RB
proxlamus replied to proxlamus's topic in S30 Series - 240z, 260z, 280z
Alrighty.. time for a update! Lots of good things. I found a RB25DET NEO out of a R34 2002 GT-T.. I also got a 5 speed RWD transmission and I got a Subaru STI 3.54 LSD with Ermish racing CV shafts. It has a Borg Warger S256 turbocharger, injector dynamics 1000cc injectors and a NISTUNE ecu. -
Thank you so much for the reply and information. The 280YZ extends out 3" on each side. So 74_5.0L_Z have you had any issues with the front wheels rubbing anything or restricting thr turning or is it clear from obstructions with your current setup? Do you think a 12" wide wheel would clear it?
-
Hey everyone, been a while since I've posted. So im ready to order the wheels for my 280YZ project and I've been doing TONS of searching and digging around. I found a company called PS Vintage Wheels (http://psvintagewheels.com/products.html) They offer 15x10 and 15x12 or 17x11. My biggest question is regarding the backspacing. The 280YZ manual says the factory backspacing is 3-7/16". I will be running coilovers and I've seen a lot of posts mentioning they've used backspacing from 3.5" all the way to 5.5". I would like to run the 15x12s all around but I really have NO clue what backspacing to use. I am also concerned about the front wheels being too wide and rubbing anything. (Although I know how hard it will be to turn). Here's some info I've written down for people running different sized wheels User and size -Cuzak901 has 15x10 and 3.5" backspacing -74_5.0L_Z has 15x10 and 5.25" backspacing with .25 spacers. -Dan Juday has 15x10 and 4.5" backspacing -infinite_worx has 15x10.5 and -32 offset which would be a 4.5" backspacing -stivaas30 has 17x10 and a -70 offset which would be a 2.75" backspacing??? -blu_ballz has 18x12.5 not sure of backspacing So as you can see I am a little confused on what backspacing to go with. The suspension is NOT assembled on the car and I cant do any measurements. So any help would be very valued.
-
Proxlamus - 11 year project now. 280YZ and RB
proxlamus replied to proxlamus's topic in S30 Series - 240z, 260z, 280z
Yeh! I actually ordered a RB25DET NEO with transmission and a Subaru LSD 3.54 and Ermish Racing CV chafts on Thursday! So I'm waiting for the guy to pack it up and ship! I also found some really cool wheels from http://psvintagewheels.com/products.html they are the T/A II version wheels. I'm going to order 15x12 wheels. Priced very well. -
Z32 transmission and RB25 bellhousing, same length transmission?
proxlamus replied to proxlamus's topic in Nissan RB Forum
I found this article on another forum, it's very informative. Thanks to DETurbine http://forums.nicoclub.com/transmission-comparison-rb25det-vs-vg30dett-t192792.html "First off here are the measurments of the two: RB25DET: Bell housing: 15 ½ inches Rear housing: 14 ¾ inches Shifter: 29 ¼ inches (from bell housing to middle of shifter). Middle case: 1 ¼ inches (where the bell housing and rear housing bolt onto). VG30DETT Bell housing: 16 inches Rear housing: 12 inches Shifter: 34 inches (from bell housing to middle of shifter). Middle case: 1 ¼ inches (where the bell housing and rear housing bolt onto). Shifter position difference between the stock RB25DET and VG30DETT measured from the bell housing to the middle of the shifter hole is 4 ½ inches. VG being the longer one. ** keep in mind this is the RB25 bell housing on the VG transmission. Driveshaft issues: Keep in mind for those that already have the RB25 in their car and have previously made the custom driveshaft to fit up to their original RB25 transmission and are now going with the VG transmission hybrid swap that you will have to modify the driveshaft since it is going to have to be about 2 ¼ inches shorter then the current driveshaft that you had made. Now for those people that have said that even the bell housings will bolt up, that it 100% incorrect. They are different in many ways such as the starter natch out on the RB25 bell housing and the bolt holes themself are different. The RB25DET bell housing will bolt straight up to the VG transmission without any problems. You can leave the rear VG caseing on, but like I had said above, the shifter itself will sit 4 1/2 inches farther back then the RB25 transmission. This wont be so bad for those with the stock R33 crossmember, since the shifter sits to far foward anyway. You are still going to hack up the transmission tunnel a little, but that just takes about 10 min. For those that are asking why wouldn't you just get a RB25 transmission...well good luck finding one and when you do have fun spending the $1k plus. I bought my VG30DETT transmission for $150 with 30k miles on it and it takes about an hour to swap the bell housings around." -
So I'm interested in picking up a Z32 transmission for a good price and I know you can take the bellhousing off a rb25/26 and bolt it onto the Z32 transmission. I am aware the internals are exactly the same and the shifter locations are slightly different. My question is, does the RB25 transmission and the Z32 transmission have the same overall length to the output shaft and would I need a different driveshaft? I bought a McKinney motorsports transmission mount and driveshaft package from an aborted project a few years ago and I would like to utilize the RB25 driveshaft from McKinney. If the length of the Z32 and RB25 transmissions are different, then I would prefer not to spend another $400-500 on a new driveshaft to be made.
-
Several people own parts from Paulo (retro spec). Take a look at these posts http://forums.hybridz.org/index.php?app=core&module=search&do=search&fromMainBar=1 EDIT - that link didnt work. Search for "retro spec" in two words. No dash. Lots of posts and information
-
At home powder coating and Eastwoods IR cure system.
proxlamus replied to proxlamus's topic in Body Kits & Paint
After looking around I found some used Ovens on Craigslist for $100 and I have a 240v outlet in the garage for my plasma cutter and air compressor. Seems like this might be a better route. However the IR curing light/heater would be useful if I wanted to coat something that was too big to fit into the oven. Hmmm. http://www.superstreetonline.com/how-to/additional-tech/1405-do-it-yourself-powdercoating/ This article is pretty slick about using the lamp. One of the pictures shows aluminum foil used to create a makeshift oven for a part that was too big to fit into a kitchen oven. http://image.superstreetonline.com/f/70428333+w+h+q80+re0+cr1/do-it-yourself-powdercoating-foil-oven-11 -
Hey guys, I've been looking into powder coating but it sure adds up taking it to a shop. I've been looking into Eastwoods at home powder coating setup with a IR curing lamp. http://www.eastwood.com/ir-cure-system-with-dual-voltage-gun.html The other option is to buy a used oven, but that takes up some space in the garage. Does anyone have any experience or have advice on such a setup? Thanks!
-
http://forums.hybridz.org/topic/113183-building-a-hitch-and-trailer-for-my-280/?fromsearch=1
-
Search for "tow hitch" or "trailer hitch" rather than tow bar. I recall seeing several threads over many years... some cool designs too with a fold down license plate to reveal the tow bar attachment point
-
Sectioning struts on a 240z vs a 280z
proxlamus replied to proxlamus's topic in Brakes, Wheels, Suspension and Chassis
Alright here's an update for anyone who searches and needs more information. For a 280z only... The final front strut tube casing measured from the bottom inside of the strut tube to the top of the threads is the following : 13.5" (originally 15" total) The final rear strut tube casing measured from the bottom inside of the strut tube to the top of the threads is the following : 16.75" (originally 18" total)