Aero Z
-
Posts
59 -
Joined
-
Last visited
Content Type
Profiles
Forums
Blogs
Events
Gallery
Downloads
Store
Everything posted by Aero Z
-
I used a 90deg switch that came on the 2001(that gen) Mustang GT. Got from Rockauto or Amazon to get best price. Has worked perfect for 8 years. from this thread. Part number in that thread.
-
Here's how I did mine in my 240z. I think I just played around with the spacing and set them in as far back as they go on the slides to figure out where they should mount.
-
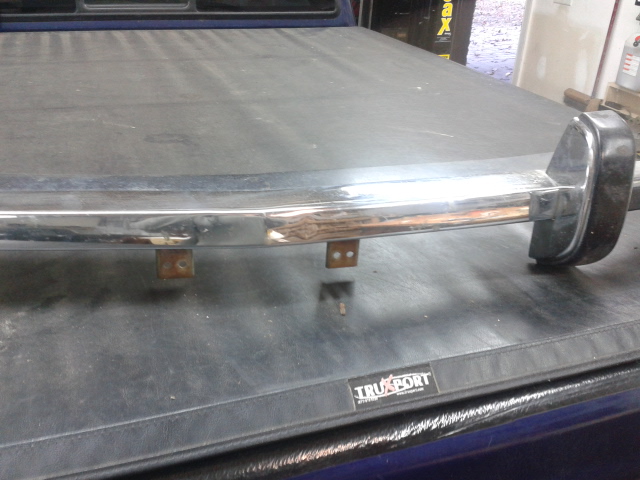
I converted my 73 to the 72 style so have my old bumper and brackets sitting around. The bumper itself looks nice when mounted. There is one small 'dent' in part of it. The top and front is pretty shiny and clean. The bottom side has some surface rust but it would probably clean up. The inside has moderately more surface rust and there may be two very small rust through spots but they're square so it might be factory holes (?). The black rubber is intact and haven't looked underneath to see if rusty. I have the brackets and they're in good shape. What would be a fair price for all? Bottom Bottom Top Front

-
Hoke Performance LS2/T56 install starts today.....
Aero Z replied to mrk3cobra's topic in Gen III & IV Chevy V8Z Tech Board
Looks very nice. I would recommend adding Techflex over or just replace that plastic wiring loom stuff which doesn't look nice in my opinion. The techflex comes in various types of protection. I added the large diameter thermal stuff over the main wiring loom that comes thru the firewall and down the rail. I added the smaller diameter regular wrap (not as insulating) over the rest of the wiring. You can just replace the plastic loom or add over it where you want. It comes in split seam just like the plastic loom so you can add with the connectors in place. Very easy to do. You can buy it at amazon as well or other places. https://www.techflex.com/prod_f6n.asp -
Use the Torque app to also monitor what your 02 sensors are reading as you get on the throttle. If they're not working correctly it could affect it. i would suspect only one (not throw both codes) would quit though instead of both at the same time. Something to maybe eliminate as the problem.
-
I used the same mat material and put a layer of their Ensolite foam on top of that. I put it down when redoing the car so no way to compare to not having it there. Seems like it does really well. Both seem very good quality and were cheaper than the inflated prices of dynamat etc. Also the seller is very good...or at least was years ago.
-
The price he's come down to (19k) might be a decent deal for a properly sorted car where everything works and might have few very minor issues. The car seems more and more like a swap just thrown together to flip, The time to get the gauges working is when you do the swap. He states the car has no issues whatsoever...except the gauges don't work, the wiring looks like spaghetti, the windows dont work etc etc etc. Probably a lot more you wont see until you go look at it.
-
The PS pump bracket is easy to replace so to me that speaks laziness on the swap. IMO. The 'cold air inlet' is the way most of the LSx swaps are done. Again a little more work running it through z structure but better. Its just 4" polished aluminum tubing. I also notice he has a gauge cluster sitting on top of the dash. Make sure all the main factory gauges work with the LS swap. If not he took the easy way out again. Before you spend time to go look at it I'd ask what's the highest offer he's turned down. If its more than you want to spend or still high for the condition its in I wouldn't waste my time. Unless its A LOT better than it appears no way I'd pay half what he's asking.
-
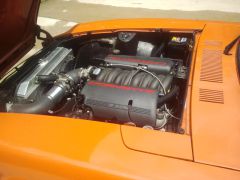
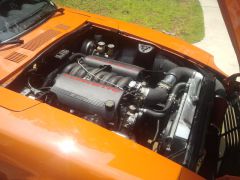
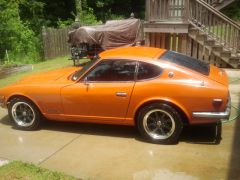
Car looks a lot like mine. That messy wiring in the engine bay is pretty bad. Is that blue painters tape on some things? When I see a car with such little care taken on making things tidy and neat I start to look at everything else that was done to make sure it wasn't a hack job. Definitely worth checking out but really go over the car. That motor still has the power steering pump on it...but he doesn't mention he added it...not sure what's going on with that or how he's making that work. Compare that to my engine pic which has similar mods. I'm no wiring expert but no way I'd have my engine compartment look like that. Just washed car so thats not rust in the engine bay fenders...just water drops.
-
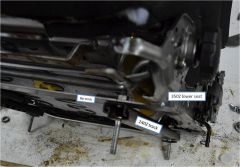
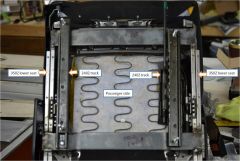
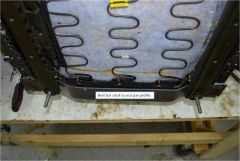
I also did a writeup from when I did this. Very simple. Like mentioned above you don't (and probably dont want to) use all of the 350z rails. Just weld to the seat structure directly. http://forums.hybridz.org/topic/103970-another-350z-seat-install-for-tall-people/?do=findComment&comment=972398
-
From the album: my ls1
-
-
-
From the album: my ls1
-
Which car would you buy to upgrade from your Z?
Aero Z replied to afbrian13's topic in Non Tech Board
I have a RX7 FD LS2 in addition to the Z. The Z 'feels' lighter and just as fast the RX7. I think the Z gets more attention but I do like the looks of the RX and its a bit more modern. I wouldn't 'upgrade' from my Z as I don't think I'd sell it to get something else. The other cars would go first. Unless I can find someone wanting to trade their Mclaren for my Z. -
Don't forget to look into the BART to maybe get around San Fran those days. You may look for places within walking distance of a Bart station. You can catch it at airport and go downtown close to Fishermans wharf etc. Finding parking, parking fees and traffic in the area is terrible! We went a few years ago and didn't get our rental car until we left SanFran to go up the coast etc.
-
Autocrossing my tow vehicle
Aero Z replied to RebekahsZ's topic in Gen III & IV Chevy V8Z Tech Board
We may come to the show but not sure what car we'd bring. Probably won't be autocrossing the Z though. -
Autocrossing my tow vehicle
Aero Z replied to RebekahsZ's topic in Gen III & IV Chevy V8Z Tech Board
The same Porsche event with autocross is this weekend. https://www.facebook.com/events/1705750732972833/ should go and autocross your z this time. -
I had Hagerty for years on multiple cars at once. They did make it restrictive by saying the cars shouldn't be driven to work regularly (which I didnt do 'regularly') but was always concerned if something happened they'd try to get out of coverage. I probably had them for 10 years. When I got my 93 RX7 LS2 and went to add it the rate was significantly more than expected based on other cars. Their excuse on the high rate was it was too 'new' which was odd cause I had a 2000 Porsche 911 covered with them months before and also a 91 NSX. I shopped the rate to ANPAC classic car and it was lower on the all the cars, Seems like I just told them the mileage I drive per year but there wasn't a 'limit' and didn't seem restrictive (maybe if you tell them you daily drive it it might be an issue)
-
S30/LS/turbo/Powerglide/Tex101/9"SRA build diary
Aero Z replied to RebekahsZ's topic in S30 Series - 240z, 260z, 280z
Looking forward to your build thread. Nice alabama find. -
Slow Build 240Z LS1/MN12 - Build Thread
Aero Z replied to JoeK's topic in Gen III & IV Chevy V8Z Tech Board
Have fuel setup identical to yours. What I did was use the camaro filler neck and a new hose to fit the camaro tank and neck. I cut the datsun filler neck/flange (where it meets the filler door) below the T (where the vent line runs in). The inner diameter here is almost exactly the outer diameter of the camaro neck so you can fit it inside the cut datsun neck. (Secure with good gorilla tape- but its a tight fit anyway) Doing this keeps the gas door flange the same as it was but with the chevy neck inside this you just put the gas nozzle inside the camaro neck. Top of the camaro neck should be just below the datsun neck vent T. I cut the camaro neck down where it tapers down the outlet diameter (from the larger diam). I think this was an inch or so before the 45deg bend. I then used the 45 bend further down to make an elbow in the line. Had to do this to keep the newly bought filler hose from kinking. Keeping the datsun filler neck with the vent T allows you to run a vent from the camaro tank back to this T to allow the air to circulate out when you fill the tank. I messed with my setup a bit and this one works perfect. Here's the camaro neck I'm talking about. http://www.ebay.com/itm/1999-CAMARO-FIREBIRD-Fuel-Filler-Neck-OEM-00-01-02-/161709133508?_trksid=p2141725.m3641.l6368 -
You don't need the whole pedal box. You just need clutch and brake pedals from a manual car. You'll need the springs and bolt from the clutch pedal too. They will bolt right in. What I did in my 73 auto. It's my understanding from doing mine that the 73 is the same as the 260z and 280z. You can verify for yourself by looking up in the box and it has the mounts for the clutch pedal. I know for sure 72 and lower year pedals are different. The pedal box itself is also different on those early cars.
-
Autocrossing my tow vehicle
Aero Z replied to RebekahsZ's topic in Gen III & IV Chevy V8Z Tech Board
I almost went to that show and meant to tell you it was in your town. Funny you beat someone I know with a Cayman. A few of the P-car owners types need to finish behind an S10 for an attitude adjustment. -
I battled the vapor smell for long time and had the charcoal canister in place (camaro plastic tank). There's a valve on the canister that's nominally open (probably until it receives a signal to close). Once i removed the canister and that valve my setup works perfect. One large vent line (that went to the old canister) that reroutes to top of the filler neck. Allows large air flow out when filling the tank. Kept stock cap. A line that T's off that one at a smaller diameter that has another T which has a check valve in and check valve out. The valves have a low 'cracking' pressure and they are nominally closed. So the system is sealed shut just sitting in the garage. The 'IN" allows for air into the tank when the tank is being emptied. The "OUT" allows for the car to sit out in the heat and to release pressure if needed. The camaro tank has an overpressure valve on it too but wanted to add another.
-
F-Body Plastic Fuel Tank Install
Aero Z replied to JoeK's topic in Gen III & IV Chevy V8Z Tech Board
Have my Fbody tank in my car 'backwards' compared to your first few pics. I've ran it down to less than 1 gallon (how found out gauge was off) in the tank and had no starvation issues. I wasn't autocrossing or anything to make the slosh affect worse. If it makes the tank sit lower than backwards I would make sure that clears your suspension setup and ground clearance. With mine the tank sits about the same level as the rear diff mount/diff. I personally wouldn't want it any lower than it currently is. Your mounts look nice. I would remove that charcoal cannister unless you're actually using it. -
I just put mine (Xenon Urethane) on last weekend. I would say it fit about perfect with good material (edge distance) for drilling holes. It did seem like it would sag in the center over time. I ran a brace across the center an made a bracket that tied the bracing into the original center support. If you just brace the airdam itself and don't tie it into the car's body it will still still sag.