Namor
-
Posts
206 -
Joined
-
Last visited
-
Days Won
2
Content Type
Profiles
Forums
Blogs
Events
Gallery
Downloads
Store
Everything posted by Namor
-
I've got one and assuming I can find a box to put it in, should be able to ship it fairly cheap. I'll get you pictures of it tonight if you want.
-
the always troublesome rear spindle pin removal
Namor replied to bawfuls's topic in S30 Series - 240z, 260z, 280z
I can't see your pictures, but what ended up working for me was soaking the strut housing in pb blaster for 3-4 days. I don't mean spraying it on or pouring some in the hole a couple times a day, I mean buy a gallon and fill a paint tray with it and completely submerge the area containing the spindle pin. This was after trying at great length on my own. I had been turned down by 1 shop and had another unsuccessfully try to heat it and press it (oxy/acetylene torch and at least a 20 ton press.) It still took a little pounding to get it out, but I could see movement after each hit. If you could fill a bucket with pb blaster to submerge it, you could feasibly do it while still on the car I think. -
CONFIRMED L28 with RB25 Flywheel and 350Z Clutch
Namor replied to 83turbo280zx's topic in Nissan L6 Forum
Finally got around to installing this spacer and a new clutch/flywheel. It works beautifully and for anyone who has wondered, it required no grinding of the bellhousing for a T5. -
I have the radio from my 280z which I tested out of curiosity and surprisingly it works very well. I don't plan on using it, so I figured I'd see what it is worth to someone who wants a period correct radio. Only downside is that it is missing the knobs.
-
They are grounded through the beam selector stalk. Each time you click it, it swaps between grounding the high and low beams. If you just direct grounded the low beams, they would come on when you turn your headlights on and stay on when you turn on your highbeams. As for keeping amperage down in the steering column, it didn't accomplish that at all because all of the power goes through the steering column. I have a warped column cover because of it.
-
I'd have to check the 71 wiring to see if it is the same as mine, but here is how the headlights in a 77 work. Each headlight has 3 wires. +12v, a highbeam ground, and a low beam ground. Turning the switch to turn the headlights on, connects power to the fusebox which then sends (+) power via separate fuses to each headlight. The highbeam stalk changes which beam is grounded. Both high and low are not grounded at the same time. I imagine you could energize both at the same time, but I'm not sure that the bulbs were designed for that and they might burn out quicker due to heat.
-
Is this the clutch you are referring to? https://www.ebay.com/itm/XTD-STAGE-3-DUAL-FRICTION-RACING-CLUTCH-KIT-FITS-03-06-350Z-03-07-G35-jdm/192450127795?fits=Model%3A350Z&hash=item2cceebe7b3:g:M9gAAOSw3ydV6grc&vxp=mtr I saw that they also have a Stage 3 that is a 6 puck, but this is the one I was leaning towards.
-
Both Z32 and CD009 use the same input shaft spline and can use stock L28 clutches.
-
It depends on how much you have to spend. The T5 is only rated to 265 lb-ft, although I believe there have been a lot of people have it hold more. The common options that I know of are T5 FS5W71C (aka KA transmission swap, also found in Non-Turbo Z31) ( http://atlanticz.ca/zclub/techtips/240sxtransmissioninstall/index.html ) Z32 Transmission + http://hokeperformance.squarespace.com/store/300zx-l28-transmission-adapter CD009 (Z33 Transmission) + http://hokeperformance.squarespace.com/store/l-series-6spd-transmission-adapter-03-06-vq35de T56 ( As for the stock speedometer, I'm not sure which of these had speedo cables originally, but there are adapters now that will drive your speedometer from an electrical signal if you decide to go with a transmission that can't directly drive your speedometer. )
-
I have a 280z and I know there is a height issue in the difference between the radiators, but I'm not sure if there is any other difference. As for A/C, it normally runs off the middle pulley on a L28et. I had an unknown 16" fan in there before that was 3.5" thick and ran into clearance issues with the tensioner pulley when recently installing A/C. Now I have a SPAL fan that is ~2.5" thick and have ~7/8" of clearance. I have a Champion 3-row radiator that measures 2.75" at the top, but the core is inset from the edge of the end tank by about 3/8" and my fan is just flat up against the core (no shroud.) *edit* Just looked, and if you have a Champion 4-row for your 240z, you should have ~.3" less clearance than I do.
-
You don't have AC though, right? How thick are the altima fans at the motor? I had a fan that was 3.5" thick at the motor and had to go to a thinner one because it interfered with my AC pulley.
-
Do you know if there are plans to offer a gauge in larger sizes?
-
That looks really good. It looks like 280z dashes should be available in the summer as well.
-
Push button start with ACC toggle, Need edumacation!
Namor replied to Jboogsthethug's topic in Ignition and Electrical
No problem, as long as you learned something through the process. -
Push button start with ACC toggle, Need edumacation!
Namor replied to Jboogsthethug's topic in Ignition and Electrical
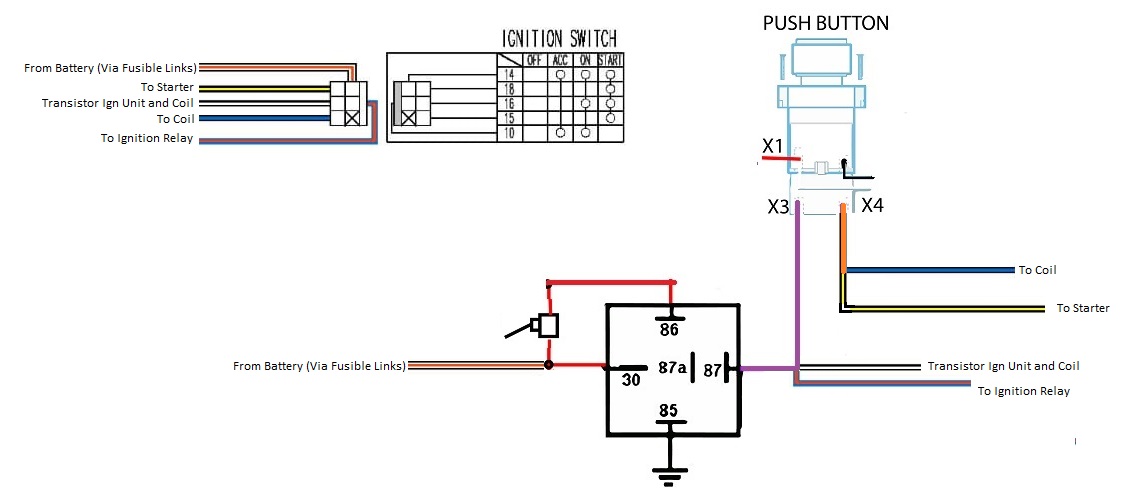
Are the grounds on the toggle switches just to light them up? The second toggle isn't really needed. Just run those wires directly to terminal 87 on the relay. (and as you figured out, not 87A) It wouldn't hurt anything to have the second toggle though but the only benefit I could see is being able to shut the engine off while keeping the relay powered (if you have other loads also powered off this relay) The coil does need to come off before the pushbutton (so terminal 87 of relay) but the stock wiring had two wires that went to the coil/resistor. One was energized while running AND starting (so the equivalent of before the button) and the other was energized only while starting (so the equivalent of after the button.) The one I labeled "to coil" above, was the latter. The other I labeled "Transistor Ign Unit and Coil" -
Push button start with ACC toggle, Need edumacation!
Namor replied to Jboogsthethug's topic in Ignition and Electrical
The relay is energized via the toggle. That applies power to the output of the relay (Terminal 87). This would essentially be your accessory power as well as power to the coil via ignition relay. This power is stopped from going to the starter solenoid and starting wire to the coil/resistor by the push button. When you push the button those are both energized, allowing the starter to turn the engine over and fire. I have gone megasquirt, so I am not sure why it needs a second wire to the coil for starting, but I think it might be to create a hotter spark while starting. If the toggle switch can handle enough current, you could technically just eliminate the relay in the diagram above and hook the toggle up to the wires that are shown going to terminals 30 and 87 of the relay. Without knowing what was done to your existing wiring, I'm not sure anyone will be able to really help you. As for the switch, X3 to X4 appears to be a normally open contact, which is what you need. I don't know what X1/X2 is, but you shouldn't need it and unless it is used to illuminate the switch, you definitely do not want to put power and ground across it. You should definitely read up on dc circuits though, you are asking questions about some very basic concepts that I would expect anyone to know if they are messing with the wiring in their car. -
Push button start with ACC toggle, Need edumacation!
Namor replied to Jboogsthethug's topic in Ignition and Electrical
That's exactly how it works. I guess the only thing I failed to notice is that the line I have labeled going to Ignition relay would still be connected during starting. On a 77 this would just mean that the radio, air conditioning and wipe would still have power during cranking, whereas it cut power to them from the factory during cranking. -
Push button start with ACC toggle, Need edumacation!
Namor replied to Jboogsthethug's topic in Ignition and Electrical
Here is a diagram using the wires that go to the stock ignition switch (I used a diagram for a 77, so your wire colors from the stock harness might not match up). This is the least intrusive way to accomplish what you want. If you have messed with more of your stock wiring, you may need to do some things differently though.
-
I think that was just a way he had it explained to him that kind of helps understand, I don't think he was truly advocating that it is scientifically accurate. A lot of guys find ways to understand why things do what they do without getting overly complex.
-
It is for the fuel warning light and I would guess that any generic capacitive level sensor would work.
-
What type of info are you looking for? You haven't said what platform, (S30, S130, etc) or use. You are likely to get more information if you give people a better starting point from which to answer your request. Here is something to maybe get you started. Try contacting the people who have done it directly with your questions.
-
Nope, that's basically it. However, as long as the wastegate can flow enough to perform it's function of controlling boost pressure, then how it is mounted doesn't really matter. Also, you could make up for a sub-optimal mounting position by upping your wastegate size.
-
Vibrant uploaded this to their Youtube page today. I hate Richard Rawlings, but I have to admit that I love this car. The only thing I am undecided on is whether I would prefer a rear bumper on the car or not.
-
Rotating it would seem to make sense if you can determine the proper spacing and alter the mount tab. Alternatively you could attempt to find the proper sleeve according to this link http://czot.org/forum/showthread.php?1760-Speed-Pinion-Gear-and-Housing-Combinations-(-70-78-240-260-280Z) ( Sleeve Assembly (16 tooth-19 tooth)PN 32707-78000 ) http://nissan.dealerdirectparts.com/Nissan-Part-number-32707-78000-p/32707-78000.htm
-
280Z flat rear floor, aftermarket fuel cell ideas?
Namor replied to Fat Dahry's topic in S30 Series - 240z, 260z, 280z
I cut out the spare tire well in my car and put a removable cover. I did this to facilitate the installation of a new universal gas tank. It is going to take some fabrication to finish what the previous owner started. Post up some pictures of your current situation and what you desired outcome / usage will be and then people can make recommendations.