ls240z Posted May 7, 2013 Share Posted May 7, 2013 This is my first Z car, a 1978 280z, which I bought last summer from a guy in Los Angeles. S30's are rare up here in Canada, and I like to have things that are different. I wanted to find a S30 with minimal rust and living in Canada pretty much guarantees otherwise. I scoured craigslist everyday and emailed a potential seller. Plan was to fly down to LA and drive up the coast, making for a nice vacation. I landed in LA, and was in contact with the seller. He started to take a real long time to respond over the next 2 days, then stopped answering all together. I was really nervous about not finding a car, and didn't want to waste the trip by buying a ticket home. Last minute, I emailed another seller and he responded just before I was leaving to the airport. It wasn't a 240z (like I wanted, hence the username), but it would get the job done. I was so excited once I hit the freeway and headed home. Driving through the interior of California during a heat wave and no a/c is something I hope I never have to endure again. I got home and basically parked the car until this spring, I was too busy working and winter is too cold to work outside. This is going to be a long running project and things might change a little, but these are my inital plans for this project: Body: 240z front and rear bumper conversion 240z tail light conversion ZG flares New paint Fix hole in passenger side floor/other spots I haven't found yet Sandblast chassis and new undercoat Interior: Restored dash Roll bar Aftermarket seats Gauges Alcantara and fresh plastic panels Drivetrain: LS2/LS3 engine T56 transmission 5 lug conversion Rear disc conversion* Wheels/Suspension: 16" Diamond Racing wheels 17" CCW wheels (when I can afford them) Coilovers (not sure which direction to go yet) *The P.O. has Toyota 4x4 front brakes installed and I have, in searching HybridZ, found the overly biased front to be an issue. Still not sure on which route to take here. The P.O. had a 5 speed put in and swapped FI for triple Webers. This engine sounds great. I started to tear apart the interior, just to see what I was dealing with. Carpet was coming apart almost everywhere, so it's trashed. Front seats are in pretty good condition. Center console is trash, door panels need work or might get replaced. Found a hole, was hoping for none. Oh well. Not sure if I have to replace the whole pan or what. The wiring for the stereo was a disaster, so many wires ending in random places. Some wires were cut off at both ends, but just left hanging with the rest of the harness by zip ties. Removed all but the factory wiring. Driver side pan looks better. After pulling most of the interior. That carpet was glued down by some rank stuff, it was a pain in the ass to pull and made a huge mess of the interior. Not sure why the install of this MSA kit was so ghetto, but it looks pretty bad. Going to pull the body kit off and run the 240z bumpers with a front valence and flares. That's as far as I got in one day, next up is to finish the interior removal of the dash, headliner, etc. After that, engine and tranny removal. This is my first project car, but I've worked on quite a few vehicles and I'm comfortable with doing almost anything. Any insight/advice I get from the knowledgeable members on this forum is greatly appreciated! Quote Link to comment Share on other sites More sharing options...
Domzs Posted May 7, 2013 Share Posted May 7, 2013 Car looks pretty good . Spend some money on the back half of the car , like diff. and CV conversion if you are planning on the T56 . It loves rearends and halfshafts . LOL . Hope you know how to weld and own a welder . This project involves a lot of fab. , cutting and welding . Quote Link to comment Share on other sites More sharing options...
ls240z Posted May 8, 2013 Author Share Posted May 8, 2013 Yeah, all the rear end stuff (CV's, LCA's, braces, OS Giken LSD, etc.) I'm planning on doing, just didn't feel like making my first post any longer with all the details haha. I have a welder, haven't gotten too much practice with it, now I have an excuse. Quote Link to comment Share on other sites More sharing options...
Domzs Posted May 8, 2013 Share Posted May 8, 2013 My advice to you is to get the car running and driving as soon as you can and then work on the other areas . You don't want to have a 10 yrs project sitting in your garage . Best way to learn how to weld is by doing it , hope it's a MIG . Quote Link to comment Share on other sites More sharing options...
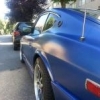
ls240z Posted May 8, 2013 Author Share Posted May 8, 2013 Got a little more work done yesterday, tried finishing up the interior. Pulled the dash cap, so much worse than I was expecting. Pretty much non salvageable. Pulled out the old security system/power locks. A lot of lazy man's solder: electrical tape. I hate that shit, my fingers are stained black from the melted adhesive. At least I have it back to completely stock wiring now. Dash out! That thing is pretty damn heavy. I'll have to go back and weigh all these pieces. Today I hope to tackle the rest of the HVAC and get the engine ready to pull. Here's an exterior shot of the Z. Quote Link to comment Share on other sites More sharing options...
ls240z Posted May 8, 2013 Author Share Posted May 8, 2013 My advice to you is to get the car running and driving as soon as you can and then work on the other areas . You don't want to have a 10 yrs project sitting in your garage . Best way to learn how to weld is by doing it , hope it's a MIG . That's the plan; all go, no show (for the beginning) haha. I want to get it on the road as soon as possible, but I won't sacrifice build quality to do so. It's a MIG, but I have a lead on a decent priced TIG unit I might pick up also. Quote Link to comment Share on other sites More sharing options...
ls240z Posted May 12, 2013 Author Share Posted May 12, 2013 (edited) Pulled the rest of the HVAC yesterday and got ready for pulling the motor/tranny She was pretty gross down under. A lot of work to do. It was nice using the tractor to pull everything out. So easy, even by myself. All empty! Going to remove anything out of the engine bay I don't need and clean everything up tomorrow. Also, I'm going to drop the fuel tank and maybe tackle the diff. Edited May 12, 2013 by ls240z Quote Link to comment Share on other sites More sharing options...
Domzs Posted May 12, 2013 Share Posted May 12, 2013 That's another way of pulling the engine and trans. . LOL . Need to get me a tractor , probably faster and less work . Quote Link to comment Share on other sites More sharing options...
Mikelly Posted May 12, 2013 Share Posted May 12, 2013 Goog luck with your build. As Domzs said, get it in running order soonest and then tackle the suspension/brakes/driveline stuff in stages. My biggest problem in my extensive build over the 10 years was the ease of getting distracted with other cars I could grab the keys and take for a drive. Get it running and enjoy it!! Mike Quote Link to comment Share on other sites More sharing options...
ls240z Posted May 12, 2013 Author Share Posted May 12, 2013 That's another way of pulling the engine and trans. . LOL . Need to get me a tractor , probably faster and less work . Haha it makes life easier for everything, pulling engines and no more hand mowing or rototilling the yard. Goog luck with your build. As Domzs said, get it in running order soonest and then tackle the suspension/brakes/driveline stuff in stages. My biggest problem in my extensive build over the 10 years was the ease of getting distracted with other cars I could grab the keys and take for a drive. Get it running and enjoy it!! Mike Thanks Mike, I'll keep that in mind. If I had a GT3 in my garage, I'd probably get distracted too haha. Quote Link to comment Share on other sites More sharing options...
RebekahsZ Posted May 12, 2013 Share Posted May 12, 2013 I'm with Mike-get the motor swapped, then start the endless "while you are at it-s." That is what kills these projects. Get the motor in and take apart as little as possible. Love the tractor for pulling a motor-awesome! Quote Link to comment Share on other sites More sharing options...
ls240z Posted June 14, 2013 Author Share Posted June 14, 2013 I know it's been a while since I've last updated but I've been crazy busy with work. On top of that, I've been waiting for my TIG welder to come in so I can start on my rotisserie. All I've done since the last update is cut out the spare tire well in preparation for building the fuel cell cage. Also, on a minor note, I removed as much sound deadening as I could with just a small scraper. Dry ice is coming in the future. I also weighed all my interior pieces for reference, not sure if anyone is interested but I could post if someone wants them. I did notice the P.O. must have been rear ended, seeing as the tail light body panel metal is wrinkled and lower braces are smooshed in. The floor isn't an issue, seeing as I'll be putting in an aluminum panel around the fuel cell, but I'm thinking I'll cut out the lower brace and weld in a new piece of metal. Does that seem legit? Should I leave the tail light area as it will be covered? Quote Link to comment Share on other sites More sharing options...
ls240z Posted June 20, 2013 Author Share Posted June 20, 2013 Still waiting on my welder to show up, so I worked on a couple little things: ground down what was left of the brackets I cut out of the engine bay. Now to fill the excess holes once I get my welder... Also cleaned up the area for where I'm mounting my fuel cell cage. Just got to go buy 20' or so of square tubing and start cutting. Quote Link to comment Share on other sites More sharing options...
ls240z Posted July 23, 2014 Author Share Posted July 23, 2014 Well it's been a year since I've seen my car, I've been travelling the world since last July. I've been all over Europe, including the Nurburgring, where I drove a lap in a supercharged Lotus Exige. Next was Thailand, Australia, New Zealand, and Brazil. I've had a lot of free time to think about what I'm going to do with this build and I'm excited to get started. Now it comes down to money, as you use a lot when you travel for a year. I'll be able to do a little here and there, but first things first I'll be ordering and installing new floor panels and frame rails and doing rust repair. I hope to keep this thread updated constantly, that means I'll be working on the car constantly! Quote Link to comment Share on other sites More sharing options...
Domzs Posted July 23, 2014 Share Posted July 23, 2014 I love pictures . I took a lot of pictures of my S30 build . Unfortunately , I didn't with my S130 build ( it took only 3 weekends to get it on the road ) . So take pictures of the area that you are working on , if you need dimensions , use measure tape(s) when taking pictures . You can look at the pictures on your down time to make your plan . Sometimes it's easier to see or figure out problems when you look at them on your computer screen . Keep at it . Quote Link to comment Share on other sites More sharing options...
socorob Posted July 23, 2014 Share Posted July 23, 2014 That's another way of pulling the engine and trans. . LOL . Need to get me a tractor , probably faster and less work . I removed the L28 and reinstalled the LS1 with a forklift. Much faster than an engine lift. Quote Link to comment Share on other sites More sharing options...
ls240z Posted July 23, 2014 Author Share Posted July 23, 2014 All my previous pictures were taken with my phone, but I'm going to use my DSLR from now on. Much better quality photos. Plus I don't care anymore if I get it dirty haha. I removed the L28 and reinstalled the LS1 with a forklift. Much faster than an engine lift. A forklift would work amazing, the tractor was a bit twitchy trying to make such precise maneuvers. Plus it has a much sharper turning radius. Quote Link to comment Share on other sites More sharing options...
socorob Posted July 25, 2014 Share Posted July 25, 2014 I lucked out on that both times. When I went to remove the engine my friend was there on his forklift and when i went to put it in same thing. Both times he volunteered. I was going to use the lift to do it as I hate messing with the cherry pickers. It was really nice that the forks could slide left and right a little. Quote Link to comment Share on other sites More sharing options...
Mikelly Posted July 27, 2014 Share Posted July 27, 2014 Glad to see you're back at it. Keep us posted... Quote Link to comment Share on other sites More sharing options...
RebekahsZ Posted July 27, 2014 Share Posted July 27, 2014 I looked back thru your thread and saw your cracked dash. When you get to that point, just cap that thing. I see lots of guys "fixing" cracked dashes. I'm sure they will crack again. My cap took a couple hours to install 20 years ago and I get compliments on my new dash all the time. Quote Link to comment Share on other sites More sharing options...
Recommended Posts
Join the conversation
You can post now and register later. If you have an account, sign in now to post with your account.