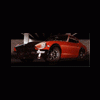
MOTORHEAD427 Posted September 28, 2007 Share Posted September 28, 2007 How To Color Your Z on PHOTOSHOP...A tutorial for absolute beginners... Hi there. I've been using Photoshop on a daily basis for over 15 years. I use Photoshop for work and for fun. I use Photoshop CS but any Photoshop newer than Photoshop 8 should do this kind of work just fine... Photoshop can become very complicated if you don't understand what it is based on: Understanding resolution, selections and layers. Resolution is the picture quality of your image. It`s measured by "Dots Per Inch. The number of DOTS(pixels) per every inch. More dots the better. Selections basically define your work area and layers are very much like the layers of an onion. Let's say you have a slice of onion with 8 layers. You want to mark something on each layer. What do you do? Photoshop layers work in a very similar way. You can create layers and you have to choose the layer you want to work on. You can place a layer on top of another or vice versa. You can delete them, you can cut them, you can remove from them or you can add to them. In this tutorial, I`ll try and show you the cleanest way to alter an image. But first, open Photoshop, open the picture you want to work on and then go to WINDOWS on top menu (Between VIEW and HELP) and turn off everything except: History Layers Channels Tools Swatches The rest, you do NOT need... First to do: You want a clear, nice quality picture. Go to IMAGE on top menu and find IMAGE SIZE. Think "Letter size" which is 8.5 x 11 in. You want your picture to fit on a letter size paper when you print it out. So change the WIDTH to about 10 in. Photoshop will adjust the height automatically, keeping the proportions. Change the resolution to 300 dpi. And click OK. Now to see the whole image go to: VIEW on top menu and click on FIT ON SCREEN. One last thing before you start working on your picture. You want to create a backup layer, just in case, by COPYING the layer you have: Hold down and drag the layer where the red arrow indicated. Congratulations, you've just learned how to copy a layer... You want to change the body color of the car. Not the background, not the trim, windows,nothing else. THE USE OF PEN TOOL and PENNING/CHANNELLING To do that the cleanest way possible, YOU HAVE TO USE THE PEN TOOL....There is no better way...Yes, there are other ways but they just are not that effective. Trust me on this. Here is where the pen tool is: I've used ZOOM tool (just press Z on your keyboard) to Zoom in to the picture. To see the whole image go to: VIEW on top menu and click on FIT ON SCREEN. PEN tool is NOT very easy to handle at first. It takes time to get used to it. PEN tool is used to create "curvy" selections the best way possible. With PEN tool you create ANCHOR POINTS linked to each other with lines. The easiest way to utilize the PEN tool is by using your LEFT MOUSE BUTTON to place anchor points one after another and holding down the CTRL(for PC) or APPLE/COMMAND Button(For MAC) to play with these anchor points. This takes patience and a little bit of experience. If you are patient, you should get used to it in no time!. Try this: Place your first anchor point where the bottom of the side mirror and the corner of the windshield trim connects. Place your second anchor point somewhere along the body line BUT!!! HOLD DOWN THE LEFT MOUSE BUTTON WHILE DRAGGING THE MOUSE TOWARDS LEFT!!! You will see that 2 antler thingies with dots at the end appeared on each side of your anchor point...Release the mouse button. Now, if you HOLD DOWN the CTRL key(You will see a tiny white cursor arrow), you can actually play with those antlers or the anchor point itself and see what happens. Sounds complicated, but you actually can get the feel of it by practicing this for an hour or less. This is what the PROS do...This is what we call "CHANNELLING". After you practice this PEN exercise for a while, when you feel comfortable with it, get back to your picture. And start PENNING/CHANNELLING the entire car minus tires. Finish it where you first started it. You will see that all anchor points disappeared. (They will reappear if you click on the solid line, holding down the control. In order to work on a specific area in Photoshop, that area should be in a "SELECTION". To turn the area you've just channelled, simply click right mouse button and go to "MAKE SELECTION" Now you have a selection. One problem though. Everything, windows, mirrors, bumpers etc are also in that selection...You don't want to mess with those...You just want to change the color of the body...for now... Don't panic...and SAVE YOUR SELECTION for later use... To do that, go to SELECT on top menu and choose SAVE SELECTION This box will appear so, if you want to, you can name that selection: Now go to CHANNELS and click on the channel you just saved...It looks like this: You'll also notice that, after you saved it, your selection indicators(blinking tiny dots) have disappeared. Don't worry. To turn your CHANNEL into a selection is easy: Just hold down the channel and drag it to where the red arrow indicates and release it....It became a selection. To see your picture, click on RGB channel (The top channel) To DESELECT, go to SELECT on top menu and choose DESELECT. Link to comment Share on other sites More sharing options...
MOTORHEAD427 Posted September 28, 2007 Author Share Posted September 28, 2007 Now it's time CHANNEL again!. This time you want to separate everything that is not a part of the body. Headlights, grill, windows etc... When you're done, just like before, right click and choose MAKE SELECTION You'll see what you selected: And then, save the selection just like before by going to the SELECT on top menu and choosing SAVE SELECTION Same NAME box will appear...You can name you SELECTION/CHANNEL this way. Click on the CHANNEL which you just created and saved and you will se this: Congratulations...You've just completed the toughest part...The rest is very very easy... Link to comment Share on other sites More sharing options...
MOTORHEAD427 Posted September 28, 2007 Author Share Posted September 28, 2007 Ooops...It appears I forgot the bumper!!! No big deal...Do whatever you've done before and channel the bumper with the PEN tool, When you're done, right mouse click, choose make selection, go to SELECT on top menu and choose SAVE SELECTION...Very simple... Here it is... Now you have 3 channels...3 different selections... As I said in the beginning, in order to use Photoshop in the most effective way possible, you have to understand selections and their capabilities. Right now you have selections and you actually can alter these selections. You can merge different selections or you can remove one selection from another. In this case, you want to remove the "headlights, trim, windows etc" selection and the "bumper" selection from "The Whole Car" selection. Very easy...Here's what you do: 1- Hold down the "The Whole Car" channel and drag it to where the red arrow indicates and release it to turn it into a selection...(Another way is a single left mouse button click on the channel name box while holding down the CTRL (PC)key or Apple ( MAC)key...It became a selection... 2- To remove the contents of the second from the first one: Same thing but this time, you should ALSO HOLD DOWN THE ALT KEY! 3-Do exactly the same thing with the "BUMPER" channel: 4-If you want to make sure you have the BODY as a selection, click on RGB channel to see the photo: 5-You know how to save this selection as a new channel...You've already done it 3 times... And this is what you get... Don't forget to SAVE your file often...As a matter of fact just save it NOW!!! Link to comment Share on other sites More sharing options...
MOTORHEAD427 Posted September 28, 2007 Author Share Posted September 28, 2007 Finally...The fun part begins... You have the BODY selected...You can see the blinkin selection indicators... Go to IMAGE on top menu and choose ADJUSTMENTS and DESATURATE Your selection area became BLACK&WHITE...This is necessary to achieve the best coloring result...Trust me on this... Now, go back to IMAGE on top menu, again, choose ADJUSTMENTS and HUE/SATURATION... A control box will magically appear out of nowhere: Click on COLORIZE option as indicated. You will see that your selection gained some color. The rest is up to you. What you do now is, playing with HUE, SATURATION and if necessary LIGHT... Until you got what you wanted... This is the color I chose: Click OK. and DESELECT: It's up to you to stop right there...But, if you think the car needs a glossy black hood, you know what to do... Back to the PEN tool and channelling. Until you turn the hood into a separate selection/channel...Just like you've done it before...Right about now you probably feel a little more comfortable with the whole process of using the pen tool and creating channels... Here's the hood... Turn the hood channel into a selection the way I showed you earlier and go to IMAGE on top menu and choose ADJUSTMENTS and DESATURATE...It became BLACK&WHITE... but...You want it to look glossy...So what do you do? Simple...You need to adjust LEVELS... LEVELS are located under IMAGE on top menu: When you adjust the levels the way I did, this is what the hood should look like: Click OK... The GLOSSY surface on a car, in this case the hood, should reflect the blue sky...So it needs a little bit of shade of blue...Easy... Go to IMAGE on top menu and choose COLOR BALANCE under ADJUSTMENTS The COLOR BALANCE control box will appear... Add a little bit of BLUE and a little bit of CYAN: Et Voila!...Deselect, save, print out.... Congratulations...You are now one step closer to become a Photoshop master... Link to comment Share on other sites More sharing options...
MOTORHEAD427 Posted September 28, 2007 Author Share Posted September 28, 2007 This is not very easy... It requires practice... You have to practice until you feel comfortable using the mouse... You have the practice using the damn pen tool!... This is how most Photoshop pros work...Creating channels, saving selections, playing with those selections, whatever I showed you... Please print these out. And try to repeat every step the way I did it. Some of you use Photoshop and they might object to the way I do it... There are many ways of creating selections. But, trust me on this, this is by far the most professional way... I skipped some of the steps which I follow usualy because I didn`t want to confuse you just yet. There are many more tricks and applications I will show you in the future if our Admins will allow me. I've created this tutorial because I felt it was necessary. A lot of people here want to be able to make their car pictures look better. I hope I was helpful... To make life easier, there are some HOT KEYS/Shortcuts to memorize... CTRL for PC and APPLE/COMMAND for MAC CTRL+Z = UNDO (Hold down CTRL and Z at the same time...duh!) CTRL+Alt+Z = UNDO One more time (Try and see what I mean) CTRL+D = DESELECT CTRL+ENTER = MAKE SELECTION When you are finished using the PEN tool. CTRL+L = LEVELS CTRL+B + COLOR BALANCE TAB Key = To hide all the menus and bring them back. Z = ZOOM P = PEN Tool While using the pen tool, if you want to start from the beginning and get rid of everything you've done all the anchor points, hit ESC key a couple times... Once you have a selection or not, you have ALMOST everything you need to enhance/alter a picture, under ADJUSTMENTS under IMAGE on top menu...Play with them... Be patient, don't get frustrated and take your time...Explore as much as you can. Photoshop HELP (on top menu) is qute useful...Try it... Other than that, if you have any questions, just ask... Thanks AZIZA Z for the picture... ERIC Link to comment Share on other sites More sharing options...
DavyZ Posted September 28, 2007 Share Posted September 28, 2007 This is the best primer for Photoshop I have yet seen---excellent! Thanks for posting this!!! I took care of the editing. Davy EDIT: Moved to the Body & Paint forum to "sticky" where this will do the most good and would be most applicable. I felt that Misc Tech or Non Tech would be less relevant for such a useful thread. Link to comment Share on other sites More sharing options...
dat240zg Posted September 28, 2007 Share Posted September 28, 2007 Man, that was great! Thanks for the good lesson. I've been wanting to learn ever since I started to mess with paint colors. On the side, it looks like the majority of the lesson is true for Fireworks (the program) as well. Bryan Link to comment Share on other sites More sharing options...
SilentNight1647 Posted September 28, 2007 Share Posted September 28, 2007 This mighty cool man thanks for the time you took to post this, I attempted to do my ZX but it didn't come out near as good as yours. Thanks again it's really cool to be able to do this now, I will finally be able to have my cars in whatever color I want. Link to comment Share on other sites More sharing options...
MOTORHEAD427 Posted September 28, 2007 Author Share Posted September 28, 2007 Thanks guys. I'm glad you enjoyed it. As I said before, it does take getting used to, especially the PEN tool but once you get the hang of it, you can do anything on Photoshop. It all starts with a decent quality picture just like the one I used. I will give you examples to good photos and "useless" photos in the future. Feel free to ask questions and please practice, practice, practice!!! I wish there was a separate forum for miscellaneous photography and computer generated images...I believe, we need one...I could share with you a lot more than this... ERIC Link to comment Share on other sites More sharing options...
tfreer85 Posted September 28, 2007 Share Posted September 28, 2007 Very cool, now I can learn the "proper" to change the color. This is one I did of Austin's (240hoke) z with a front bumper from a Porsche. Very amateur but I had fun with it. Thanks for taking your time to give the tutorial write up! Tyson Link to comment Share on other sites More sharing options...
MOTORHEAD427 Posted September 29, 2007 Author Share Posted September 29, 2007 Tyson, that's quite good. It will look even better if you lower the saturation of the body color-not the hood- and add some shadow on the ground right under the bumper and tires... Did you use the pen tool? ERIC Link to comment Share on other sites More sharing options...
skib Posted October 5, 2007 Share Posted October 5, 2007 wow, this is a great photoshop tutorial. i use photoshop and illustrator fairly often as well and to anyone not to familiar with photoshop, work on the pen tool a lot, its a pain at first but when you learn to use it things are a lot easier. Link to comment Share on other sites More sharing options...
JSM Posted October 16, 2007 Share Posted October 16, 2007 What are the big differences in Photoshop 7? I have a copy at home is the reason I ask. Link to comment Share on other sites More sharing options...
MOTORHEAD427 Posted October 18, 2007 Author Share Posted October 18, 2007 What are the big differences in Photoshop 7? I have a copy at home is the reason I ask. For this kind of work, Photoshop 7 should get the job done. I used 7,a few years ago. I can't remember if it had the "history" option and some other stuff-certain effects etc. Just to change color and other simple stuff, 7 should be more than enough... Link to comment Share on other sites More sharing options...
EvilC Posted October 22, 2007 Share Posted October 22, 2007 Very cool, now I can learn the "proper" to change the color. This is one I did of Austin's (240hoke) z with a front bumper from a Porsche. Very amateur but I had fun with it. Thanks for taking your time to give the tutorial write up! Tyson I love that front end look!!!!!!!!!!!!!!!!!!! Link to comment Share on other sites More sharing options...
tfreer85 Posted October 22, 2007 Share Posted October 22, 2007 Thanks EvilC, its from a Porsche actually... and of course I can't find my original for the comparison. Here's the original: Motorhead iirc its a combination of the Fill and paint brush tool, something you might enjoy checking out is PS-garage.com its where I did this the first time. Link to comment Share on other sites More sharing options...
Adam393 Posted October 23, 2007 Share Posted October 23, 2007 Great write up, ive been trying to figure out how to do this forever! Link to comment Share on other sites More sharing options...
rbpowered280z Posted November 2, 2007 Share Posted November 2, 2007 Very cool, now I can learn the "proper" to change the color. This is one I did of Austin's (240hoke) z with a front bumper from a Porsche. Very amateur but I had fun with it. Thanks for taking your time to give the tutorial write up! Tyson i just got a boner. i was thinking something along those lines, but about 1' wider on each side! peace Link to comment Share on other sites More sharing options...
MOTORHEAD427 Posted March 4, 2008 Author Share Posted March 4, 2008 I made a mistake...Picture belongs to Auxilary not Aziza Z... Thanks Auxilary.... Any photoshop questions?...Just post your questions here... Link to comment Share on other sites More sharing options...
TrumpetRhapsody Posted March 4, 2008 Share Posted March 4, 2008 Wow, I don't have time to read this thread now, but this will undoubtedly be useful. I'm an amateur/average photoshop user, and I'll admit I had a rough time altering the color of a dull yellow Z about a month or two ago. I'll have to give this a try when I get some spare time. Cool stuff! Link to comment Share on other sites More sharing options...
Recommended Posts