

zgeezer
-
Posts
772 -
Joined
-
Last visited
-
Days Won
3
Content Type
Profiles
Forums
Blogs
Events
Gallery
Downloads
Store
Posts posted by zgeezer
-
-
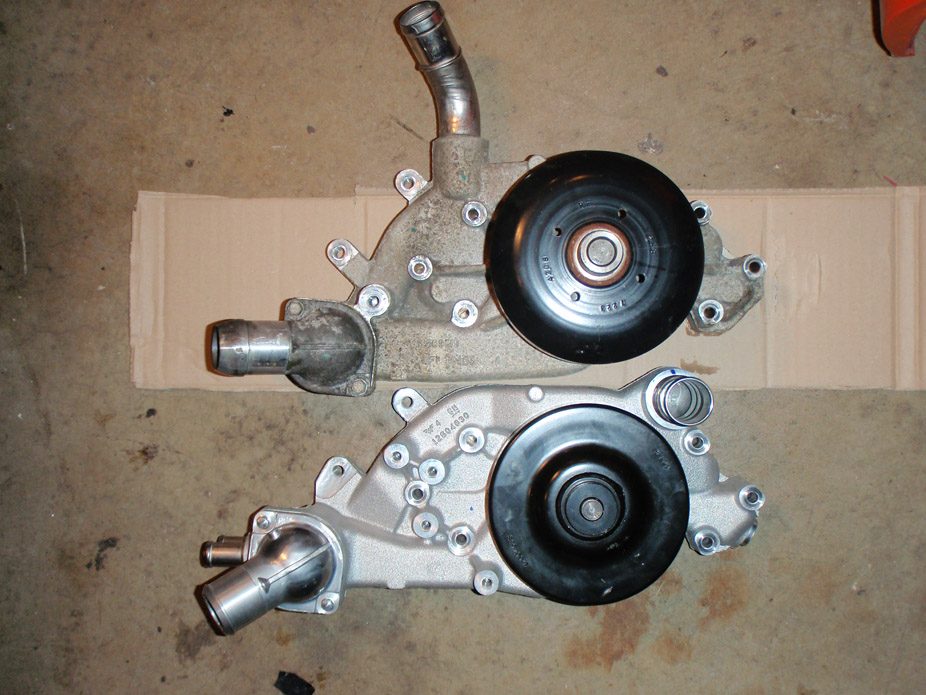
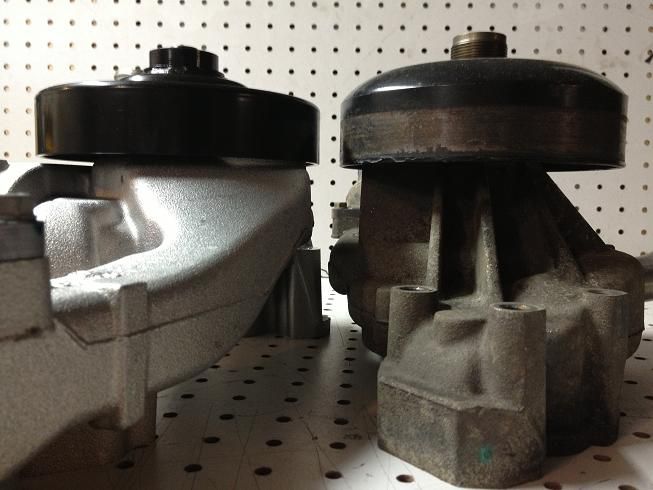
I've received my water pump and compared it to a pump off a LS3 crate motor. They are the same as to the radiator connections as both have driver's side horizontal piping. The Camaro pump is spaced about .75 inch forward. The original truck pump mounted very close to the engine block and the pump "snout" that supported the pulley and mechanical fan was spaced forward. The Camaro pump uses the same pulley as the LS3 crate engine, but the entire pump stands away from the engine block. Truck water pump spacers used to mount passenger car pumps give the same effect. I'll mount photos if I can figure out how to reduce a very large file down to something less than one megabyte in size.
LS1tech forums state that the straight thermostat cover from 1998-2000 Ford Windstar 3.8 v6 will bolt to a later Gen III water pump. Don't know if the GEN III thermostat would fit; but one would think the Ford 'stat might work.
Z
-
It appears from posts on LS1tech.com that the water pump from a 2010 Camaro with the 6.2 l engine uses the same offset from the block as do the LM7 and LQ4 iron block truck engines. Moreover, the water "pipe" is horizontal and located low on the driver's side. http://www.ls1tech.com/forums/attachments/conversions-hybrids/267367d1291698554-lq4-into-3rd-gen-1972-nova-21.jpg and
http://i228.photobucket.com/albums/ee208/modi_photos/WaterPump003x_zps6632715f.jpg .
The advantage for me is the ability to convert to an LS1 alternator location and still use the truck 135 amp alternator and an straighter radiator hose route.
While my local Chevrolet agency will sell this at retail for around $800 or my first born and first choice on my Redbone bitch's next litter, take out's are listed at McKindrick's Racing and Ebay. Apparently, it is only on the 6.2 L option of 2010 and up Camaros. LS 3 water pumps from other vehicles appear not to have the same offset and the water pipe is located on the passenger side of the pump pulley.
I've order one for my swap and if it does not fit as advertised, I'll post the bad news here.
G
-
Hey guys,
So I have done some reading and research and I am very surprised to find nothing on this topic.
I am about to start assembling my lq4 based 408 stroker.
The front timing cover I have on this motor is from the stock lq4. The car I am swapping it into is a 73 240z and I do not want the car to have power steering or ac. Does anybody know of a front accessory drive combo, with part numbers, that will mount to my motor, place the alternator in the f body position, and will work with the lq4 front timing cover? Any issues with the F body mounting position.
Thanks
If all you want is to run the alternator in the F body position on a truck then simply buy a LS1 F body alternator bracket and mount it on your block. Your iron block should have a flat boss that you will drill and tap. You will need to cut a spacer to make up the difference between truck and passenger car crank/water pump pully. I used scrap AL flat plate. Advantage is that the longer 135 Amp truck alternator will clear the Z motor mounts.. The spacer would be .50 or .75 inches. This modification is covered somewhere on HybridZ. You do have to buy 2 longer shoulder bolts with allen heads to clear the serpentine belt. You, of course, remove and sell the truck p/s & alternator mount.
-
Short story is I have a set of aftermarket s31 4 lug wheels [6.5 x 15 +38 offset] i wish to mount on my early s30. I have a set of 280z hubs and a non-turbo 4 lug 300zx. Both hubs have an offset different from my 240Z hubs.
I understand that the non-turbo 300zx has a .75 inch offset over the stock 240z. However, the aftermarket wheels [Fittipaldi] I pulled of a non-turbo 300zx have "ET 38" cast into the hub. I understand ET38 is a +38mm [1.5 inches] offset.
Is there any advantage to using the 300zx hubs or can I simply purchase wheel adaptors that are 1.5 inches thick? The plan would be to mount 205/215 x 65 x15 tires on these wheels.
This is not a race car; but, it does have a mild 6 L GenIII truck engine. Are wheel adaptors that thick safe to drive?
G
-
Not to mention the direct injection fuel system and OBD-II powertrain - you can't exactly slap someone else's EFI or a carb onto this...
My brother has fitted a 3.7 V6 into a '62 Falcon. It is a crowd: very tall and wide. He had to remove the strut towers and go with Mustang II front assembly. His biggest issue at the moment is sourcing a loom for engine management, transmission management, and electronic throttle. The after-market hasn't caught up with the popularity of this engine and the wrecking lots won't break one up for sale. Ford has NEVER made it easy on the DIY engine swapper: they just seem to package and market their engines with an eye toward discouraging anyone without excellent fabrication skills and a deep pocket from swapping them. The Windsor and flathead appear to be the only engine families that Ford stuck with for the long haul. Well, maybe the OHC fours (Turbo Mustang/Thunderbirds and such) had a good run.
g
-
A shot of the whole back cover would be the easiest way for me to identify the diff. Based off of the shift or the offset, I'm pretty sure that is an R200. The offset of the R180 is pretty minimal.
I would turn the driveshaft a good 40 times and count how many times the wheel turns turns, unless you have a welded or lsd rear end. The ratio should be 3-4.3 driveshaft turns to 1 wheel rotation.
A 2 to 1 sounds a bit too far off, that would mean a theoretical top speed of like 250mph with a 4 speed. I remember someone saying the theorhetical is ludicrously around 200mph for US spec 240z at redline in top gear with stock tires, so 2:1 doesnt seem right
I agree, it is an R200. My junk yard experience is that if you lock down one wheel, rotate the other, and count pinion/drive shaft rotations and multiply that number by 2 will give you a ball park figure. Your's is probably a 3:9. The only real way to determine ratio is to pull the cover, rotate the crown gear until the numbers appear: the small # will be the number of teeth on the pinion; the larger # is the tooth count for the crown gear. Do the math. G
-
Just disassembled and inspected my spare open 3.70 diff, retorqued ring gear and carrier yoke bolts with red locktite, installed new cover gasket. All to help "loan" it to my buddy to get my competition's 280z back on the track. Hope to press in some new u-joints for him tomorrow night. Don't you guys wanna come race (?)-I'll even fix your cars! Love a close race.
I look forward to reading about your progress. Have you considered changing out the 3.70 for a 3.54 or 3.36? Here's a a post and several replies off of ls1tech.com regarding 2:7?:1 r&p in comparison to 3:73 and such. Scroll down to about post #22-24 for time and e.t. comparisons. Look here.http://ls1tech.com/forums/gears-axles/3260-considering-going-3-73-gears-2-73s-crazy.html
g
-
Add me to the list. I need lens and rings. Please post prices when you are ready.
-
As Post #10 pointed out, this has been covered before, I was being tangentially-polite in my prior contributions.
Having your head on a swivel, and learning to DRIVE your car is the BEST safety YOU can provide for yourself.
If you depend on a mechanical device to provide your safety, it will fail, and you WILL be disappointed.
To a man, almost everybody I have talked to after an accident can review something in their driving they could have done leading up to the accident, to have avoided or lessened it's impact to a great degree.
EVERYBODY needs to learn to drive in a 1960's VW Microbus. You learn patience. You learn NOT to tailgate. You realize it's YOUR legs hanging out there between nothing, and the most substantial axle beam on the planet, and you rearend someone....you better reach enlightenment and levitate in the Lotus Position BUT QUICK if you want to keep your legs attached.
Everybody thought hippies were into Eastern Religion for esoteric reasons, I can attest, you did it as 'accident mitigation' training driving to and from The Dead concerts!
Tony, a DeadHead? Who would''a guessed? He's dead right about those VW Micobuses and your legs. Even mounting a spare tire up front would be of no avail.
-
I think Tony is on to something. Afterall centrifugal pumps work by spinning water or air out to the side. But, there are several modern modifications to the exhaust system that are guaranteed to cure both the resonance and fume issues our S30's are plagued with. Tony, would you look at this modification and give us some estimate ot the power and torque increases one might see on the dyno: Look here http://kalecoauto.com/index.php?main_page=product_info&cPath=11&products_id=41&zenid=9ehs7jle2c2pvk9sii32oiln83
-
The problem is I can not find an oil seal that fits one of my hubs.
Here are the parts I have.
- two pair of 240Z hubs.... scalloped, 4 x 114.5 lugs.
- one 280 hub....... round, 4.114.5 lug spacing, with cast number on hub flange "76".
- one unknown [but thought to be a 280z) hub with no number cast on the hub flange.
Visually, hubs 1, 2, & 3 are the same offset.. that is the wheel mounting flange all measure the same height off a flat table.
I have rebuilt Hub # 2 with inner and outer bearing and oil seals from the local parts house. The part numbers for bearings and seal are the same for 240, 260, and 280Z. This hub works.
Hub #3, accepts the bearing [removed and pressed in the races]; but, the seal drops straight down and makes contact with the inner bearing. It can be removed simply by picking it out of the hub with a fingernail. This seal is the same part number as the seal I installed into hub #2. It fits properly into hubs #1.
I am reasonably certain the inner bearing race is installed properly into hub #3. It was pressed in using a bearing race tool and a light hammer.
According to my parts house the same bearings and seal service 240z, 260z, 280z and 300zx.
Please any comments are welcome. I've picked up all these hubs scavenging my local jy over the last few years and I have no real idea just what vehicle they came off. Except for the 240z hubs.
Do I have an "odd" hub or am I missing something really obvious. If necessary, I'll tear it all down and use the 240z hubs, but I'd prefer to save them for another project.
Sorry about no photos, but I've been able to post for a number of years, after the last software switch.
G
G
-
I bought a Harbor Freight large pressure blaster with deadman nozzle and used 30 grit dry sand from Home Depot. Blows sand all over kingdom come and then some. But, it removes bondo and leaves the body with a clean surface ready for primer... after body work of course. It does take time and sand will be in every crevice. But, other than time, the cost was less than $200.00.
g
-
I really am embarrassed.
So with that corrected, we are then comparing moments? As in Moment = Force x Radial Distance from rotational axis, where Force equals the area multiplied by line pressure, and the radial distance is the corrected radius of rotor - radius of piston.
So to calculate ratio Moments...
Front Bias = (Moment of Front / (Moment of Front + Moment of Rear)) x 100.
Rear Bias = (Moment of Rear/ (Moment of Front + Moment of Rear)) x 100.
Moment Toyota 4x4 front caliper = 2360mm^2 x Line pressure x (135.5mm-21.5mm) = 269040mm^3 x line pressure (in kg/mm^2)
Moment Toyota 4-runner = 2904mm^2 x Line pressure x (135.5mm-21.5mm) = 331056mm^3 x line pressure
Moment Nissan 280zx = 1452mm^2 x Line pressure x (142.5mm - 21.5mm) = 175692mm^3 x line pressure
Moment Nissan 240sx = 1134mm^2 x Line pressure x (142.5mm - 19mm) = 140049mm^3 x line pressure
The ratio removes line pressure from the equation assuming same line pressure goes to front and back (for our very simple calculation)
So we end up with biases of:
Toyota vented 4-runner and Nissan 240sx rear caliper setup
70%:30%
Toyota vented 4-runner and Nissan 280zx rear caliper setup
65%:35%
Toyota solid 4x4 and Nissan 240sx rear caliper setup
66%:34%
Toyota solid 4x4 and Nissan 280zx rear caliper setup
60.5%/39.5%
This would be my calculations using the slightly strange fact my rear rotors are larger than my fronts and using the stock z rotor for the front (not sure if the 4-runner guys run a different diameter, or if there is another size that most people run for the rear).
To calculate the actual braking force applied we would have to then start accounting for the leg pressure, master cylinder bore, mu of the tire, the radial distance from the rotational axis to the contact patch of the tire, and on and on, and factor in the weight shift of the car as one is braking and cornering, so this very brutal calculation is a very simple way of looking at comparable pad bites?
Well regardless, thank you very much Nigel for helping me fumble through all this math, I definitely need to pull out my physics books and brush up on them again.
This is really good stuff! Would run the math using stock s30 rotors and caliper with the 240sx caliper and the MM rear rotors? Thanks for the great read.
g
-
Shupee- This would be a bolt in too ! You would just need the basic MM or Checkered Flag adapters !
And, of course, Checker Flag axles or play with short Pathfinder axle and adapter.
g
-
Oh, I thought they all rode on the shaft. This would explain why the stock shaft I just removed required a lever to "pop", but didn't have a clip. I'll just have to probe that diff with a long finger and see what I find. Thanks for the tip.
G
-
Here's the set-up:
1. I have a 3:36 R200 with clsd and the additional clutches purchased from a Member.
2. The axles are CV from the same 300Z Turbo as the clsd.
3. MM early welded up cv adaptors.
What I did:
4. I purchased set of cv axles out of a Nissan Pathfinder.
5. Disassembled the Pathfinder axles and Disassembled the 300Z cv axles.
6. Reassembled the 300Z axles swapping the driver's side 300 cv axle to the passenger side
7. Reassembled the 300Z axle swapping in the shorter Pathfinder axle to the driver's side.
Reassembly using Cir Clip:
8. I noted that neither of my CV axles had cir-clips attached to the input shaft that is splined and cut for cir-clips ("input" shaft is that portion fitted into the differential). Not a problem, as the Pathfinder input shaft did have a cir clip. I removed that cir- clip and installed it on my Turbo axle input shaft. The fit was loose, but did not "hang down". There were small light marks on the Pathfinder cir-clip that correspond to the splines on my 300 cv input shaft.
The Problem:
9. The passenger side axle does not slid in and "click" as the cir-clip expands. It stops dead as the cir-clip begins to enter the spider gear. Light taps on the end of the axle with a dead hammer does not move the axle. If I remove the cir-clip the axle engages and moves all the way in.
My First Resolution:
10. I thought the Pathfinder cir-clip was not compressing or was not compatible with this assortment of R200 parts.
The Confusion:
11. Searching for Nissan cir-clips, I pulled the input shafts of two other long nose R200's in my garage. No cir-clips on any of the four. I then went to my favorite JY in search of 300Z. Found one 86 or so Turbo, R200 non-lsd. Pulled the passenger side axle..... NO CIR-CLIP. Ok, pulled the other side and, again, no cir-clip.
There is no doubt that each of these input shafts are machined for a cir-clip of some sort. The spider gears they fit into are also machined with a corresponding groove. So now, my questions are:
a. Did Nissan ship these cars without a cir-clip retaining the input shaft in the spider gear?
b. What is the effect of running these axles w/o cir-clips and
c. Where do I find cir-clips for this application?
I might add that cir-clip or none, the input shafts still needed leverage to "pop" them out of the differential.
G
-
Thanks for the information.
I took the JTR book to heart; I'm running the 10" 2+2 booster and larger 13/16 inch MC. I'll return to stock front calipers and slotted rotors [just for the bling], aftermarket PV and hope for the best.
G
-
My Z has the MM rear disc brake conversion using 240zx calipers and 300z non ventilated rotors.
I have all the elements to install ventilated front discs and Toyota truck calipers. I do not have a functioning proportioning valve as I gutted the original.
After reading all the posts describing this swap to be inherently unbalanced in that the Toyo calipers are too large in comparison with the 240zx rears, I'm thinking seriously about returning the front to stock specifications: stock rotors and calipers, and keeping the MM rear discs [hey, they look good and the drums have long since disappeared].
I think I should install another after market proportioning valve in my rear brake line. But I don't know if it is "necessary" or not from a safety standpoint. This is not a track car; but, I do wish to have predictable behavior for panic stops from a straight line.
Does anyone have any experience with stock brakes using only the MM rear brake set up?
I tend to ascribe to both "more is better" and "while I'm at it I might as well ........ ." views of life.
This time I really want to do it right.
Please comment.
G
-
The flat circling or the round one? Rockford driveline has the round one in their boot kits.
The round one. Might have to spring for another set of new boots.
G
-
Upon reinstalling my CV axles after swapping the driver's side axle center bar over to the passsenger's side, I find that the axle, with circ clip will enter the differential and will partiallly engage the inner splines. I can turn the differential; but, the input shaft stops before the circ clip snaps. I think the circ clip is not compressing into it's groove. This is new, as in the past, the circ clip would snap in place with little effort.
What is the proper way to install? I've tapped the end of the axle [with the dust shield in place] with .5 lb plastic dead blow hammer. With no luck. The angle of the axle is not straight as the rear suspension is at full droop and interference with the CV adaptor companion flange prevents a straight line "shove".
Finally, can anyone here source new circ clips for input shafts for R200 LSD from an '87 300zxt?
Thanks,
G
-
I'm sure any of those three will perform quite well. However, the later Mazda 1980 or so Rx7 have an oil cooler that will fit very nicely between the "horns' of 240z. It also has abuilt in thermostat. Quite often used as upgrade cooler into 944 porsches. Cheap too. Look here.http://www.pbase.com/slidevalve911rsr/for_sale_mazda_rx7_front_oil_cooler_used
-
Car Craft (July 2013) ran a bunch of GM cams through a stock 5.3. Here's three notable ones.
HP TQ
Stock 5.3 w/ LM7 cam= 353 / 384
LS6= 376 / 389
LS9= 420 / 412
I'd be shoppin' LS9
I'm running a C6 oil pan ('05-'08 Vette) on my LS2 240. Good clearance, great baffling.
Steve
I just got my c6 oil pan... paid less for it than I did for my fbody ls1. Looks like a better pan as it has at least one inch more road clearance than the fbody pan. I think the Ls9 cam's sensor is upfront, not in the back.
So, now I'm shopping a good set of heads. I've seen 799s for $250-300 a pair (might be cores only, but that price is in my range).
gg
g
-
Like most custom vehicles, the least expensive way for most folks is to buy someone elses 90% complete project car. Some real buys have appeared on this website.
-
Really appreciate the comments. The flat top LS2 pistons and rods will stay in their boxes for the time being. The Lq4 will receive a 2004 LS6 (405 hp) cam with the GTO lifters, 7.425 pushrods, Ls2 springs (yellow..beehive equivalent to the z06 springs) and stock 317 heads. Oil pan from 2006 Ls2 Corvette... looks like it will fit, if not; the price was right. Stock 4l60E automatic transmission. Recovered an oil cooler from a third GEN Rx7 that is a perfect fit between the Z's front "frame"horns. Has a built in thermostat. Once this is back in and tuned, I'll start shopping for a set of heads. Either stock 799s that I can pass off as genuine truck castings or the other casting often found on LS2. I calculate that the GTO stock LS2 heads will net about 10.4 CR.
Since I have a year to work on this charade, I should be able to sort it all out in time for a 500 mile trip from the low California desert up to Reno.
Thanks G
Repair wiper pivots - How to disassemble
in Miscellaneous Tech
Posted
The pivot points support the windshield wipers. They are located at each end of your windshield wiper transmission. Often, they are frozen or have considerable drag. They are easy to disassemble, derust, and regrease.
The pivot is a steel shaft supported by two steel bushings set into the pot-metal housing that is tapped for 3 small bolts. Most pivots have lost their pivot point cap, which was designed to keep the steel to steel contract between the bushings and the shaft dry.
You can disassemble and re-grease the pivot points without removing them from the flat rods that make up the windshield wiper transmission. Here's how:
1. Remove the wipers from the pivot points.
2. Remove the entire transmission assembly from the car.
3. Inspect the pivot point. You should see the shaft starts with a threaded portion leading to a splined shoulder and then a collar that is seated on a steel bushing. These parts usually are well rusted.
4. The collar is, in fact, a wire "C" clip. A rounded wire, not a typical flat "c" clip. If your pivot point has heavy rust or a layer of build up, you might not recognize the wire clip as a clip. It is seated in a recess cut into the shaft.
5. Spread this clip with a very small pointed hook. I used the smallest flat screwdriver I could find. Once the wire clip is spread it is easy to work it out of the recess and up the shaft. These are very easy to lose and I've never seen them for sale. Remove the clip and place it in a magnetic bowl or cup.
6. Screw a nut over the threaded portion of the pivot shaft. I used the cap nut that secures the wiper blade assembly to the pivot.
7. With the threads protected by the nut or cap nut, gently tap with a lead or other "soft" hammer.
8. Bear in mind that the body of the pivot is made of "pot metal". It can be broken when you drive the shaft out. Don't use a BFH..
9. I supported the flat side of the pivot point on a small open vise.
10 If the shaft does not move after receiving a few taps of the small soft hammer, then soak it over night in a container of light oil. I used a pint of A/T fluid, but I think any commercial penetrating oil will work.
11. After removal, clean both the shaft and two steel bushings. I held the shaft in a small vice and scrubbed it with a piece of 1500 grit wet/dry sandpaper soaked in light oil. I cleaned the bushings by wrapping the same piece of 1500 grit wet/dry sandpaper soaked in light oil around a .32 caliber brass bore brush. The bushings were cleaned in the same fashion as cleaning the bore of a .22 or .32 caliber firearm.
12. Once the shaft and the bushings are clean, smooth, and dry, I packed the pivot housing bore with a heavy bearing grease used to pack wheel bearings of boat trailers. This grease is designed to repel water. [Actually, I think all grease repels water to a lesser or greater degree.]. I think you could use any quality heavy grease.
13 Drop the greased shaft into the greased pivot housing, place the cleaned and greased wire "c" clip over the shaft and work it down the shaft until it seats in the recess cut into the shaft. I used a deep well socket, I believe a 10 or 12 mm socket, to push the wire "c" clip squarely down the shaft.
14. The last step is to push onto the pivot point shaft, a plastic/rubber cap that is designed to slow or prevent water intrusion . These are available for a couple of bucks off the internet. Google 240z wiper pivot seals.
Sorry for the lack of photos.
G