

Kuro
-
Posts
107 -
Joined
-
Last visited
Content Type
Profiles
Forums
Blogs
Events
Gallery
Downloads
Store
Posts posted by Kuro
-
-
Hi Pallnet,
I did send an e-mail few weeks ago and didn't have answers since then.
I'm interested in a 11mm fuel rail but I wanted to know if you are still offering to put a pressure guage on the rail (like few years ago)? If not it's not that bad, I'm still interested hehe!
Thanks
THE Vador! Love your z!
-
I just wanted to post a quick closer look at one of the gauges (speedometer) with 4 bulbs and 2 green covers

Here’s the bulbs side by side, the bigger one in the back is the 4watt, I just realized that I said 3.5 for the stocks, but they are actually 3.4watt. I just wanted to make that correction.
Oh and for the record, don’t EVER try to do this while you’re pumped up on caffeine and haven’t eaten. It took about 10 min to get the last four little screws back in! LOLOLOLOLOLOL!!!!!!!
-
Dash (is done now, but this was when I was doing it)
Ok just started experimenting with the repair of the dashboard....
Wish me luck! I have no idea how it's going to turn out, but I have a good feeling about it.....
Before (I've got some more pics somewhere, I'll post them up later on:
This is the Great Stuff foam ( I went a little overboard, but it just means more sanding later)
This is just after cutting off some of the excess foam:
Next step is to sand sand sand down all the excess and then put a coat of bumper repair over the crack (and feather sand it out after).
I've got some SEM texture paint coming soon to cover it after it's sanded smooth......
Ok well I did some scraping (with a razor - works well) and some sanding. What I didn't realize when I "thought" I was done was that the edges of the cracks were raised up significantly and if I left it like that, the finished product would be VERY wavy. Not good.
I took my razor and scored some of the black plastic, probably a good 1/4 to 1/2 outside of the original crack to lower the profile a bit and make it more even with the rest of the dash. It's not perfect but it's much better then it was.
I will have to work a little more on the area in between the gauges and just above them on the vertical dip to the gauges.
I still have a good feeling about this right now.... here's the pics:
Well here's the progress on this project:
So I'm learning a lot on what NOT to do when working with this bumper repair epoxy. The biggest thing is to put it on smoothly, cause it's a ***** to sand. Here's some sanding progress and then another skimming of the bumper repair stuff over the top. I didn't tackle the gauge pods very well yet, I just got the edges knocked off and put another layer on.
The pics seem to show a hump on the new layer of repair stuff but trust me it's just a reflection. It is pretty smooth.
So I was just about done sanding finally.
Not quite done, but getting there….
What a pain.
And then…. another pain surfaced.
As I was sanding down this section I heard a clicking sound as I went over the valley between the gauges. I realized what was happening.
That area was weak from being dried out and had actually lifted away from the original foam. I pressed on it a little, it was ok, I pressed on it a bit harder and it broke through. Damn, here I go again.
I pressed on it so that all the weak spots cracked off and then decided I’d better check the other areas a little more.
Then there were two. :sadface:
Now I’m tired, I hope I didn’t put this **** on too sloppily because of it. I think I did. Oh well, we’ll see how it goes.
Second coat was a little neater then the last….
Almost done..it’s not perfect but it looks 1000000x better then it did.
I finally removed the dash top from the frame and noticed that only one crack made it all the way through the foam underneath. My “Great Stuff†fix came through the bottom and acted like a nail head underneath. WIN!! I may add some more great stuff underneath for good measure.
Here it is after I cleaned it with mineral spirits (after the complete sanding while it was on the frame still).
Here is the first spray with the texture stuff
Here it is after about 3 coats of texture spray.
Looks pretty good, although the texture spray sometimes “spit†at the dash and I ended up with some blobs here and there. Nothing I can’t live with!
This is after sanding it all down with 1000 grit. Basically just to knock off the rough areas.
Liking it!
Need to do a little more sanding here….
I didn’t do the paint yet. I wanted to make sure it sits for a day before I do paint, so probably tonight it will be done!
I ended up using rubberized undercoating over the texture stuff. It came out better then I thought!
Here it is installed (just to drive it to a shop, lol). Better pics to come later, once I get my car back!
Still needs the metal trim near the windshield and a few more bolts in but it survived the bolting into the dash frame, fumbling around in the car with it, attaching hoses, and hands all over it. Seems to be sturdy enough now. More pics later, here’s some crappy cell phone pics.
-
Carpet
There's some fat mat under there now to help insulate the interior from the outside.
Sorry bout the crappy pics, I still need to glue down the rear (behind the seats), but not rushing on that until I'm ready to put the center console back in.
It's dirty but hey, still got work going on in there!
-
Got to do something about my exhaust
Here's some pics of the body holes, rust etc when I took it in to the body shop
Pic of the rear panel
Pic of the holes along the side
Pics of the rusties
Side mirrors (useless)
Antenna hole
Trim panels
I painted them with Plastic Paint and they now look brand new!
some pics as I was painting… (there's still some touchups I need to do)
-
Some pics when I was having the coilovers put on:
cut down strut housing
Fronts
Complete on Spindle
Rears
-
Most of these pictures are going to be out of order, but I just wanted to get them on... There's many more, I just need more time!
Body work
So here’s a couple of pics of what the 280z looks like with the park bench bumper removed. As you can see there’s some big holes left behind and it’s quite ugly. Although people do tend to leave it like that and that’s perfectly fine – I think it gives it some character. But in the end, I want the body hole-less.
Before:
In progress:
Checking the spoiler
She had been painted at least once after the original paint (over the original paint).
So far everything is still pointing to her being originally black, at least from most of the car that I’ve inspected (I’m cautious to verify that she was an original black).
There was some lower body work done at some point also, probably due to rust. Leo will be taking a look as he works to let me know what he’s finding.
Here's what she has under the paint - it hasn't been taken down past the surface rust yet, but you can see where he did take it down near the very rear.
Coilovers
Here's the Stance coilovers with the adapters (one of the camber plates is pictured next to them...)
Seats
old seat and new refurbed seat
Here's the old passenger side (which wasn't ripped, the passenger side looks like Freddy got to it) and the new 240z seat cover/foam on the drivers side (on the right). The small wrinkles will smooth out eventually, but I do like them either way.
-
Oh boy, I've forgotten about this thread.... pics on the way....
-
Love that first pic!
-
How's the clearance on your exhaust?
-
Sorry, I posted without reading..... couldn't delete, so I apologize.
-
Looks good! Congrats! Can't wait to see what you do to it...
-
Subscribed!
Thinking about doing the same thing. Megasquirt scares me a little bit.
-
Im surprised how many people really think its TT, its not
It has single gtx3071r, the gold one is a gt3082 also known as door stop/prop
You're messing with peoples emotions lol!
-
Almost embarassed to post these hellasunk pictures. Hopefully in a few weeks I can order wheels and flares.
I saw your car on clubroadster, I like where you're going with it....
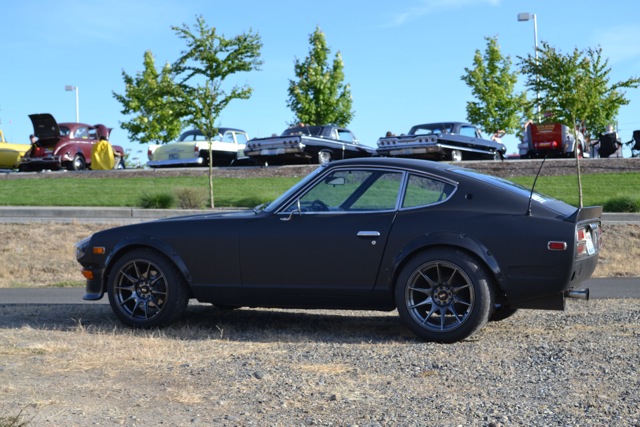
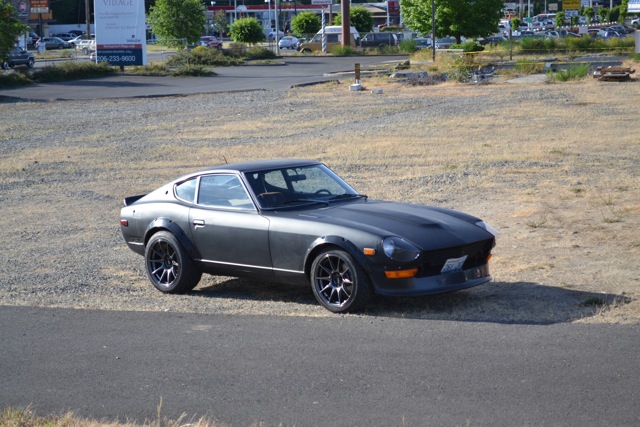
Here's mine:
-
Probably not but you're gonna have to follow the wiring to figure out what was done
-
Looks good! Congrats I will be checking in!
-
I wonder if 370z seats are too big. I'm going to measure them.....
-
Pictures finally. Call them repulsive or whatever ya want, but when these babies have coilovers for neighbors, i think the car will look pretty damn good..
I think it looks fantastic! I'm taking a similar route with mine, waiting on coilovers...........
-
Here's a couple more pics, I haven't cleaned it yet but well you know....
First another look at the before:
And now the after. I'm sure there's more tucking I can do, but it certainly looks so much better now!
Here's the FPR mounted on the firewall, Aaron....
-
Wow, I like that, fitment looks real good.
-
Hey guys,
I'm currently looking to get a molded carpet kit to put in my Z, as I am currently running a totally naked interior. For those of you with molded carpet kits installed in your cars, would you mind posting some installed pictures?
Did you ever decide on a carpet kit?
-
oh boy, haha, that's awesome ^^^^
I hate it too.
-
mine actually came exactly how your looks, so whatever you have taken off is exactly what was taken off of mine by the previous owner... im sorry i can be a little more helpful...
Oh that's ok... I left it on for now, I think it's better to have it on anyways so the air dam isn't flapping around all over the place.


Post pics of your z's here!!
in Non Tech Board
Posted
Beautiful! I love your entire setup!