

Chino 240Z
-
Posts
50 -
Joined
-
Last visited
Content Type
Profiles
Forums
Blogs
Events
Gallery
Downloads
Store
Posts posted by Chino 240Z
-
-
Had a b!tch of a time getting a worn roller bearing out last year. When time to change and the bearings come out in your hand and then the outer bearing race sticks you often need to dremel cut the race out. Not as easy to change as the bushing type. Too tight for bearing pullers & hooks, grease & pressure method fails. It was stuck good! After the one episode with the previous owner installed pilot bearing... never again.

-
We made this one from "Home To-pot" parts. Still keeping our butts planted to the asphalt in high speed turns for the last 4-1/2 years now. It will flex a little and probably could have been placed at a softer angle. I'm a little hesitant to try something new after this set up has never failed us at 125mph in T9 at Willow or in the Roval T1-T2 at Cal. speedway. Very similar to Speedgato's version.
-
-
Toyo's RA1s 225x50x14 on 14x7 Panasports, lowered and did not rub, fenders not rolled. Since then we have gone to 225x50x15 on 15x7 Panasports. BTW... I now have a set of 5ea rims & tires up for any offers.
I did like the profile of the 14x7's with 50's on the car better than the 15x7's on 50's. Had to size up with the installation of the Arizona Wilwoods & rotor setup.
sorry bout the large pic, tried to re-size too.
-
yea, I guess I remember seeing a slight gap or a thread left before tighenting down onto the actual gland nut shoulder. Previous owner who cut my tubes had one a little longer than the other 3. That was the side I had to take apart 2 times to get the right fit with no rattles or banging.
-
I dont see why not, except that it would be too easy;)
In the case of my 240 tubes the threads inside were not very deep and left too much gland thread outside the tube and too much gap under the strut insert. I cut the gland nut threads enough so that the shoulder of the gland nut would tighten to spec and seat flush on the top of the tube. Now I don't know how deep the treads are in the top of a 280 tube? It may thread all the way to the gland nut shoulder, then you just need to section the tube test fitting everything before welding the tube back up. Careful not to make too short.
-
So your saying the part number for one that does not need to be modified to fit a 240 is B30-629 A1
Let us know if you get them, as I would like to order some new ones after messing mine up for not using the correct tool to tighten them:biggrin:
I second this nut for the 240Z:
ThyssenKrupp Bilstein invoice shows:
Part Number Description- B4-B30-U232B1 (Ringnut, M48x1.5 OST). I
needed to cut down this new nut in length in order to seat down
properly for my 240.
Tool for this Ring Nut 30MM is # E4-MS08/7. Was worth every penny of $4.40. (02/02/07 Bilstein price)
-
Did you get them revalved to 300/100 also? I am considering getting them revalved to suit 240/200 springs. Is the adjustment linear? Ie, would 220/72 valving suit?
Dave
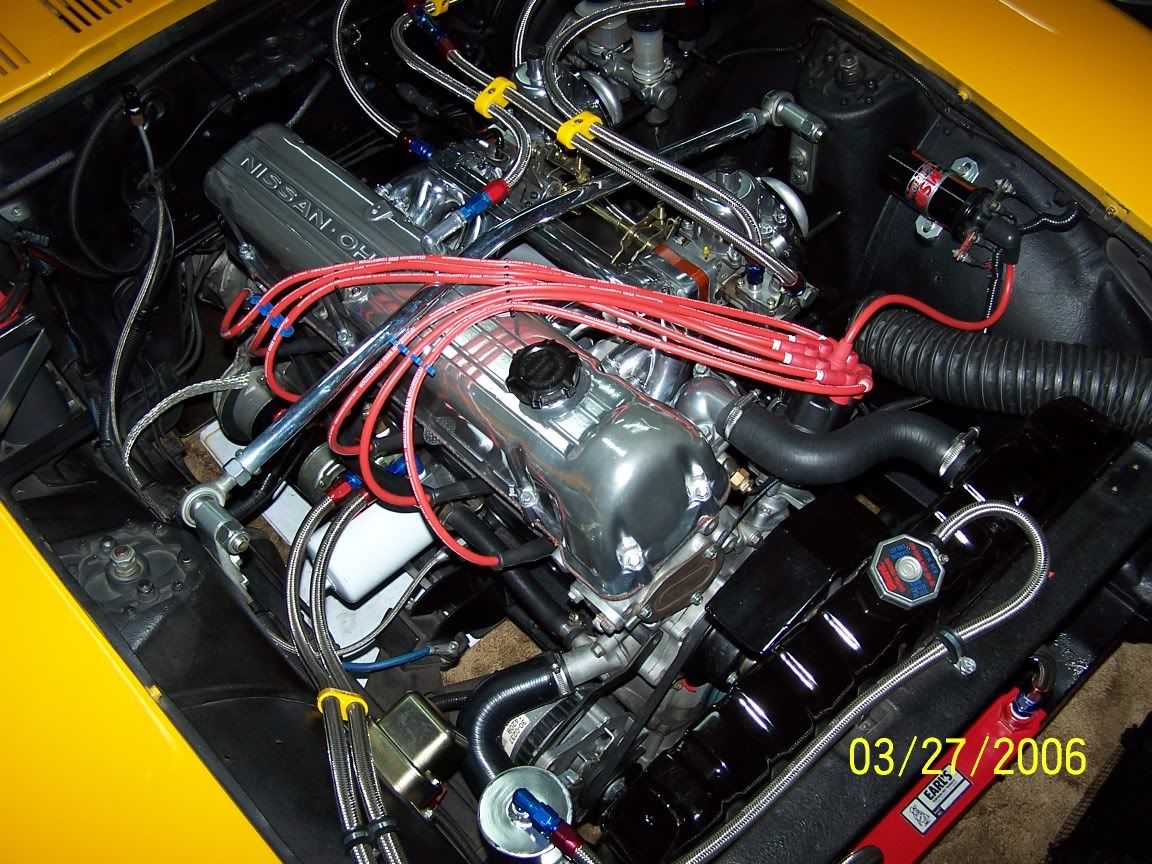
Yes I did the revalve 300/100, but this not on a street ride. The car is gutted or lightened, fiberglass hood & rear hatch, plexi-glass rear window, no heater core, no fan, no radio, no interior, door windows removed, race prepped car. As we learned and improved our driving on track we expected more out the car too. Just like everyone else we wanted to be faster and have better lap times too. But before we spent more money on HP upgrades in the motor we thought we should get the existing 170rwhp this 2.4L was giving us out and onto the asphalt.
I don't think you need to revalve or will have problems with shocks failing with lower spring rates like 240/200. Different story if you plan to get up over 300 in the future. I'm not shock and spring experienced but I'd agree with jmortensen's comments too. Cutlass, I do have 10" springs on front and I can get it pretty low, un-drivable.
We had a lot of body lean, and nose drop or diving as we kept braking deeper into the braking zone at high speeds. Other cars were able to hit harder & deeper into the turn without upsetting their car as much as ours did. It wasn't crazy, but just enough to see why some other car had pulled a little bit on us in a turn, after turn, after turn no matter how hard I tried.
We started with Tokico shocks up front & the adjustable in the rear with 275F / 225R springs. After removing the Tokicos I had found that they were basically trashed. I believe the extreme rebound rate of a 250 or 275 and 300 lbs. spring damages the internal valving in the shock. Not so much on the compression stroke of the shock but the forces of the spring rebounding seems to be too much for the shock to take and shortens it's life.
As for the coil overs good or bad? I would put it on a priority list of changes if one was looking for performance. It gave us the ability to play with ride height and weight. Makes changing springs and shocks easier to deal with too. Helped get the airdam lower to the ground too.
After swapping to this setup I dropped 2 seconds without trying. I think each driver finds what he or she is comfortable in their car. Such as, I like the feel of a welded rear out of a high speed turn. To me the rear feels more predictable time after time , lap after lap, as long as I keep the same line. And with this new spring and shock combination I was able to push that comfort zone harder and faster in these type of turns. My wife adapted to the new set up well, but doesn't trust it as much as I do (Knock on wood).
I'm on a budget too, I can't afford several spring & shock assortments and other mechanics to do the work for me. I need to hopefully get it right the first time though. With lots of homework and luck I was hoping that money spent would show results. We use to run 3 or 4 events after each change or upgrade. The real results of this new suspension came into play when we added the Arizona Z 12.2†Directional Vented Rotors & Wilwood 4 Piston Calipers. Dropped couple more seconds and still looking for the limit of this thing. It's going to be a combination of changes, trail & error, and driver seat time to find what improves lap times. I don't want to be the slow car on the track but understand the cars limit is directly proportional to the dollar spent. I'm just following you guys here and having fun doing it too. Thanks for your experience.
ok time to shut up, sorry
-
Sorry to reiterate, but was the exact PN F4-P30-0032-MO or something different?
Dave
FWIW....
Last year I did this conversion on our 240 track car, removing the Tokico shocks. With the info collected from this thread, everything went as planned. Strut tubes had already been shortened.
Bilstein Shocks # F4-P30-0032-MO (revalved 300/100), # B30-629 gland nuts milled down a few threads to fit flush with top of strut tubes. After playing with lower spring rates this setup (right or wrong?) 325lbs Front / 275lbs Rear is currently working for me. Tire temps and wear showed much improvement. You may need to add small spacer in the bottom of strut tube for best fit during assembly. Purchasing the gland nut wrench that fits this nut makes install and removal smooth.
The shock is listed on receipt as: P30-0032 VW 74-89 Front Sport. The revalve was an additional $75 performed at Bilstein. I also used Shox.com
I can also see that each install adjustments may be a bit different as there are many coil over hardware packages on the market.
craig
-
it's an neat freak thing...
-
I would think Most Z cars using an MSA type III front air dam would probably be lowered and more worried about going under another street car these days. The honeycomb idea or a light weight bar can easily epoxied on the inside of the front piece for extra protection.
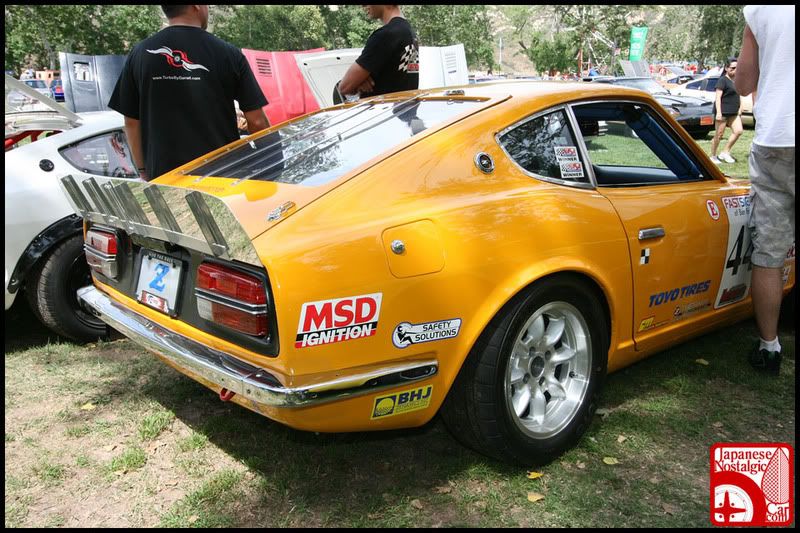
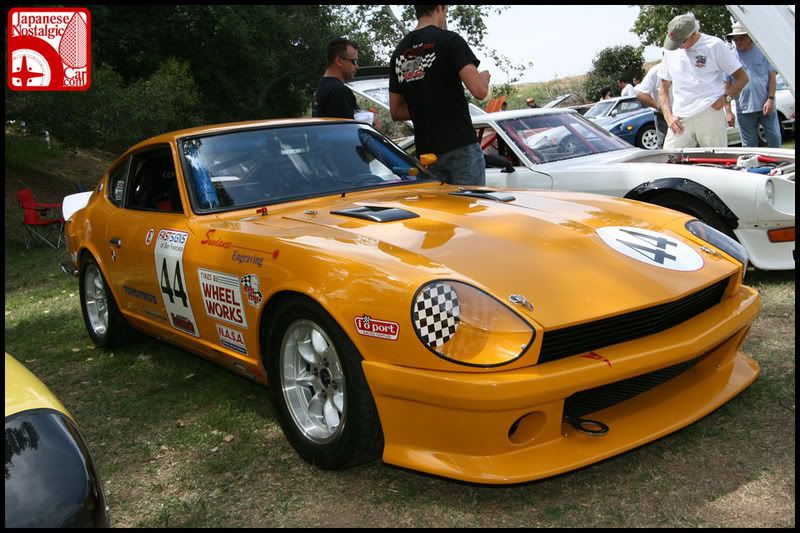
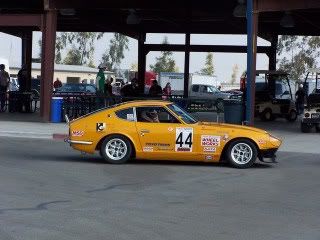
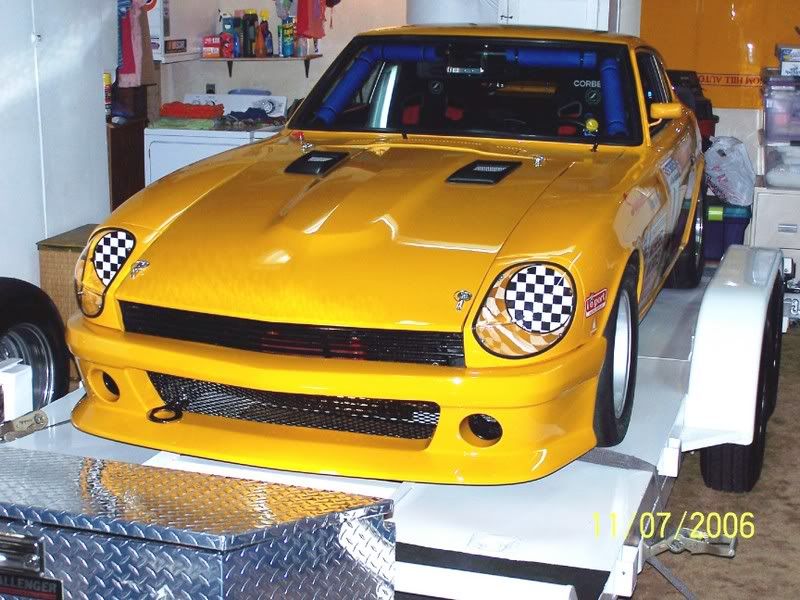
Thanks Mayolives, it's a 71, 2.4, dedicated track car we have fun with.
Okay, there ya go, put a bunch of old and new pics in my photo album.
-
MSA Type III-Front
Stay away from curbs, speed bumps and animal road kills... no supports, light weight, but works. The fiberglass has done well taking stones and rock impact on track for about a year now. Test fit, trim and prep before painting then bolts right on. I'm happy with ours.
Additional sheet metal tin work required inside if "aero" is a concern.
-
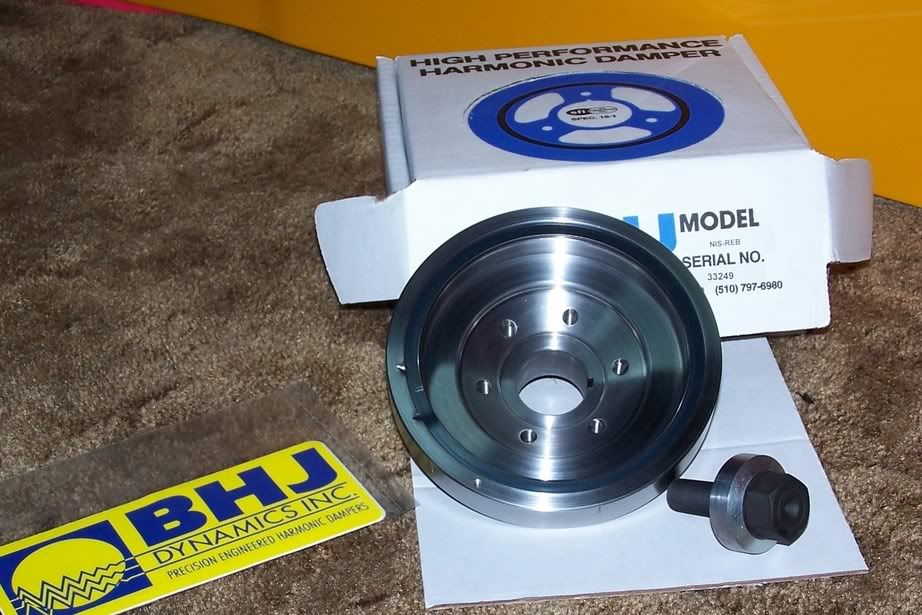
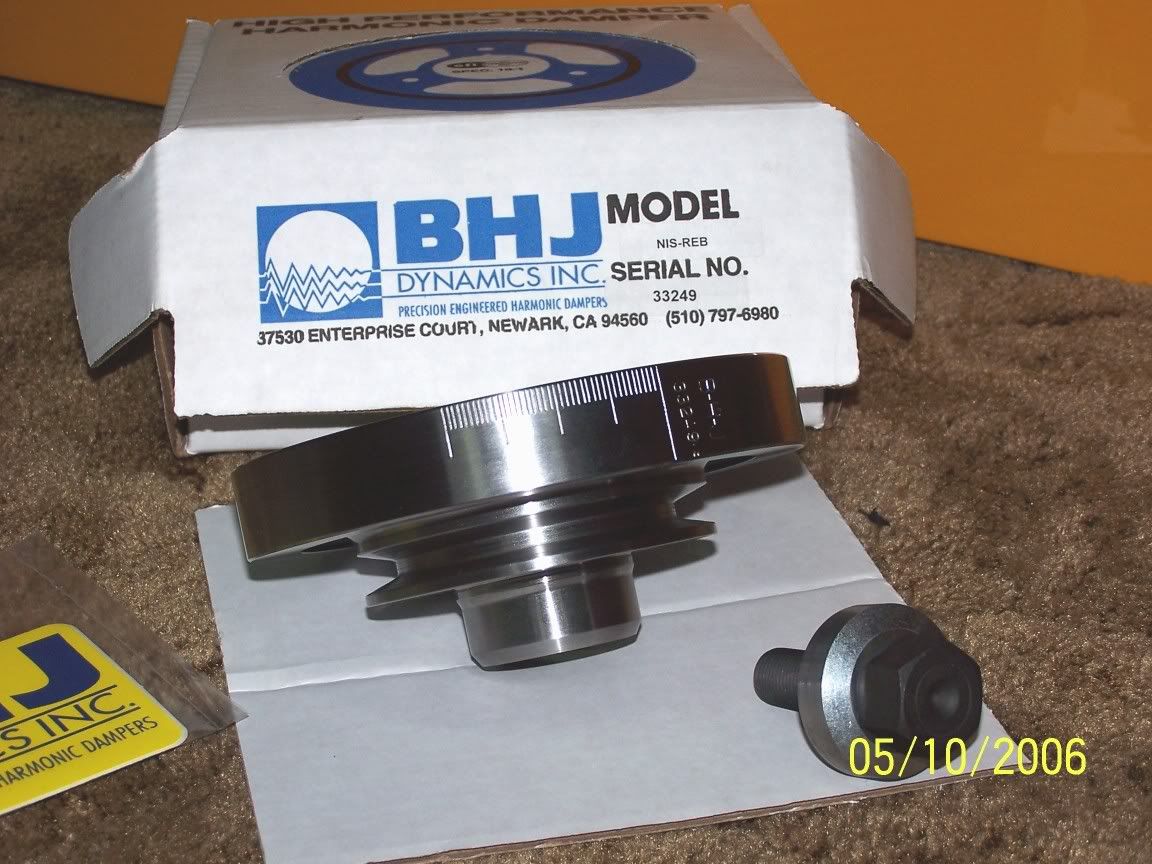
If it's loose it's not right, if it's tight you may mar the crank or push out the key, either way don't trust mfg. to give you something perfect for your application. Green loctite is also given in the package of the BHJ product for a Z application. Well if the manufacture doesn't make are perfect fit, you can see if you can correct it, just don't rush the job.
-
This is some info from BHJ about installing one of their products, but you can see that each manufacture may require different install techniques. I would think any quality balancer shouldn't be hit with a hammer or overheated. I found this a good reminder after reading....
-
Last year I had trouble with a new BHJ-Dynamics racing pulley. After much time trial fitting the pulley only, I found couple high spots on the pulley edge and the crank end. Little very fine emery paper cleaned them up and made for a smooth combination. Cleaned the keyway up with a tiny thin file, and smoothed up the key by using fine emery paper on a hard bench surface and they key fit perfect into the keyway. Once each surface was smoothed and clean to fit, just a gentle tap of the rubber mallet made for a perfect fit then torqued to spec with the bolt and spacer intalled.
If the 3 components are too tight it is easy for the key to pop out the back of keyway and when you are tightening and well.... ooooooh what a mess they can make of the pulley, key and keyway; but they are repaireable if not to badley damaged. If it doesn't feel right or look right it probably isn't, remove and start again. Good Luck.
-
After having problems with those blue colored damper we went for the BHJ. This one is made strickly for Rebello Racing by BHJ.
BHJ Dynamics 4" Racing, Single Groove Harmonic Balancer # NIS-REB
They need to be clear coated or painted to keep from rusting. Larger sizes available too.
-
LOL... no body is rich any more once you start tinkering on these cars, there is always one more item you would like to change or add!
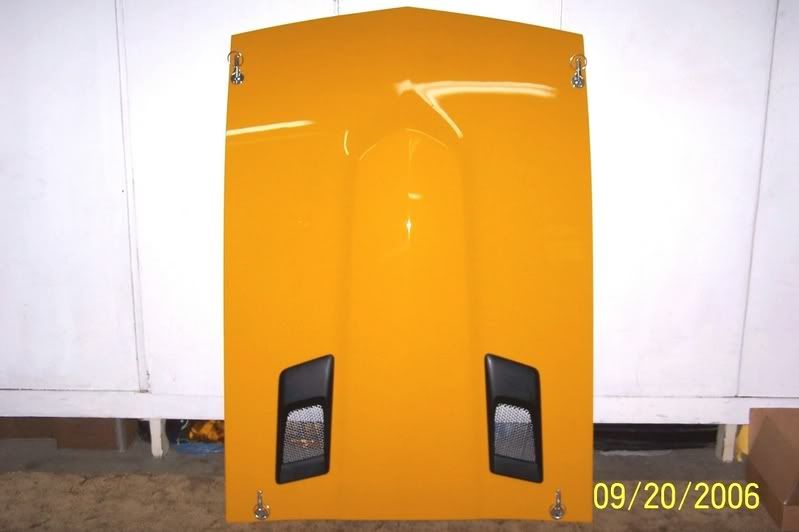
I will say the vents do work good. After a 30 minute session at the the track, we don't remove the hood any more (getting lazy), just turn on the electric fan for about 5 to 10 minutes and it pushes the heat right out.
I understand about the big C word... Mrs. Chino (second driver) works at City of Hope in Duarte as an RN, glad to here you are doing better!
-
I'd like a pair, but $125 is a bit steep to me.....
And you built that crazy red twin turbo Z monster? Impressive and beautiful! You say a buck-twentyfive is too steep.....
. You're suppose to ignore the price tag if you really want something. What's one more receipt on that mountain of purchases. -
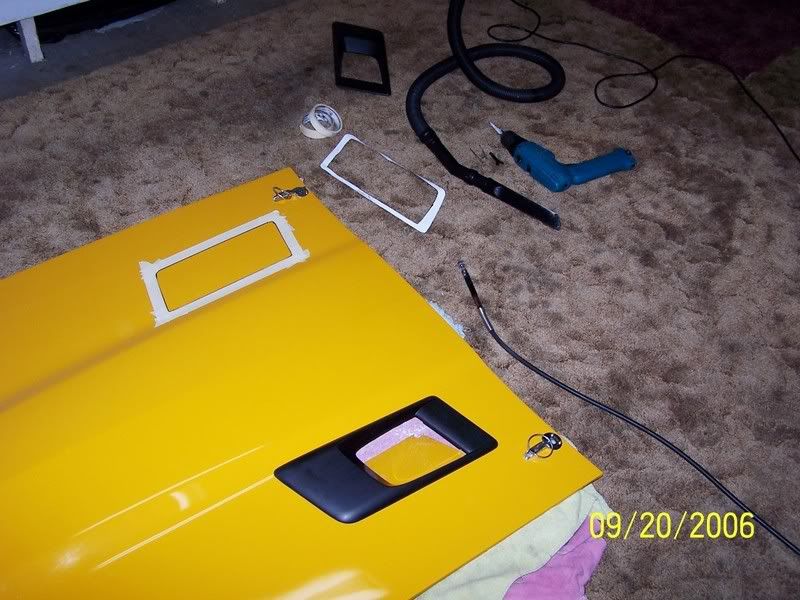
For those who where interested in the hood vents in this thread, I just got an update from Steve. Another batch has been made and are now up for sale. With all the aerodynamics talk lately, perhaps this can help some? Here are his comments...
"Just wanted to bring you up to date with regards to the hood vents. We just received our first shipment from our new supplier and we are now able to offer them back up for sale. I've already listed them again on Ebay - Datsun Z Hood Vents. . People can also contact me directly if they are not Ebay users and wish to purchase a set. - grndfx@pacbell.net. I'm also hoping to have a website up and running soon that people can go to as well. I had to put the price up a bit as our cost have increased with this new supplier."
Z-ya
Craig
-
Got word back that the Hood Vents may be available in the near future. Got a nice email saying...
"I can say that we are currently in the process of having more made
and should have them available within the next couple of weeks (we had
hope to get them at the MSA show, but couldn't quite swing it). I'll let
you know when they become available and perhaps you could then pass the
word on."
So sit tight and perhaps more will be up for sale soon. Then save them for installation after more testing may give heads up for best placement.
Craig
-
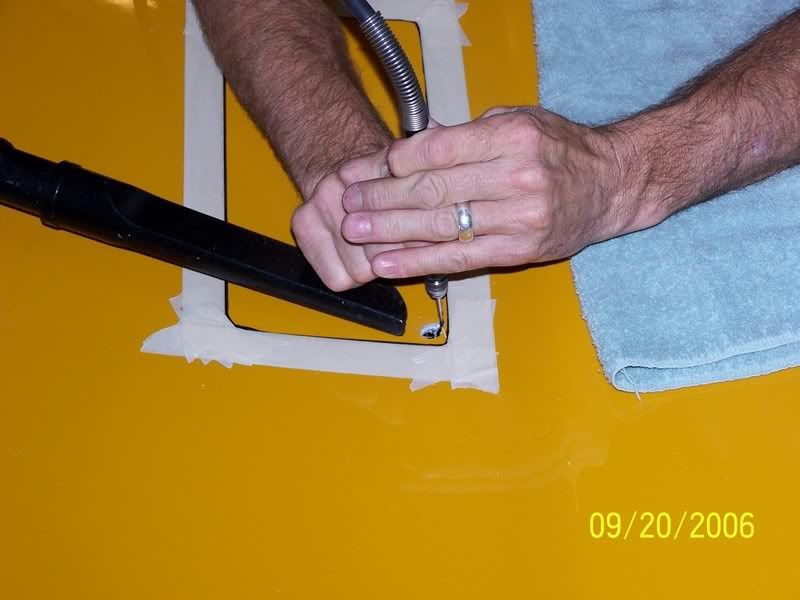
For vents not yet installed good idea, but also make sure you check the vent shape with the normal curve of the hood in the area you plan to install before you make the first cut, might not fit the ideal areo location.
-
Yes it was GRNDFX I got these from. I just sent email to him and hope we here from him.
-
I'll see if I can dig up the receipt in the huge pile of receipts....
I picked them up from a guy that had only a couple left last year but he said he was getting ready to order up some more, or run another batch through the molds or something like that. Over the weekend I'll look for the contact. I don't think it was much over about $100 or so. You can prep them to be painted too, I just left them in the raw rubber/plastic state. I think they can directly drop into a 280 hood vent and couple screws into the bottom, trim the metal screen and done.
-
I found a set of them on ebay and they worked for us. We had to use longer installation screws since we had a fiberglass hood. Helped let the air out and kept the hood from bowing up so much at high speed.


 . You're suppose to ignore the price tag if you really want something. What's one more receipt on that mountain of purchases.

Roller Clutch Pilot Bearing, 70-96 Z/ZX
in Drivetrain
Posted
Once the bearing cage is worn, it becomes very thin and brittle. While trying to remove it, the cage just crumbled into pieces except the outer race ring. The outer race is to thin to grab and to tight to pull. Now it becomes this super tight, hard steel liner inside the crank end. When the cage and bearings all fall to pieces the is nothing for grease or TP and pressure to push against out of the hole. No lip edge or ring to pry against. To thin and tight for heat & ice to work. But a tiny dremel bit did score the race enough to snap in half and pull out. The race metal is a very hard metal and ate up several bits while trying to score or cut it. I was very surprized with the hardness of it.
I've seen these nice looking roller bearings before but never installed them only the solid type. Not sure how long they last, since this car is a track only car and is out 7 or 8 weekends a year for the past 4 years. I'm sure they install simple and often remove easily too. Maybe I just had bad luck that night but was wishing the po had gone with the solid type. I just remember the crazy words and foreign tongue I spoke as I spent hours working on such a simple item under the car.