
ECUAdam
-
Posts
38 -
Joined
-
Last visited
Content Type
Profiles
Forums
Blogs
Events
Gallery
Downloads
Store
Posts posted by ECUAdam
-
-
Sunny Z turned me on to these. You can see how I did mine if you look at my build thread. It really makes for more room than other kits, and you can grind off the factory mounting points on the cross member to aid in alternator bolt clearance if you use a lower car mount for the alternator.
-
Some more pictures before I tore it down. I already miss driving this thing.

-
Love this. It's very similar to all the crap I am doing. Should finish my rotisserie tomorrow so I can weld in some real frame rails from front to back since mine have more holes than I care to count.
Thanks
I'm curious to see how you tackle that rocker rust, as I have to deal with the same thing. It's not likely to be a fun ordeal... Your build looks great though!
I too am curious how to fix the rust here, lol. I wil go out one day and sand blast it to figure out where to start. I bought the patch panel for the part that is already cut out, but I dont want to think about replacing the rocker...
Beautiful TIG welds!
I appreciate it. Im just some dude making metal stick together in his garage. I wish I was better. Have you seen Toxic Fab's stuff? This guy is an artist... http://instagram.com/toxicfab/
By that time, my paint will have gone to crap and I will take all the trophies home!
I got lucky, I cant wait until the next one.
-
Turbo is a ebay GT45. I think it was 230 dollars shipped to me. My buddy has been 9.6 in the quarter on it using a 5.3 inside a mustang. It should make 600 pretty easily with the cam and components I bought.
-
More rust, this time on the lower rocker right in front of the driver side rear tire.
Drilling out spot welds and trying to get the cancer cut out.
All this did is expose all the cancer behind the outer layer. Shit. I haven't repaired this yet because I really don't know where to start.
This is where I welded the motor mount flanges on the frame rail. I hope it will all work as I want it too.
If you are not a Datsun owner, you have no idea how big of a deal this picture is.
Now it is time to start trying to make things look pretty. Sand blasting can make a hell of a difference.
Powder coating has started.
The chrome powder is not exactly chrome, but I give it a solid polished aluminum.
Here are the mounts done in black.
I shaved the original motor mounts off the cross member because they are not needed and will help with adding room for previously mentioned gigantic down pipe.
That is all I have now. I am wanting to go work on my car sooo bad, but my surgery will not allow it. I am 3 weeks out of it, but I still do not feel like I can do much. I am not going to rush it because I dont want to go through this shit again. Man how I would love to do some fab work... -
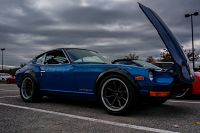
Here are my favorite pics of my car so far. I was bored, drove my car into the yard and snapped a few pics.
Now on to more rust... Dammit man. The floor pans are completely screwed.
I bought some floor pans and Bad Dog frame rails / sub frame connectors. They are much thicker than stock and should help stiffen up the car for the added horsepower.
In the next potato quality photo you can see the ever growing mountain of parts for this car. Wheel bearings, seals, every tie rod, bushings, frame rails, floor pans, wilwood brakes, and everything else you need to restore a classic turd such as my ride...
I also decided that my current motor mounts were taking up too much room and were not advantageous to running a giant down pipe. I bought this kit and figured Id have my go at it. http://www.randyellisdesign.com/DIY-Caged-Bushing-Tubular-GM-LS-Series-Race-Motor-Mount-Kit_p_85.html .
More Fab work...
This is the last picture I have of the car before I started tearing it down to do the full restoration. It looks like the giant light is calling it home. It is about to die and go to heaven, lol.
The motor is out and ready to be put on hold for a while.
Front is on the rotisserie.
Now the rear.
Shit just got real. -
Well as with any Datsun that has not been restored, you will eventually need to start addressing rust. I started with stuff that would not completely take my car down so that I could still drive it. This is a pic of the rear area under the hatch. In this pic I had already removed the top panel by drilling out all the spot welds.
I sourced some sheet metal from a buddy and started fabbing up replacement panels. It is a little thicker than stock, but I figured it cant hurt. I bent a few pieces in the break that I have and this is what I came up with.
I got most of the rust cut out and started to patch it in and make it fit the best I could before I started welding it all in.
Starting to burn it in. This cheap ass 1973 meal does not weld too good...
Here is the replacement panel almost ready to weld in.
I also bought some much needed seats. Just like titties, I can feel them so they are real enough for me.
I tried to place them so that I will have room for a cage in the future.
I also picked up a turbo, this is getting fun. -
I recently had surgery so I finally have some down time to update this thread.
I took my rusty turd to Z Attack at the Nissan Headquarters. They do the event every two years. I had a blast, saw a bunch of cool z's and had a great time. Nissan really does a bang up job at this event. No ricers, no stupid kids doing disrespectful burnouts, just a good time. Thanks Nissan for putting the event on. Also thanks Jonathan for all your help putting the event on.
The coolest part of the show was how much love I got from everybody on my car. It really is a good feeling for others to appreciate all the work you have put into your car. I actually won two awards and was completely floored by it. The Diamond In the rough is my favorite.
Another shot of the engine bay.
Took her to the dyno
Almost made 300, but for a 5.3 on a dyno dynamics, I was happy. -
What brand of air dam did you buy bjhines? How does it fit?
-
Is there a better option that the urethane front air dam with ducts? I dont think I want fiberglass because it can crack so easily. Is one brand better than the other? Does say one from black dragon, or Msa fit better than the ones on ebay. I searched and couldnt find the exact answer to this question. Thanks.
-
As the title states... pm me or reply to this thread. Thanks
-
Pm me if you have a set that you would like to part with.
-
Has anyone out there seen both kits? I am about to pull the trigger on my brakes but I don't want to over pay by 350 dollars if it is going to function the same.
According to the gentleman I spoke with day datsun parts llc, they are the exact same calipers.
Thanks.
-
What size an? Im assuming -6 since you said 3/8 npt.
-
Should have taken your car. You always stress over the rules, most of the tech guys at these events want to see your car run about as bad as you wanna drive it. Id like to see what you do next time.
-
Your thread is the basis for my setup. I am much cheaper than you and went with the ebay gt45 that all the sloppy mechanics have luck with. (If you dont know what sloppy mechanics is, get on facebook and look it up)
If you had to do it again what, if any thing, would you do differently?
What fittings did you use in your oil return? 45? 90? Your kit is beautiful. Very good job on a home made build, I love it!
-
Run it Sunny z. Gap those rings and hone it and let it be. I had 3 cylinders that looked worse and I just honed it with the pistons still in the block and it dosent smoke at all. You are fine.
-
Took about four weeks for my set to arrive. Worth the wait and worth the money. Fitment is 100% correct.
-
I have been really good about working on the car, but not so good about updating my build thread. So let me start with the new shoes and flares.
I found the two rear and four of these tires on craigslist local to me
I then needed to figure out exactly how much I needed to cut off. Using the exact measuring of my buddys eyes, we figured this should be about right.
I used thes tools called Cleco's. These were instrumental in positioning the flares and holding them on the body line while i figured out the next hole to drill. You can find kits online with the tool to install them for around 25 bucks. you can see the clecos being used in the pic. If your doing flares on your z, buy them. Trust me.
First side cut....
I then trimmed the inner fender so I could bend it upward and make a flat arch in case the tire ever touched it. make sure that you remove the rubber on the metal between the inner and outer fender. If you do not get all the rubber out it will weld like crap. I used a needle scaler to remove it all and it worked awesome.
As I was bending it up (I used a hammer and dolly) I had to pie cut the inner fender. I didn't make a ton of cuts so that I didn't have a ton of welding to close it all back up.
Getting it closer...
Driver rear held on with clecos and car lowered a little more, looking good if I do say so myself...
I forgot to take a picture, But all I did was trim the excess metal off flush with the body line using a cutting wheel. I used a 120 mig welder on its lowest heat setting adding extra wire speed to help fill material in. This thin stuff is picky to weld.
Driver side cut and inner fender trimmed ready to bend upward.
Here you can see the front where I started to cut material out. The best advice I can give on the front is be patient and take your time cutting out a little bit at a time. It is difficult IMO to make the left perfectly match the right when trimming the front valence.
I know you are probably going to think I am crazy, but mid way into my flares I decided I wanted to have the Marugen Shoukai flares from RHDJapan.com. They seemed to just fit better based off what I read on the internet. I was lucky enough to have Keith give me the set he had, as long as I replaced them with a new set. From the time I ordered them it was 4 weeks for them to show up. They fit amazing, well worth the extra money if you can afford them. They are as close to the original ZG flares that I have found.
The front flares have a hard bend in the flare that matches the body line on the front fender nicely. I used nut setters in the body to accept the screws that hold the flares on. I used 1/4-20 stainless button head bolts, fender welting, and plastic caps for button head bolts to finish the flares off. I don't think I could be happier with how they turned out.
Marugen ShoukaiMARUGEN SHOUKAI Wide Over Fenders - ZG Wide Type Nissan S30 S31 - See more at: http://www.rhdjapan.com/marugen-shoukai-wide-over-fenders-zg-wide-type-nissan-s30-s31.html#sthash.52U7fsvZ.dpufMARUGEN SHOUKAI Wide Over Fenders - ZG Wide Type Nissan S30 S31 - See more at: http://www.rhdjapan.com/marugen-shoukai-wide-over-fenders-zg-wide-type-nissan-s30-s31.html#sthash.52U7fsvZ.dpuf -
You have seen my heap, I have all autometer. Programmable speedo (I love this thing, really smooth sweep and easy to program) tach, water temp, oil pressure, and fuel level. The basics...
-
Go to rhdjapan.com and type s30 in the search. Then under the filter select Marugen Shoukai as the manufacturer. It looks like the guy mixed flares from two of thier kits. Hope this helps.
-
I would like to comment on the Marugen Shoukai flares that are purchased from RHDjapan.
If you search this forum you will find a thread about a member that originally tried to start a group buy for the flares. In this thread he talks about language barriers and the difficulty he had in trying to find out the price. Then a person from rhdjapan stepped in and said he would deal with anyone from American that wanted to purchase the Marugen Shoukai flares.
RebekahsZ was kind enough to let me purchase/ replace the Marugen Shoukai flares he bought from another forum member here. They are an exact copy of the flares you have pictured in your post HS30-H. They have defined curves in the flares to match the fenders perfectly. The quality is second to none in my opinion. I will go outside and get good photos with my camera and post back to this thread. They fit 10000000 times better than the copies I tried from another supplier. If you want something that is as good as zg flares then look no further. They cost more money than other copies, but sometimes you just have to pay to play. Fender flares are one of those times. Blown away by the difference.
-
Chris started on my exhaust while I worked on all the loose ends. He started by making an x Pipe out of 2 180 bends.
I bought v bands to make removing the exhaust really easy. I bought all the bends in a universal builder kit from columbia river mandrel bends. There several tiny bends that have to happen to clear everything. I am really happy with how well it fits under the car
She runs and drives in this picture. It felt pretty good in the short little drive that I drove it. It was 11:00 at night and I had work in the morning so I could not drive it like I wanted to. I plan on working on it Monday and putting it through its paces. I did find out that the transmission I bought has something wrong with 5th gear. It catches loudly when you put it in both shifting up and shifting down. Hopefully it is just synchros. This thing is going to be a blast once I get these bugs ironed out. -
No, those are felpro head gaskets.


LS1 240 mounts (facts not opinion???)
in Gen III & IV Chevy V8Z Tech Board
Posted
From the pics I have seen posted of the CX trans mount, As rebeckaz said unless your car is close to stock ride height you are going to have trouble running the exhaust. I personally like my exhaust to be tucked up into the floor as much as possible. I also have my z fairly low to the ground. If you run 15 inch wheels you are really going to be in trouble. The ground clearance I gained ftom putting 17's on my car made all the difference in the world. I still stand by the fact that diy mounts are the best. For several reasons.
1. If you do it right you have more clearance to run stuff in the engine bay.
2. You can run a low mount alternator without worrying about hitting the cross member if you shave the stock mountibg places off the cross member.
3. You can buy sanderson headers and bolt them to the engine, then fab your mounts. That way you know the alt, headers, and steering shaft clear before you make the first weld.