

traininvain
-
Posts
16 -
Joined
-
Last visited
Content Type
Profiles
Forums
Blogs
Events
Gallery
Downloads
Store
Posts posted by traininvain
-
-
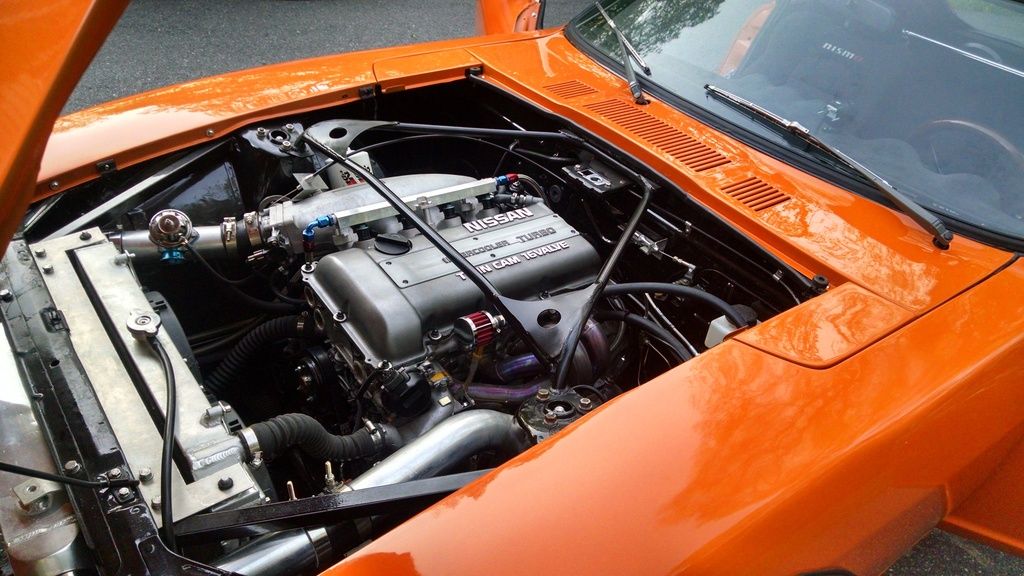
One of the nice things about taking a long time for a build is you can really scoop up deals and aren't forced to track down parts as you need them. I had been on the lookout for a larger T28 turbo, was thinking of a GT28 but then this minty fresh 2871R .64AR came up locally for really cheap and I scooped her up -

Greddy/Denso 720CC topfeeds to feed the beast
Found out later that topfeeds are low impedance and you need to run resistors on them or you'll smoke the injector drivers in your SR20 ecu. Caught that oversight just in time
-
For the head I went with BC springs and retainers and BC stage 2 264 cams. A subset of the BC retainers ended up having the wrong inner diameter and the valve stem keepers wouldn't fit. Even though they were second hand BC next-day shipped me replacements no charge - great service
Thankfully I had the sense to keep all the head innards in order when I disassembled
Bled lifters - but then ended up having to re-bleed them again later after the motor sat for over a year
Shimming the head was one of the areas I was least comfortable with - I couldn't find the tool that used to be made which sat in the SR lifter wells, so I made something from harbor freight goodies that ended up working out well enough but was difficult to use
Tomei 1.5mm headgasket = more than I paid for the block haha
All together -
-
Engine build actually started before I found the car itself - found a deal on an SR20det that was packed away in boxes and rags.
Initially I had intended to do a fairly stock build, and put a considerable amount of time into getting every bolt and hose accounted for, cleaned, and bagged up. It ended up that I utilized virtually nothing from this initial motor purchase - I think I used the head, valves, and the tranny along with a few misc sensors that seemed to be in decent condition.
Everything was dec-greased and sorted -
Then I found a crazy deal on an already-worked block locally. Bored .5mm over, decked, cleaned and ready to go. The block ended up being from an S14 (65F) bottom end so there were some minor issues to work through with the older not vvt head which was from an S13 (52F) motor. Mainly additional oil passages that needed to be blocked, and the front cover / oil pump don't share the same bolt pattern.
Which of course meant I needed new pistons for the 86.5mm bore . . . and new pistons need new rods of course.
-
Looking for the link that runs from the pedal to the throttle lever, through the firewall.
The plastic component to mine cracked and it doesn't want to stay on the ball anymore . . .
Prompt payment, reachable via pm or nate.p.holmes@gmail.com
-
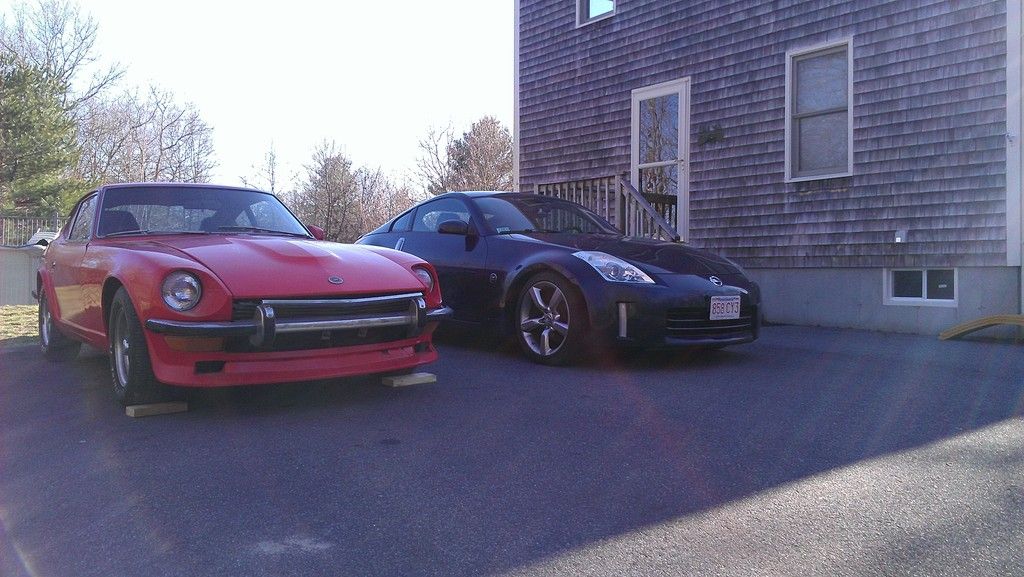
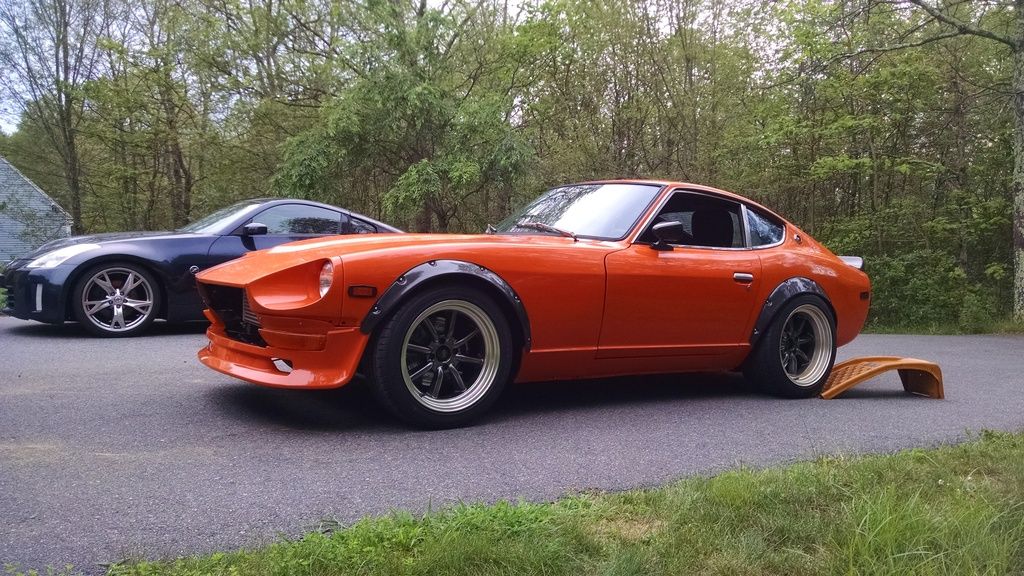
Finally got my project on the road after a long few years!
Though I know it's decidedly less enjoyable for someone to post an entire build at once, I didn't have the patience to upload pictures along the way so that's all I have. As with most things I took way too many pictures at the start - and then have only a handful to cover months of work later.
Thanks to all those who helped - both those here who lent a hand with the car when I needed it and those here on Hybrid who hooked me up with parts and advice when needed.
Bunch of bulk pictures up here:
If some of the build looks familiar, I did start a thread a while back but didn't bother to update and I think most of the links are broken anyway. Figure it will take a few posts to put the pictures up, and that may take me a bit, so in summary:
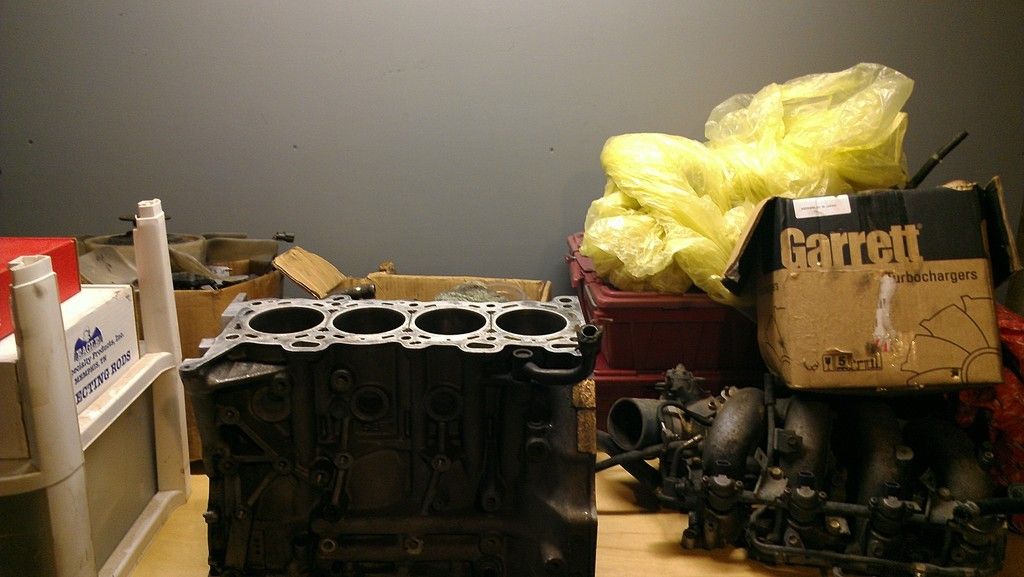
Over the last two years this collection of parts which was supposedly an SR20:
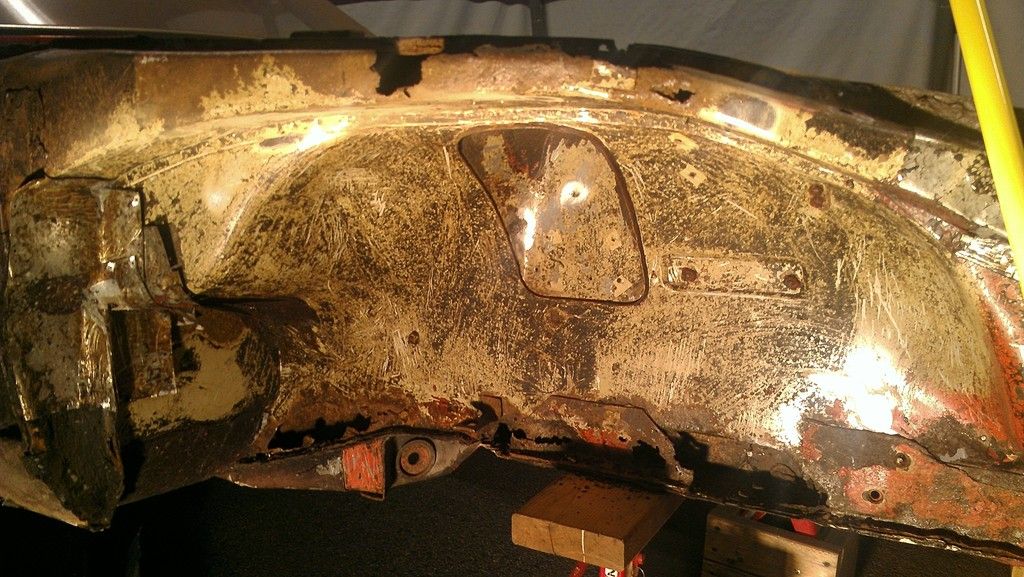
And this rusted out 73 that spent 40 years in Syracuse NY and was probably not worth calling a parts car:
Has been brought back to life
Work was made a bit slower by lack of a real garage, but my roundtop held up through winter and all. Burned a lot of propane through the winters, learned how to weld (and got too much experience), bought a lot of new tools, pretended I knew how to paint, and spent countless hours carting crap in and out of my basement to the tent.
Victory!
-
Thank you for the answer John! I guess I'll stay where it is . . . Thanks for the ofer TeamZ, don't toss them out just yet!
On a side note I went with 175 front / 200 rear springs with the ground controls and they seem a bit on the stiff side to me in a quick ride around. Next teir down maintaining about the same front / rear ratio would be to get a set of 160's for the front and move the 175's to the rear. Is that too soft?
No track work, just built it to enjoy around town and such.
-
Actually got it up where I wanted on the current setup, but I had to preload the springs to get the height (ie the springs are a bit compressed on the shock even when the vehicle load isn't on them). I suppose this makes the height loss when the vehicle weight compresses them less so its up a bit more. Is that a terrible idea?
Cloud drive comes free with Amazon Prime membership now-a-days. It has some cool features and its seems faster than photobucket plus they give you plenty of space.
-
Looking for a pair of the taller 260z/280z rear strut insulators if anyone had a set!
PM would work but an email to nate.p.holmes@gmail.com would be even better. Thanks -
-
So I screwed up a bit. I sectioned the rear strut tubes to fit a front length strut when I did my coils, and now it sits too low for me up in Massachusetts. Shes gotta go back up about an inch. Rear is at max height in this picture (also I put my flares a bit lower than I should which is making it a bit worse tbh. Interestingly I sectioned the fronts as well but they're just fine, I can adjust up and down in a reasonable rang.
I see my options as the following (flames accepted.):
1. Get original length shocks and either refab the rear or find new rear strut tubes to fab off. Lots of work, don't have parts, lots of money. Will probably do this in the winter, but I'd like to get it on the road for the rest of the summer as its the end of a 2 year project.
2. Does there exist a spacer I could run for the top? Would only have to be an inch. Something like this but that fits my the Z (feel free to laugh). http://www.amazon.com/MotoFab-Lifts-F150-2-5-Front-Leveling/dp/B00I5054M6/ref=pd_sim_sbs_263_7?ie=UTF8&refRID=16GD4BS43388VDP056HV
3. The 280z rear insulator appears to be about an inch taller than the 240z one! Is it offset in a way such that it would actually raise my height in the rear a bit? It appears to be . . . is this hoping for too much? http://www.thezstore.com/page/TZS/PROD/23-4382 Obviously not at that price but would it work?
4. I could bring the flares up a bit - I rub on the flares, not on the actual edge where I cut the fender back. Did I put the flares significantly lower than most folks do?
Thanks for reading -
I can't really bring the front down as I don't have a ton of oil pan clearance on the SR swap due to just how it seems to sit with the mckinny mounts. Plus I like a little bit of rake to the car, and right now its either dead even or the back might even be down a bit.
-
Almost done with my car and realize one of the doors I bought isn't a 240 door but rather a 260 which apparently my old regulator doesn't mount to.
Looking for the one like this:
http://www.showcargarage.com/gallery/files/1/260ZWindowRegulator001.jpg
with the spring on the opposite side of the handle crank . . .
I can be reached by PM or faster by email at nate.p.holmes@gmail.com
-
Paying more than you'd imagine, need something in the next few weeks
-
Bumppp really need to find one. Doesn't have to be mint just no rot
-
I think anything before the latch design was changed in 77? will work. Don't care about year as long as it works, need a clean straight shell with little to no rust.
I have all glass & mech but wouldn't be opposed to buying a whole unit. I expect to pay shipping to East Coast.
nate.p.holmes@gmail.com is better contact than PM but I will check PM. Thank you -
-
I used one of the small lamps that was actually the backlight for the original 240z gauges (read about 20ohms). Hooked that up to the second smaller wire off the alt, other side to positive. This brought my idle alternator voltage from 16.X down to 14.7 so all is well now. Seeing as that works I'll probably pick up a 1-2watt 20ohm resistor and be done with it.
Big wire of the 2 pin plug to live, small wire to live through a bulb or resistor (20ohms worked for me, if you use a resistor use something that can handle a bit of current).
Like many people I'm running a full custom wiring job and aftermarket gauges. We don't have the luxury of our car "having a charge lamp circuit that will do the job". My comment was intended to be helpful to that crowd as I was having trouble finding the info I needed.
Here's a picture of my hack-job of spare bulbs and resistors, for the kind gentleman above
-
I just got my SR running a few weeks ago, and my one remaining issue is that my alternator is making ~15.5 volts. I assumed the voltage regulator was just bad and started looking for another, but then I found this thread :
http://community.ratsun.net/topic/54092-alternator-wiring-on-sr20-install/
I had left the second (smaller) wire off the 2 pin plug disconnected. The larger wire is the voltage sense and I put that the power as you said. The smaller one though, apparently, usually runs through the dash charge light or a ~100ohm resistor to 12v. Apparently the alternator actually sources some kind of reference from this line or some such? I don't know. I found several other rather cryptic references to it needing to be hooked up.
I couldn't find a resistor but I found a few old bulbs so I'll see later this week what happens when I hook that up.
-
Well I have no video but she's running! All she needs now are wheels/tires, brakes, an exhaust and then all the interior and body work done....
- Dash went in - no problem there. Electrical is good. Mounted a PC680 in the tool area behind passenger seat.
-Tranny gasket was leaking into the bell housing and I found that the threads for the slave cylinder bolts were completely stripped. Pulled the tranny, new gasket, bell housing swap from another tranny (I picked up full longblock and spare tranny for parts a few weeks back. Spun bottom end). good and good. Switched clutches from a used Exedy stage2 3 puck to a Nismo full face as well.
- The sump I welded to the old fuel tank was too close to the rear bumper for me, so I tosssed it, cut the spare tire well, fuel cell went in. The one pictured actually leaks, Summit put a new one in the mail already no questions asked. Their service is phenomenal.
-Cheap ABS plastic adapter for 3" air filter to Z32 MAF cracked. Made one from 16G steel in about 10 minutes with the MIG. Not sure what I didn't do that in the first place.
- Did from the rear wheel arches forward in dynamat material.
-Installed a water neck spacer so I had a 1/8 NPT fitting for my sheethut water temp sensor.
Got all the fuilds in, everything hooked up and went to start. No fuel, no spark. Great -
-I had wired my top feed injectors so that the common leg between them went to ground ( I assumed the common leg was ground and that the ECU fed 12V to open the injectors). Turns out its the other way - constant 12V and ground pulled low by ECU. I should have looked it up. Rewired those and got fuel.
-No spark came down to a bad ignition switch that came with the car. It has full contact in the RUN position but only intermittent in the start position - causing me to lose the signal to my ignition relay only when cranking it. Wired around it while I wait for the replacement. Got spark.
Started right up! Idles a bit rough, but stays running. All systems look good. BB garrett 2871R takes a good 10 seconds to spin down after fuel cut and sounds epic. Can't wait.
-
Need a full passenger door for a 73. Someone chopped a 280 door with the different latch style on the car and I can't handle it.
Willing to drive pretty far in the Northeast to pickup. Local to Southeast MA / RI.
Would love it it had mech and glass but I would take a shell.
Fastest contact = nate.p.holmes@gmail.com
-
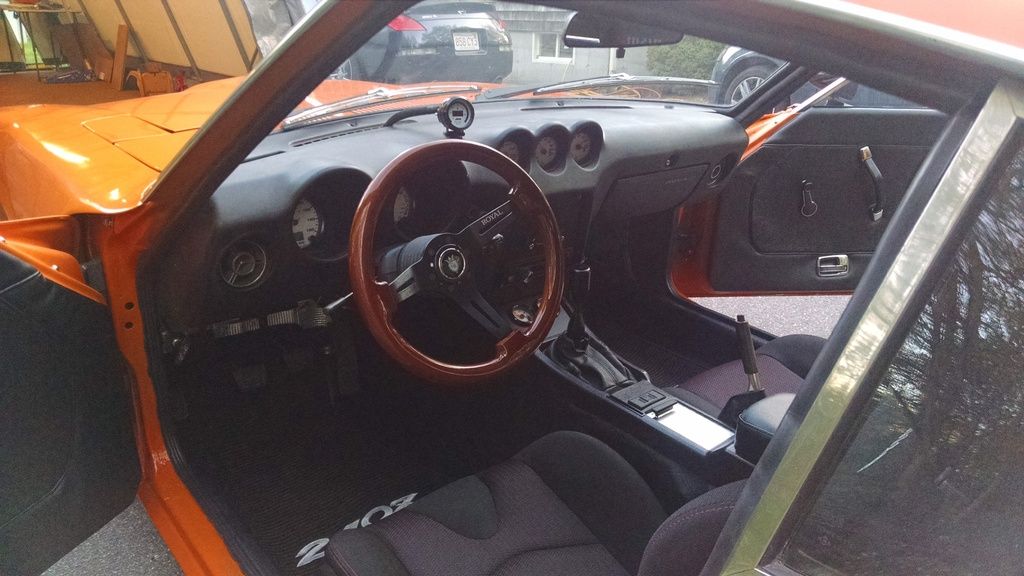
Finished my dash and started wiring. Center section of the dash is made of out steel with some brackets welded to the back, screws into the stock holes.
A work in progress, but I think I have all the right connections and everythings labeled so it should go together fairly well.
-
Enough motor fun, finally decided to tackle the rockersPOR15 inside, weld through pimer on mating surfacesThe good stuff arrived. Mckinney SR20 mount kit, driveshaft, throttle cable, TTT RLCAStocking up parts for the big assembly push. New brake master, clutch master, all bushings, ball joints, tie rod ends, wheel bearings, you name itBrought the spindles to my fathers for coil over fabrication.Threw my tranny on the spare block for lining up the mounts. Was a pain to get that in there with no hoist. Before you all say its too far forward, I put the shifter in the center of the hole in the chassis. That seemed like the right thing to do.Wiring harness for the SR20 really wasn't that bad but I wanted to sleeve it upCame out niceTook me a while to get a handle on the rest of the wiringLabels are essentialWheel bearings really aren't that bad when its all apart.How do you put 200ft lb on the stub axle when its not on the car? I mounted it to a wheel then set my toolbox on top of the tire. WinCoilover assembly finallySweet. Cheap KYB shocks since I coudln't find TokicosPut it all together in the basement to figure out what I was missing for bolts and suchFrontendFrontend of car, now in POR15. Which I did in May so it's full of pollen but whatever.The massive hoist returnsA day I thought I'd never seeMaking all the linesBrakes - I don't like the flaring tool I bought. I screwed up half of themGetting all the wiring inCouldn't figure out where to put the wilwood bias adjuster, so it went right in the middle.Made an aluminum mount to hold all the wiring jazz. Put some firewall material up - the space on the right holds the ECU. It's headed out to get flashed right nowThis part will be interesting - the dash wiring isn't even in there yet.Ditched the stock gauges, cleaned out the dash. Went with SpeedHutFor all the ruin of the car, the dash only has one blemish on the far passenger sidePut the Speedhuts in. I was going through making cool brakets and decided it wasn't worth it. Spray foam ftw.Needed to make something to hold radio / boost controller / etcRear end turned out to be a nightmare. I didn't take a lot of pictures, suffice to say I bought MSA quarter panel inserts and I am going to have to use a lot of fill to make it look decent.Cleaning gas tank up - went with a bottom mount sump. Ended up mounting it too far back I thinkWas too long for the flat surface, had to cut it up a bitTank straps were beyond usableYeah that j bolt is welded back together lolCut templates out of some stock, had a fried make them out of stainless for me at workHomemade tractor supply gas tank straps ehWell thats where I am now. Bodywork is looming over me, especially on the rear end, but I want to get it running first. Still need wheels and brakes as well. New ebrake assembly is on the way.Hoping for first start sometime later this summer if all goes as planned, interior and bodywork over the winter, and then have it sprayed in the spring.
-
Cut the crap out, clean it upTurns out I made too much of a corner out of it and came too close to the tire position. Had to fix later. Was trying to make a larger flat area for the battery so I didn't need a seperate tray I think.Pass floorAgain too much rot for the panelSimilar to the other sideStill itimidated by the rockers at this point so I left that area. I'd been circling around the main issue figuring out what to doOut that comesTried to find a parts car to source a chunk of the passenger side from. Failed, so I went at it.While I'm at it, I couldn't figure out how the radiator would mount. Plus I read somewhere reinforcing the front core was a good idea soI shall call her patches.I bought an S13 radiator, turned out to be too wide.Made a little panel for the top mountsIdk seemed like a good idea after I boxed the front core.Score. 370z Nismo seatsThis crap though. I didn't think I could makea the shape of the outside easily and that wasn't rotted (relatively speaking.)Not much original left. Wish I'd found a donor car. Or had started with another car.Finally got my other seat bracketsMade these to mount intercooler as I didnt like the positioning on the ebay mountLipstick on pigEnded up taking it all off again because I kept scratching it up. Now its POR15'd, doesnt look as nice but it doesn't nick up either.Used some square tube to mount the seats so they would slide on my 240z seat bracketsHad been cleaning and painting all the bits I would be using as I wentBack to the motor - head assembly. Had it cleaned up at the machine shop.I had been vigilent when taking it apart to label everything. My rocker shims were all loose when I got it though, so I had to make a tool to measure valve heights to place them.BC springs / ti retainersBC264 camsOn they goTwo of my retainers had the incorrect center hole diameter if you believe it. I called BC and it seems it wasn't that uncommon - they overnighted me two new ones with no proof of purchase or anything. Very pleasant to deal with.Bleeding hydraulic liftersShimmingTool I made, with the hydraulic lifters I just made sure the shims were flat across the two contacts of the rocker arm.Was missing something I needed for the motor to continue, started pulling struts apart for coil over fabricationPerch removalMe and one friend dragged the whole thing out of the car and into my basement down the storm door.Had to cut the spindle pins. I spent a lot of time and effort trying to get these out, in the end I bought a new set of rears for pretty cheap and tossed these.According to my photo timeline I was apparnetly waiting on my headgasket. Tomei 1.5m, .4mm over stock as my block was decked.Going togetherFound my turbo - 2871RGoing to kill the open R180 while I save for a STi R180 LSD in the rear. Seemed to be in fine shape. New fluid, new gasket, done
-
I've been working on my build / swap / resto / resurrection whatever you want to call it for about a year now. Figured I wouldn't post anything until I was sure I would see it through - I think that bridge has been crossed. This is just about a year of work I've got into it so far. Be kind to my welding, most of the early stuff was cut out and redone after I figured out how it all worked.The forum here has been a helpful resource so far, and the dozens of folks I've met for parts across NE have been great. I'm sure many people will recognize their parts here within. Thanks to those that have helped out.** Things I'm still looking for**Passenger door - car had a 280z door horribly aligned on. Restored the original latch style to pre-73 so I need that doorFront and rear brakesGunmetal group buy 17" RotasStock SR20 oil panBRE style spoilerAutopower roll bar***************************If you see something I didn't use, ask about it. It's probably for sale, I have tons of S30 and SR20 parts.***************************I'd been looking for a S30 chassis for a while, probaly 5-6 months and not having luck. I'd seen a number of nice shells, but at that point I was hoping to get something in decent condition and just drop an SR20 in, do a few mods, and drive it around.Not having any luck with the chassis and getting bored with my 350z, I picked up an SR20 in complete disassembly in cardboard boxes and what I honestly think were some kind of lobster crate? from a craigslist add. Turns out it was all there except for one rocker if you can believe that. Ended up not using any of the main components except the head and crank, but I got most of my money back from selling them off and the buy was useful for all the bolts and minor components.Spent a while cleaning what I had, at this point thinking I would be using everything. Lots of wire brushes and Simple Green.Probably spent a whole day online trying to figure out which bolts went where in the end.The mystery pile!Decided that stock SR20s are lame and decided to go for a 2871R .64 based build. Figuring I'd like to end up in the 375 HP range with decent response. Enjuku shopping spree ensued.Scored a deal on a already machined block that someone didn't need anymore. Later I would find out I had an S13 head and this was an S14 block - I found some material online about dealing with that and hopefully I did so appropriately. (the main difference is an extra oil channel in the S14 block for the VTC that needs to be plugged. Also had to get a new water pump, which wasn't a bad idea anyway). So I tapped that out with a small NPT that I can't recall and plugged it up.Shiny new block in hand, started putting things together follow the numerous guides online.I checked and rechecked but I couldn't find anywhere the crank seemed to be out of spec so I decided to go with it as is. Fingers crossed I suppose.Wiseco 86.5 over Eagle H Beams.In they goSince low-rush shells were too intimidating as a starting point, I was looking for a running vehicle of some sort. Eventually I settled on HLS30165828 - which in my inexperience I though things looked relatively square for the price. Turns out the car spent its entire life in upstate NY judging by a closer inspection of the paperwork. I've ended up using barely anything from the original car, but hey, its one more Z car still on the road in some fashion. Not everyone can start with Cali cars!The day I picked it up, somewhere outside Hartford.Couldnt' quite figure out what the deal with the flares on the rear was. Molded fiberglass I thought? Turns out it was chopped up galvanized under a pile of bondo but lets not jump ahead. More on that type of thing soon.Pulled the motor. Turned out to by an L28. Didn't know that - wonder what else I didn't notice.Started tearing things apart.Wtf is up with this frame rail that's not quite spare. Ah ok made of bondo no big deal.Hmm...Turns out the floors were sheets of galvanized riveted over the original, non-existant rusted out floors. The theme of riveted galv with bondo on top would become all too familiar.Both sides of courseI got depressed at this point and went back to cleaning up the SR20, painting brackets and stuff.I was contemplating getting rid of the car and finding another shell. I've never done any welding, had no idea where to start. Ended up figuring the reason I bought it was for something to work on so what the hell.Bad dog rails, bad dog seat brackets, MSA replacement floors, a whole ton of 18 and 16 ga sheet, bunch of square tube (not pictured). I think I ended up using 4 full 8ft by 4ft sheets of 18 and 16.Back to it - found some micesFenders also come with sections of bondo over galv. Rivets included free of charge.WTS frame railDrivers side floor areaPassenger side. I have no idea how the L28 hadn't broken through. I almost gave up again when I saw this. Still didn't own a welder at this point.YumSteering rack seemed to function fine at leastMade some templates of the steering rack crossmember plates, made them out of stainlessThis ones actually from Cali, thanks someone on here. Mine was too rotted.Decided if I was serious about this I needed somewhere to work. Should have occurred to me sooner I suppose. Up goes the tent.It's really not that bad to be honest. Theres enough room to work anyway. Lights, music, fan, honestly garages are overrated.At this point I bought an AutoArc 140? 120v model.I started on the passenger side and had no idea what I was doing. I ended up having to cut out most what I did here because I was embarassed by the work later.Frustrating part was having to keep hitting everything with a coat of primer even when pausing for a few days, too much humidity in the NE.I think I kept most of what I did from this point onBent these on the brake at workDidn't really know where to cut the floor at first. My rot went past where the replacement floor pan went in several cases.For the frontExtended the bad dogs with the small rails that came with the MSA floorsTotally warped the drivers side a bit building up too much heat. Was thicker than the 16ga stuff I'd been doing and I wasn't aware how easy it would warp the floor.I left it, it wasn't bad enough to matter to me, given everything elseScored new fenders locally in perfect shapeBad dog seat bracketsI didn't know how to deal with this, fudged it up and had to cut off what I did. Ended up getting new rockers laterWasn't happy with a lot of it that I did early - ended up redoing everything forward of traction rod pickup I think. But this is where I was atPassengers side is worse all around, but I had figured out the basics now.Went through 3 paint scrapers I think[
-
Looking for some rear end parts!
The rear transverse link (peice that goes behind the rear diff beftween the rear LCA bushings?)
Front diff mount bracket
http://240z.jeromio.com/images/DiffMountClean.JPG
Also need a new isolator for the front, figure I'll have to get that from MSA though.
Also I ruined one of the long bolts that mount the bracket for the front strut mount insulator to the front of the diff. If someone had one of those that would be great.
Car has stock R180, I know the later cars had one that made room to fit the R200. Either would be fine.
Local to Boston, MA area.
Shipping to 02780.
Thanks!
-
Jesse -
I have no plans to use the ones on the car I bought. I will take one of the drums off tomorrow and shoot you a few of how they look inside.
If you have two sets of LCA's, I would trade for one.
I'm down in Taunton, MA, guy with the red 73 you picked up the L28 from earlier this year.


Seat swap list for s30's
in Interior
Posted · Edited by traininvain
I got a set of Nismo 370z seats in without issue - not that they're any different than base 370 seats. Its a bit difficult to utilize the reclining lever without a bit of finger tip trickery though.