

Dat73z
-
Posts
755 -
Joined
-
Last visited
-
Days Won
3
Content Type
Profiles
Forums
Blogs
Events
Gallery
Downloads
Store
Posts posted by Dat73z
-
-
@240zturbo just to keep it simple and in one post, in my research there are ultimately 5 things seem to solve all turbo hardware failure issues:
1. Upsizing hardware to M10
2. Inconel or high temp alloys
3. Some form of mechanical locking hardware
4. Do not overtorque materials to yield
5. Don't trap heat in
Edit: added 5 but again since this is a carb setup everything is conpromise
-
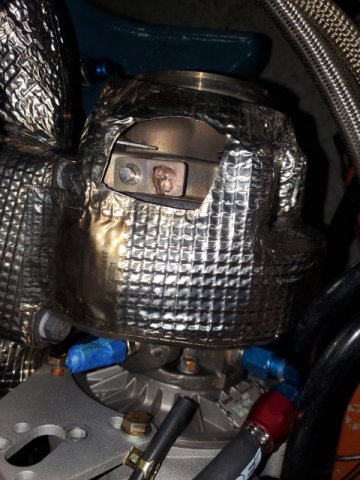
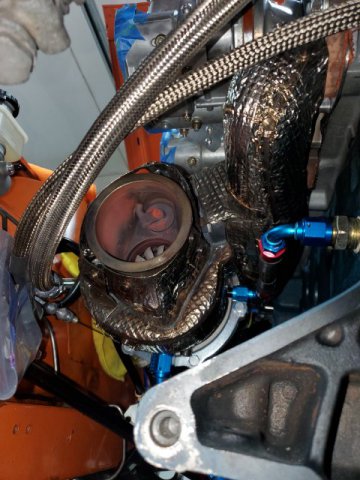
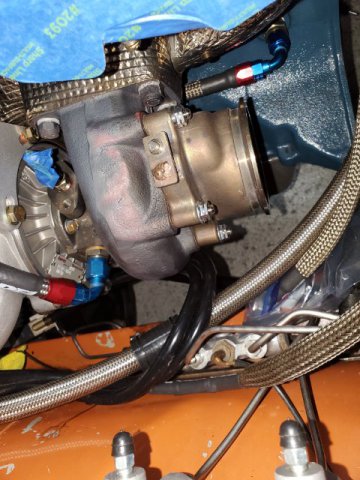
Tonight I test fit the rest of the stage 8 and modified hardware to the inconel shielding.
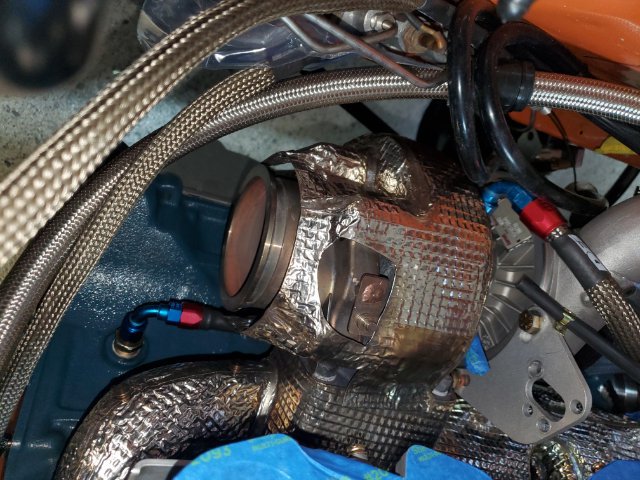
Things don't fit as well as they used to, mostly due to the hardware on the stage 8 being larger. Since the inconel shielding is just two layers of inconel with a ceramic layer sandwiched inbetween, I'll just bend the shielding a bit to hug nicer before the final safety wiring.
Debatably, Ive read online that inconel shielding and turbo blankets trap heat in allowing turbo hardware to heat higher and longer than they would exposed to free air resulting in high temp creep for the hardware. But since I drive this car on the street I'm hoping to find a compromise since I've found through this build that carbs and ethanol fuel in bowls above the turbo really benefit from the shielding. If it was a pure track machine I'd lean towards no shielding around the hardware at all for reliability since the carb radiant heat issues start coming up in stop and go traffic only.
Edit: Just to document this and perhaps only those that have run these setups know (which is the point of documenting this build thread since I've never seen this info out there...) but one thing I've found is when you're boosting, the atomization of the fuel and charge air cause the carbs to get ice cold to the touch. So even when you've parked and heat soaked to where the carbs have boiled over/fuel had completely evaporated and you will literally burn skin touching the carbs...after the first mile or so of boosting the carbs get ice cold and can have condensation building outside of them depending on ambient weather conditions. These are details I wanted to document here I've never found researching these setups.

-
Thanks @240zturbo. Lots of great information, just haven't had time to process it this week. It seems the dry trq spec for m8x1.25 in your table is 21ftlbs which is what I expected. I posted the torque values I intend to use but wet with Resbond in a prior post, which are close enough to your table I think.
Anyways now that it's Friday I'm starting back in on the build. Fortunately my resbond showed up so tonight I'll start back in on this turbine work.
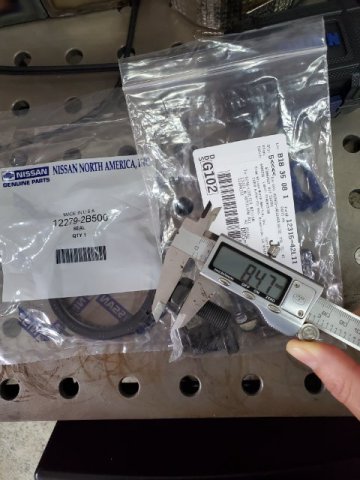
Unfortunately a supplier who was supposed to ship me an OE Nissan part sent me one of those aftermarket deals in a ziplock bag. So more parts delays again and changing of suppliers. Every time this happens, I feel like a week is lost in waiting, return shipping, etc.
-
@240zturbo in the video I posted earlier, I'm fairly certain all of the studs had stretched. I think the root cause was spiking egts when I was throwing fire out the exhaust with retarded timing when the crank pulley was walking off, but also I am running inconel shielding all around which traps the heat into the hot side.
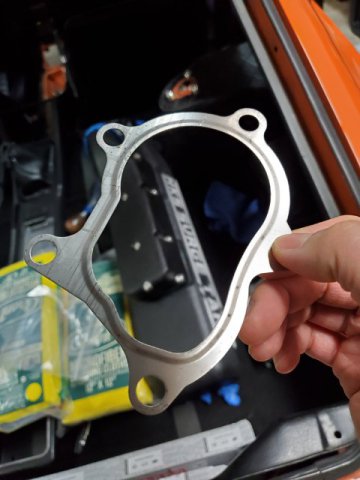
The gasket is actually a stamped SS piece with a raised lip, but it's only good for one use (attached a pic of the new gasket I have).
I agree simpler is better, but I also didn't want to order the same hardware to slam it together and have the same issues down the line which is why I'm now at resbond, inconel studs, and stage 8 hardware.
Edit: also for reference after going through all this and doing the research, the next iteration of this build with the next turbo will be all vbands and no gaskets including the manifold. No gaskets, studs, or hardware to fail.
-
Been feeling under the weather so I cleaned the house and garage a bit.
My buddy designed and 3d printed a L6 RMS install tool for me which was really solid of him...hopefully I'll pick it up this weekend, and I found a supplier in CA with fresh Resbond 907ts within expiration so I ordered a small quantity of that, just enough to do the turbine studs and nuts at least.
After some research (and it was pretty interesting, at least the materials aspect of it), it seems the turbine m8 nuts should be torqued to 21-23ft-lbs or so with resbond, and the m8 studs to 30-40% of that (~9ft-lbs) with resbond into the turbine housing. The key so far as I can tell is to not overtorque as that will cause the studs to yield/plastically deform thereby defeating the purpose of preloading the stud in tension. Since there is a range of torque the plan is to torque the nuts to the lower limit, and give them a bit more to line up the stage8 hardware against the wastegate housing.
A lot of words to lay out a plan to torque a few turbo studs and nuts but there's a lot of conflicting information and opinions out there on what works/doesn't work so if this doesn't work for me then I'll document that here in the build.

-
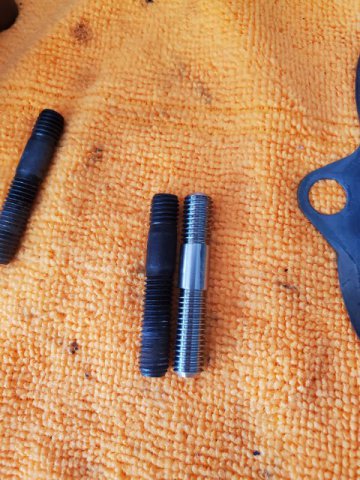
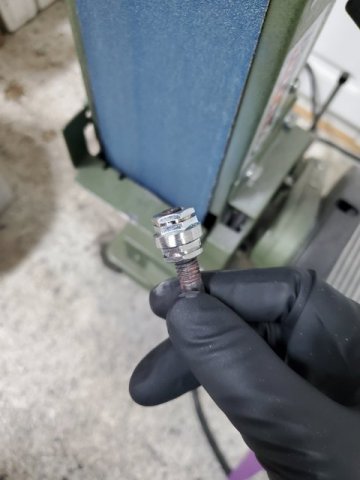
Out of time tonight but I got all the studs trimmed to seat on the chamfered shoulders.
Something always comes up but I think I'll course correct this week and hit all the turbine housing holes with my counterbore bit, carefully by hand just to clean up the seats. Order some resbond, and test fit/clearance my inconel shielding as the stage 8 hardware does add some volume. I really don't want to be pulling apart the turbo components again anytime soon.
Either way, things are looking good to get back on the road next month with a more bulletproofed setup.
-
This evening I started shortening the inconel studs which has proven difficult as it's a very hard material. Like everything else in this build, I'm learning a lot as I go.
The shoulder on the studs are fairly precisely machined to I believe 45 degrees or so, I'll need to confirm this with the manufacturer. It seems this mating surface is critical to also ensure it is prepared on the turbine side.
According to a lot of fast track turbo miata guys online, resbond 907ts on the inconel studs and stage 8 hardware is the way to go. Now to find a vendor who sells Resbond in small quanities which is not expired, as it only has a 6 month shelf life.
-
@240zturbo yes that is what I ran before and I'm actually tempted to run them again instead of this stage 8 hardware. Copper coated deformed head nuts from ATP turbo. They didn't loosen on me and so far as I could tell the failure was the grade 8.8 studs stretching perhaps from spiking egts and other failures I've documented in this build thread. I'm sure the inconel shielding didn't help either by trapping the heat in.
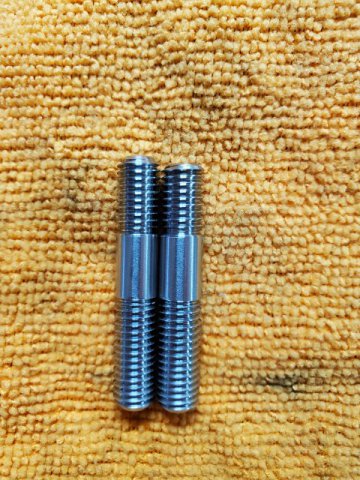
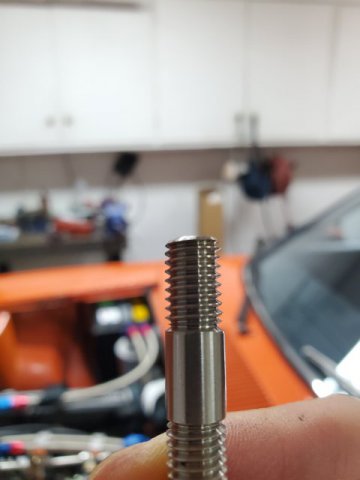
Moving on with the build, my inconel studs came in today. They definitely feel quality and the threads are well cut/are not loose at all, but the length of the studs into the turbine housing are a thread or so too long.
Based on some research, I shouldn't let the studs bottom out and instead be able to torque the stud onto the shoulder. So I'll need to trim the studs down a thread or so before installing.
-
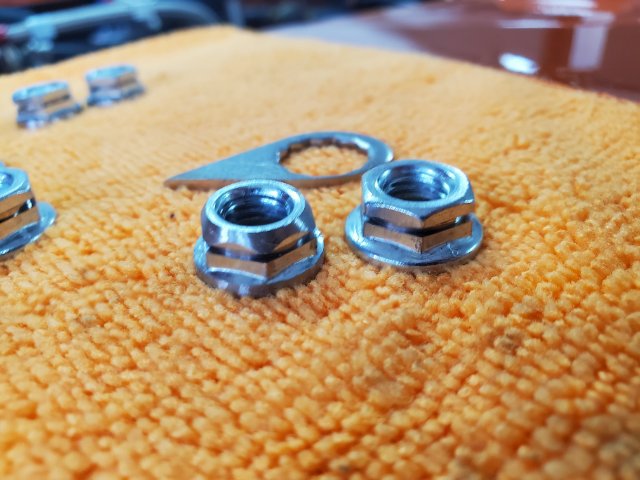
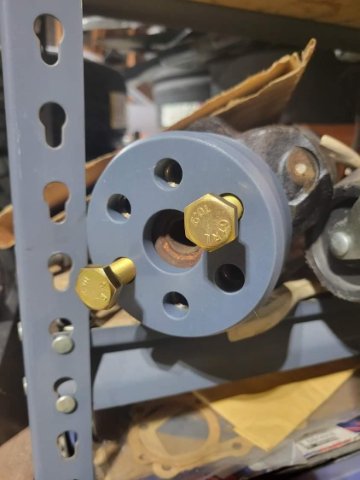
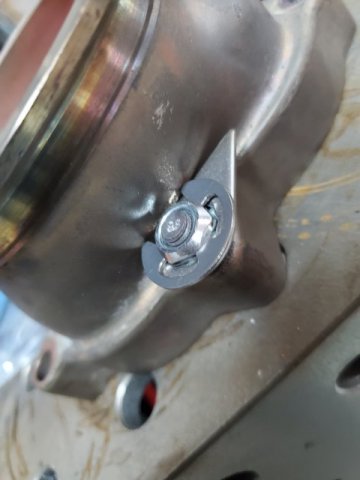
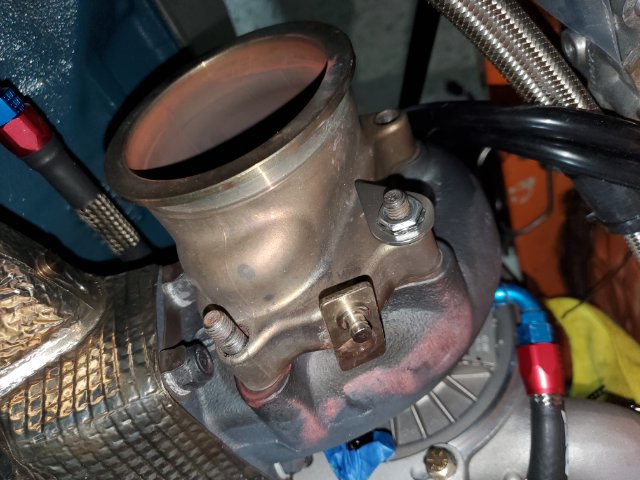
And a quick detail shot of how the hardware had to be modified.
The base of the stage 8 hardware, the head of the nut, and the locking ears all had to be ground down to allow assembly once everything is in the car for 4 of the 5 wastegate housing mounting points
Hopefully I can get the turbine reassembled tomorrow after work. Then the rest of the week will be driveline reassembly
-
After a long wait it seems my inconel studs will be in tomorrow so tonight I dusted off some parts and started back in on the build.
The stage8 hardware needs to be clearanced to hug the ATP gate.
-
It's been a nice long weekend. Some more parts came in including a new trans mount. I figured I would easily spend a day measuring and fabricating a mount from scrap so I ended up buying one. My engine and diff mounts are all poly, and my sus is all poly or spherical bearings so I think the trans mount is the last rubber piece.
The last item I'm waiting for before final reassembly are the inconel turbo studs, which are apparently waiting to board an international flight so hopefully they get through customs before Feb.
-
Been rained out and waiting for parts so I started investigating meth injection again.
I'm thinking if I could set up a system by rewelding the BOV on the cold side charge pipe so I'm not venting flammable vapors followed by some bungs for the injector nozzles all pre surge tank. It'll be a tight fit but I think workable.
I'm a bit worried about even distribution across all 6 barrels but perhaps the meth would flash off in the surge tank inlet, I'm not sure as I've never run this type of system before. The PO of my car actually had an oldschool meth spray system on the car when it was drawthrough turbo in the 80s but I have long since sold all of that system.
-
There is some adjustment in the Jbolted straps but tucked up like OE is better imo. My OE tank is cut and welded similar to how you have it up top for a fuel cell plate and the dimensions are similar to OE with the OE rubber pads. Since you are fabricating all of that as well see if you can match the OE dimensions, so your tank is appropriately level and doesn't hang low.
-
@AydinZ71 in my experience welding the cast s30 strut material you'll want to preheat and ideally have a big bucket of sand or something to cool it slowly. It welds really easy but it will crack out if you're not careful.
-
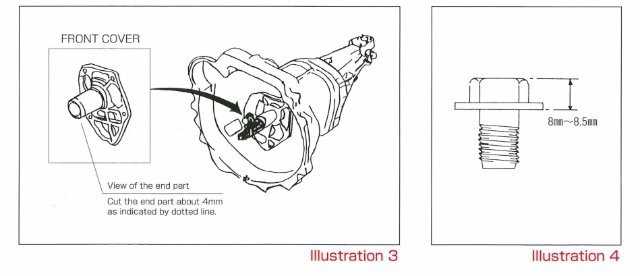
This AM I started gettings things ready for reassembly. The new Nissan flywheel bolts won't require grinding down like the original 240z bolts I had used prior, as the OS Giken spec on the TS2BD is 8-8.5mm.
I'm still waiting on some parts, mostly international at this point but there are some minor reassembly items I'll be tackling this week.
-
I think you have it pretty well covered. Hopefully someone can chime in on the EFI side. If you're going to push more power in the future I'd uprate the fuel lines to at least 3/8 or -6.
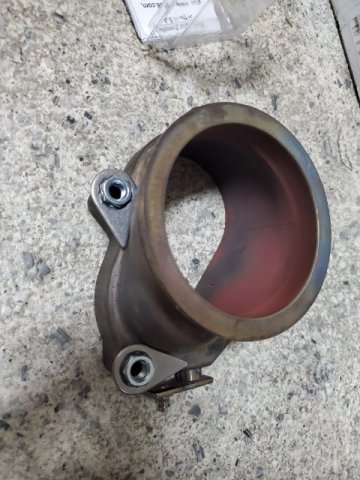
For the turbo make sure you look real close for any cracks. I think I've had bad luck with the two OE 280zxt Garrett air research turbos I had, both showed significant cracking on the hot side after removing the wastegate housings.
-
@240Z Turbo I'm actually having a custom square set of wheels barreled for the 245s once my centers get to the builder from Japan. They went via seamail over a month ago so it's been a long wait.
They will likely be 16x8-9 +10 front +12-20 rear with my suspension and no flares, but the plan is to do the final measurements once I get a center shipped back from my builder.
-
Getting rained out again so I put some more time into the build.
Tonight I pulled the leaky RMS, retapped all the hot side bolts, and test fit the stage 8 hardware. As with everything on this build I'll need to clearance some of the stage 8 hardware to fit is tight for a couple of holes.
-
Looks like parts are finally going to start trickling in starting tomorrow. It will likely be another 2-4 weeks until I get everything I need in.
This AM I removed the turbo studs. Whatever was left of the nickel antiseize had turned into black dust. None of them came out clean but the threads are still there, so I'll need to chase or retap the hot side.
I'm thinking when I was losing timing and throwing fire out the exhaust, my egts were likely spiking contributing to all of this. I'm tempted to pull the turbo and replace the hardware with inconel and stage 8 as well since I'm already this deep. I guess I'll simmer on it over this next couple of days.
-
Did some more tinkering this AM before work and realized I should probably add some bracing to the downpipe or midpipe as well. Although I welded in a flex on my downpipe I suspect the movement along with the heatcycles, especially with the inconel shielding isn't helping. Likely in its current configuration, I doubt the setup would last a few 20min track sessions.
-
I couldn't resist just continuing disassembly, since I need to measure out the studs for their inconel replacements.
All of the studs were still tight in the turbo and none of them backed out as I removed the nuts. I think I had torqued the studs in at 30ftlbs or so with nickel anti seize. The copper coating had burned off on all of the nuts which I suppose is expected when things get glowing red hot.
What I suspect happened is all of the studs stretched. Hopefully inconel studs and stage 8 hardware will mitigate this.
-
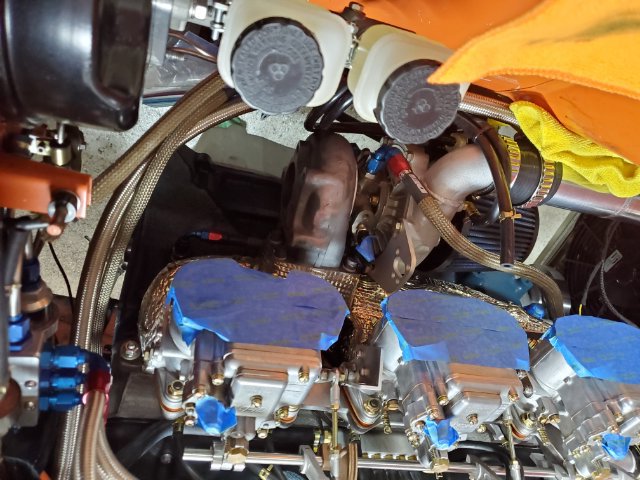
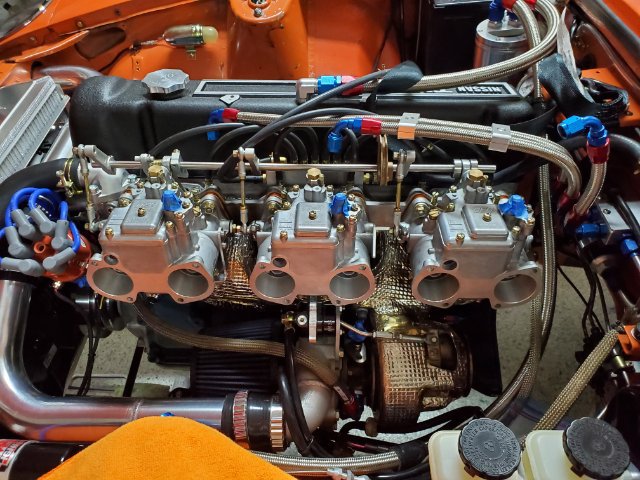
This evening I removed the surge tank to gain access to the turbo.
All of the carbs and barrels look good. I'm thinking after I get things reassembled, I will run things in NA for ar least one heatcycle and check the sync on the carbs before putting the surge tank back on.
If I can squeeze in some time in tonight I'll start removing the heat shielding over the hot side.
-
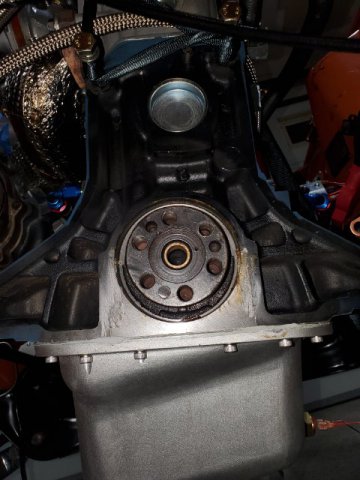
Last night I cleaned off the rear of the block. For sure the rear main is leaking, but it is questionable if the pan is. The new OE RMS should be in later this week, and flywheel bolts maybe next week.
Since I'm waiting on parts again, the (hopefully) last thing that I found on teardown which needs to be addressed is the loose wastegate housing.
After some research I went ahead and ordered stage 8 locking nuts which were quite expensive but basically like safety wire as it prevents the nut from rotating off. I also found a supplier for 718 inconel studs. Basically the idea is the materials selected should have similar thermal characteristics and also be resistant to high temp creep as to not lose tension and let the wastegate housing come loose as it has for me.
I'll need to teardown the turbo hot side and measure all of the dimensions before I order, so I'll start on that later this evening.
-
Thanks @rossman I'll take a look and weigh the options.
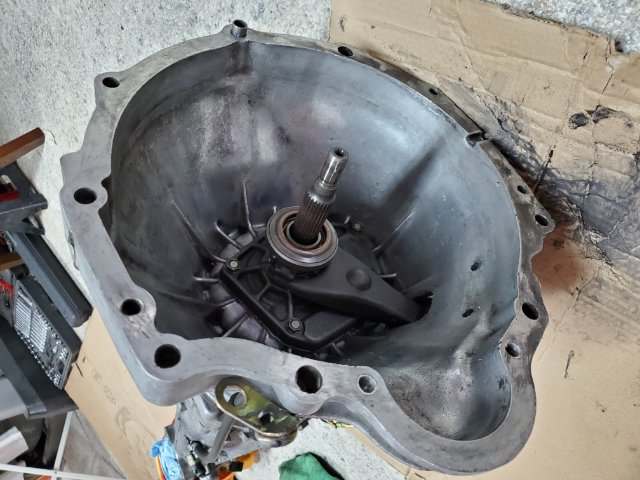
After getting my holiday lights down I went ahead and quickly cleaned the clutch and trans for reassembly, at least the areas that matter. No leaks from the trans as I had fully resealed it after machining and assembling, so the light oil I saw on the front edge/corner of the bell housing was likely dripping from the rear main as there's no way I can see how it made it there from the pan with the bellhousing plate in place.
This PM I'll start the removal process for the RMS as I've already ordered a new OE Nissan RMS. Hopefully it doesnt take a month to get here.


Triple Blowthrough Turbo
in Turbo / Supercharger
Posted · Edited by Dat73z
@240zturbo nice projects. Are the downpipe hardware exposed on all of them? I've seen people mention on roadracing forums to not run a turbo blanket or shielding over the hardware, I've been wondering if that could be an issue.
It was a nice weekend and since I'm still waiting on parts for reassembly I decided to pick up some tools for next week. A set of 3d printed L seal install tools from my buddy and a flywheel holding tool so I can stop asking my wife/neighbors/buddies for help at random hours.