nmehdikh
-
Posts
82 -
Joined
-
Last visited
Content Type
Profiles
Forums
Blogs
Events
Gallery
Downloads
Store
Everything posted by nmehdikh
-
I'll have both the intake and exhaust machined flat, but pulling the head to machine it again is quite a large time and money investment. Is this the oem gasket you are talking about? Do you happen to know the nissan part # so I can try and get it locally? https://zcardepot.com/products/manifold-gasket-intake-exhaust-oem-280z-280zx?_pos=8&_sid=3cfbea7cf&_ss=r Is this it? https://www.nissanpartsdeal.com/parts/nissan-gasket-manifold~14035-n3500.html
-
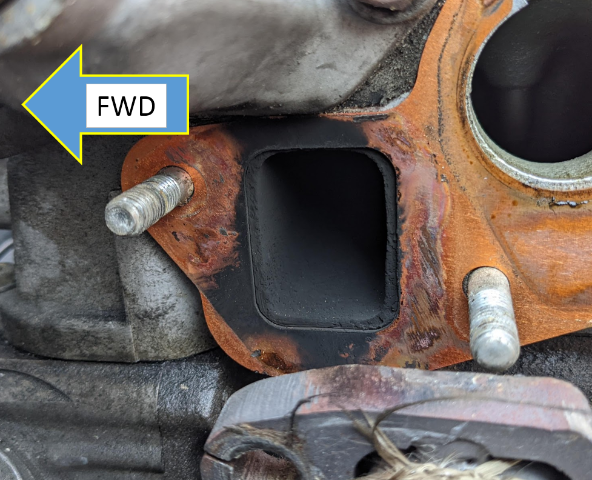
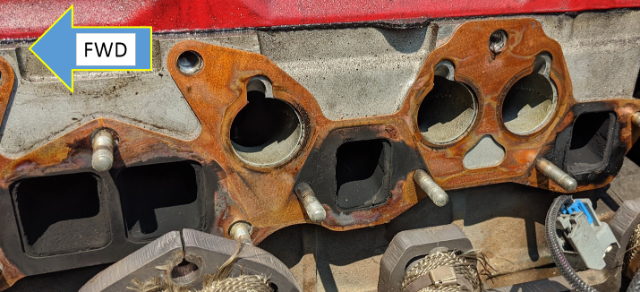
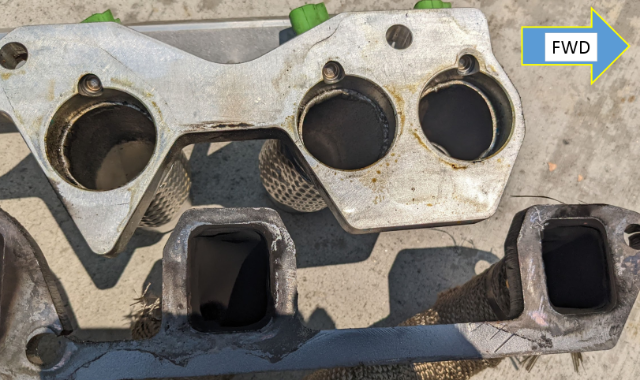
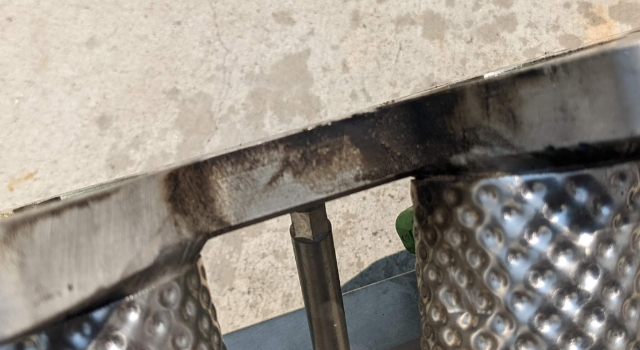
Hi guys, I've been battle exhaust manifold leaks since I've had the car. I can't drive with the windows down or else I get a immediate headache from the fumes. The head has been rebuilt and head side is definitely square/true. If you look at the photos, you'll see I am leaking from a few separate places. I am open to any and all suggestions, so please help. The intake side is custom ITBs that don't seem to be leaking anywhere. The exhaust is a header set from "Top end performance". The flange on the intake is much thicker than the exhaust, so I have a custom step down washer on the shared bolts, it is unclear how well this is working. Tomorrow, I will check the exhaust flange for squareness / true. And I will also get more pictures with the gasket (copper) removed, so we can see if there are marks on the head side. 1) Cylinder #1, exhaust leakingout from the top (towards thermostat) and downward/forward. 2) Cylinder #2, exhaust leaking straight up 3) Cylinder #3 and #4 leaking straight downwards. 4) Cylinder #5, leaking towards both sides 6) Cylinder #6, leaking in all directions. My gut is telling me the exhaust isn't square/true. I don't think this is from not getting the bolts tight enough, their torque spec is so low. Looking at most of the leak paths, and how this exhaust bolts to the head, it doesn't seem like tightening bolts would really help any of these issues. My plan of attack : 1) Check the exhaust manifold for squareness, and machine flat. 2) Check intake manifold for squareness, machine flat, and thin out sections (to match exhaust manifold thickness) that share stud with the ehxuast 3) Replace studs with allen head bolts and lock washers to make wrench access easier. A couple of the studs are very difficult to get tightened. I am aware studs are less likely to break, but I just can't tighten some of these studs down. 4) Replace gasket? What do you guys recommend? I previously went with the copper because it came highly recommended. Should I be using any sealants? Photos: Cylinder #1 Cylinder #2 exhaust Cylinders #3 through #6 With intake Cylinder #1 and #2 Cylinder #3 through #5 Cylinder #5 and #6 Exhaust leaks blasting intake manifold Thanks,

-
Looking for interior door panels for an early 240z. Car is a 1973. A lot of places used to stock reproductions but everyone I've talked to is on back order with no date on re-stocking. Does anyone have anything for sale? Used or reproduction are ok.
-
New diff. New Ujoints. New bushings. Rear end clunks. Oh joy.
nmehdikh replied to nmehdikh's topic in Drivetrain
I didn't place in a circlip, there was already one in there. However, the axle did not slide in very easily, so I wouldn't expect to slide them out by hand, even if they weren't seated. I had to use a rubber mallet to get them in, and I don't know if I get them all the way in. I can try prying them out and see if I get any movement. Or trying to hit them in further. Do we have a measurements of how far the flange should be from the diff body? I could measure it fairly easily. If they weren't fully seated, do you think they would be causing the source of the noise? Looking at pictures of the LSD taken apart, looks like the axles play no part in the diff's operation. Like you'd be able spin the diff without any axles installed and it should operate normally
-
New diff. New Ujoints. New bushings. Rear end clunks. Oh joy.
nmehdikh replied to nmehdikh's topic in Drivetrain
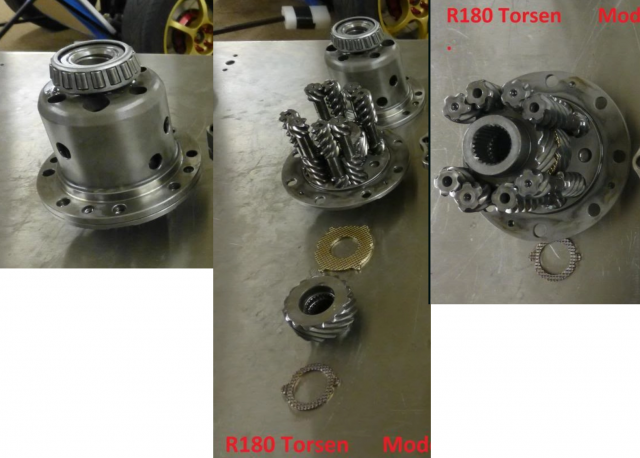
1) I'm using silverminemotors side axles. I'm not sure how to check if they are properly seated in the LSD. I tapped them in with a rubber mallet until they didn't seem like they were going in any further. I'll get photos in the next couple days https://www.silverminemotors.com/datsun/datsun-240z/drivetrain-26/lsd-r180-sti-out-output-flange-conversion-stub-axels Not the best photo, but its what I have on my phone off hand. Looks like the side axle is all the way in to me. Compared to what "moelk" posted on classiczcars a couple years back: Bad Good 2) yes, halfshafts have been driven on, which is why I'm ruling them out. 3) LCAs were swaped with T3 arms and have new bushings. Along with the rest of the suspension (new coilovers etc) 4) I plan on lowering it for the next set of testing.
-
New diff. New Ujoints. New bushings. Rear end clunks. Oh joy.
nmehdikh replied to nmehdikh's topic in Drivetrain
On the topic of ujoint binding, how much angle is too much angle? Now that I think about it, the coilovers haven't been adjusted yet, so the car is sitting relatively high (probably 2-3 inches higher than stock). So even when the car was on the ground and rolling, maybe that was still too much angle for the ujoints causing it to bind? -
New diff. New Ujoints. New bushings. Rear end clunks. Oh joy.
nmehdikh replied to nmehdikh's topic in Drivetrain
Sorry, the clunk occurs when applying power. Not just when shifting gears. Next weekend I'll try moving the jackstands and loading the drivetrain with the ebrake on. -
New diff. New Ujoints. New bushings. Rear end clunks. Oh joy.
nmehdikh replied to nmehdikh's topic in Drivetrain
The jackstands are under the body, not on the suspension. Before I had the differential out to take to the shop, I put the car down and went up and down the driveway. Still clunked hard. Also, if they were binding, I'd feel it while rotating the wheel by hand correct? I've rotated the wheels multiple times and there is no obvious spot its hitting/binding either. The clunk can instantly be reproduced by engaging the clutch, it doesn't even have to go a full revolution. -
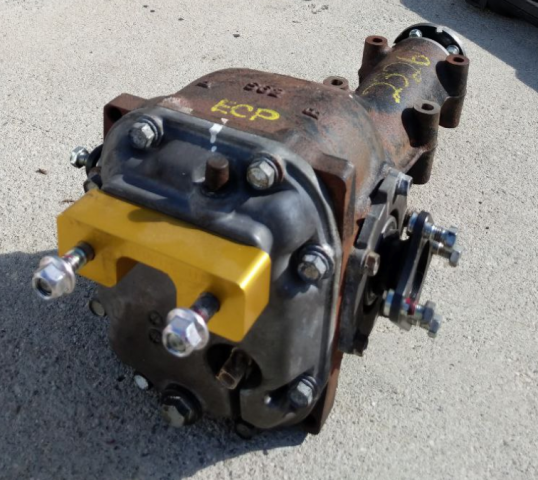
I have gone down the rabit hole of rebuilding my suspension and driveline. Car did not have any noises like this before I started. I installed a Subaru R180 out of a 2011 STI, with torsen LSD. Sitting on jackstands, going through the gears, there was massive clunking and banging coming from the rear end. Very apparent when going on and off the clutch. Checked to make sure everything was tight, no luck. Removed the differential, and took it to a specialty shop to check it out. The differential has a clean bill of health. If you hold the differential input, and try to turn the output, there is a bit of play. Differential guys said this is normal. Put the differential back in, hooked up the driveshaft only, no axles. Sitting on jack stands, going through the gears, clunking noises GREATLY reduced. Like down to 5% what it was before. You really have to listen for it. Hooked up passenger side, clunk is immediately back. Wheel off, clunk is gone. Wheel on, clunk is there. Wheel is not loose and has no play. Got annoyed and didn't bother testing the drivers side just yet. Things I've done before the clunk appeared: 1) While welding on coilovers to the rear spindles, I noticed the stub axle had some play back and forth. Further examination lead me to fine the peened nut had come loose. I replaced both sides with a new locknut from MSA, torqued the spec (close to 200 ftlbs) and the play was completely gone. Did not remove the stub axle or mess with the bearings in this process. Just took the nut off and put a new one on. 2) All 4 rear axle u-joints were replaced about a year ago. Car hasn't gotten many miles on it since, but they don't have any play. 3) New T3 suspension installed, including new mustache bar and drop mounts. I've also installed a Ron Tyler diff mount about 2 years ago on my old R180. The diff is in there solid, and there isn't any play when hearing the noise. I've tried jacking up the diff at different points and it doesn't budge. Thoughts / Ideas 1) I'm leaning towards maybe a driveshaft u-joint. With just the driveshaft hooked up, the noise is faintly there. With the added rotational mass of the wheel, it might be exasperating the problem. 2) My dad is convinced its a rear wheel bearing issue. I'm not buying it as I'd expect a consistent grinding/whirring noise. Not sudden chassis shaking rumbles. 3) Poorly fit splines somewhere: a) Differential input : factory subaru piece, just drilled to match the 240z driveshaft. Splines went it tight with no slop. b) Differetnail output : got output flanges from silverminemotors , they went in tight with a rubber mallet. Didn't appear to have any play c) Stub axles spines are worn out. I can't feel any play moving the two flanges relative to each other, but maybe the force from the engine is enough to cause some play. Any ideas on what the hell I'm chasing down here?
-
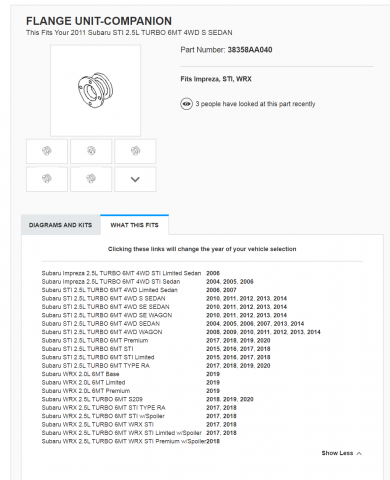
Yeah I cracked it open. It was as expected a 3.55:1 Torsen diff. Had all the proper markings on the outside as well. It also had the temp sensor built into the fill plug. Looking through the subaru parts diagrams, the companion flange appears to be the same throughout the model years. Part #38358AA040 Maybe there are differences in the Datsun R180 input flanges through the years?
-
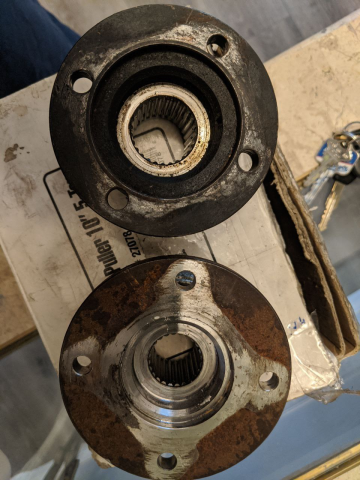
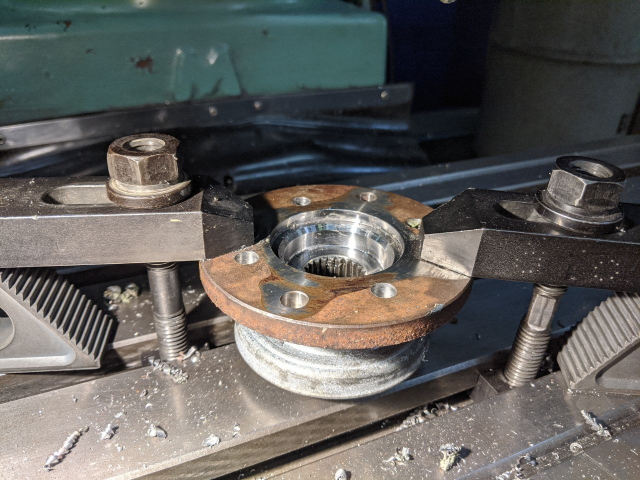
I bought a 2011 Subaru STI R180 recently with the intention of putting it in my 73 240z. I got the different stub axles, and they fit fine. However when I went to swap the pinion flange from the Datsun R180 to the Subaru R180, I was surprised to fine it doesn't transfer over at all. The Datsun pinion flange bore is much larger than the Subaru, by about .5" in diameter. So it doesn't engage with the splines at all and just rattles around. Am I missing something here? I was under the impression it should just swap over. My solution was to just take the Subaru flange and drill the Datsun pattern on it. Datsun flange on top. Subaru flange on the mill
-
240z with L26 - ITBs, EFI, megasquirt
nmehdikh replied to nmehdikh's topic in S30 Series - 240z, 260z, 280z
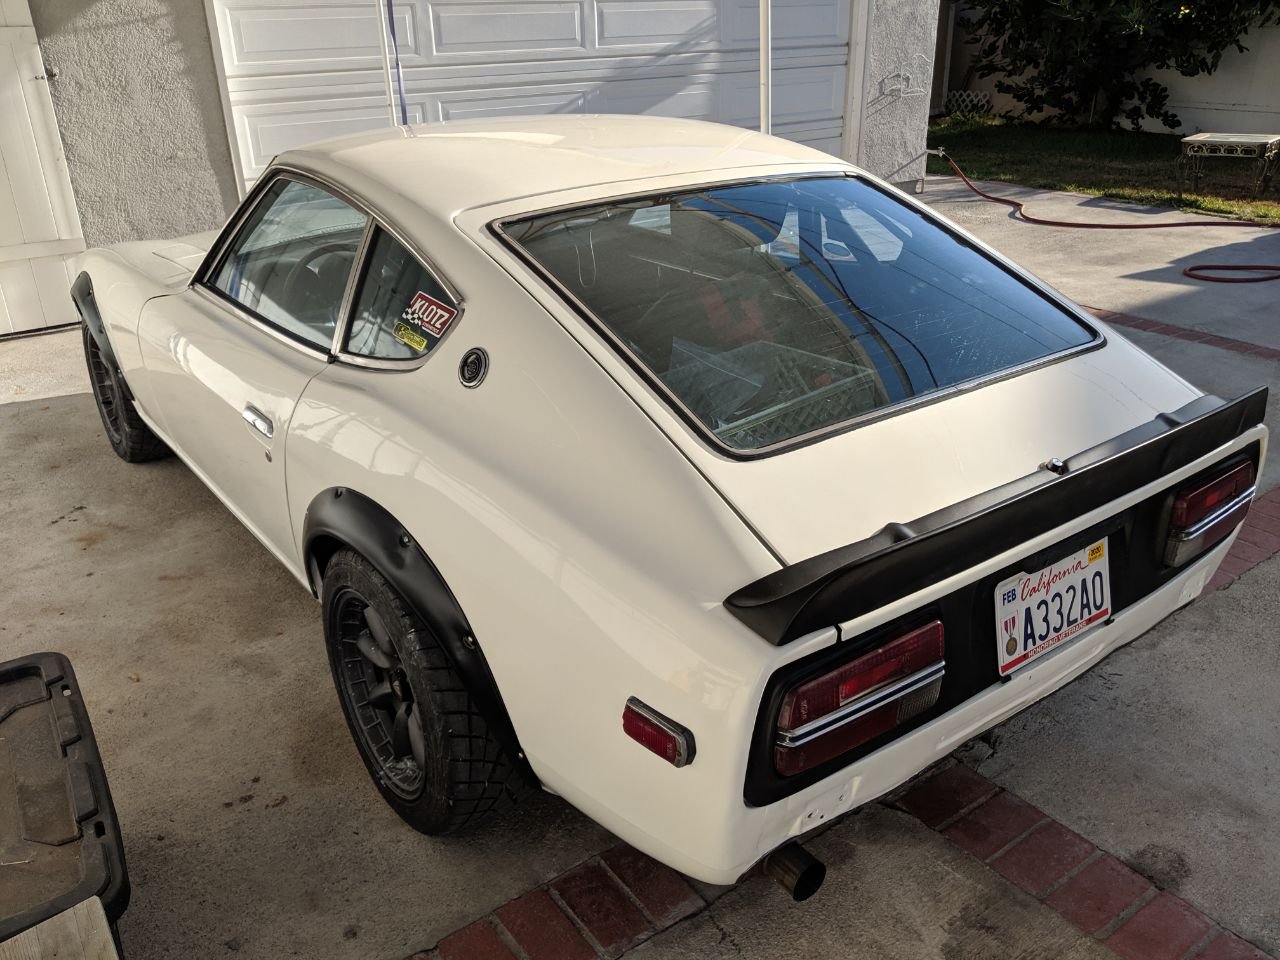
Had some time this weekend to buff the paint and start putting it back together. Still need to get the front end put together.
-
240z with L26 - ITBs, EFI, megasquirt
nmehdikh replied to nmehdikh's topic in S30 Series - 240z, 260z, 280z
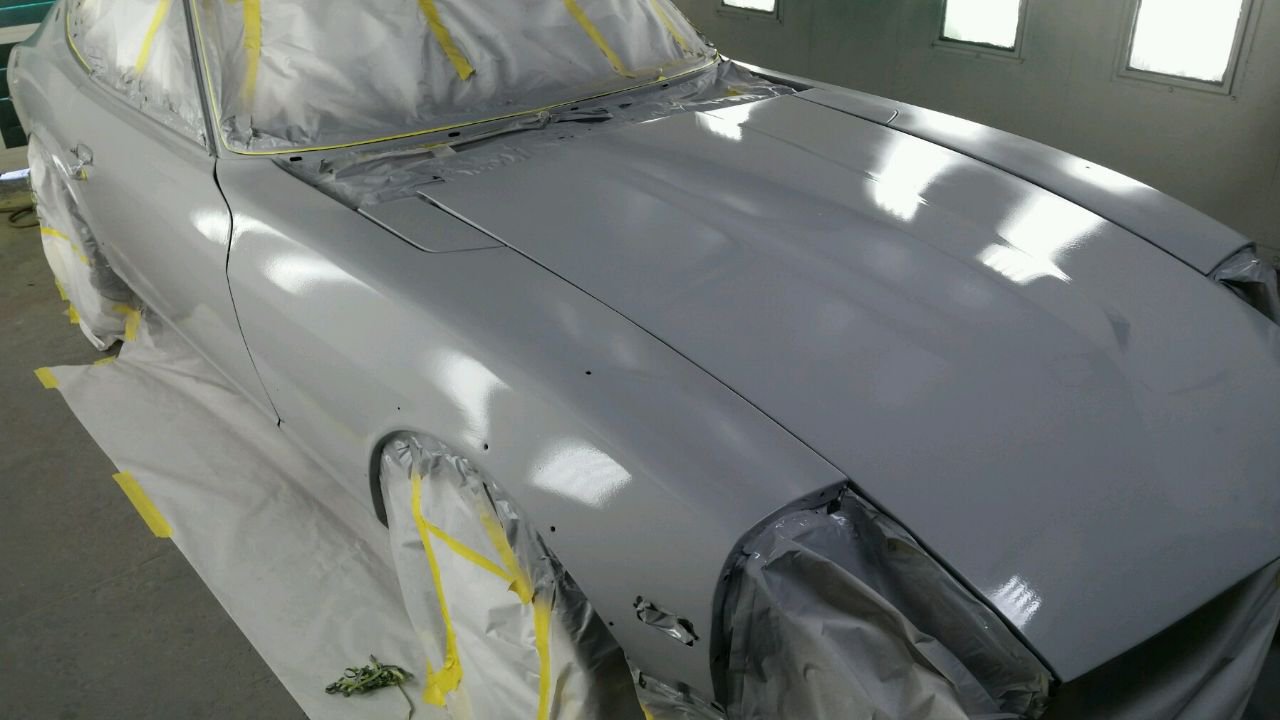
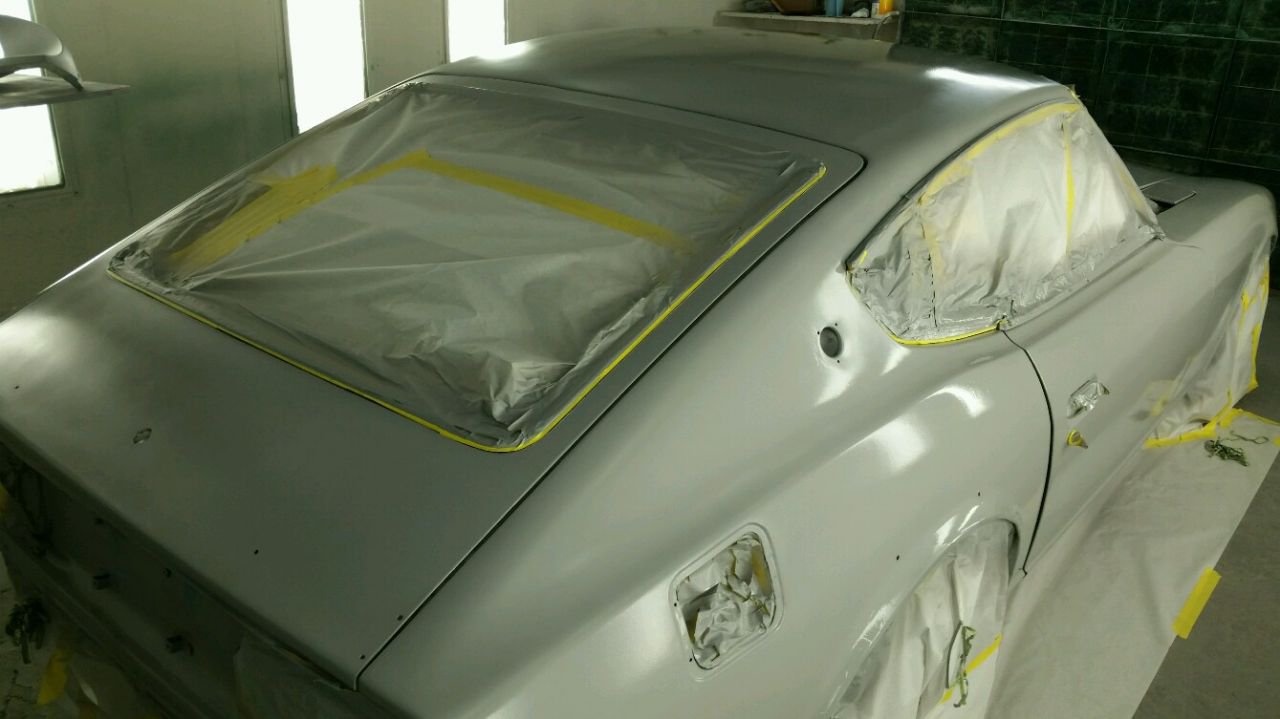
Bodywork and paint done by my dad. Paint code is NH0, Honda championship white
-
240z with L26 - ITBs, EFI, megasquirt
nmehdikh replied to nmehdikh's topic in S30 Series - 240z, 260z, 280z
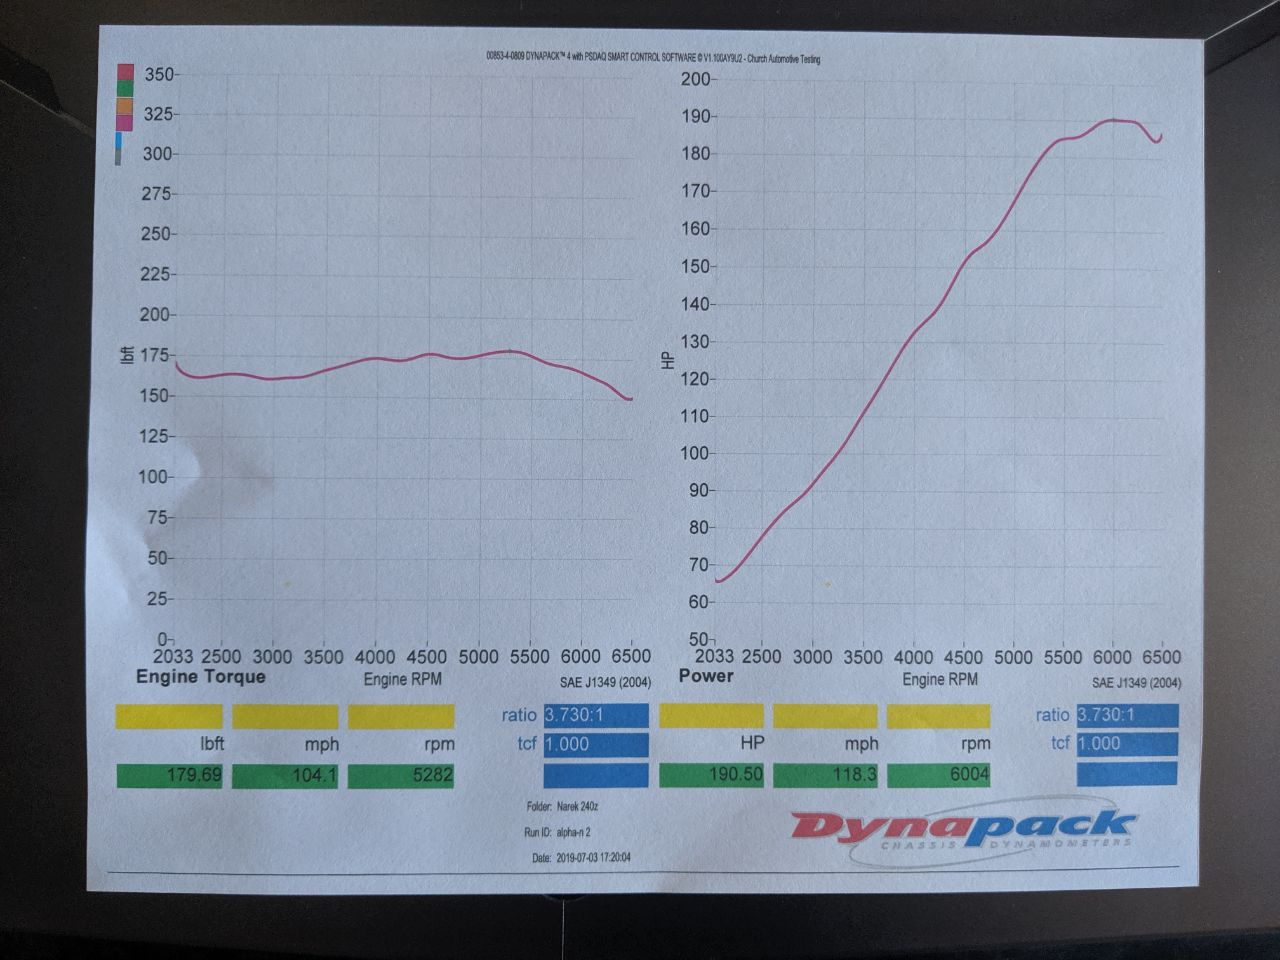
I don't know anything about the bottom end of the engine, just that the block is stamped L26 and it has flat pistons. The head is a N42 that I only had rebuilt and got a Isky L-490 cam on, as well as new valve springs etc. Didn't do any head work. The header is a "Top end performance" 6-2-1, with mostly a straight section with followed by a relatively small magnaflow muffler. Besides that its just the whole EFI / ITB setup. I'm honestly very surprised how much power it made, I was expecting 160-170ish. -
240z with L26 - ITBs, EFI, megasquirt
nmehdikh replied to nmehdikh's topic in S30 Series - 240z, 260z, 280z
Finally hit the dyno, made 190 horsepower to the wheels. Very happy with the results. https://photos.app.goo.gl/qB5vufWp9q44WQiA9
-
240z with L26 - ITBs, EFI, megasquirt
nmehdikh replied to nmehdikh's topic in S30 Series - 240z, 260z, 280z
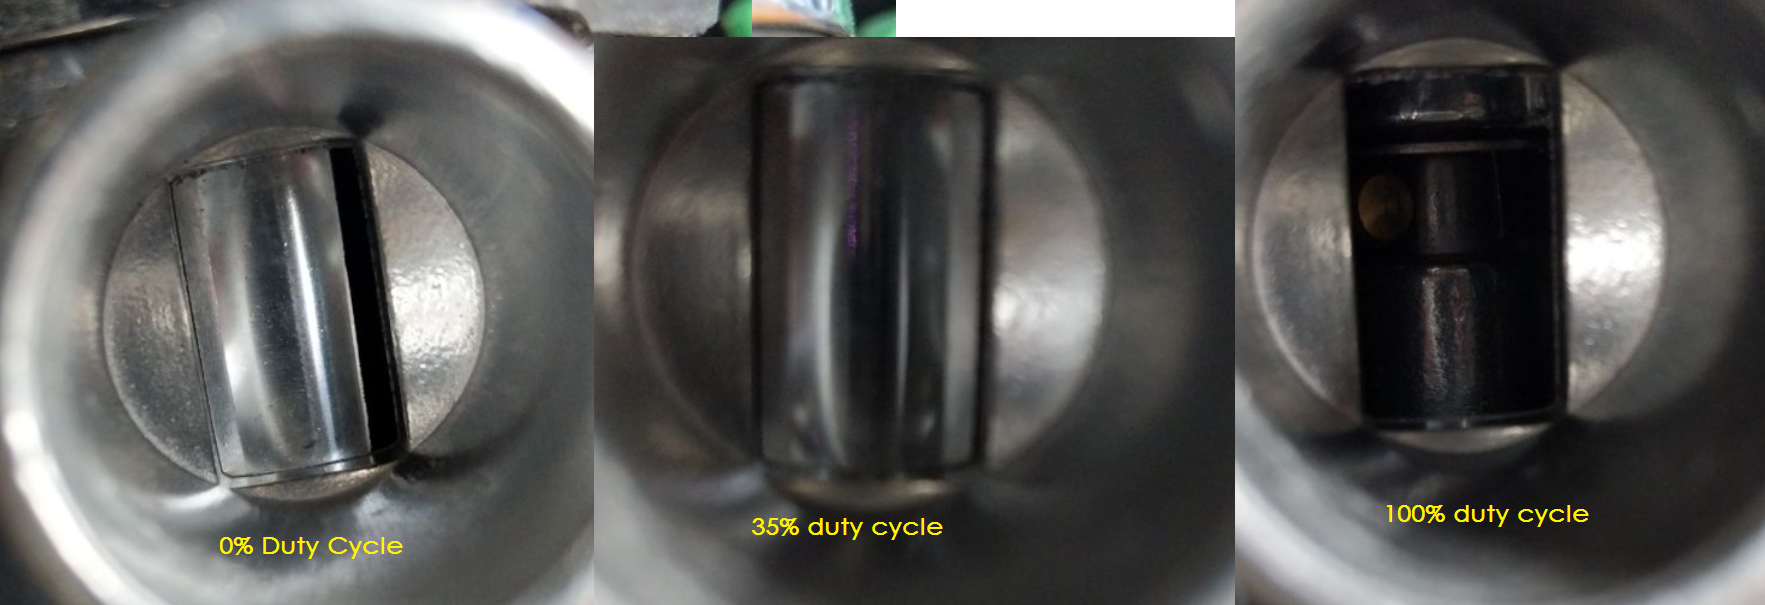
I'm really scratching my head over this. I swapped out the IAC with a new one. Car idles stable at 550 rpms, but regardless of what the IAC is doing, the RPMs don't change. The valve is physically opening and closing when commanded by the ECU. (click the pic for better quality) At fully closed, the valve is still moving air through it. At fully open, the valve is still moving the same amount of air through it. Blocking the valve with my hand kills airflow to the engine and stalls it. Car is warmed up to temp and idling stable in the log. The only possible thing I can think of is the plumbing from the IAC to the ITBs isn't large enough to move enough air, but I seriously doubt this is it. Any ideas? -
240z with L26 - ITBs, EFI, megasquirt
nmehdikh replied to nmehdikh's topic in S30 Series - 240z, 260z, 280z
99hz. The valve moves as expected, and responds to ECU commands. I just wasn't getting a change in RPM, which lead me to believe I had a vacuum leak. Which made me check the valve at "closed" and it was still pulling in air. -
240z with L26 - ITBs, EFI, megasquirt
nmehdikh replied to nmehdikh's topic in S30 Series - 240z, 260z, 280z
I got in a new IAC, but haven't had a chance to mess with it yet. I'll try your suggestion this weekend, thanks for the input. My bigger issue is that I wasn't really getting any change in idle speed regardless of the position of the idle valve, which leads me to believe I may have a vacuum leak to hunt down as well. -
240z with L26 - ITBs, EFI, megasquirt
nmehdikh replied to nmehdikh's topic in S30 Series - 240z, 260z, 280z
It's driven from the megasquirt and behaving as it should. At 0% duty cycle, its slightly open. At 35% duty cycle, its fully closed. At 100% duty cycle, its fully open. The 0% slightly open mode is a fail safe mode. This thread shows the expected behavior of the valve. Here is my valve, as you can see at 35% duty cycle, its closed. But it seems to not actually be sealing shut.
-
240z with L26 - ITBs, EFI, megasquirt
nmehdikh replied to nmehdikh's topic in S30 Series - 240z, 260z, 280z
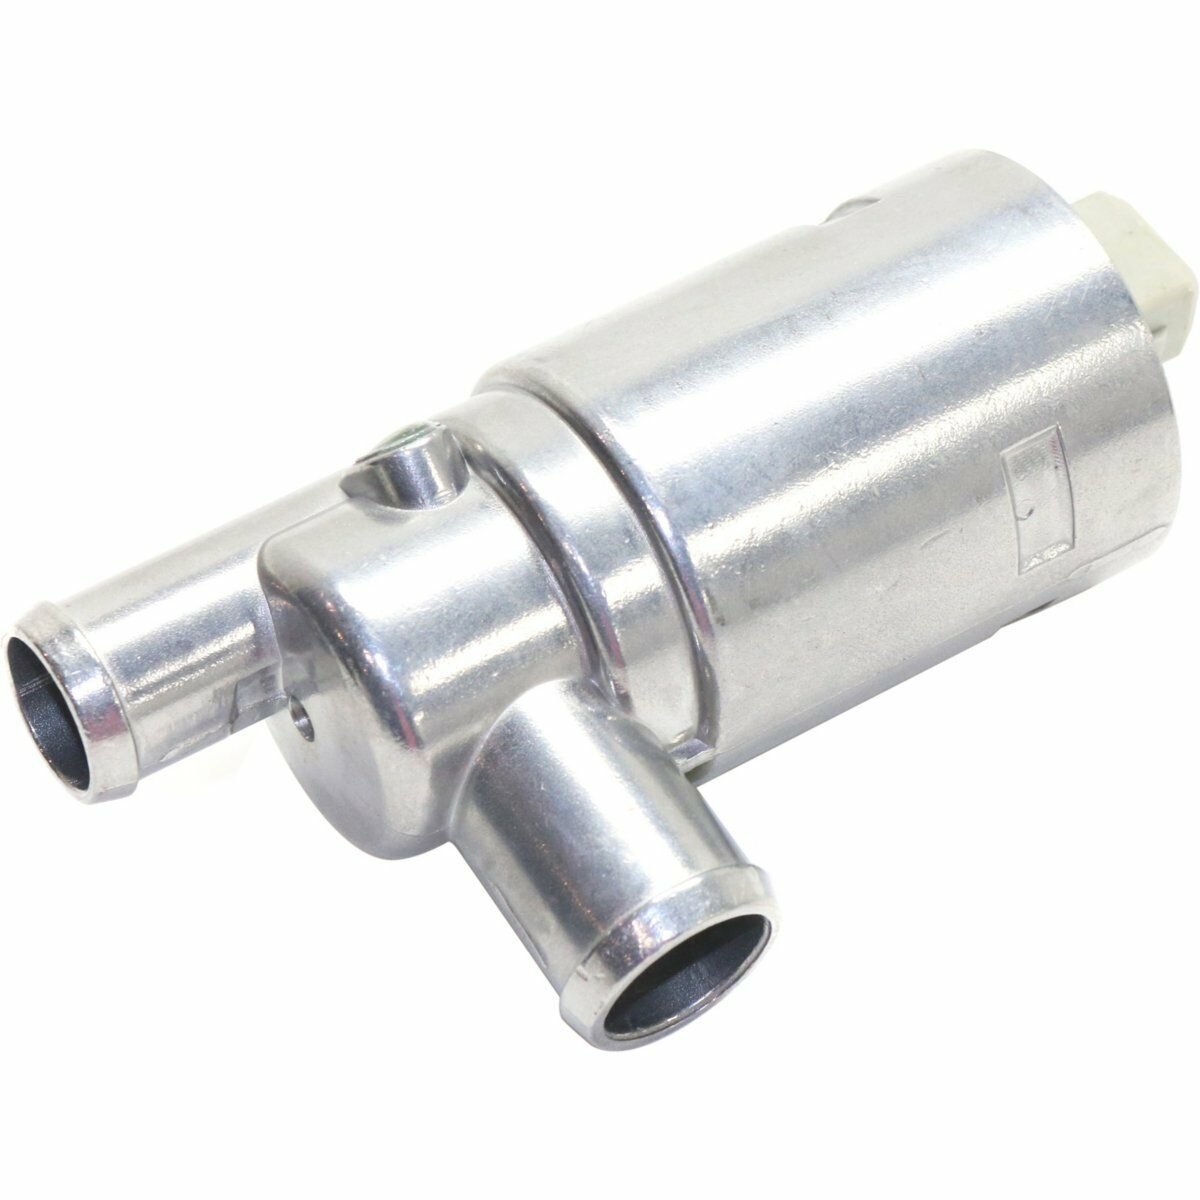
Yeah I hear you, just slowly ticking away at it. I have a question about Bosch Idle valves if someone might have some experience with them. I'm using a bosch IAC out of a early 2000s VW (pictured below). The valve behaves as expected, and I can see it close at the proper duty cycles. However, it's only effecting my idle by about 50 rpm. If I put my thumb infront of the idle hole, I can still feel a lot of air being sucked in through the valve even when its fully closed. If I fully cover the IAC intake, the engine shuts down. Are these valves supposed to seal at fully closed? Or do they still leak air by? I think I might have a defective valve.
-
240z with L26 - ITBs, EFI, megasquirt
nmehdikh replied to nmehdikh's topic in S30 Series - 240z, 260z, 280z
Its been a while since I updated this. Work and grad school really taking up most of my time. But if any of you guys are interested, this crazy idea actually worked. I was able to fire up the car a couple days ago. I wouldn't have been able to do it without the help of softopz or chickenman, if anyone is considering a megasquirt setup, definitely contact them. Here it is warmed up and idling. I haven't messed with the idle screws on the ITBs at all, nor have I completely figured out my IAC yet, but it manages to maintain idle all the way down at 550 rpm. I did a cold valve adjustment when I put the head on, and rechecked it again after running it for a short bit, but I am still getting a lot of valve train noise. The head was rebuilt since the car last ran, and it now has a isky L-490 cam in it. Isky recommended valve clearance of 0.008 for intake and 0.010 for exhaust. https://photos.google.com/share/AF1QipN_NSWTqU1tN3p8_JVp7szJaDdhc5ZWN0e7GPRV5N3Po2cQ5dEdTi5KxlpcsvwEbw?key=M1h6WjB6LVFYa1pBNkFkUWpDdy1scnVnZ3RYT3NR Here are some short revs to 3k https://photos.google.com/share/AF1QipPw4LY1RrPY9tM2cJXfVbCpmwAxgEaBIFc62txmmWP2fCwzQAILc4LDuIZNwGHQ7w?key=akJQbnRiSzdaNFhTU2JCdExZZ2pfQ3h1eTF2a05n -
I came here to reiterate how helpful Chickenman is. I wouldn't have been able to get my car running without his help. If anyone is considering anything to do with megasquirt, I'd definitely recommend contacting him.
-
240z with L26 - ITBs, EFI, megasquirt
nmehdikh replied to nmehdikh's topic in S30 Series - 240z, 260z, 280z
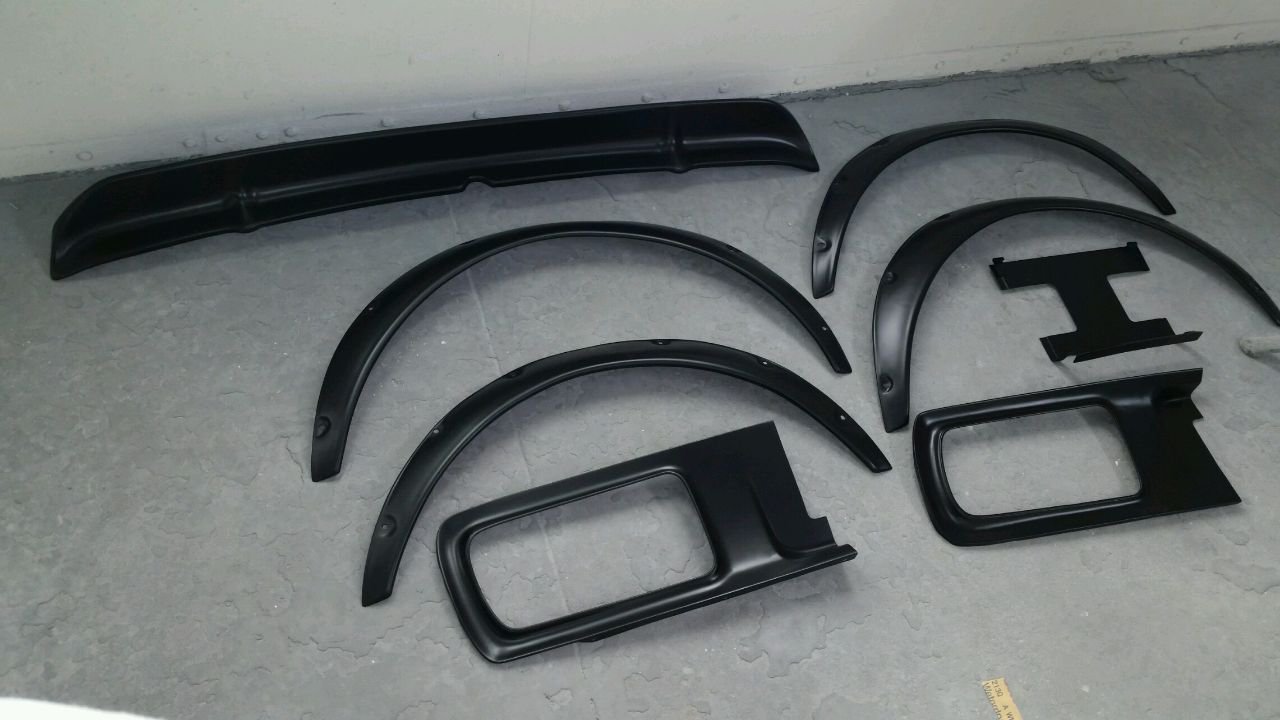
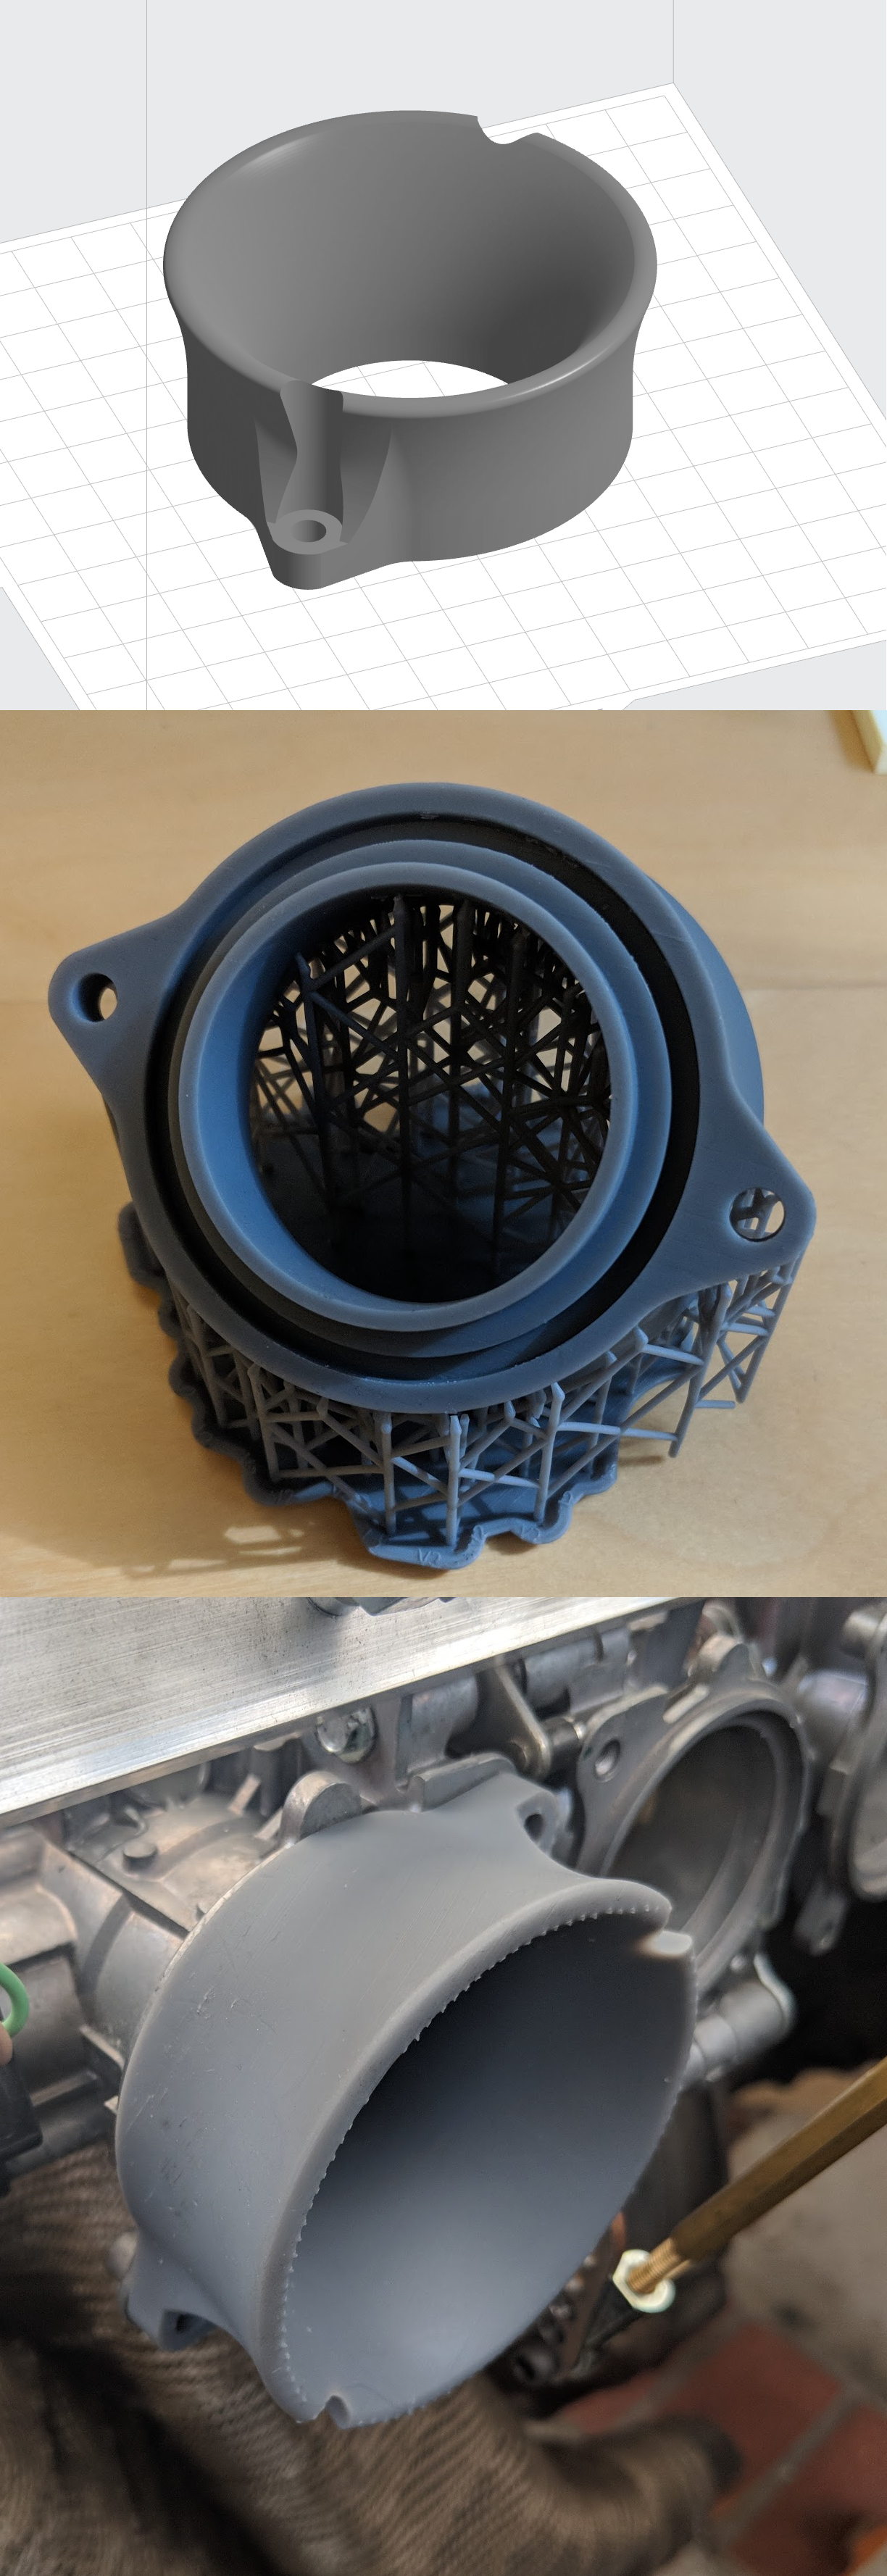
Updates! 1) Got the vintage air unit mounted under the dash and AC lines plumbed to a bulkhead fitting in the firewall. 2) Plumbed heater hoses to the vintage air unit as well 3) Got fuel lines completely finished up and mounted up. Including regulator and tank vents. 4) Started plumbing vacuum lines, about 75% done In the next couple of weekends I'll probably be finishing up the vacuum lines. Then mounting the radiator, fan, and coolant plumbing. I also had some time with one of the 3d printers at work, so I modeled up a velocity stack and printed it for some practice. The surface of the print has not been cleaned up at all, hence the left overs from the supports and rough finish.
-
240z with L26 - ITBs, EFI, megasquirt
nmehdikh replied to nmehdikh's topic in S30 Series - 240z, 260z, 280z
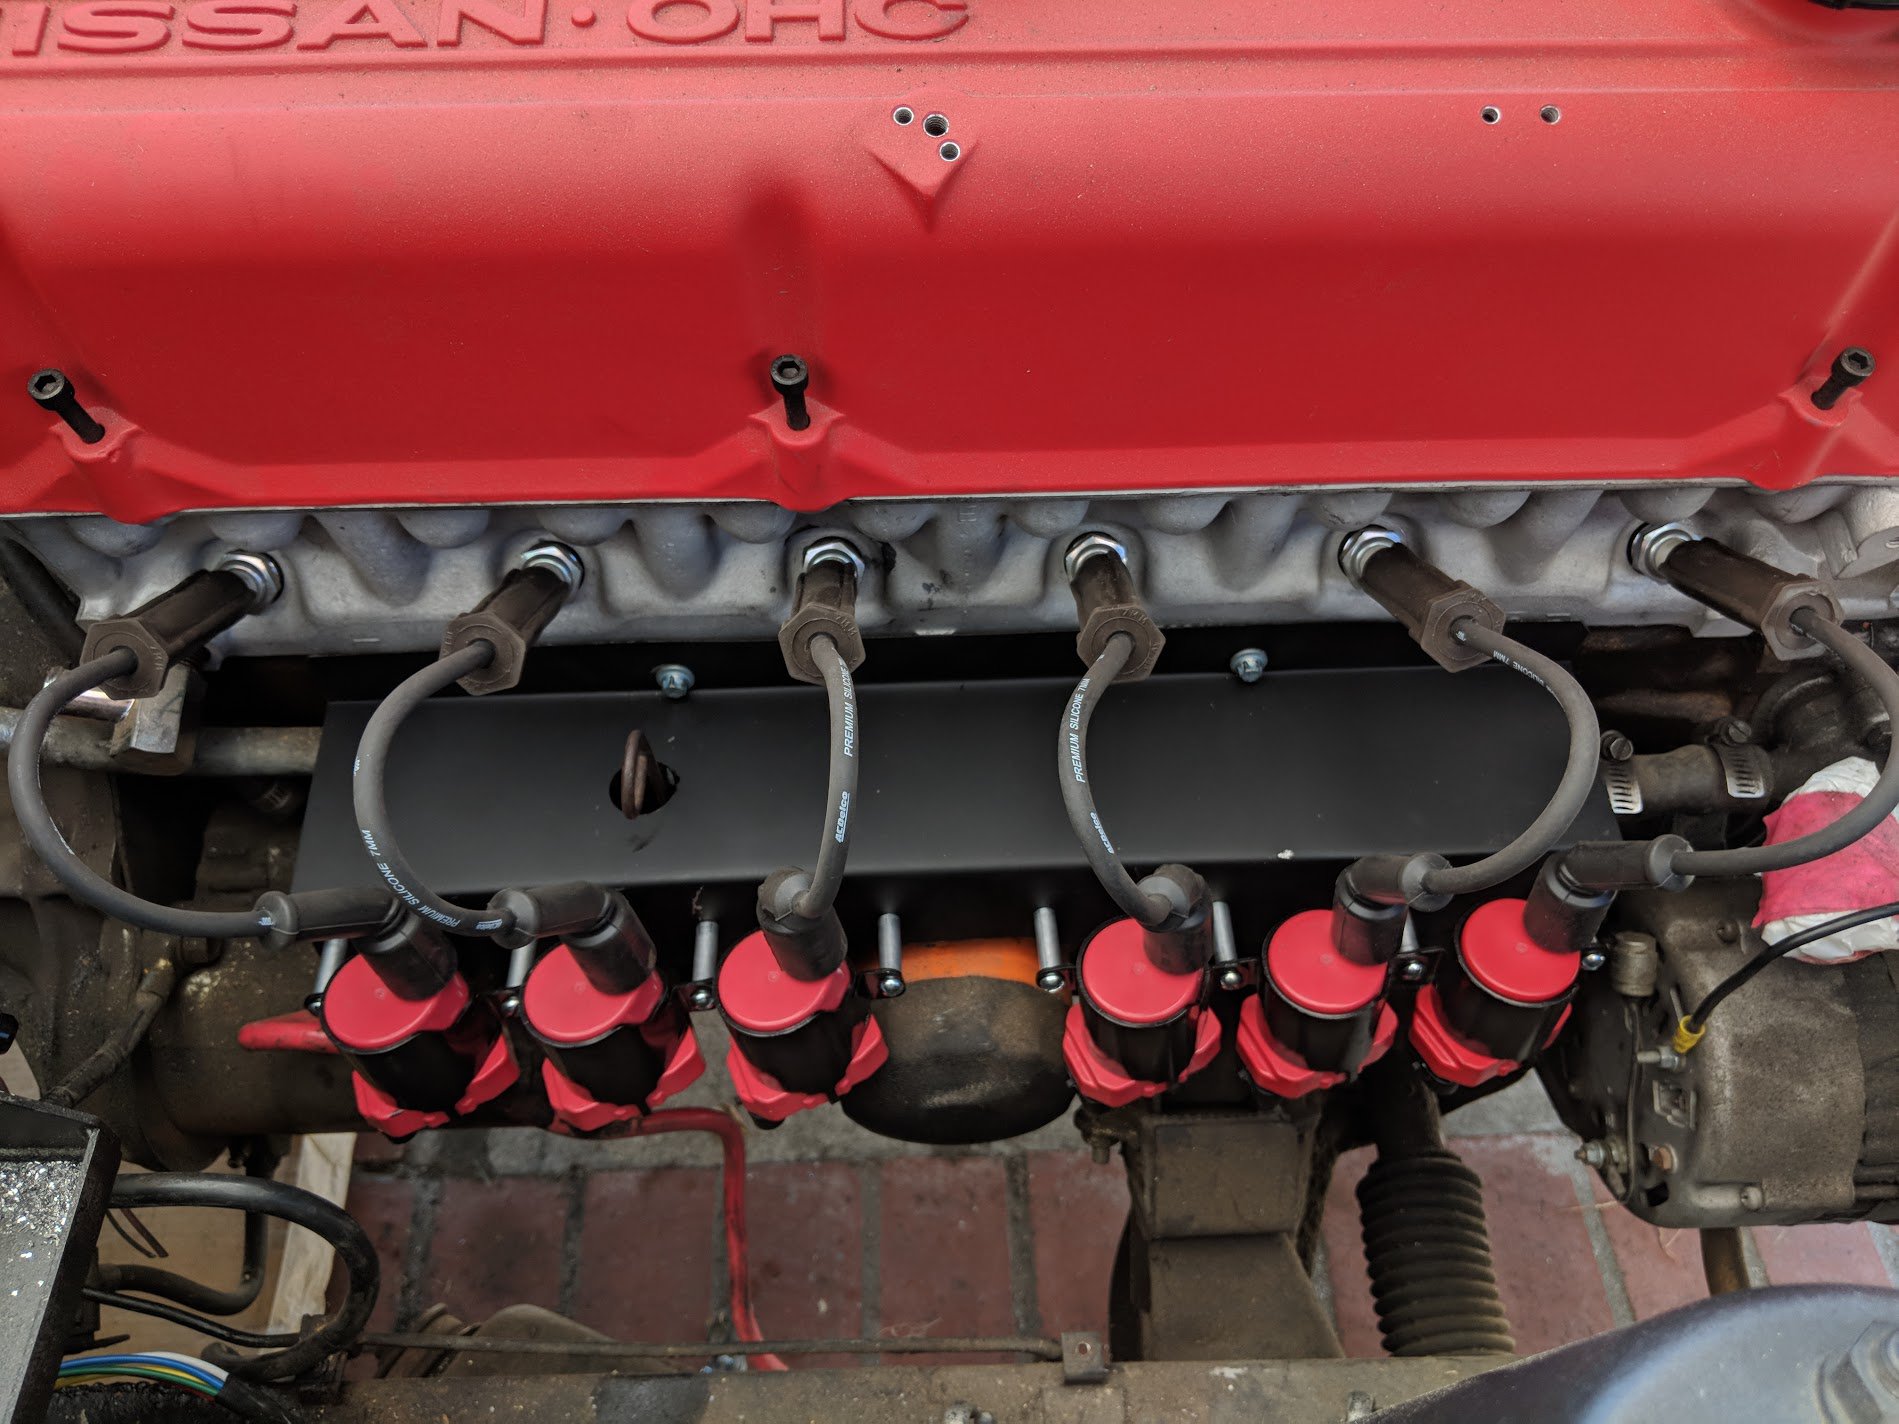
Progress has been slow due to the following factors : Finals Finding a new apartment Work travel Graduating from college this week Starting a new job on Monday But I had some time this afternoon so I made a mount for the coil packs and got that done. There has also been progress on wiring. chassis re-wiring is done. Need to finish up gauges and tie it all in with the engine harness. Slow and steady.
-
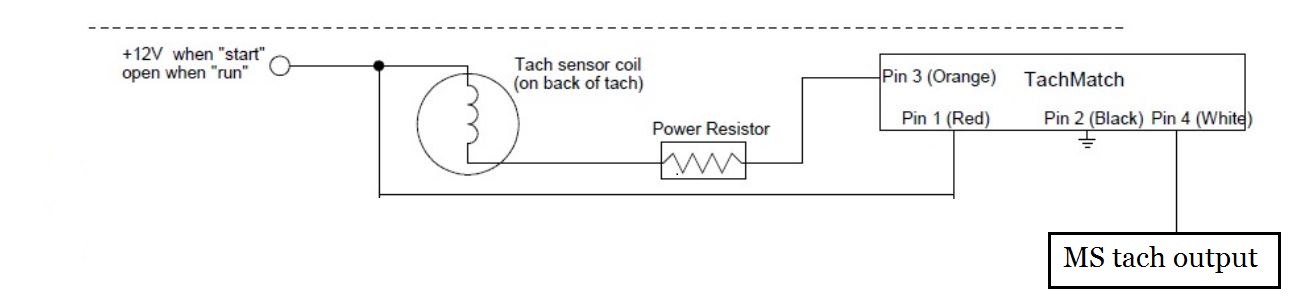
Brian at technoversions got back to me. I just placed an order for his adapter, and it'll be a couple weeks before I have time to actually wire it up and test it. But this is the general diagram I'm going with. I'll bump this thread with updates later.