

JMortensen
-
Posts
13727 -
Joined
-
Last visited
-
Days Won
61
Content Type
Profiles
Forums
Blogs
Events
Gallery
Downloads
Store
Posts posted by JMortensen
-
-
Yeah, lowered otherwise stock Z will have something like -3 in back and -.5 in front. Terrible.
-
9 hours ago, AydinZ71 said:
One more option is I seperate the shock tube from the wheel hub, change the angle, and weld it back-on. That would give me the track and ride height I need and still center the strut in the tower. Despite my whining about the camber plate, it does have a well functioning uniball shock attachment that can make-up quite a bit of shock angle without applying lateral force in the shock.
just for simplicity, I think I’m going to turn the camber plate 180 deg, drill new mounting holes, make a new center hole for the shock nib, and see if that gets me where I need to be. I’ll also make a 3/8”tk retaining ring to distribute the force of the mounting bolts on top of the shock, since changing the angle is applying forces in the tower in areas that were not as heavily reinforced by OEM. That should “sandwhich” shock tower when the mounting bolts are torqued.
I'm in this same boat. I widened the LCAs an inch to prevent CV bottoming and the rear ended up at something like -3.5 with the camber plates flipped and maxxed out positive.
I had the same idea about removing the tubes from the uprights. I actually have Mustang 36mm Bilsteins I am going to run. They are the same length as my sectioned front struts that I run now, so I'll need to run a spacer in the back. My thought was to make a mount and bolt the uprights to it to measure the strut angle, then bend the strut tube in say 4 degrees. The camber plate should handle about 2 degrees of adjustment (guesstimate) and so if I could get somewhere in the 0 to -2 or -1 to -3 range I think it would work.
My other thoughts were to cut the top of the tower out, plate it and recut the hole for the camber plate (sounds like a lot of hassle), or to make a 1" thick offset plate to mount between the bottom and top of the camber plate and move everything outboard, but seems like that might be a lot of extra stress on the camber plate and strut tower. -
I was under the impression that since you don't need airflow to atomize the fuel, you should go bigger on ITBs.
-
They had a problem where their fabbed upright was flexing. Wasn't the arm. Maybe this one didn't get the update, or maybe the update wasn't good enough. I have similar arms (Apex modeled theirs on mine) and I don't have issues.
Regardless, that doesn't look good at all. -
Make sure that the suspension moves freely through the full range. Can remove springs and compress the strut with ratchet straps and make sure you don't feel any solid resistance.
-
 1
1
-
-
The factory mounts are pretty tall. I think you're going to have to remove them with any seat you choose at that height. If you want to race might need to go 1x1 square frame and screw directly into the tubes.
BTW, removing the mounts is a PITA too. 487 spot welds holding those bastards in.-
 1
1
-
-
Autox but will be doing track days hopefully next summer. Track should have me doing 140 - 150 at the end of the straight, from what I hear.
-
I think tube80z shared that with me a few years ago. Made me regret that I had installed my fuel cell at a 7* angle because when I did it 7* was considered the max angle you could run without separation. He's talking 20* in there though. That's way outside of what I would have thought would work. I think when I do build one the focus will be on making it as long as possible and I may try to change the angle along the length. Been looking at AJ's gigantic one, and it appears that maximizing the angle in that particular space is the focus, rather than sticking to a particular angle. You can see it kinda steps up past the axle, then flattens out a bit under the gas tank, then steps up again at the end.
https://ajhartmanaero.com/modular-diffusor/

-
15 hours ago, calZ said:
The sooner you start your diffuser, the larger you can make it and the more you can get out of it. Being longer also means you can use a less aggressive angle and still get the height out of it you want. The angle is tough and dependent on your speeds. Too sharp and the air is just going to separate, rendering the diffuser useless, but too shallow and you aren't maximizing its effectiveness. Better than a flat plate is to have a smooth transition with a gradually increasing angle. It's really not that much harder to fabricate either.
Here's something that really surprised me when I read it: diffusers actually work best when the air starts to separate:
https://www.racetechmag.com/2017/08/willem-toet-explains-motorsport-diffusers/ -
Here's the video with the CFD on the splitter diffusers:
-
4. This doesn't seem counter-intuitive, as more lift on the front end will tend to make the car understeer, and that's the more inherently stable tendency.
5. I'm sure I read in a book somewhere that lift or drag translates directly to work. If the airflow is doing work it will show up as force on the car. So as calz says, if you clean up the airflow under the car so that it isn't turbulent, you can reduce drag and lift, as it has to do less work to get under the car - acting less like a parachute. If you have a lot of lift, that's a sign the the air is doing more work. Closing the huge hole in the front and ducting to the radiator prevents all that air from packing into the front and pushing up on the hood. This will reduce lift and drag. A spoiler on a Z reduces lift and drag as well (to a point, after which it will reduce lift and increase drag).
7. The further away from the axle the more leverage you have too. So a rear wing can be mounted lower and further back and make more downforce than the same wing mounted in cleaner air and higher in some circumstances.
Thinking back to what might be the same video about splitters, I think his view on the shape of a proper splitter is a little simplistic. Most of the time on a race car you're rule limited, or you have practical constraints that limit the shape, but in the more unlimited classes you see the upturned nose of a splitter or a raised tunnel entrance in the front. There are also interesting front wings on open wheel cars that we can learn a little bit from where they have unusual profiles: relatively high in front, flat and close to the ground for a bit, then sloping up at the back. Not unlike McBeath's drawings of what an undertray should look like, but with a more wing-y looking top side.
Most low level race cars use flat splitters, but diffuser on the splitter kind of aim for the same sort of shape in the back as the wing. If you're going to design a splitter I'd suggest a close look at what AJ Hartman is doing. He's working with high level aerodynamicists, does lots of CFD and wind tunnel testing, and makes good stuff. Then he makes youtube videos telling you how to DIY it. Pretty amazing, really. Note the front lip shape. Sharp on top, rounded on bottom.
-
I've watched a bunch of his videos on youtube and ended up buying a bunch of pressure pucks and five 1" manometers to do some track testing. Of course I bought all that shit and then put the car down and spent the next year doing other stuff. Still need to make a temporary dashboard to hold the gauges.
The one thing that he really bugged me with was his refrain that "you can't just slap a splitter, diffuser, and a wing on and make downforce" which he said quite a bit IIRC. I ended up linking in the youtube comments to AJ Hartmann's company, because that's exactly what he sells, and it obviously works. I haven't watched anything in a few months, but I did finally find one where he added I think it was a splitter and wing and was like: "HEY! That really worked!"
As you mentioned though, he has a ton of good info and practical techniques in his videos, I can imagine the book will be better. Did a lot of coast downs for drag measurement too as I recall. Anyway, thanks for the heads up. Will purchase. -
Read your previous post, if it's plugged at the wheel cyl probably just need to rebuild/replace.
-
What worked for me with an entirely new brake system was pushing fluid backwards. Open the bleeder, use a tube feeding syringe to force fluid to the master. I tried everything; pump/hold/open bleeder, gravity bleed, repeated pumps with hose submerged, vacuum bleed, couldn't get a pedal until I reverse bled.
Good luck. It was frustrating as hell for me.
https://www.amazon.com/Syringe-Adapter-Feeding-Refilling-Drawing/dp/B07SQC95DT/
-
This doesn't look like the more aggressive NISMO one, looks like a Z31T LSD. That's probably a good thing. They're plenty aggressive as it is.
You might open it up and see if it has the big washers on the sides. If so, that's a pretty big weakness. You can get some clutches from Gary Savage if he's still making them: https://www.facebook.com/garysavage42 or pull the clutches and have 4 more of the ones with the tabs on the inside laser or water cut.
Here is a write up on installing it.
-
You can mod the shifter if you get the shorter trans, may require some surgery on the center console if you're running with an interior. Sounds more race car based build though.
With regards to weight distribution I can tell you I went from the L6 and 49.5F/50.5R to the LS 52/48 and having changed the spring rates and alignment, etc that the "nose heavy" LS version turns in WAY harder than the L6 version ever did. I moved the engine to the right 1.5" and have the right head about 3/4" from the firewall, had to cut part of the trans tunnel to fit the bell housing. Spring rates are 600/700, no rear bar anymore. The point is you can work around the weight distribution issues.
In a more extreme example, I used to autocross against the Mustang guys at Maximum Motorsports. Fox body Mustangs have a ridiculously bad distro of something like 60/40, and MM made those pigs fast.
EDIT--will be harder to avoid understeer with staggered tire setup. -
Pull it off, check the end of the crank and the slot for the woodruff key. Pretty common for the slot to break. Happened to me.
-
All that electrical makes me feel functionally retarded. Nice job.
-
I think the reason the whale tail works is that it lengthens the car and the flow tries to stay attached longer, and this reduces some of the ill effects of air from underneath losing contact and becoming turbulent, and also redirects the air coming off of the top, which would otherwise be traveling down and creating lift. I think this is why the drag racing spoilers work too. I've wanted to see wind tunnel/CFD data on this forever.
The one think that I think might be an issue is that if the tail is TOO long it might insulate the wing's upwash from the bottom of the car. I think you want the wing to pull air out from underneath, especially if you have undercar aero, but since we both have (or will have) wings hanging off the back a ways, makes sense that the spoiler can be a little longer.
Spoiler angle and length with wing is definitely something worth testing. -
It's not multiple disk. Looks like your typical CF pressure plate with a standard disk rather than their dual friction disk which has pucks on one side. I remember you talking about double or triple disk button clutches, but FWIW, I've seen quite a few Center Force pressure plate failures online where the weights fail, and had a friend with the dual friction that chewed into the flywheel and tore up the thrust bearings in his CA18DET engine. Avoid.
-
13 hours ago, clarkspeed said:
"I'm never doing this again". Ha Ha!
We've all felt that feeling.
-
Very interesting Ben. Would have been nice to see before I bought the aluminum for the uprights. Oh well.
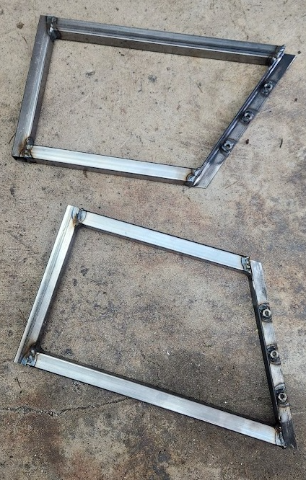
Mine won't be SCCA legal either. Figure if that becomes an issue I can make another set of uprights. Just finished my tube frames to transfer load to the floor.
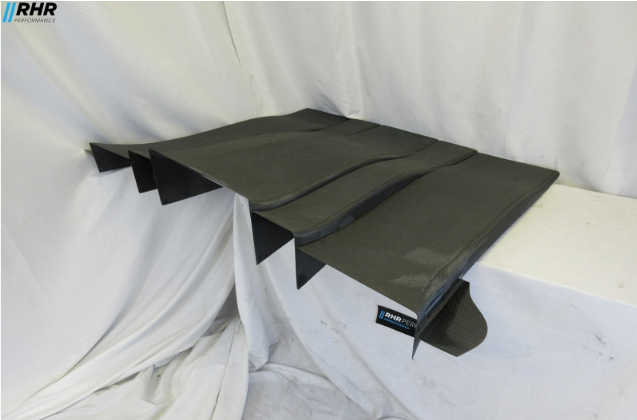
Yours is no doubt stronger. The advantage to mine is that I'll be able to drill several sets of holes in the uprights and raise and lower the wing.
Been doing a little research and the trend seems to be to want to get the elements down to roof level to reduce drag even in time attack cars that generally don't care about drag. I'll experiment a bit I guess. The other thing I'm curious about is the spoiler. Leave it 10" and lay it way down, or make one that is closer to 4" and keep it relatively upright? Thinking I might get more diffuser action if I lay it flat. Of course, would help to have a diffuser. Haven't made any progress on that one... typical.
-
Wow, that would have been a good option.
-
Just FYI it was about $90 to ship, so factor that in when you're looking at the price online. I ship doggy doors for sliding glass doors that are long like this, they're not gouging. UPS and FedEx just bend you over when you ship such a long box. Plus there is a second package with the end plates.
240z SCCA vintage race car, restoration
in S30 Series - 240z, 260z, 280z
Posted
I ran Buttonwillow and Streets of Willow but never Big Willow. I signed up but something came up and didn't go. Buttonwillow speeds are lower, there isn't shit out there to figure out braking markers so you end up looking for cracks in the pavement and stuff like that. Track is very hard on brakes especially if you run the hairpin, good place to stress test your build. Used to be pretty bumpy in the braking zones 20 years ago.
I can't remember if you play Assetto Corsa or not, but you can download Buttonwillow and it comes with a bunch of configurations. Well worth the $6 or $7. https://www.simtraxx.net/shop/product/buttonwillow-raceway-usa-aerial-laserscanned-ac-ultimate-edition/