

Alexander240z
-
Posts
13 -
Joined
-
Last visited
Content Type
Profiles
Forums
Blogs
Events
Gallery
Downloads
Store
Posts posted by Alexander240z
-
-
5 hours ago, 240Z Turbo said:
Passenger side inner rocker, middle rocker and outer rocker completed.

Amazing work. I have yet to put in my outer rocker. I need to fix my firewall first. Im worried that the rocker won't have the proper angle if it isn't welded to the firewall first. (Maybe they won't?) let me know. The Tabco panels do suck quite a bit. I especially wasn't fond of their quarter panel replacement pieces due to the dogleg not sitting properly. Protrudes out way too much. KF vintage on the other hand I have never had an issue with fitment. Keep up the good work!
-
3 minutes ago, calZ said:
The frame rails help support the entire front of that car. If your sway bar is bending your entire frame, you've got issues with more than sway bar mounting. I think the sheer number of cars with upgraded bars that have torn sheet metal around the mounting nuts shows where the weak point is.
Yes you are right. I just have concerns with the factory spot welds and I don't trust them at all. You can easily see when the sheet metal round the mounting nuts fail but the spot welds hold the entire rail together might be breaking under it all without visible evidence unless you look really hard. Seems like my concern might be something that occurs after hundreds of hours of driving.
-
1 hour ago, AydinZ71 said:
i can tell ya, on mine it was completely rusted out. So much so, that the die-pressed steel gusset supporting the nuts and sway bar mount inside the frame rail, was half gone. Meanwhile, there was little surface rust on the outside of the rail. Another classic situation where water had worked its way in between the lap joints, and the PO had no idea it was happening until holes showed up in the usual spots.I'm not sure what condition mine is in but my sway bar bolts broke the nuts so I hardly had a sway bar to begin with. Need to put the floors in and attach the rail to it before I start messing with the driver side lower rail and firewall so that I don't mess up the location of the tension rod.
-
9 hours ago, calZ said:
Three sides? Really it's just the one side. The common fix is to just weld a thicker spreader plate over the area.
Physically yes its being held on by one side of the box. Structurally the bottom plate that the nut is welded to is being held by the 2 lateral sides. One of those lateral sides being held by spot welds. Unfortunately for these cars you have to assume rust is already eating at the spot welds. So the structural integrity might not be fully there. If you weld a spreader plate that encompasses the top section of the rail, that'll work too. This is for a factory situation as in Aydin's case he redid the entire front rail.
-
On 1/23/2022 at 11:38 AM, AydinZ71 said:
Thanks Clark! So I think I see all the parts I would need. I’m eyeing a 1-1/4” .188 wall 36”. I’m going for the aluminum arms. Now the OEM style bar “arm” has an angle (about 30 deg?) outward so the bar avoids the wheel/tire during steering. Any recommendations on how to bend the AL arm to accommodate as well? I suppose I could cal them Monday and ask if they can pre-band for me.
meanwhile, I need to re-fabricate the OEM mount location to meet EP anyways, so I went ahead and lengthened the bar. I recognize the welded metal does not meet the stiffness of whatever alloy they used but now the bar makes it across so I can fab the chassis mounts. Just for shits and giggles, I did quench and hammer the weld so it’s harder than mild steel but I’m not going to use it anyways. It might just snap in half. I might want to see that.
I'm curious to see what you make for the sway bar mounts. I've read that the OEM sway bar mount were insufficient due to the nut holding the bot for the mount only being welded to the bottom of the inside of the lower rails. This means its only being held by 3 sides of a "box." A solution to fix this would be welding a nut on the top of the inside of the lower rail and running a bolt all the way though so you have support from the entire "box." May be different for you depending on how you mount them. I'm not sure.
I have this document that I believe I got off this website that goes into detail about the structural analysis of an Early Z chassis. They have a section dedicated to racing and what "deficiencies" are produced by heavy load.
Analysis of Early Z Chassis - NewZletter - James Lux - 19xx.pdf
-
15 hours ago, AydinZ71 said:
I hear ya") I have been doing so much rust repair over the past year and a half that I feel more comfortable fabricating from scratch now than re-fitting OEM steel. Sounds silly I suppose. I did enjoy it after getting good at it, so I can’t say it makes complete sense.
I have been doing so much rust repair over the past year and a half that I feel more comfortable fabricating from scratch now than re-fitting OEM steel. Sounds silly I suppose. I did enjoy it after getting good at it, so I can’t say it makes complete sense.
I just find it easier because 9/10 it'll fit a lot better than anything I do. Just gotta make sure the metal you're putting back on it ain't rusty itself lol (forgot to do that for the rear hatch area 😅). Also I don't have a sheet metal brake so bending is a bit difficult with my vise.
-
7 hours ago, AydinZ71 said:
Looks good
I fabricate replacement steel freehand as well
Fabrication is my last resort. Big fan of getting multiple panels of datsuns and sticking them together. I must have panels from 4 or 5 datsuns in my garage lol.
-
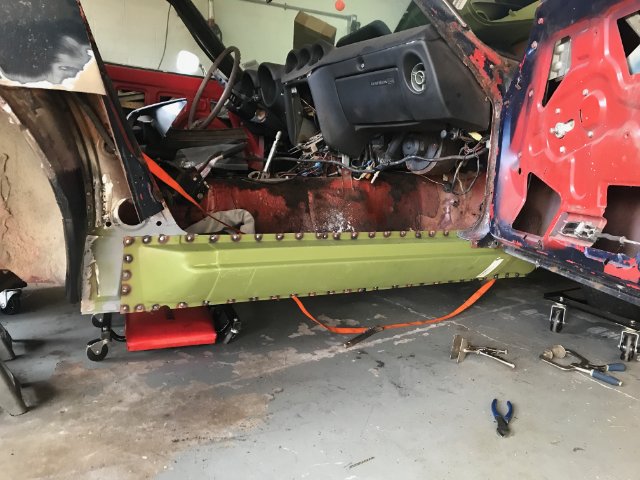
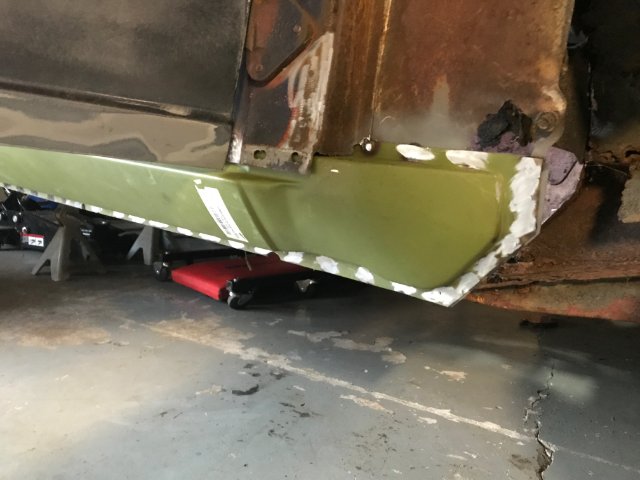
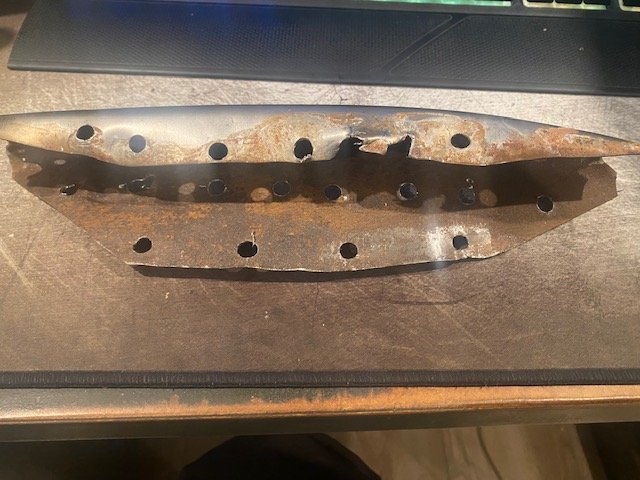
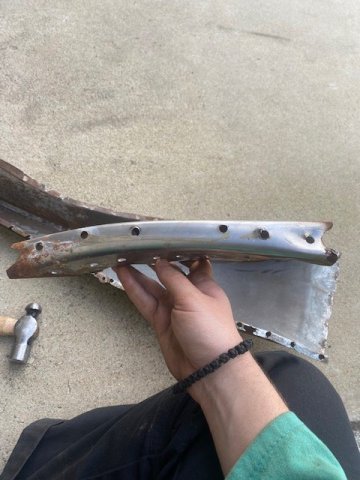
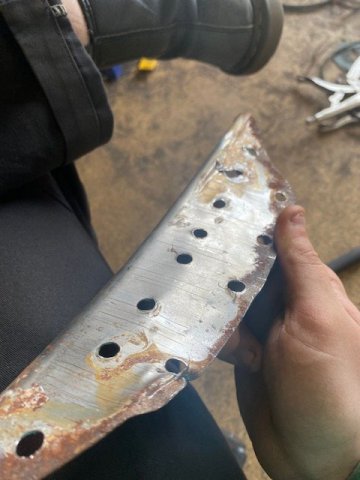
So being the impatient person I am and not wanting to wait I just decided to have a crack at making it.
Decided it was best to make it out of three pieces because I don’t have a sheet metal breaker and it has a curve to it.
Here is the final result. Is it the best looking? No. Does it fit? Thankfully. Will it do the job? I can hope.
-
2 hours ago, pamato said:
You need one of these...
I’ve seen people bend a copper or brass plate and use vise grips to hold it. I like the idea of using both my hands during welding so this tool looks helpful. Hopefully enough metal under all that rust 🤔
-
6 minutes ago, rturbo 930 said:
Doesn't look that bad. Why not clean it up and reuse it?
You are correct it isn’t too bad. Just a pain to weld it up again because I drilled 5/16 holes through the spots welds through the frame and this piece so I would need some brass or copper as a back plate. Unfortunately not cheap. Was hoping because I have a bunch of 18 gauge laying around. But I am curious as to what’s the point of this piece as should more be added to the frame to beef it up.
-
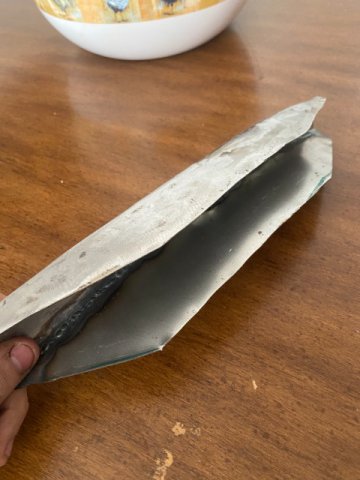
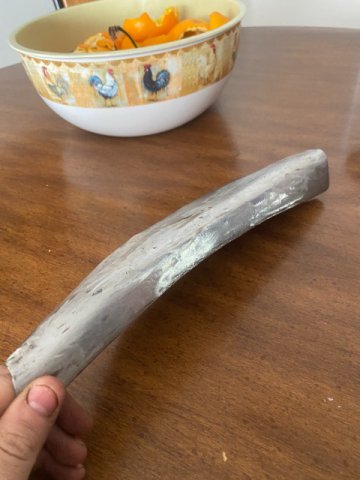
I am currently working on a 1971 Datsun 240z. The car was a Nevada car until one of the PO thought it'd be a good idea to take it out to Chicago. Unfortunately a lot of rust formed up in the fresh air vent rails but its mostly surface with a descent amount of shallow pitting (por-15 time). PO tried fixing the driver side corner where the firewall meets the A pillar but it all rusted so I had to take the rail off anyways. Any who, the situation I'm having right now is how to remanufacture a piece that is inside of the frame. I'm not sure what's the purpose of this piece other than maybe supporting the rail from torsional forces. Its a bit of a complex bend and not sure how to go about making this piece. Any advice or ideas would be appreciated.

-
I had a similar issue as well. Backfire out of the carbs on my 1971 240z with 4 screws. I was young and dumb (still am) and when I switched out the distributor I put it back 180 off! Took a neighbor getting tired of hearing my motor trying to run on a single cylinder to come over and let me borrow a timing gun for me to find out that my timing was way off. I'm not familiar with other year model z's like your 73 so I'm not sure what type of distributor it is. Quick search gave me these results. Part number 22100-E4603 is from 7109 to 7206. 22100-N3300 is from 7207 to 7307. Here's the link: http://www.carpartsmanual.com/datsun/Z-1969-1978/electrical/distributor/240z/for-manual/from-sep-71 . Not sure how to read the part number on a dizzy to find out which one yours is. I do know that a difference between some of the distributors are how many points they have. The earlier models were single points while later model 240z had dual points (smog). Good luck!
Edit:
From 7308 to 7411 22100-N3602. Link: http://www.carpartsmanual.com/datsun/Z-1969-1978/electrical/distributor/260z


I'm Back, 1971 240Z and Yes, it will be TurboCharged
in S30 Series - 240z, 260z, 280z
Posted
Ah man I know the pain. Are you planning to work on the upper rails that run along the engine bay (I think they are called horns? correct me if I'm wrong)? The corner where the driver side fire wall meets the shock tower support sheet and the sheet of metal that connects the door hinges was completely rusted out for me. PO did some botched work that you guessed it made the rust worse. Then the car sat on the side of the road in Chicago 👌. I didn't go as far as you did for the piece that you just took off. (I just POR-15 and let the paint spill towards the bottom). You are doing the better route. Keep it up.
I didn't like how Nissan didn't include a weep hole (at least I didn't see one and no, open seem welds don't count as weep holes!). They did for the front where your hood hinges bolt on to. This made is so that the water would just go down the horns and into the seams where it meats the column that supports the door hinges and then straight down into the inner and outer rocker! Water also came In through the top and along the seam where the weather strip is supposed to be. So much for that 😕