Perfect240z Posted September 29, 2012 Share Posted September 29, 2012 Maybe part this one out and gets some money back and find one with less rust. Hit up tabco for panel parts. Alot cheaper then what I did, I went through blackdragon and they buy from tabco. like 30 bucks a panel. Quote Link to comment Share on other sites More sharing options...
bestlowrida Posted September 30, 2012 Author Share Posted September 30, 2012 The area above the TC bucket on your right side looks a lot like how mine was back when I was driving my car (except mine wasn't bent back like that). Back then the Z was my only car and one day when I hit the brakes that whole section of the car separated from the rest of the unibody. I had to do a quick fix just so I could keep driving it and back then all I had was a flux welder. My car looked better because of all the dura-glass and bondo the previous owner used but after looking around I found the rockers were completely gone and the floors were just 22g sheet metal screwed down. My front subframe was busted were the sway bar mounts with smaller rust holes above the crossmember. Surprisingly there's only tiny rust holes above my rear wheel arches and a couple in the doors. Roll pan has been hammered in an accident (with 2.5" of dura-glass filling it up). A lot of people didn't think it could be saved but it's on it's way. My outer rockers are cut out completely allowing me to weld a 2X4 0.120" tubing to whats left of the inner rocker and adjoining areas. Then I have 2X2 0.083" as my subframe connector from directly off the TC bucket to the rear crossmember with 1.5" round tubing connecting it to the 2X4 in my rocker with 16g sheet metal used as a floor. I have the passenger side done and still working on the driver's side, but when it's done the engine is coming out and the front sub-frame is going to be replaced by 2X3 0.083". It should go without saying that I gave my flux core welder away to a friend and bought myself a nice MIG. When you start working on it, just remember to not rush yourself. That's the biggest mistake I see people do, the more time you take the better your results will be. Wow that sounds like alot of fun but there is alot of awesome information I'm going to use to tackle this thank you! Quote Link to comment Share on other sites More sharing options...
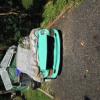
bestlowrida Posted October 5, 2012 Author Share Posted October 5, 2012 Just a little update, my co worker and I finally had a few hours so we attacked the passenger side rear well area. Before Out with the old cancer. In with the fresh metal. Took about 2 hours but its a start. I'm going to order some body parts for the tail trim and some floorboards and find a fix for the Tc box thingy s, but when I was going to park the car it stopped, stalled out and wouldn't go back into gear. Time to check the slave cylinder. Quote Link to comment Share on other sites More sharing options...
Zman0690 Posted October 6, 2012 Share Posted October 6, 2012 I'm glad to see you are actually trying to save this car, mind you all my Zedds had slightly less rust it was still worth the learning experience just keeping my Z on the road every week. I'd really recommend you start with structural rust instead of cosmetic like you did though. Good luck and keep the updates coming. Quote Link to comment Share on other sites More sharing options...
Dershum Posted October 6, 2012 Share Posted October 6, 2012 Now I'm all jealous. I've had the two rear quarters and inner wheel arches on back order from MSA for almost a month now... Quote Link to comment Share on other sites More sharing options...
Ernest Harmon Posted October 6, 2012 Share Posted October 6, 2012 Keep up the good work and good luck with your project.For some inspiration while not z related look at this save. http://www.thesamba.com/vw/forum/viewtopic.php?t=340552 Quote Link to comment Share on other sites More sharing options...
bestlowrida Posted October 6, 2012 Author Share Posted October 6, 2012 Thanks guys. Its pretty rewarding to learn something new, I just started the wheel arch because the piece came with the car. Quote Link to comment Share on other sites More sharing options...
norstar Posted November 26, 2012 Share Posted November 26, 2012 (edited) did you happen to buy this car nh by any chance? Seen one similiar on craigslist. Just curious. Edited February 8, 2016 by norstar Quote Link to comment Share on other sites More sharing options...
bestlowrida Posted November 26, 2012 Author Share Posted November 26, 2012 Yeah I bought it from a guy in south jersey, I feel bad I havent been working on it lately, just been driving it once a week to keep components rolling. Cant wait till spring to get working again! Quote Link to comment Share on other sites More sharing options...
bestlowrida Posted October 6, 2013 Author Share Posted October 6, 2013 (edited) It's been about a year and I finally got my welding equipment. I was debated between the Eastwood 135 mig and Lincoln 135 I think it was. I went with the Eastwood because of the more positive comparison towards the Eastwood. Then grab a 40cubic inch bottle with the c25 argon co2 mix. In theast year I have also bought a jdm 94 rx7 from a friend who was moving and also a technovoilet 97 e36 m3 from another friend who upgraded to a newer model bmw. So this car was on the back burner for a year. Whoever I was able to take the two layers of orange paint off her with one jug of air craft paint remover. Took a couple of weekend to remove the fenders, interior, moldings, trim etc. AFter those long nasty, dirty hard labor weekends of break down I didn't really find any more rust surprises. With the bare metal car expose I used the etching primer to protect it. So that's were I am with this project so far here are a couple pics. I just picked up welding the quarter panel piece that my co worker helped me start (RIP Ryan) and will continue to update and I gather more replacement panels, time and money! Edited October 6, 2013 by bestlowrida Quote Link to comment Share on other sites More sharing options...
morbias Posted October 6, 2013 Share Posted October 6, 2013 Hey bud, good to finally get stuck in eh? You might want to crank up the power on your welder, looks like you're not getting good penetration (*snicker*). Don't be scared of holding the trigger in either; that said, the quarter panel is the easiest panel to warp so move around a lot and give it plenty of time to cool down. You'll probably find that many of those welds don't hold once you start grinding them down, if that's the case then it would be a good idea to practice getting your welder settings right on some scrap before re-welding the quarter panel. Quote Link to comment Share on other sites More sharing options...
rturbo 930 Posted October 6, 2013 Share Posted October 6, 2013 The front right behind the wheel. IMG_20120924_182721.jpg Looks like your car has been hit. The TC Rod mount is buckled. Make sure you fix this as well. Quote Link to comment Share on other sites More sharing options...
bestlowrida Posted October 6, 2013 Author Share Posted October 6, 2013 thanks guys will do, I did have the welder on the wrong setting I just went out to double check. I will tackle the tc box area next while waiting for more panels to arrive! Quote Link to comment Share on other sites More sharing options...
Pharaohabq Posted October 31, 2013 Share Posted October 31, 2013 Well congrats on the car and kudos for trying to save it. Great job on getting all the old nasty paint off. You can really see what you're looking at with that out of the way. Those areas behind the front wheels are Structural metal, Meaning you REALLY need to repair it right, and as Rturbo pointed out, the car has hit something, so expect more damage on that side.. You can cut and replace that whole section from a good donor car. You've got the outter arches, but you'll also need to put in new inner wheel well arches too. As they said, Tabco is the place to go, but you can also get the parts through Rock-auto (who buys from tabco, but is often cheaper) You might also consider adding Bad Dog frame rails. They'll fix up your old rails quick and really add to the safety of your car. It's probably better you started on the cosmetic side of fixing this, since you want to do a REALLY good welding job when you're fixing the structure. that's safest. Tabco has all the panels you need. The rear deck, the inner arches, the doglegs, the floorpans. That tension rod mount should be replaced as one piece. meaning you'll want to cut around it then weld it in place like the original to the surrounding metal. now if you can't get a replacement panel for some area, use your grinder and cut out the section, pull it out without bending it too much, then you can used that part as a template to make the replacement piece. You can use some blocks of wood to carve out shapes to help you form your sheetmetal. A set of bodyman's tools will really help. Especially that copper spatula can keep you from burning too far through your panels while welding them in. just take your time, and watch all the your tube videos. You'll get there. There's a lot of yards out my direction who have good parts they'd be willing to cut out for you. One guy is Nelson, his email is NLAckerman1@aol.com, just let him know what you need, I think he's got 15 cars and a barn full of parts. Now replacing those panels, Are you using Panel clips? You can buy them on ebay cheap, but they really help hold the panels in place while you weld things up. The panel warping is an issue to watch out for. you can warp it while grinding down the welds too, so be careful and move around a lot. Always wear your safety equipment, Fixing the car won't do any good if you're dying in bed from chemical poisoning, metal gas poisoning or even cancer. So keep well ventilated. and always wear goggles. I'll second his suggestion for using Por-15, Rust bullet, or some other, both under the car and inside any panels where at all possible. Especially out where you are, Things will rust quickly, and these Z's didn't use a very high carbon steel so they tend to rust a little easier than most. Keeping them coated is the #1 method for preservation. Again Kudos for saving this one. We're proud of you. I hope you budget will allow you to complete her. Quote Link to comment Share on other sites More sharing options...
bestlowrida Posted October 31, 2013 Author Share Posted October 31, 2013 Amen amen amen @pharaohabq. Thanks for that! I will email the guy for some pieces of that tension rod mount. I will hit up tabco for some more pieces of metal and lucky I have acquired much body tools from the store, friends, and family because they know and support this project. I hope I am saving her the right way thanks for keeping me in check I have some more pics and updates for this very thread soon! Luckily all the patched I made so far are made from a fender and hood left over from a friend. Quote Link to comment Share on other sites More sharing options...
bestlowrida Posted November 5, 2013 Author Share Posted November 5, 2013 Few updates I did over a couple Saturdays Rear slam panel Driver door bottom Drivers dogleg More to come! Quote Link to comment Share on other sites More sharing options...
seattlejester Posted November 5, 2013 Share Posted November 5, 2013 Getting stuff done! Hmm, if you don't mind me saying...I would suggest you either weld hotter and faster (more amps more wiring speed) and move around a lot more, or weld slower and space things outs more. I'm sure the welds are plenty strong for their purposes, but you are going to introduce a lot of heat with the tall welds and even more when you have to spend lots of time grinding them down. It will save you lots of time in the long run. Quote Link to comment Share on other sites More sharing options...
bestlowrida Posted November 9, 2013 Author Share Posted November 9, 2013 Is this how the floors came from Nissan or is this two floors in one?? Do y'all think I should replace them or patch up? Quote Link to comment Share on other sites More sharing options...
RebekahsZ Posted November 9, 2013 Share Posted November 9, 2013 I think that is the factory applied sound proofing. We like to remove it. I think when you do, you will find that your floor pans need replacement. Quote Link to comment Share on other sites More sharing options...
bestlowrida Posted November 9, 2013 Author Share Posted November 9, 2013 Thanks Seattlejester will do!! And I guess I'll be scraping that factory applied sound proofing next weekend then to find rusty floors lol Quote Link to comment Share on other sites More sharing options...
Recommended Posts
Join the conversation
You can post now and register later. If you have an account, sign in now to post with your account.