RebekahsZ Posted March 23, 2016 Share Posted March 23, 2016 (edited) What brand shocks are you gonna run? If you run Koni's, you may have some trouble getting enough droop out of the rear to achieve a reasonable ride height if you cut the tube to the length of the shock without inserting a spacer. If running Tokicos, you may be ok because they allow greater droop. I'm concerned that you may have sectioned too much from the rear tubes....time will tell and I hope I'm wrong. Damn nice work and welding! Edited March 23, 2016 by RebekahsZ Quote Link to comment Share on other sites More sharing options...
Stock Car Mafia Posted March 24, 2016 Author Share Posted March 24, 2016 I have the Tokico's. BZ 3099's for the front and BZ 3013's for the rear. I really am hoping you are wrong too! I was on the phone quite a bit with Ground Control when I bought the kit back in June. I told him the size of my wheels and tires, motor swap I was planning and any other question he had. I really gave him a shit ton of information to get me the best setup. The "directions" they provided seemed rather generic though. The backs I won't be using camber plates so the stock uppers are reused I believe, so I shouldn't lose any ride height there. Good news is, I saved my sectioned pieces and if worse comes to worse, I am not afraid to weld more. Quote Link to comment Share on other sites More sharing options...
Stock Car Mafia Posted March 24, 2016 Author Share Posted March 24, 2016 Reading through the strut sectioning FAQ, they do mention the rear measurement should be at about 15". This is from the bottom of the inside to the lip and Mine is almost right at 15". I praying I am fine! I had time to cut out the steel collars in the front and rear LCA's. Now I'm debating dissassembling the rear brakes and axles so the can be blasted and painted. I have to put the companion flanges in the near future and I am hoping to aligns with when I get my parts back. The next task before the weekend is cutting and clearancing the front diff mount for dual exhaust. I have the RT style diff mount so the OEM diff mount will be just used for LCA mounting. I am going to make sure I don't remove too much rigidity however. Quote Link to comment Share on other sites More sharing options...
RebekahsZ Posted March 24, 2016 Share Posted March 24, 2016 I bet you are fine. My rear tubes are 14" from the top of the hub casting to the gland nut, so you should be good. I was afraid you had cut to fit the Koni's. If you cut to fit Tokicos that were originally meant to fit in the front of a Z, you should be fine. Sorry I freaked you out. Plus, Tokicos have tons longer droop. Quote Link to comment Share on other sites More sharing options...
Stock Car Mafia Posted March 24, 2016 Author Share Posted March 24, 2016 Ha Keith, I am still a little freaked out! I won't feel comfortable until they are back on the car and the ride height is set. To me, the 2 things I am more concerned with is the short threaded adjuster and the fact I have 10" springs and not 12". I am not sure if the 10" springs will get me high enough, but those are cheap. The fenders will be cut for flares as well. Quote Link to comment Share on other sites More sharing options...
RebekahsZ Posted March 24, 2016 Share Posted March 24, 2016 I will measure the total droop on mine and post it for you. I switch back and forth between 12 and 10". With they made 11". Like you said: springs are cheap. Be sure car is level on the ground when you do your flare marking. My car had the ass up on jacks and my flares are rotated a couple of degrees. Quote Link to comment Share on other sites More sharing options...
Stock Car Mafia Posted March 25, 2016 Author Share Posted March 25, 2016 Awesome! I'm not sure how different your 240z will be but it can't hurt to know! Flares will be marked with the car on the ground. I haven't read about it yet but will be in short order. Wouldn't it be nice if I quit sidestepping and just got the car running? haha Quote Link to comment Share on other sites More sharing options...
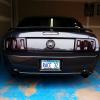
RebekahsZ Posted March 25, 2016 Share Posted March 25, 2016 (edited) Ok. Here are my measurements: I have 12" rear coils. My rear spring seat is 8" above the top of the hub casting where the tube is welded into the hub. My total length from the top mounting surface of the DP camber plate to the bottom of the hub casting at the bottom of the tube is 23-1/2" to 24". My lower rear spring seat is roughly 8" above the top of the hub casting. In front: I have 10" front coils. The total length of the strut assembly from the top surface of the DP plate to the bottom where the steering knuckle bolts on is 22-1/2". The spring seat is 10" up from the steering knuckle mounting surface. If you run shorter springs, just raise your seats accordingly. With Koni's, (which have a lot less droop than Tokicos, there is a little pre-load on the coils at full droop. With Tokicos, my rear springs were just snug against the spring seats, but my fronts had so much droop that my springs were about 2" dropped away from the top seat and I had to be careful to adjust the spring manually as I lowered the car off jacks. Below is the ride height of the car with the struts assembled as described. Not that this picture was taken with good traction and the car is in a right turn, so at rest, it might not look this low. Second photo is going in a straight line. 16" front tires, 17" rear tires. Edited March 25, 2016 by RebekahsZ Quote Link to comment Share on other sites More sharing options...
Stock Car Mafia Posted March 25, 2016 Author Share Posted March 25, 2016 Keith, thanks a bunch for those numbers! I added them to my build sheet for future reference. I think my built sheet notes is up to like 18-19 pages now O.O I'll have to measure how high mine are up form the mounting surface. I know mine are 6 inches up from the hub casting. And by the way, your car is beautiful! I have a lot of your pictures saved from when you did your fender flares and also referenced others. I hope mine can look that sharp someday. Quote Link to comment Share on other sites More sharing options...
Stock Car Mafia Posted March 25, 2016 Author Share Posted March 25, 2016 (edited) This is starting to be a tall order to get all my suspension parts prepared for Easter Sunday. My brother is coming up to my mom's this weekend and I want to get him all of the parts. I have yet to disassemble the rear axles or brakes yet. I spent the majority of the night fabbing up the front differential mount for dual exhaust. I wanted to keep the piece as symmetrical as possible. I borrowed some 4" stainless tubing from work and only needed a 3.5" section to match the thickness of the mount. I used a combination of a cut off wheel and a sawzall to get the initial cut done. I ran out of my cut off wheels and barely had enough to finish this! I notched it to the center eyelet to make it easier to make an angled cut. I will not be bolting the diff from the bottom anymore so it isn't important that I leave this open but just for future reference, I did leave enough room if I ever choose to mount the diff from top and bottom and really rattle my teeth. Doing some test fitting, I cut the tube almost in half to give me the right depth. I left an extra 1/8" on each side so I could grind that down smooth after it was mocked up. I set the stainless semicircle on each side and marked where to grind down to. Then I just used my carbide bit to get it close. I had some gaps but I wasn't worried. I welded in section to prevent as much distortion as possible. It was warping a little bit since this section is pretty thin, but I test fitted it after I tacked it in place, had 50% of it welded, and then again once it was complete. Another fabricated piece that I am quite happy with. I am really enjoying the perks of having this equipment to do this work! Edited March 25, 2016 by Stock Car Mafia Quote Link to comment Share on other sites More sharing options...
Stock Car Mafia Posted March 25, 2016 Author Share Posted March 25, 2016 I have the following coming in from Z Car Depot: Stub axle nuts - I am waiting for Chequered Flag Joe to give me a call back when the shortened axles and flanges are in. Pinion nut - I plan on swapping flanges from my open diff to my CLSD R200 that I picked up. Hawk brake pads - To replace the shitty stock ones. I think this should be adequate for the street for now and I will get my rotors turned. 2" wheel studs - I will press these in to replace the short stockers. Front wheel bearings - I will replace the rears another time as they are expensive AF and seem fine. Braided stainless steel brake lines - The rotted rubber ones have to go. Stainless bolts for the dust shields - I am not sure if I posted up on here but the stockers were seized in the hub. I stripped one out but got the rest out with a torch and a vise grips. I really wish there was a differential rebuild kit for new races and bearings. I think it is quite pricey just like the rear axle kit. Hopefully this sucker holds up. More updates to follow. I might have a few minutes to work on the car tomorrow but I will be mostly out of town. Quote Link to comment Share on other sites More sharing options...
Stock Car Mafia Posted March 26, 2016 Author Share Posted March 26, 2016 I took the bearing caps off the CLSD R200 diff on Thursday and the carrier shims are just stuffed REALLY tight in there. I would guess that there is too much load on the bearings and this will smoke them up. I haven't taken it apart any farther, but are carrier shims available for this diff or will they have to be custom made? If anyone knows the rebuild kit or bearings part numbers for a full rebuild that would be greatly appreciated. Today's goals are to take apart the rear brake assemblies and axles for sandblasting. I have the front bearings and seals already pushed out today. Quote Link to comment Share on other sites More sharing options...
RebekahsZ Posted March 26, 2016 Share Posted March 26, 2016 If the bearings are smooth, just re-use what is there. Good R200s are common enough to make the cost of a re-build unadviseable. Quote Link to comment Share on other sites More sharing options...
Stock Car Mafia Posted March 27, 2016 Author Share Posted March 27, 2016 Sounds good. Are there shims available for it? I'm sure I could have a shop make some. When I rebuilt the rear end in the Mustang you shim it enough to snugly fit in there and this one is really pressed in. I was able to remove the driver side stub axle and flange but I am struggling with the passenger side. I have heated and slide hammered like crazy with no success. Any suggestions? I might just use a puller to remove the flange and then just sand and paint this one myself. Quote Link to comment Share on other sites More sharing options...
rossman Posted March 27, 2016 Share Posted March 27, 2016 I rebuilt my LSD R200 (twice - don't ask ). Bearings alone cost me almost $400 from Nissan and some are becoming difficult to find here in the states. Quote Link to comment Share on other sites More sharing options...
RebekahsZ Posted March 27, 2016 Share Posted March 27, 2016 I typically have to pry the diff carrier out with a 1x1 wooden pry bar. I usually have to coerce them back in with a rubber mallet. If it turned easy when you started it should turn easy when you are done. Quote Link to comment Share on other sites More sharing options...
Stock Car Mafia Posted March 28, 2016 Author Share Posted March 28, 2016 Thanks Rossman. You've been nice enough to give me a parts list but the diff does turn nice so I think I'm ok. I am going to get a pulley puller to get the companion flange off and then slide hammer again without it rusted to those splines. That's where I think the axle is getting hung up on. Quote Link to comment Share on other sites More sharing options...
rossman Posted March 28, 2016 Share Posted March 28, 2016 Thanks Rossman. You've been nice enough to give me a parts list but the diff does turn nice so I think I'm ok. Its all good. I wouldn't mess with it either. Quote Link to comment Share on other sites More sharing options...
Stock Car Mafia Posted March 28, 2016 Author Share Posted March 28, 2016 This community is the best! I hope to contribute long term like some of you other guys have. Quote Link to comment Share on other sites More sharing options...
Stock Car Mafia Posted March 28, 2016 Author Share Posted March 28, 2016 Easter weekend took away some time from the car but it allowed me to hand off my suspension parts to my brother so he could sandblast and prime them. I already got a picture from him that he is sandblasting today. It's always good to have people in the family that enjoy the same type of stuff! Quote Link to comment Share on other sites More sharing options...
Recommended Posts
Join the conversation
You can post now and register later. If you have an account, sign in now to post with your account.