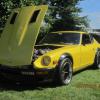
padam07 Posted February 18, 2010 Share Posted February 18, 2010 Well some of you might know that last year I bought a 72 240z to start a project. Below is the link to my previous thread on that car. http://forums.hybridz.org/showthread.php?t=144109 Well when i really started tearing into the rust problems I realized that I was not going to get a car on the road until quite some time. With a 2 year old and another one due in June my project would pretty much not see any time. So a buddy of mine told me he knew of a 260Z that was for sale and was willing to part from it for relatively short money. So I went to look at it and decided to buy it for $2500. Not bad considering i paid $1000 which had a lot of rust problems. I sold the 240Z to a kid that will be doing an electric car conversion. I was able to get $1100 without the motor or carbs. I did throw in a set of zed findings floor pans. It has a new rebuilt 2.8 motor with an n47 head with new stainless valves and seals. The carbs are SU's from a E-type jaguar. Has 4 wheel discs conversion and a ATK 5 speed transmission. He gave me a set of bumbers from a 240Z that are in real good condition. I will not be installing the rear though. Some downfalls that I will be fixing before i register and that is that it has a full roll cage and race buckets. I will be removing the door bars (they get in the way of the door handles) and I will be replacing the seats with 2000 Celica leather seats that I already have. I need to do some work to the front strut towers because it is sitting about an inch higher in the front. They were previously hacked up for some coilovers. The 260z definitely needs paint but there isn't a lot of problem areas. My idea for the car would be the same for the 240z, new front valence, fender flares and rota wheels from the group buy. Here are the pictures the day i got it. Here is a picture where it sat for the past year buried in a garage. 1 Quote Link to comment Share on other sites More sharing options...
padam07 Posted February 22, 2010 Author Share Posted February 22, 2010 Well my buddies and I went down to the garage to see if we can get this beast fired up after sitting for a couple years. We drained the old gas and put some fresh 93 in it. It took some time but we were able to get it running. The carbs were so out of sync. Once we were able to get them close it ran beautifully. We took the valve cover off and it is true the motor is new. It is really clean on the inside. Here are a few pics. Quote Link to comment Share on other sites More sharing options...
Sean111 Posted February 22, 2010 Share Posted February 22, 2010 Nice looking car! The roll cage would look better in mine though Quote Link to comment Share on other sites More sharing options...
daschundtwosixdee Posted February 22, 2010 Share Posted February 22, 2010 WOOT for another 260Z owner. Quote Link to comment Share on other sites More sharing options...
ModernS30 Posted February 22, 2010 Share Posted February 22, 2010 That's a pretty good looking car. I want the cage. Quote Link to comment Share on other sites More sharing options...
leftover z Posted February 22, 2010 Share Posted February 22, 2010 Nice looking project with tons of potential and possibilities Quote Link to comment Share on other sites More sharing options...
padam07 Posted March 2, 2010 Author Share Posted March 2, 2010 So I was able to get to the garage and try to get the car moving under its own power. There was something worng wit hthe clutch. I tried to bleed the system but that didn't work. I already had a brand new slave cylinder that someone gave me and I went to Autozone to buy a clutch master cylinder just in case. The first thing I did was replace the slave cylinder. It fixed the problem and I was able to get it outside for the first time to take a quick spin. Next on the agenda is buy a carpet kit and a new front air damn. I am going to buy the carpet kit that you see on ebay and a new fiber glass air damn from MSA. After the interior is where I want it I am going to tackle the suspension issues in the front. After driving it I noticed that there might be a bad u joint. Here are the pics from earlier tonight. Quote Link to comment Share on other sites More sharing options...
padam07 Posted August 25, 2010 Author Share Posted August 25, 2010 Well it sure has been a long time since i have updated this thread. I have been caught up with having a new baby. I have done a lot of work on the car but still have not got it registered for the road. I had to put new shocks in the car because the old ones were completely blown. While doing that I ended up putting new spindle pins and cleaned up the rear control arms with some paint and new bushings. I fabricated a new bracket for the celica seats. this job was quite extensive seeing that I had to cut the hump out in the tranny tunnel to fit the seats. I also developed a fuel leak in the carbs. turns out the PO never put in a fuel pressure regulator and it is just over powering the seat float bowls. So I now have to purchase a fuel pressure regulator. While figuring out that problem I ended up winning an auction for a set of mikuni triple carbs. (Mikuni Triple Carbs ) So I will be getting rid if the HD8 SU carbs. I think I got a decent deal. Attached are some pics of the carbs Quote Link to comment Share on other sites More sharing options...
aplyedmind Posted August 26, 2010 Share Posted August 26, 2010 Very nice 260z Never saw a manifold like that one before. Good luck with your build good to see a 260z being worked on instead of a 240 Quote Link to comment Share on other sites More sharing options...
padam07 Posted August 29, 2010 Author Share Posted August 29, 2010 Well my buddy and I went to the garage the last two nights to do some work on our cars. I was able to repair the battery tray area. I was also able to elongate holes on both fenders to get them to line up properly. I did not finish bolting them down until after I reinstall the hood to make sure it lines up. I also put seem sealer on the floor patch. Next time down I will spray it with undercoating. Mocked up front air dam Here is pictures of the driver side seat bracket and the corresponding floor modification. Installed seat Here is a picture of the rear bumper installed. Right now it is temporary. My end goal is to narrow it to get it tighter to the body and weld the seems to eliminate the bolts. I will be painting it a matte black to match the fender flares. Carbs came in on Friday!!!!! I took a short video of the engine running before I remove the Jag SU carbs for the triple mikuni setup. Quote Link to comment Share on other sites More sharing options...
260ruztmachine Posted August 31, 2010 Share Posted August 31, 2010 I like the sound of those carbs on the vid. Quote Link to comment Share on other sites More sharing options...
Zhunter Posted August 31, 2010 Share Posted August 31, 2010 YES! Very pleased to see another 260z on here[: I just recently got mine back on the ground after fixing some SERIOUS unexpected rust... Quote Link to comment Share on other sites More sharing options...
padam07 Posted September 2, 2010 Author Share Posted September 2, 2010 I like the sound of those carbs on the vid. The carbs are in good shape and run well but I just couldn't pass up on the auction on ebay for the mikunis. I am not sure if I will sell the HD8 SU's to recover some of the cost of the triples. Quote Link to comment Share on other sites More sharing options...
padam07 Posted September 10, 2010 Author Share Posted September 10, 2010 (edited) Well since I last posted my buddy and I were able to get all the front sheet metal back on and aligned as best as we can with the junk fenders and headlight buckets. The big day is coming up on Sunday when we install the new mikuni carbs. I can't wait. Feel like it is Christmas time as a kid. Today I went to another friends house to pick up some spare parts just in case we will need them for the install. Never know what could happen. Take a look below. Mikuni Jet kit Mikuni gasket kits, spare accelerator pumps, intake/exhaust gasket, and Nissan silicone gasket. I will have more pics and hopefully a video Sunday night after we finish. Edited September 11, 2010 by padam07 Quote Link to comment Share on other sites More sharing options...
padam07 Posted September 19, 2010 Author Share Posted September 19, 2010 Well I had a big night last night. My buddies and I were able to get the Mikunis installed. I also wrapped the header beacuse I don't have any kind of heat shield in between the carbs right now so I figured the wrap might help a little. I was a PITA to bolt everything up but was very rewarding when it started on the first try. The PO was correct when he said that they came off a running car. They were pretty close when we sync'd them. After header was wrapped and installed With such a short intake it was a bi@tch to get the fasteners on. Just getting the last ones on. That is me on the right. My buddy Adam on the left (yes we are both named Adam) After carbs are installed In the video the fuel lines were temporary attached just do get it running. It was about 1 am at the time of the video sp we were getting tired. Quote Link to comment Share on other sites More sharing options...
RB26powered74zcar Posted September 19, 2010 Share Posted September 19, 2010 (edited) Sounds great, looks great! I remember way back when I installed Mikuni triples on mine. It was a great feeling driving around with that mean, throaty sound... Edited September 19, 2010 by J. Soileau RB26zcar Quote Link to comment Share on other sites More sharing options...
Tony D Posted September 19, 2010 Share Posted September 19, 2010 Ahhh the good old FET Kyukto manifold. I have two of those! One has a specific plan in mind for one of my turbo surge tanks..... Quote Link to comment Share on other sites More sharing options...
padam07 Posted October 5, 2010 Author Share Posted October 5, 2010 Small Update I have done a few things recently. I had a clutch issue since day one that I finally figured out the problem. The problem was I could not keep any clutch pressure and I always had to bleed the system. I replaced the slave cylinder thinking that was the issue but to no prevail. It ended up being a bad rubber clutch line going to the salve. I ordered a new SS clutch hose from MSA and installed it. Now to tackle the brake problem I have. I have a lot of brake fluid seeping out behind the master cylinder. So i decided to upgrade the front brakes which includes a new larger master cylinder. The car already has toyota 4 x 4 calipers installed but they are the ones that use the stock solid disc 260Z rotors. I picked up a set of 1988 Toyota 4runner calipers which allow me to use a set of 1984 Nissan 300zx vented rotors. I will also have to upgrade the brake master cylinder with a unit from a 1979 Datsun 280zx 15/16" dia. Now I have to track down these parts. Here are the pics of the new calipers. Quote Link to comment Share on other sites More sharing options...
75zcar Posted October 6, 2010 Share Posted October 6, 2010 Whats the word on your old carbs? Quote Link to comment Share on other sites More sharing options...
padam07 Posted October 6, 2010 Author Share Posted October 6, 2010 (edited) Whats the word on your old carbs? I sold them to a guy who will be using them in building a Gulf Miller 1946 rear engined Indy car with a late model jaguar 4 liter engine. this guy builds replica vintage race cars. www.Babineaumetalworks.com Edited October 6, 2010 by padam07 Quote Link to comment Share on other sites More sharing options...
Recommended Posts
Join the conversation
You can post now and register later. If you have an account, sign in now to post with your account.