
ls240z
-
Posts
60 -
Joined
-
Last visited
Content Type
Profiles
Forums
Blogs
Events
Gallery
Downloads
Store
Posts posted by ls240z
-
-
I believe he's using the ATL SP-112,a steel container surrounding a 12 gallon bladder.
Edit: I was a couple minutes slow!
-
Started tackling the floor patches, not the easiest to get a good fit up when you're trying to butt up nicely to all the curved surfaces. Or cutting with dull tin snips... Oh well. I seem to be blowing through every so often, I just hold the trigger a hair too long. After I get it all welded and ground down, I can start flattening the floor to fit closer to my angle pieces fab'd to fit the Bad Dogs to the car.

-
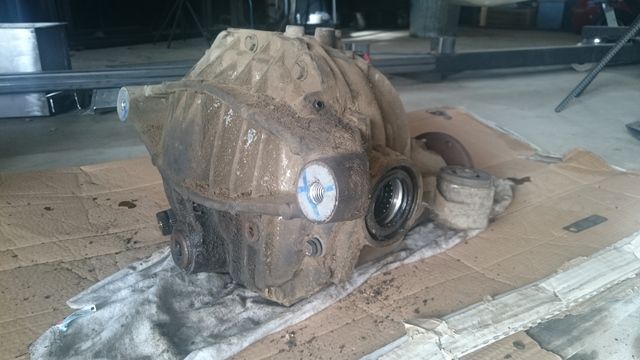
Well so much for that supposed progress, been traveling and working a lot of OT to pay for car parts. Putting a hold on welding in the fuel cell structure until I get the rear end bits from Will. I went out and pulled this rear diff from an 04 Explorer, twas a bit of a bitch to yank out in 2 hours (closing time).
It's a 3.55, not sure if that'll suit my needs, I need to research more on the 8.8" gear choices seeing as I spent most of my time looking at R200 ratios.
Working a lot in the next 2 weeks, but I hope to get started on the subframe connectors so I can sandblast the chassis.
-
What sort of camber adjustment range will this be capable of? I'm wondering if I should bother with camber plates in the rear if the uprights are able to get enough negative camber.
-
Damn that silver looks nice with those satin grey wheels. I'm following your build closely, I'm going to order Will's IRS package when they're produced. Which coilovers did you use with the Koni's? Have you had a chance to get a sense of the handling? If so, what are your thoughts on your combo?
-
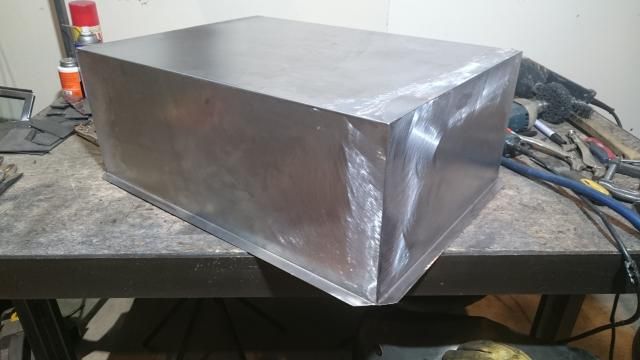
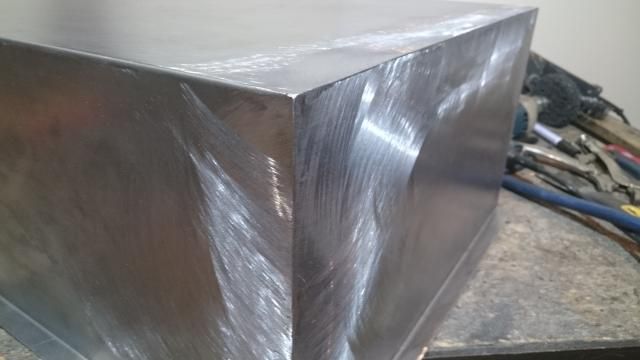
So I finished up welding the container, it turned out better than I could have hoped. It was my first time welding sheet metal so I was a little nervous. All that I need to do is drill a drain hole, drill the holes for the lid, remake the lid (the old one was an 1/8th of an inch to small), and get it all powdercoated (going to wait on that, might as well do a batch of stuff to save money).
Now that I have this made I can put together the supporting cage in the rear. Getting the angle pieces to mount my Bad Dogs made up and I'm picking them up on Tuesday, should hopefully be some decent progress in the next 2-3 weeks
-
I agree with texis, gloss is way too shiny, and doesn't mesh will with the rest of the interior imo. Amazing work on the actual console though
-
Look into the Deka=Braille threads throughout the Web; identical batteries made by the same parent company, but a huge price difference between the two. I plan on running the 21lb Deka when I even get close to having an engine...
-
I have the passenger side, but I know who has the driver side. Let me check.
Do you need the inner or outer tail light panels?
PM'd you
-
I think I have the rear corner. Let me check.
Would you happen to have any other pieces of the rear, like the tail light panel sheet metal?
-
These are gorgeous, I would love these seats. Dat diamond stitching...
-
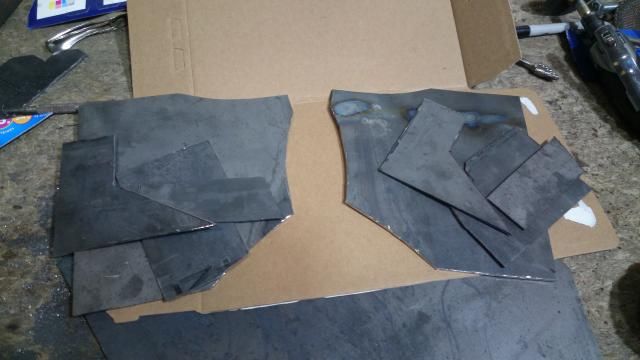
Still looking for a shop with a power break to bend the 12ga angle strips I need to mount my Bad Dogs, so in the mean time I've been cutting up 1/8" steel for the mounting plates/boxes for the main hoop. I am copying robbs70z's design, which is this:
Here is my pile of puzzle pieces so far
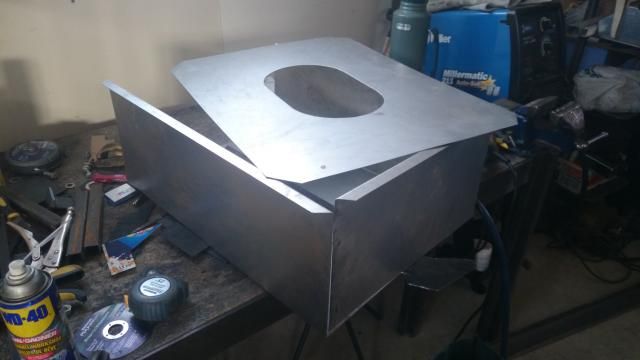
I also had my fuel cell container bent up. I picked it up today, they did a good job bending it. I just have to weld the sides, drill the cover holes, and get it powder coated. I'm getting an ATL Saver Cell, so I built the container before I bought it so I can mock up the fuel cell frame in the rear. This also saves me a bunch of money right now, and I don't waste the limited life span (5 year?) FIA certification.
I also bought a 4'x8' sheet of 20ga steel, for the hatch floor, battery tray, and firewall holes.
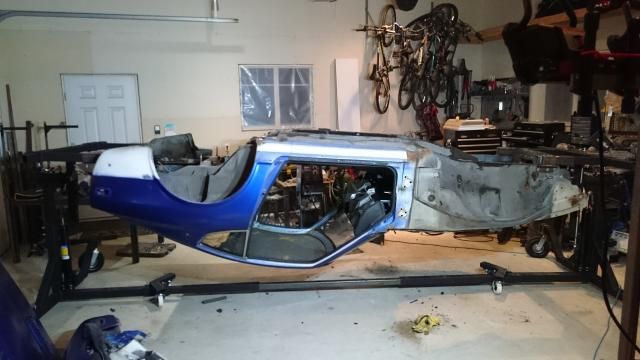
Slowly but surely, this build is finally going places.
-
Thanks for the confirmation and mention of 12 ga John. When I said angle, I had planned on folding thinner sheet 90 degrees. 1/8" angle is the smallest I had found, and like you said, it's too thick.
-
Yeah, that would almost be a last resort for me. In all the threads I've read for installing these, I haven't seen this issue mentioned once.
-
I removed my entire factory rail because it was in terrible shape and I wanted to clean up under it completely. Looking at the floor now, there is a large drop from one side of where the rail sits. The Bad Dog rails don't take this into account so now there is a large gap. I knew people have recommended to install over existing rails, but looking at this makes me think it's a requirement for the 280Z. The driver side looks like it will work fine because the floor is flat.
My "solution" to the passenger side is to rosette/plug weld a length of angle along the floor along the trans tunnel side, acting like the "old, cut off rail", and then weld the new rail to it. Does that seem like the way to go about this? Or am I not looking at it correctly?
I was desperately hoping my floor was ridiculously bent, but it is definitely supposed to be like that. Both Bad Dog rails are identical, so using the wrong side isn't the issue.
Passenger side
Driver side
Where I currently stand
-
I'm curious to see how you tackle that rocker rust, as I have to deal with the same thing. It's not likely to be a fun ordeal... Your build looks great though!
-
So here is version 2.0, hopefully utilizing your suggestions. Door bars are not accurate, only an approximation. They are subject to change to fit the door cards/be NHRA legal/be decent to climb over.
Red = 1.75"x.120"
Yellow = 1.625"x.060"
-
Your door bars are out of spec for NHRA, which requires that the door bar pass between the shoulder and the elbow in the driving position. The NHRA door bar sucks for all other forms of racing. So, do what you want and see if you get away with it. In the meantime, I will be smacking my elbow every time I autocross the car, all because I have an NHRA legal door bar.
Looking back at my picture, those bars are ridiculously low, I didn't realize it until you mentioned it Keith. I'm sure I could manage to set it up in a way to be NHRA legal and still have an ok time getting in and out. I was just looking for the opinion on that style (two bent, uncut door bars welded and gusseted).
A knee bar will still help in a side impact. I'd run the door bars as far up the knee bar as you can.
The sill bar protects you from a low nosed car in a side impact, or if you go off the track or a road and hit a stump or a rock or something like that. Not strictly necessary, but a good idea.
It makes sense, I just don't want to get caught up in the "tubing fever" and install more than I need. I'll likely add them, what's another ~20 lbs at this point?
-
Check with a tech inspector and see if this is legal for SCCA. I'm sure it is for autocross, but I would think that it wouldn't be for road racing, since you have no A pillar bar. Most track day type stuff doesn't have any requirement for a roll bar at all, unless you're in a convertible.
I figured I'd be missing out on road racing without the A pillar bars. Not a big issue for me, I'll have my hands full even without other vehicles on track with me. This setup works for autocross, and if I go to the drag strip, it will work too. I'll need the roll bar since I will be going faster than 11.49, but not faster than 10.00. I can use a roll bar instead of a cage at those times with an "unaltered firewall, floor and body." I'll have to find out their definition of "altered".
1. Are you trying to keep the stock dash? If you are, I don't think your supports to the firewall are going to happen. If not, I'd run a straight dash bar (at dash height) and then I'd have a second set of thinner tubing to do the firewall support. This will give you better protection if you get T boned, and the extra weight of the two tubes to the firewall won't be a big deal. Make your minimum requirement cage out of the 1.75 x .120, then do everything else thinner/lighter if possible. Thinner and larger diameter will be stiffer than smaller diameter thicker wall. I did all of my extra stuff out of 1.625 x .060. Same thing with the rear strut bar. Use whatever thinner tubing you decide on.
I am keeping the stock dash, so I'll have to have another look at what will fit. Would you say that as long as I manage to maneuver a bar under the dash it'll be a decent knee bar and better than nothing?
2.1.625 x .060, or 1.5 x .090, something in that general area is what I'd suggest. I picked by going to www.onlinemetals.com and checking weight per foot. For your yellow tubes I ran 1" square x .065, and I ran a tube from the TC rods to the xmember to make it a K member as well.
Thanks for the recommendation. I am also going to look into your K member modification.
3. Not a fan of the X in the rear stays. I think you used to be able to do that instead of a diag in the main hoop, but not anymore. It's weight up high. I really like an X from the rear struts to the bottom of the main hoop and used that in my cage, but it's a real PITA to weld in. Had to cut holes in the fenders and dog legs to do it.
I was looking at your use of that X, and considered it if I didn't need anything between the rear stays. Since you're saying I don't, that's perfect in terms of visibility, especially when driving on the street. Another plus, I already have the "toolbox area" cut out and I'm 90% sure I'll have to be doing some work on the doglegs/ outer rockers regardless.
4. Yes, door bars should help a lot. One problem Z's have is flexing around the firewall. You step on the brakes, and essentially the car wants to fold at the firewall. Jack the car up and support it under the TC rods, and you can SEE the front end sag down under teh weight of the motor (at least you could on my 70). By tying the front and rear structures together, you'll prevent that beam flexing. Without it, you might have a stiff structure in front and another in the back, but nothing substantial to hold them together. I would put the front end of the door bars as high as you can, don't do it 1/2 way down the tube. Make that node the same one that goes to the firewall too. Every time two tubes hit a third, you should try to have them hit the target tube in the same spot.
You have convinced me on the door bars, no sense leaving a major flex point between two structures. If running the style of door bars I've shown, is the sill bar still needed/recommended? I forgot to mention I'm installing Bad Dog frame rails and subframe connectors currently, if that makes any difference. I hear what you're saying about nodes, I'll definitely incorporate that.
5. Not so sure about seat mounts. I welded to the subframe connectors that I added. Not really seeing the benefit of welding a big spreader plate to the trans tunnel which is very weak anyway. Would make a lot more sense if you could put a connector tube across the bottom of the car, but most Z's don't have that option because the exhaust is in the way.
My reasoning behind the spreader plate (whether or not it's actually correct) was that the tubing would be less likely to tear the plate opposed to the thinner sheet metal on the tunnel. I suppose the tubular seat mounts johnc mentions in his list of chassis stiffening mods for street cars are of the kind you mention: solid tubing across the entire width of the car. I can't see that working, like you said, the exhaust (dual) will be in the way. Since that's the case, I'll likely go with what seems to be the norm on here: rectangle tubing that's cut on one side and welded to the floor.
I'll sketch another lovely paint jpeg incorporating these revisions.
-
I am trying to get my roll bar/chassis bracing plan finalized, here is what I have come up with and I'm looking for your scrutiny and suggestions. I took info and inspiration from 74_5.0L_Z's build and numerous other's, but I have some questions. This car is going to be a summer weekend toy that I'll take to the track and autocross from time to time. I believe I have it to spec in all NHRA, SCCA, and FIA Canada rulebooks. Due to Canadian autocross rules, the minimum diameter/thickness is 1.75" x .120". Thicker than I'd like, but more what can you do.
Red = 1.75" x .120"
Purple = bolted in 1.75" x .120"
Blue = mounting/spreader plates
Yellow = tubing of which both diameter and thickness I am unsure of
Lime Green = tubing I am unsure of even using or the final configuration
Dark Green = gussets
My questions are:
1. I know the knee bar should all be bent in one plane to keep it stronger, but I'm wondering if by gusseting it to the firewall/lower cowl box area will keep it strong and increase chassis stiffness?
2. What size/thickness is preferred for additional chassis bracing not outlined in the rulebooks? Is larger/thinner or smaller/thicker better? Can anyone suggest a size?
3. For the bracing between the rear hoop stays, I'm not sure if I should run an "X", a "V", or nothing at all? What am I looking at in terms of visibility vs. stiffening/strengthening?
4. Door bars, do I use them? Will they tie in the chassis as a whole a lot better than just the knee bar and main hoop attached to the rockers themselves? I'm keeping a full interior, so this might not be an option in terms of access/egress and my size (6'2", 200 lbs). If no, should I just run a sill bar between the knee bar and main hoop?
5. Tubular seat mounts, I'm sure I've read they should attach to the cage (I'm assuming the sill bars). I'm also assuming they terminate at the trans tunnel, welded to a mounting/spreader plate, is that correct?
As this is my first build, I'm still wrapping my head around some of the finer points of a full on build. I am trying to be thorough and do the job correctly the first time, and I greatly appreciate your help with that. Cheers.
-
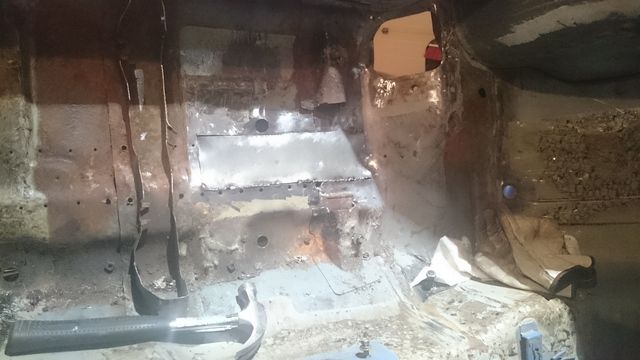
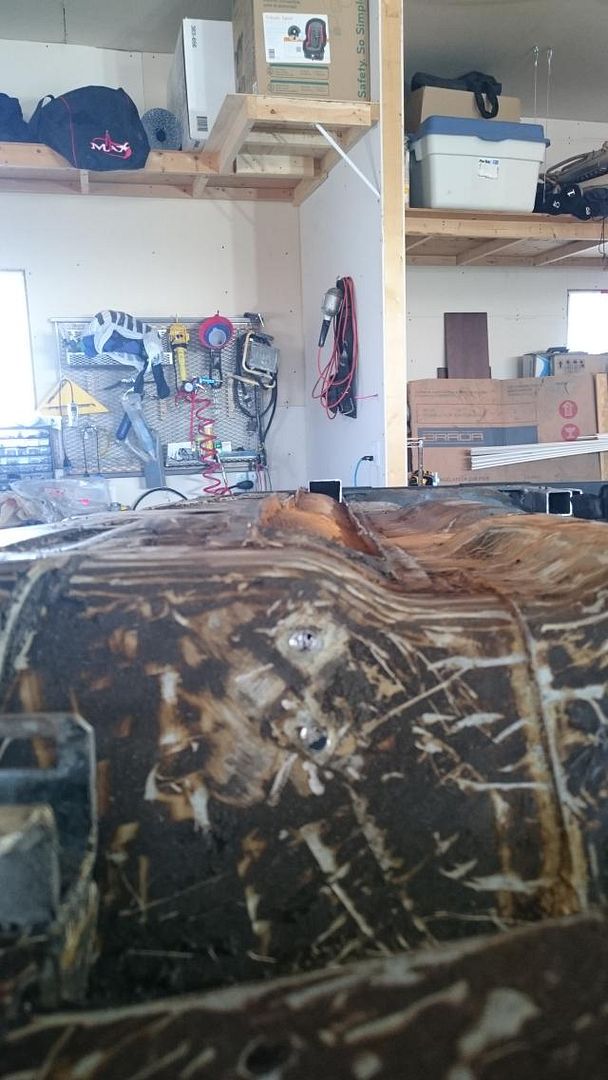
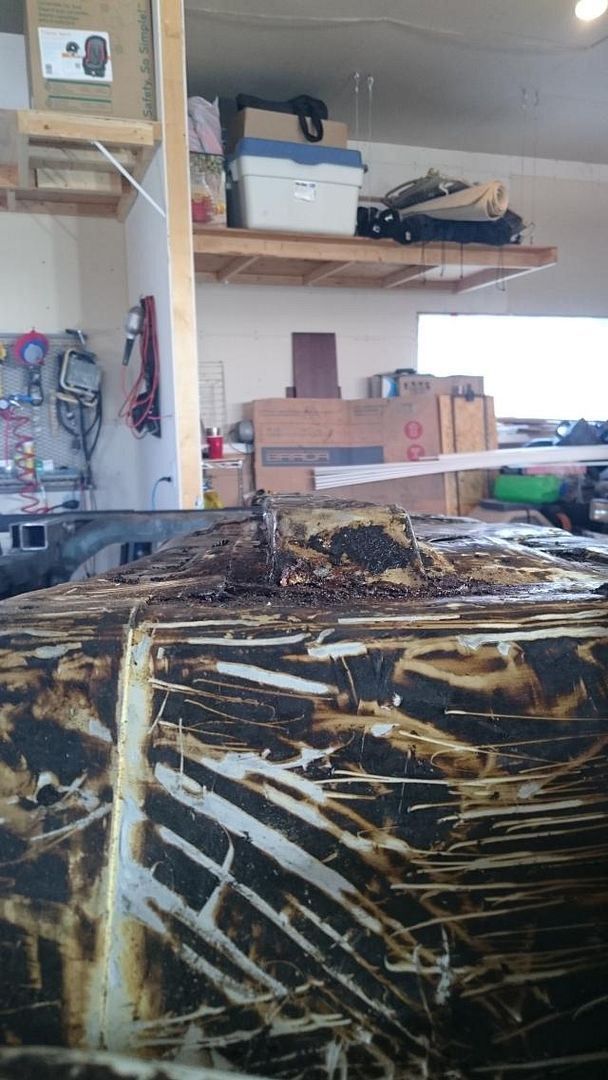
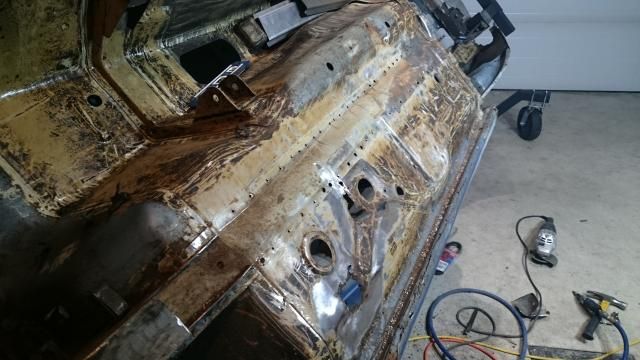
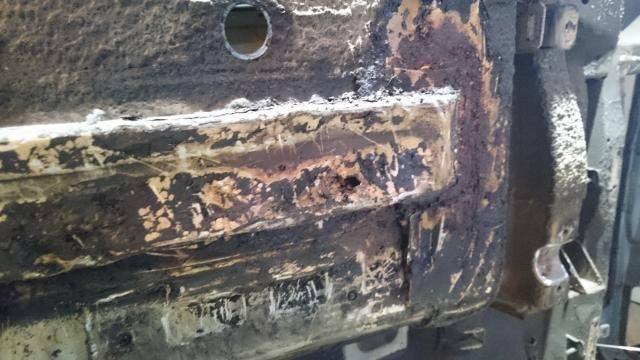
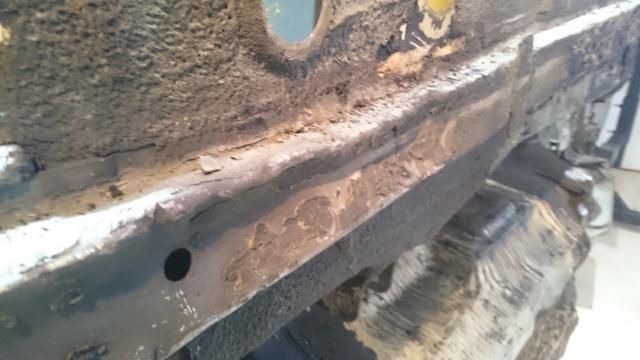
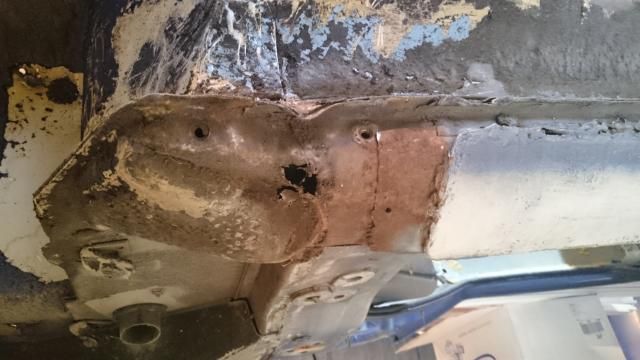
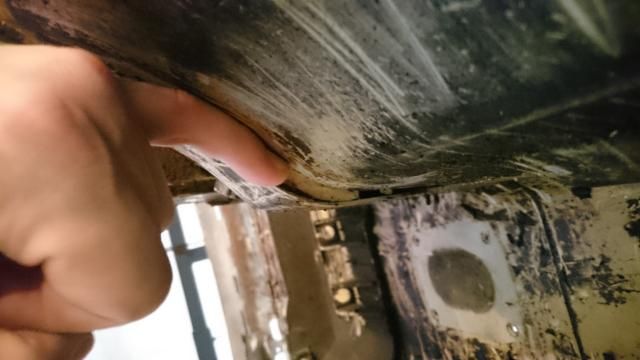
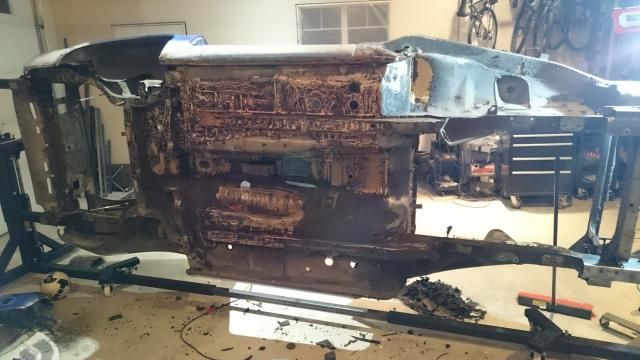
I haven't progressed too much on the underbody aside from scraping off some more undercoating.
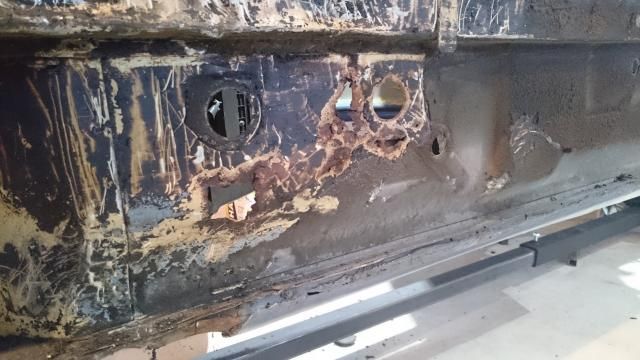
This seems like the worst of what I've found so far, which doesn't seem too bad.
This seems a little troubling...
Do all these cars have such a huge gap between some seams? Damn things is like 1/4"...
How she looks right now. Once I finish scraping, I'm going to use a scotchbrite pad and a drill to clean everything up.
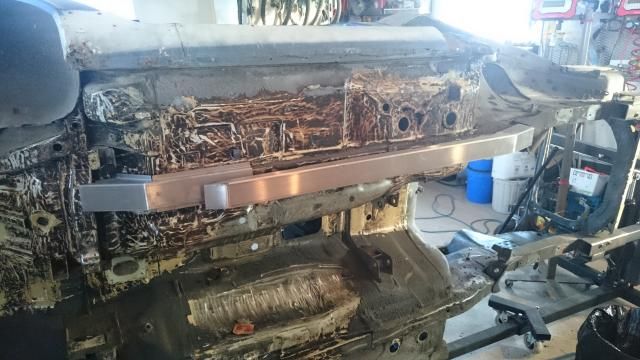
I also just recieved my Bad Dog frame rails and the 240Z subframe connectors, which I'll have to modify from what I've read on here. They are some quality pieces. They are just sitting on my existing rail right now.
I am going to try to plug away at johnc's list of chassis reinforcements for a street car.
For a street driven S30, here's about as much as you can do to stiffen the chassis:
1. Seam Weld (every sheet metal seam overlap.)
2. Bad Dog Subframe Connectors
3. Weld-In Roll Bar.
4. Welded In Rear STB.
5. Triangulated Front STB.
6. Radiator Core Support Reinforcement.
7. Transverse Link Bracing Reinforcement.
8. RT Diff Mount.
9. Tubular Seat Mounts.
10. Box Upper Frame Horns to Firewall/Cowl.
11. Reinforce Pedal Box/Brake MC Mount.
12. Reinforce Front ARB Mount.
13. Reinforce Front Strut Tower to Frame Rail Junction. -
And that is why I absolutely hate buying cars. Such a pain in the ass, and so many potential problems. My car has a bit of rust, but no accident history or bondo issues, thank god.
Hope it's not too bad underneath the filler.
I wish there were chassis up here like that, and if they existed, didn't cost a fortune to buy.
You'd be surprised Keith (or maybe not) by some of the crap I found in this car. When I took off the doors I found random washers used as spacers between the hinges and body. They looked like they were attached by bird crap, turns out they were welds...
-
Houston, we have inversion.
Already I'm seeing that this chassis has been abused and slapped with body filler, I'm scared to take it down to metal... The PO was a cheap bastard that's for sure.
-
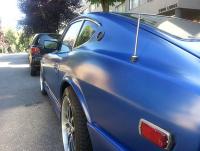
I only just noticed you're in Edmonton, that's great to know someone else up here is modifying this car! I am only just getting to the point you were at 3.5 years ago though... Awesome work!


Swiss two-become-one 240Z Ground up restauration / JDM mods
in S30 Series - 240z, 260z, 280z
Posted
Where did you get those corner lights? They look mint!