z240
-
Posts
397 -
Joined
-
Last visited
-
Days Won
4
Content Type
Profiles
Forums
Blogs
Events
Gallery
Downloads
Store
Everything posted by z240
-
There are some great threads on here about air box design. The one thing that sticks in my mind is how poor a basic retangular box works. It is hard to create an ideal box without 3D flow modeling or following a pre-existing design. At the very least, if you have to have the inlet at the front, build a tapered box so that you have a 3/3 - 2/3 - 1/3 x-sectional area taper from front to rear to keep the rear from starving. Just think that at the front you have all 6, then after the first 2, you need 2/3's of the remaining air, then after 4, 1/3. And make it as large as possible. 3" inlet size minimum. Really crude flow design, but its better than a small rectangular box.
-
Hazard lights not blinking at the right speed. Hyperactive!
z240 replied to spiff's topic in Ignition and Electrical
Just a crazy idea, but maybe you changed the turn signal relay and not the hazard relay? They are two separate items. Generally a too-fast blinker is caused by in-sufficient load on the circuit like a burned out bulb, but all four blinkers are blinking, right? Did you recently change some bulbs to LED's? -
http://www.brandcarparts.com/shocks-struts-nissan-model-selection They have all the Z's in 'Nissan', not Datsun. Only 510's and Roadsters in 'Datsun'
-
Anybody have trouble installing polyurethane bushings?
z240 replied to jparker893's topic in S30 Series - 240z, 260z, 280z
This makes me worried. There may be a mix up of rack bushings. 280 racks have a wider bushing area (distance between the flanges that constrain the bushing) on the drivers side than the earlier racks, and there are two different bushings to account for this. Poor AZghost and many others have endless tails of whoa getting the right bushings inplace as they are very very tight. Requires total cleanout, handfulls of lube, gear clamps,copious swearing and bleeding to get the bushings seated well enough to re-assemble. The end result is great, but its not easy as you seem to indicate The MSA page you linked to shows the differences. Their 23-4151 rack bushings should be right. If you accidently got a 240 bushing, it will fit way too loose and will allow the rack to move left right with steering input. The other side is the same on both racks. If you have the too-small 240 bushing, it will seem to slip together pretty well and seats 'ok', but the test of putting the wheels on the ground and steering right/left while watching the rack move will tell you the story. Another diagnostic would be, when on the road you will notice that if you turn left, the wheel will return to center in one place, but if you then turn right, the wheel will re-center to a noticably different spot. Sure sign of the rack shifting with the turns. Maybe you got lucky, don't worry about it until you take it for a drive. -
I'm not exactly close, but I have a few of these. It's the metal one you want, right? The early plastic ones don't seem as sturdy. Or is that the other way around.... I'll send you one for the price of a stamp if no one closer offers up something. The only fans I have are the 10 or so datsun squirrel cages I have in the shed Don't mind loosing a few.
-
Erratic = unreliable fuel pump/delivery/float level. Get a gauge on there and see if pressure goes wonky when the problems arise.
-
Yes, an internal passage. All six runners are joined at the head end (no passage there, just joined), AND with a second roughly round casting just behind the carb flange between all runners. If you look into any runner from the carb end, you see a 1/2"-ish opening about 1" in from the carb flange on both sides of all runners (well, not the first and last...) that connect each adjacent pair. If you wanted to, you could weasel a single piece of wire in there and extend it through the entire manifold. I'll to post a picture to make it any more clear. While this is wonderful to get a nice all-plenum vacuum MAP signal for my 123 ignition dizzy or the brake booster, it does pose challenges for individual carb syncing.
-
On the subject of vacuum logs, makes me wonder how many people know if their intake has shared passages between runners already? I have a Cannon triple manifold for my 44's that has a good 1/2 " hole running through ALL of the shared support casting between every runner, while another Mikuni manifold on the wall has nothing, even between adjacent pairs. It does however have six individual threaded and plugged bosses on top of each runner with a 1/4 or so internal cast hole running down to the ID of each runner just inside the carb mount flange to use as needed. Just a word of caution for those who now are rushing off to make a vacuum log...
-
This is a just a 14mm x 1.5 LH nut I'm pretty sure. McMaster Carr? Or belmetric.com https://www.belmetric.com/left-hand-nuts-zinc-class-8-c-1039_1042_1055.html
-
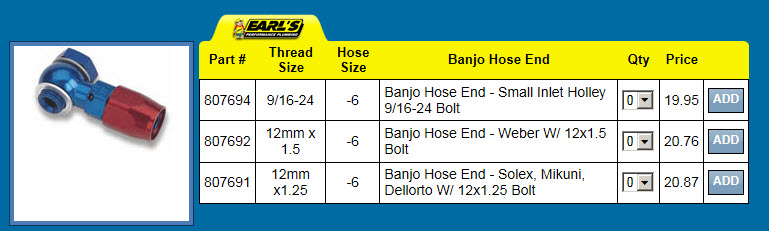
There are banjo fittings for Mikuni and Weber that are 12x1.25 and 12x1.5 respectively that may work for you. They use a pair of crush washers to seal. Look for Earls or equivalent at your local speed shop. You can also get -6 and -8 male banjo's and then a matching bolt. look here for a guide http://www.anplumbing.com/Adapters/Banjos+%26+Bolts-26.html The Z SU's also use a 12x1.25 banjo like fittings but they end in a tube for a hose.

-
New? Bolt-in camber top mounts on the market
z240 replied to 1vicissitude's topic in Brakes, Wheels, Suspension and Chassis
First glance says there isn't as much camber adjustment as you might think. The adjustment channel containing the four small socket head lock down bolts is pretty short compared to the long channel where the mono ball rides. Might ask for some number specs from this guys before ordering so you get the amount of adjustment you need. -
Rear Control Arm Bolt - Size and Source?
z240 replied to m1ghtymaxXx's topic in Brakes, Wheels, Suspension and Chassis
That would have freaked me out. Glad nothing nasty happened. I have spares of both that old-ball bolt and its lock washer, and the poly bushings (new) too, not exactly close but I can send it Priority post of something quick to get it to you. Check if the gang at WhiteHead have any spares laying around too. Contact me at z240@shaw.ca for logistics -
'72 240Z Backfiring Through Carbs at Low RPM.
z240 replied to Connor280ZX's topic in Nissan L6 Forum
The vacuum advance hose is the one that is plugged. Someone has incorrectly connected the dizzy advance to the intake manifold vacuum. This vacuum source does not give you the correct vacuum signal your dizzy needs, it must be attached to the line at the carb (ported vacuum) for it work as intended. Set your timing with the dizzy hose removed (and plugged, engine side), you have quite high manifold vacuum at idle with your hose connected like it is, and it is advancing your timing too much. Your float vent lines are connected correctly to the air cleaner. -
I have one in Calgary if you can't find one closer. PM me or send an email to z240 @ shaw dot ca for further info.
-
one key difference in the panels is the fit around the shock tower. If your early 260 has the short rear shock towers like a 240, then they are interchangable. The issue with the hatch support strut is that at some point the right side rear panel has the raised bit that clears the bracket on that side. If you don't have the bracket then you leave a small gap there. No biggy. If you have the later taller strut towers, then there is an extra 3x3 ish notch in the one panel where it fits around the tower. This is the dead give away between early and later 260/shot/tall strut towers. 260 and up interior panels are a nice thick tough ABS plastic, while the 240 panels are that thin crack-prone squeaky fibreglass crap. Nirvana happens when you own a 240 and find a set of those nice thick early 260 panels to replace them with. I'm lucky to be blessed in this fashion.
-
The FSM for 81/82 that use the E12-80/92 ignitors, indicates the stock coil (no ballast resistor on these cars), should have 0.84-1.02 ohms primary resistance (EL-30 for the 81 FSM). Most of the generic MSD Blaster coils have 0.7ohm primary resistance. Close, but it will run with higher than designed current and will shorten the coil life. By how much is your guess. BTW, the 8207 has a 0.355 ohm primary resistance (all from msdignition.com) and will cause coil and or module failure fairly quickly. You should be run with a 0.5 ohm or higher balast resister in line with the + terminal if you decide to use it. The MSD ballast resistor is apparently 0.8 ohm.
-
Knowledge of condition is definitely worth something more than junk yard value. Depends then on how much trust you have in sellers information. The price is fair for the stated condition in this market.
-
Allow me (the friend) to clarify. Rick didn't quite translate the discussion we had about this accurately. I never intended to indicate any binding might occur, just the lash tweak that might produce more whine. I believe the issue is with the reports posted here and on other forums of having "different" than original torque on the input flange bolt after the flange switch, that results in a change in lash, which in turn results in additional or a change in the preceived diff noise. This what I recall from these prior posts, it may not reflect the actual problem, if there is one at all. Generally changing the flange is reasonably safe if you use the recommended FSM torque when putting it back together I would think. One method mentioned mentioned in prior posts to 'duplicate' the original torque is to mark the nut and end of the shaft before removing them, then put the nut back where you found it using the witness marks as reference. There are many frictional variables in this that make even this method a bit suspect. My direct experience with this is null, I am mearly parroting what I believe I have read. The Subie diff swap thing is suddenly becoming popular in my neck of the woods, and I want to understand the best way to accomplish it. Let's use this chance to summarize and get solid experience based input from the experts about if this really is a problem, and the best way to ensure that the least degradation of diff performance (even if its just a sound change) post flange swap.
-
Just one comment. There is no such thing as a rust free Datsun. Low rust, sure, no rust, uh-uh. Have a very very careful look. Undercoating, the tar mat on the interior, dirt, bad lighting, all hide rust real well....
-
Please help identify these diferrentials
z240 replied to yuthh's topic in S30 Series - 240z, 260z, 280z
Pics 2, 3 and 4 are generic R200 diffs. As suggested, unwrap more to make sure they are long nose. The first one is definitely not a Z diff, an interesting mystery that someone will have to solve. You will be asked for more pictures of it from several angles. Please post soon as the suspense is killing me. The overall configuration makes it look like a relatively 'easy' fab job to get into a Z compared to some recent swaps we've seen here. -
If I was putting the hatch on by myself like that poor guy, I'd want the glass out too!
-
Tension rod(compression rod) question.
z240 replied to rickyellow zee's topic in Brakes, Wheels, Suspension and Chassis
Same same. If its the one for $15 from Houston, go for it. There is one common weakness on these things. The area that is trapped inside the bushing is prone to rust, pitting and the resulting weakness. Get a very close-close up picture of the area where the there is a step change in OD, to up just below the threads start, ie the area that is inside the bushing, and get a picture ALL THE WAY AROUND. if there is ANY rust pitting, don't get it. It looks pretty good from the close up zoomed in view on ebay, but still... And see what he wants for shipping first.... -
Little plastic ball cup thing for the door handle, thing..
z240 replied to Sideways's topic in S30 Series - 240z, 260z, 280z
Well I have plenty of old used door handles that have that little plastic piece. If you can't find one closer to home, I'll send you a couple for the price of postage. Let me know at z240@shaw.ca -
This fellow canuck has a few tucked away. How many do you need? Contact me at z240@shaw.ca and we'll get this arranged. I'm assuming these are the inner LCA bolts you're looking for.... Maybe send me a pic when you email and there will be no confusion. thks
-
Yes, those are the hatch area hold down straps.