

schema
-
Posts
24 -
Joined
-
Last visited
Content Type
Profiles
Forums
Blogs
Events
Gallery
Downloads
Store
Posts posted by schema
-
-
Thanks Bill! Next Friday I payday, gotta stock up on some more 16ga for the floors then these bad boys are on their way in

Hey Cable Srv, saw your website, got a couple q's on your frame rails.
I saw you used 2.5x.1.5. I'm not sure if it's different on the 240's ( I have a 280) but my front rails measured 2.5x2.5, then under the floors were 2.5 wide by 1.25 tall. Will having 1.5 tall front rails misalign anything?
Also, I saw you added some cross members along where the trans tunnel is Will that actually end up behind the transmission/under the drive shaft? I may actually copy that idea
Just don't want to run in to any problems. Any other tips appreciated!
-
Mother's Day Update!!!
Whip out your razorblade folks, it's time for a shave
So, originally I was going to put the car on a rotissarie to replace the frame rails. But because I'm cutting the the rails AND floors out now, there was no need to flip it over, so I decided to go ahead and finish up shaving the bumper today.
Damn glad I didn't use the bumper mounts to hold the weight. Theses things were rusted to ♥♥♥♥!
Left side. Pulled the bumper mounts out and tossed 'em. Then made a template. This is where I ended up making a TON more work for myself. Pics below.....
Cut out.
Welded in. See those tiger scratches. Yeah. I had to friggin mangle the piece to shape it right because I gave it a rough shape before putting it in. Right after I spent 2 hours doing this I finally discovered why it was such a pita to fit right. At the very bottom of the bumper, it curves inward at about a 35 degree angle, like a reverse lip. I put that lip in the new piece before I welded anything in. Bad idea. It prevented me from bending the metal along the bottom in the other direction. Lesson learned. The right side took about 1/4 of the time to complete, and even came out better.
Right side ready to go. Forgot to take a pic of it cut out, but you get the idea.
Left side done , after grinding, grinding, and more grinding. Blah!
Right side done. Piece of friggin cake
Pure beauty. I Love it! I have a rinky dink hole left that i'll patch up in 15 min, but after spending 4 hours just on that left side, and under an hour on the right, I was done for the day
-
I was just putting my shell+doors on my lift the other day.Its a 280z and without anything in the car whatsoever aside from the doors i noticed at least a good 1/8" change in the door gap upun lifting the car,i personally would be carefull,and this is why i am going to street cage it:)
Hrmm, you just made me think of something. I'm going to throw the doors back on when I do this. Might be an easy way to keep track of any changes, and adjust when needed,where needed. Good thought!
-
Thanks Bill, I'll look up your thread momentairaly.
as mentioned, the car is just the frame, when I say frame, there isn't a bolt left to unscrew, or interior piece to take out. No gas tank,diff, engine,nadda. One big solid piece. (scroll to the bottomto see the rails/where I'm at now: http://forums.hybridz.org/showthread.php?t=119866)
-
Whelp,
I made my own frame rails,and making new floor board, which means I really don't need to flip the car over.
With that said, when I remove the floors and rails, how can I sufficiently and safely suspend the car?
My plan is to cut the floors, cut the old rails, weld in new rails, lay new 16ga sheet metal floors in (using the new rails as welding points, completing the floor, then going under the car to finshin securing the rails to the new floors.
So, where do I move the jacks to? The rear jacks are tucked somewhere over a cross member where the diff was, so that's fine, but the fronts are sitting on the rails, I was thinking I can run the jacks to the strut towers (car is bare frame by the way) but I'm afraid of sagging or simply not being able to support the front end.
Any ideas? How did some of you guys set it up?
-
Here I am posing with my baby
just kidding, no idea who this hunk is
Ha, I've seen this guy while flipping through a friends myspace, he's from Dansville NY, and he dresses in a bunch of costumes.
Ahwell, cool car though:tongue:
-
5-6-07 update:
Got a teensy bit done tonight, busy day.
Here we are at the driver's side rear quarter. As mentioned, I have a full passenger side replacement on order from Tabco, and this is the side that was worth keeping ( I can fix this in less time vs what I would have to work to order a new one) This seriously took me all of 15 min to do.
Anywho, I cut out the cancer;
It's hammer time. Pounded the piece flat and traced on to 18ga sheet metal:
Getting the fitting right. Since there were no lines to go from on the bottom half, I gave it a rouch shaped and trimmed as needed.
Used VERY light hammer taps to get the shape absolutely perfect. Then tack'd in place.
Badda bing badda boom. I'll come back to this when I have less to do and pretty it up. As mentioned, the goal is to use as little body filler as humanly possible. Here you can clearly see the cancer on the bottom of the wheel arch. Even though it has completely rusted away, the rest of the panel is almost perfect. Since there is no existing metal left, I don't have any reference to where the lines will end up, so when the passenger side comes in, I'll make a reverse teplate and fabb up a replacement for this side.
On to the frame rails. Got a few pieces welded together. It'snice to finally play with thicker steel so I can ramp up the voltage and actually make some nice penny welds instead of "tack here, tack there, tack here again" with the sheet metal
Lay'd up
Whoop. Almost done!!! I ran out of gas, again ( anyone else think I need a bigger tank;) ) but the night was over anyway. I may be sol for a while till I get my argon refilled, the earliest I can get it is NEXT Saturday due to my work hours.
-
I'm in! I'd HATE to tear this one apart, but I'll buy another, and this sounds litoo fun to pass up
June 30th? I'll get started !!! -
5-4-06 update
Got a little more done at the shop. Shaving the rear bumper, repair inside door jam, starting on frame rails.
I WISH I took pictures of what this looked like before I got the new metal in place. There was a 4 inch wide strip of RUST across the entire bumper. It didnt look like it was even worth keeping. The areas around the bumper give you and idea, but yea, it was BAD.
Tacked in to place:
Rear Shot:
Shitty picture, but welds were grinded down and polished smooth. Looks f'in awesome, can't wait to get to the other areas. The reason I didn't do it all is because I still may need those bumper mounts if/when it gets on the rotissarie. Once it's back down, the shock will be recessed and a steel bar will be bolted to them behind the bumper.
Just a snapshot, all the bluish metal was where I worked on, the entire area was one big rust hole. Cut and shaped, still gotta polish it up. Damn, I gotta remember to take before pictures, these don't do it justice
Now, on to the frame rail, I measured/cut the steel tubing I'll be using for this, now I had to work on the joint piece to tie them together. I <3 cardboard and painters tape
Finally, at 1am, I decided to go home. All this was about 5 hours of work. The template was laid down, few pieces cut, my ass was TIRED.
This weekend I'll have both rails made and ready to go. I've decided to cut the floorpans, weld these in, then put brand new floors in with 16 ga metal. Gotta get a rotissarie and bead roller, so chances are I'll prepare as much as possible then wait till I can get both to finish the job.
In the mean time, stay tuned for dollying up the driver's rear quarter, a full sheet metal replacement quarter (on order now) and two new 18ga rocker panels
__________________
-
Had the neighbors come over today to help on the Z. Today's focus was on the passenger floor. Yesterday I finished the corner on the rear of the car,but forgot the camera, so here's a snapshot. Not much more to complete it.
And here's what was on today's menu. The flap of metal hanging down was actually RIVETED over the rust metal, then slapped with undercoating. Tards.
This is about the only picture you'll ever see of me doing work
Cutting out the floor pan. Lots of rust.
We pushed cardboard paper in to the floorboard and made a template to trace on 16 ga metal.
Roughly shaped to be put in (no not by the hammer this time!)
Trial fitting.
Test fit, few adjustments made
Got the top part and bottom corners tacked in. The bottom center needs to be bowled in to line up correctly, and the metal the will be welding to the right edge needs to be replaced before the floor is completely in. this was about 3-4 hours of work, and we all headed home. More to follow tomorrow night
-
Had my neighbors come with me to the shop tonight to use the last of the argon before I refill it tomorrow:
I've decided to leave the rear of the car alone for a bit as I'm going to scrap the two rear quarter panels and but new replacements, so,on to the front of the car.
Started cutting out all the rust spots. Make cardboard templates, welded in new 18ga metal. Tacked everything in then ran out of gas,but I'll have it refilled tomorrow morning.
(opposite view from above)
The top of the car was brought to bare metal, painted with etching primer. Quarter was brought down to bare metal, then decided to scrap it, new ones cost $70ish, not worth the fabbing time.
Trial fit
Neighbor Eric at the grinding wheel
Neighbor Greg exposing any potential rust (good so far on the driver side!) he also did all the cutting of the body
Passanger side rust tacked in
Driver side tacked in
Ran out of gas at this point. The following days I'll grind down the welds and finish them up. The next thing to tackle is the lower rocker panels. During this I'm going to start taking measurements and planning for completely cutting out the frame rails and welding in nice,thick square tubing. I'm going to be pretty cautious about this part, because if I can screw up badly, this is where it can happen. Stay tuned!
-
Haven't got much done, nowadays when i have the extra time, been trying to get my fat ass to the gym, but making progress.
Fuzzy Pic. Rail welded in, smoothed, then the tack welds you see are little pin holes left over from grinding.
The seam was right on the bend, smoothed and shiny
Not sure what this piece was called, but it was rusted
Made a cardboard paper template and tack welded the pieces for fitting
Ran out of gas, Next week I'll weld it in, shape it up, and smooth it out.
-
Eeek, guess the typical Z owner is a hot head, not the kind of replies I expected.
I would suggest you climb under your car with a tape measure and DIYThat is a good suggestion, and it's what I did before posting here. The funny thing is, I can't seem to take measurements for metal that doesn't exist. As a Z owner, I'm sure you are well aware of the delights of corrosion. I also didn't think it was THAT bad of an idea to gain input from people who have already done so,as to possibly avoid making any mistakes they may encountered along the way?
www.alteredz.comAnd yes, if one is rusting you should replace everything. Especially if you do it like Pete did above.
Thanks bud, and I've actually had his page book marked from some time, just got shuffled along the way.
not so pull the old "search before you speak" card but, try searching for frame rails you will find a ton of info on the topic. Many before you have been faced with the same problems.Nope, that's a good card to play. I'm a mod on a local car forum and it's mildly frustrating when the same question gets piled high. I did a seach before this, and pulled up a few pages on where to buy, not making them.
If I can clarify, as it seems my simple post has aggitated more than just who has replied here;
-"What I said was meant from a person (like myself) who likes to spend the extra time and work to tinker with stuff on their own, to build and fabricate, take pride in their work, know what I mean? It wasn't a shoot down to anybody's work. The time it will take for (me) to make a frame rail won't be as cost effective as buying a premade one, but time enjoyed wasting isn't wasted time." -Me
Feel free to delete this entire thread, I know I can make them myself, that was never in question. I was just looking for experienced Z owners who have traveled the same path.
-
WAAAAAAY back when I was in college, she was pretty stock (T/C ball/socket kit, rack bushings, steering coupler, wide tires and wheels (14x7, 225/60-14), Air dam, 72 SUs, MSA 2.5" exhaust):
After putting her away for years, fixing her, driving her with the 6, then tearing her apart for the 11 year transformation:
More here: http://alteredz.com/mypics.htm
Haha I've had your web page save in my favorites for about a year now, cool to see you on here!
-
Hey all!
I did a search on making frame rails, but for the most part I pulled up posts on people asking where to buy.
Buy!?! Why buy!?
Mine a pretty rusted through, and by god if they weren't I'd still feel like it was a death trap
So, if any of the DIY'ers can post dimensions, pics, experience on making their own, I'd be happy to post a write up for building and installing them.
Thanks!
-
Just a small update. I've only put about another 10-15 hours in to the car since the last update. Been doing all the paint stripping/body filler removal.
There's not too many pictures that can be taken as a result, but I just picked up a bunch of 18 and 16 ga sheet metal that I've started fab'ing up new parts with (just got around to making a new rocker panel, got to the shop pretty late tonight). The old stuff must've been as thin as 20-22 ga, was pretty surprised, no wonder why these things twist out of shape.
Anywho, just a few pics of what I did tonight. I need to pick up a press, I did these bends with a clamp, edge of a table, and a hammer. Old-school beyotch
I'm planning to spend the day there tomorrow (Sunday) if anyone's handy with metal shaping. For me, this is the fun part, I finally get to see some moving forward in the project. More pics to follow for tomorrow night.
-
I was stripping paint from the rear pillar of the Z and noticed the scraper dug in to the metal ( I was using aircraft stripper) after closer inspection, I noticed both sides having it. Did the Z's come like that, or can I expect there to be some body work done to it? Did the roof come in 2 pieces and use the lead as a body filler to hide the seams? It looks very will done,and the windshields along with everything else fit perfect before teardown, just more curious than anything.
-
Yeah sites been down for some time....someone hacked it and you know what that led to. John is the pres of the club who drives the 350z and has a series 1 240z that is getting a resto job as we speak.
ZCCR's Monthly Membership Meeting is every third Thursaday of the month.
PINEAPPLE JACKS at 485 Spencerport Rd. in Gates. As always, dinner starting at 6pm, meeting to follow at 7pm. Pineapple Jacks is located on Spencerport Road just west of the Long Pond Rd. intersection.
Looks like you want to go LS2 this winter 07?
Is that an invite to PJ's ? (I've been there a ton of times, know right where that is). I'd love to join.
As for the car, I will be diligently keeping an eye out for a wrecked GTO after the fall. I'm pretty good with time management and what I can get done. The car isn't going completey back to stock, and this year the heater core/ac will not be installed. (if you see the system in the pics you'd see why) . By June/July the car will be running with a KA motor so I can have a chance to take it out this year. I'm soley going to be working on the body. You won'r believe how misused the bondo was on this car. It was obviously restored by a weekend repair guy, so I plan to invest 90% of this year to frame and body, 10% engine, then come winter will be the other way around.
Anywho, just came from the shop 2 hours ago, and man o man, if you're playing with aircraft stripper, stand back. Phew!
-
^ Hey bud!
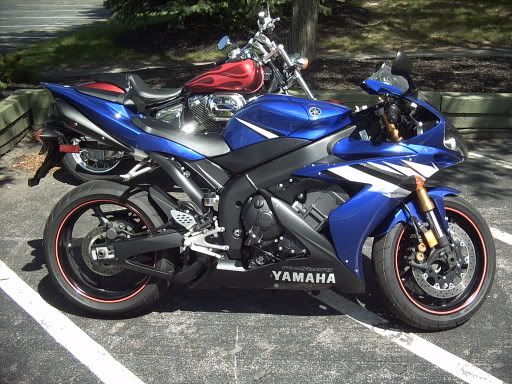
I'm familiar with ZCCR, saw you guys in Canadaigua last summer on a REALLY hot day when I was on my bike . Been waiting for your guy's site to come back up so I can join and meet some locals.
Back in the day I've worked with Mike T-sumthin, looks like he's the son of the zccr's president, he drives a blue 280, his dad a copper 350. Havent caught up with him for some time.
I'd love to meet up though. This Sat and Sunday I may have other responsibilites the majority of the day, but let me know where you're going to be and I'd love stop stop by. Any weekends after give me a heads up and I can lend a hand
-
Build thread created
http://forums.hybridz.org/showthread...037#post746037
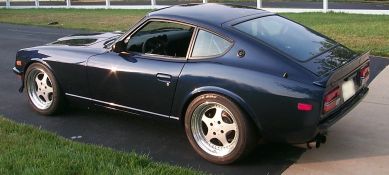
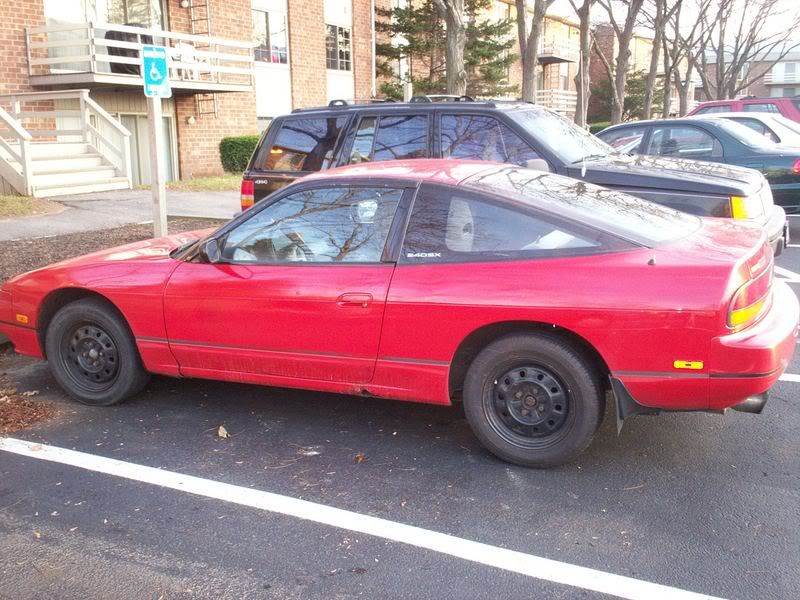
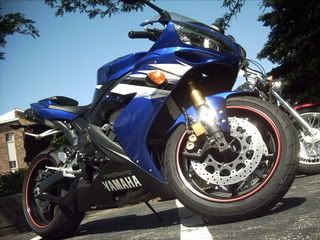
The rides:
Teh JDM-ness: (Daily and winter beater
)The slow mobile;
The no-go Mobile:
-
Well, I got the car completley stripped down to it's frame and bare metal...
Lol ok enough fun
OK, so I've slacked for about a month on the project because the next step was bodywork, figured I couldnt do anything till the welder came in.
So I'm going to be spending the next two weeks sanding and if I can vent it, aircraft stripper. So here's what I just started on yesterday. The owner(s) before me decided to put fiberglass fenders over the quarter panel to "hide" any rust or damage. Friggin slackers. The quarters weren't even that bad!! Nearly the whole lip was intact and rust free, though where there was rust, it was pretty bad.
The fenders. I was thinking about selling them on the Z forums, still might, but may turn these in to a widebody
That's later down the line, I'll keep them around just in case. There are about 20 rivet holes on each fender. LUCKILY none of them had the slightest sign of rust, that would have been a pain. The less curved pieces I have the cut and reweld the better.
BUT, as my luck would have it, I ran out of argon/co2. Guess I played with it a but too much this week since I got. I'll put some more time in to sanding/stripping tonight, can't make it to a welding shop till Sat.
Till next time......
-
Got ALOT done, spent about 4 or 5 hours on the days work, not too shabby.
From the very first picture in this thread to the one below, took about 20 hours worth of labor. Between the rest of the lines running under the car, and the rear interior panels, I have about 2 more hours ahead of me. The easy part is just about over. What's next? The most tedious and time consuming of them all. Phase II: The Restoration-TBA
-
. And there you have it! A day's work well done
irst things first, get the gas tank out. PITA #1. Dropping it from the car was a piece of cake. Getting 30 year old gas lines disconnected, Hell.
But we managed...
Took the exaust out without a hitch
Next on the list, the transmission. Didnt have much of a problem with this aside from deciding how to safely lower, or in this case, fall out of the car
After yanking on my shaft for a little bit, it went a little limp...
Went then started to tackle the rear end, aside from a little more tugging on some old bolts, things were going pretty smooth
Untill we hit the brake lines, which I couldnt get disconnected for the life of me. If Matt weren't there I probably would have kicked a hole through car, but after an hour of frustration, we just left it hanging and called it a day. I figured I'd come back to it in a better mood, and it'll probably slide right off then
Got a bunch of pics/updates from the work I did last night (Sat) Enjoy!
Finally got the suspension out, after I tore through the brake lines with an angle grinder, the rest was cake. I probably wont keep much of anything here,the swing arms will be replaced with a tubed 4130 or stronger, the Diff will be replaced with an LSD, probably from a late 80's Z, and shocks are goin in the trash or ebay.
Relocated the jacks further back to evenly balance out the support for the car.
Watchout!! The driver side jack tilted a little, just made a small adjustment and it evened it out. As this point I can tuck under the car and sit straight up again
Plently of grime and surface rust
A view from the back
.. the front
... and the side. Back is all done!
Now went for what was left in the cab of the car. Got the steering colum out of the way.
Wiring... sucks... balls. I probably could haave just cut through everything, but I decided to fish it out the right way, not 1 wire cut.
The center console.
Somehing had to be living in here at one point
The blower
THIS is why you don't turn on the heater/AC from a 30 year old car. Man I'm glad I didn't think to try.
Hrmm, to die of cold, or die of suffocation
The last one, i swear
I think the car used to be white!!
Who want's to go for a ride, I call shotgun!!
This is the only major rust I have to work with, as it has to be completley replaced with new metal.
-
They see me rollin', the hatin' ..
And now a word from our sponsors.....
...
.
Z-Crew, Part 1, Signing out!!
From left to right ( jettaX7,88si, and hurleyint) Thanks again guys!!!!
1/13/2007
Whelp, got more done at the shop today, this time with my own pair of hands (which worked out great, had to do some sandblasting on a pair or rims, so I was back and forth)
First thing on the agenda, the front suspension goes bye bye!
Look ma, a new toy!!
On stands and good to go! Front end near complete (got the front grill and the wires in the engine bay to yank out)
Rollin wit da homies......
I went to put the rear end on stands with the rollers, but couldnt set them on the rear end because that needed to come out, so the stands went as far back on the frame rails, and if you look closely, ya might realize that when I lowered the car on to the rear stands, I placed them in the EXACT balance point (on accident) of the car. The front stands aren't touching the car at ALL, it's perfectly balanced on the two rear stands lol
So, to alleviate this problem, I first went for the gas tank . . . .
Then the rear tires....
Put all the tires on the front to weight it down more..


 So I'm going to be spending the next two weeks sanding and if I can vent it, aircraft stripper.
 That's later down the line, I'll keep them around just in case.


Removing curb rash from rims
in Brakes, Wheels, Suspension and Chassis
Posted
If its a polished lip, you're SOL. Otheriwise, as mentioned, a filler then paint. I've seen plenty of people use body filler, but the JB Weld make more sense.