

2savage
-
Posts
57 -
Joined
-
Last visited
Content Type
Profiles
Forums
Blogs
Events
Gallery
Downloads
Store
Posts posted by 2savage
-
-
stiffer, good. Taller, bad. How much taller?
-
I bought Tociko springs and shocks for my 1973 240Z and the vendor sent a kit for a 260Z, 75 to 78. What is the difference and will they fit? These are the adjustable Illumina shocks.
-
Remember that such instructions need to satisfy all engine builds, from a guy in New Mexico working in 100 degree plus contitions to the lunatic Canuk working in his unheated garage in winter. What the instructions are trying to convey is that the bores and rings should be well coated with nice thick oil. Since a multigrade oil has better viscous properties in a wider range of temperatures, it is more likely to stick in a think layer.
Hope this helps.
-
Now that everything seems to be running well it is time to install some air filters. Just having air trumpets may look cool and have free flow but the engine will not last long like that so I bought three oval 3" deep K&N style filter assemblies. I had been told that I can install the air trumpets inside the filters and that's exactly what I did, but I was a bit concerned about reducing air flow because the trumpets were over 2" long and that only left a small gap between the trumpet and filter end plate.
After a quick test drive (and an embassing spanking from a ricer) I realized I must have lost at least 30bhp due to the restrictions. Back to the garage and removed the trumpets. Things are better now but certainly not as powerful as it was in free flow mode.
Finally, I got 5 Falken Azenis RT615's from www.discounttiredirect.com and got them mounted. I think I'm now ready for my track day at Pocono Raceway on May 3rd. I really hope the Z will be reliable but I'm planning on taking my Shelby Cobra too as a back-up. I really hope I don;'t need the Cobra because it has been sold and will be delivered to the new owner two days later. I can't imagine what I'd do if anything happened to it!!
-
To be honest, I don't think the price of fuel here is that bad. That is, not when you realize that a gallon of gas in Great Britain costs $8.36.
-
Although this may not solve your current problem, I have to ask myself why you are trying to start a car with such electrical issues. You should really be focusing on a plan to fix the electrical issues firrst. I've been there, and I'm currently wearing the t-shirt

Get a plan. I was very confused by the masses of relays and little black boxes all over the place but wanted to master everything. So I decided to rip out all the wiring and install a custom wiring loom. This approach meant I knew every wire in the car and I also managed to reduce weight by abouy 15 lbs. It's not as scary as you think. I've done this three times now on different cars using a different supplier of the loom each time. My current car is wired as a race car and has no ignition key, just a bank of switches for everything and a starter button. The alternator is a Chevy 1-wire unit so there is no voltage regulator or other such junk.
Really, don't try to fix one problem when there are several more that lie before it.
-
The Motorsports catalog that sells these carbon bumpers says "the front will fit 1970 to 1972 240Z's and can also be fitted to later years if you use brackets from 1972". I could not find any information on this web site that covered the install and the bumpers came with no instructions. Here's how to proceed.
Front:
The brackets supplied need to be cut down in two places. First the end that will point towards the back of the car needs to be cut 1/8" behind the rear hole. This will provide clearance from the bulkhead to which the radiator is mounted. Next, the part of the bracket that will bolt to the bumper needs to be cut 1/8" above the lower hole. This will leave just one mounting hole at the front. The other is not needed. Next, trial fit the bumper by securing it with tape to the car. Once you are happy with the position, place one mounting bracket on the horizontal flange where the light harness lies and ensure the front of the bracket is next to where it will bolt to the bumper. Mark through the bolt holes onto the flange where you need to drill the mounting holes. Then drill two holes for your mounting bolts and bolt up the bracket. Don't snug them all the way yet as you will need some movement for the final steps. Repeat for the second bracket. For the outside ends of the bumper, slip a bolt through the mounting bracket on the bumper and secure it with a nut. This will provide you with a 'stud' which will go into the hole where the previous bumper mounting bolt was. For the final mounting, bolt up the front of the bumper to the brackets and add nuts and washers to the ends from inside the wheel wells. Once all is alligned, snug all the nuts tight. Finished!!
Rear:
You use the same brackets that were removed. There is a left and a right, plus there is an up and an upside down. Hopefully you marked this on removal. The issue I had was that the mounting brackets on the bumper were not aligned properly. I had to file slots in my original mounting brackets to allow the bumper to move from sird to side in order to get it to bolt up evenly, Mounting of the outer ends is basically the same as the front, using nuts and bolts to create a 'stud'. Since the hole you will mount to at the rear is quite large you will need large washers on the inside.
Hope this helps someone.
-
If you take out the cannister you not only need to plug the vacuum lines but you need to plug the line that comes from the tank at the rear.
-
What are you using for a crank pulley?
From what I understand the stock L28 ones come apart easily at high rpm (+6.5k).
Mario
I think it's stock. I'll start looking for something better. Any suggestions? I only need one belt for the alternator. No other stuff left up front.
-
My track car is now pretty much ready and I've been testing with much success (it is also road legal, registered and inspected). I installed a shift light and need to have some idea where I should set this to protect the engine from abuse. Here's my setup...
2.8 L6, balanced and blueprinted (piston type not known)
E88 head, ported with three angle valve seats
3/4 race cam (make unknown)
triple weber 45 DCOE's, set for power above 3500
Stahl 2" headers
Mallory Firewire 6 ignition module
Mallory magnetic induction distributor
I know the ignition and fuel system can handle high rpm's but I don't know enough about the durability of the L6 rotating mechanism to have a realistinc redline. All suggestions assistance is appreciated.
-
Autozone sells a nice pack of caps for blocking off vacuum hoses like that.
-
After installing the second pump (Holley Red) next to the tank and as low as the bottom of the tank, there has been a total transformation of this car!! Not only is the fuel starvation issue gone, but the engine has reached new levels of performance. It feels like at least another 50bhp has been found and this car is now a thoroughbred instead of a cart horse.
I took it out over the weekend to a place where I could open her up and it was still pulling strong past 110mph before I ran out of space. Not bad for a 35 year old car.
It passed it's safety inspection too so I'm entered for my first autocross next Sunday.
-
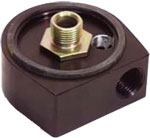
I had a similar issue when I wanted to fit both an oil temperature and pressure gauge. I solved the problem by adding a custom fitting that goes where the oil filter is. It has a take-off point for oil pressure. The filter screws right onto this adapter plate.
Here's a link to buy one... http://www.livermoreperformance.com/canton_oil_adapters.html
-
well, the front pump is already installed, wired and working. Also since it's a vane style it should help smooth out the flow. Removing it will make the setup simpler but that's the only reason I can think of.
-
If a vane style fuel pump is being used and is mounted in the engine bay fairly high up, is it possible that it could have difficulty if you run out of fuel and air gets into the fuel delivery line? (I'm feeding triple weber 45's).
My plan for a remedy is to fit a second pump low down near the tank. Does it matter what style that pump is?
-
I installed the pressure gauge first and it showed 11 pSi; way too much. Next I installed the regulator and dialed it down to 3 PSI. The leak was fixed!
After some test drives and some trial and error I settled for 4 PSI. The carbs still need some adjustment but at least there are no leaks now
-
I'm surprised by the lack of input from this forum because you all seem very knowledgable, but I also use another forum FFCobra.com, which has provided the following information.
1) Possible causes are worn spindles, float level too high, excess fuel pressure or dirt on the float needle.
2) Since the fuel leak occurs only when the fuel pump is running (regardless of whether the engine runs or not) that eliminates worn spindles.
3) Since I am running a vane type Carter fuel pump and no regulator, fuel pressure is probably around 5-6PSI, which is about double the recommendation of 1.5 to 2.5 PSI at high RPM's and 3PSI at lower RPM's.
So, I have ordered a fuel pressure regulator and an in-line fuel pressure gauge that will get fitted over the weekend. I'll post progress next week.
-
What car do you have? On my 260 the female part is attached to the seat.
I have a 1973 240Z
-
I stripped my car six months ago and am now at the point where I'm installing 5 point race harnesses. The side mounts are obvoius where the old belts used to be but where did the belts mount by the tranny tunnel??
-
An unfinished project is the place for a bargain! At $2,000 this is in my opinion a fair price but not a bargain. I would not want to pay more than $1,500 because it's what you don't know about the car (because it won't run) that comes back to bite you.
-
Two of my freshly rebuilt webers leak a little. Not sure exactly where from but the fuel puddles on top of the heat shields I installed under them. Would this be the float needle not seating properly? Or maybe float height set too high to prevent the needle from seating? I have checked the tightness of the screws underneath the carbs and they are snug.
Any suggestions appreciated.
-
The pistons are flat top. And yes, I agree that 249 does seem very high, but I guess I'm optimistic since the work was doen by Bob Sharp Racing, who apparently knew a thing or two about getting components balanced and optimized.
I promise the forum that once road legal again I'll take a trip to the dyno and report the results. Thanks for the input.
-
My 1973 240z is making progress. After six months of dismantling, welding, revamping, replacing, rebuilding and rewiring I was ready this week to fire her up again. No go and I tracked it down to a bad electronic ignition box (an old Mallory Hyfire 2a). Well yesterday my new Hyfire 6a came from JEGS and I installed it and hit the button again....POW!! That did it and this baby now runs strong!!
It sounds really powerful and if I list the mods, maybe you could guess the BHP?? Here's what the engine is:
2.8 liter block, balanced and blueprinted
E88 head, ported and with bigger valves
Cannon intake to tripple weber 45 DCOE's with heat shields
Stahl headers, heatwrapped, to large bore exhaust (with one race mufffler)
3/4 race camshaft
Mallory Hyfire electronic ignition
Mallory Magnetic breakerless distributor
Lightweight flywheel
The previous owner showed me a dyno sheet with 249BHP at the rear wheels. After driving ther car home I was inclined not to believe him but now after a carb rebuild and other upgrades I think it could be true.
What's your guess??
-
What about the crank angle sensor? If that is bad the computer will have a basic map for firing each cylinder but this is conservative, to protect the engine, when the CAS malfunctions. It will get you home but that's it. You need a functioning CAS to get full power.
Need help with springs and shocks...
in Brakes, Wheels, Suspension and Chassis
Posted
Actually this will be good for my needs. Ultimately this car will compete in the Targa Newfoundland car rally and I will need the extra clearance.
I have competed in this superb event twice in the past and can't wait to do it again. Unfortunately this year I am too busy opening up my new Scooter Store "Metro Scooter" which is in northern New Jersey.