

nathaninwa
-
Posts
140 -
Joined
-
Last visited
-
Days Won
1
Content Type
Profiles
Forums
Blogs
Events
Gallery
Downloads
Store
Posts posted by nathaninwa
-
-
Finally got back to the 1/4 mile this year after my winter upgrades. Nothing crazy but man the results are impressive
This is at PIR in Portland on there street grudge night/test and tune
I made 4 passes doing some testing on Wastegate pressures and starting to turn it up
Major changes this year are a Glide versus the 80e I had, a2a versus a2w cooler and some random weight savings
Setup is still soft on the launch as Portland isn't usually that great with the prep
First pass. 4lb spring, 3400 launch. 10.46@145
Second pass. 10lb spring, 3400 launch. 9.76@152
Third pass. 10lb spring in low gear, ramped in 14lbs in high gear, 3400 launch. 9.39@165
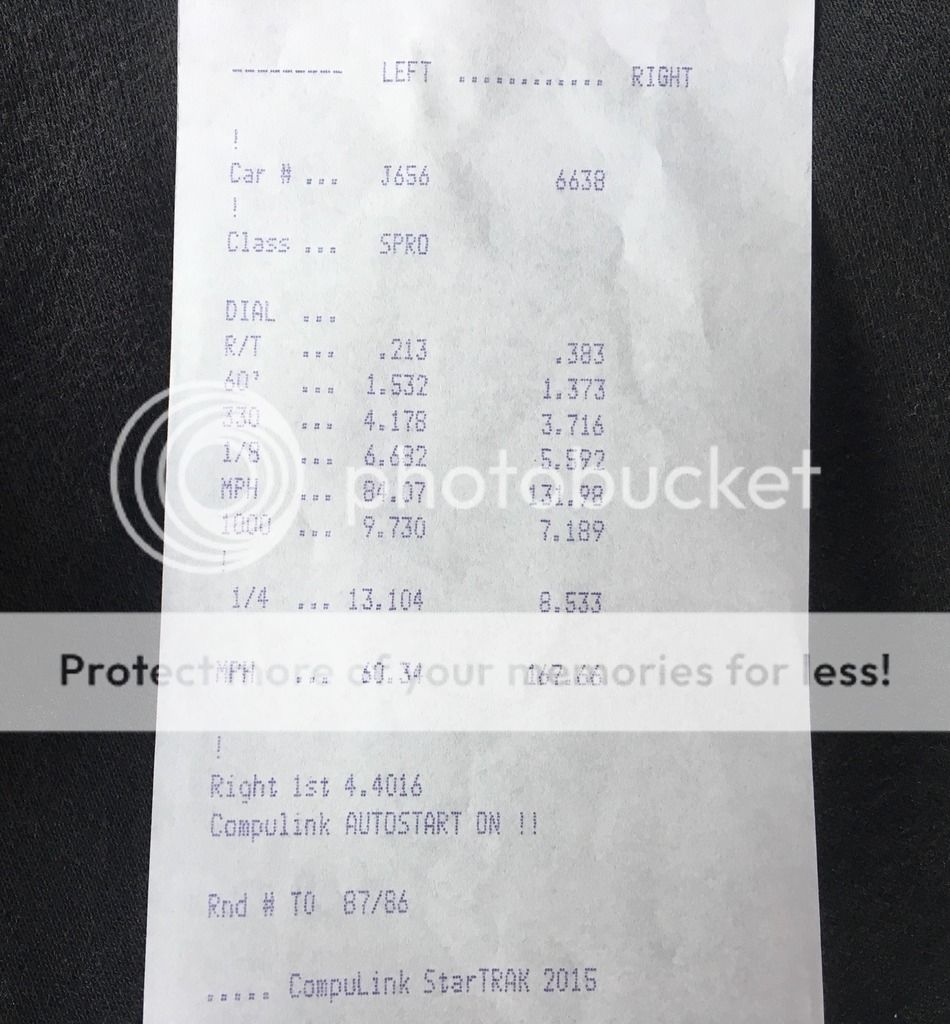
Fourth and final pass. 10lb spring ramped to 14psi in low gear, ramped from 14 to 18ish lbs in high gear, raised the two step 4000. Car mustard an 8.86@171.7
And to be honest, like how we all datalog in our heads, it could have taken more power in low gear, and a bit more in the top of high gear. I could feel the car nose over near the finish and it may have taken more two step as well. But I was happy it made a clean pass and it drove on to the trailer!
The last pass was a medium soft, 1.5x sixty foot with a 5.9x@131 1/8th mile time. The car picked up 40mph on the back half!
-
Got this just about sorted. Pulled the cross member, welded on new slotted rack mounts, slotted the control arm mount and ended up fabbing my own caster rods. Turned out alright, and initial garage alignment shows 1/16 toe in at ride height and at rebound height I get 1/4 inch toe in
I'll make a few 1/8 mile hits on this setup, collect some data and get the car aligned proper

-
My pics are not loading for some reason. But I just did some more testing.
Raised rack and no LCA spacer it went all wonky again
So I took the bolt out of the LCA pivot and put a pc of 1/8 rod in there and raised it, and toe for the one side went 1/4 in and out
So I lowered the pivot point, and now it's 1/8 toe in compression and rebound
Maybe more low would work. I'll see about more testing
-
Ok. I'll post a shot in bit after a cup of coffee
I don't have any plot data, just a bunch if info written down on paper of static position, versus compressed and the rebound hieght my car travels at down the track
I currently have a 14 inch, 125lb spring up front which maybe helping with nose lift after the launch. That's combined with a 90/10 drag strut. I have some material to make a splitter to help with bringing the front down, and I can get some 70/30 struts for my application. I'm running 3rd gen comaro struts, but can't fit the adjustables from how I mounted them. So I'm ordering some 12 inch 150lb coils for some testing
I am running an LS, but it's setback in the chassis, and the manual pinto rack has tons of clearance
And I have reamed my steering arm for the pinto balljoint. But from the overall width of the pinto rack, I'm not sure there is enough thread on the inner tierod, versus getting the bump steer kit installed safely
In the beginning I wanted power steering, so I installed the Forester rack, but then decided that I wanted the manual system back. Since the 240 rack was gone, and buying one used and rebuilding it was more money than the pinto rack, I installed the pinto setup. After looking at pics I thought I was close to the stock position when welding in the mounts
So yesterday I spent most of the time trial and erroring different spacing and positions. My initial setting would give me almost 3/4 inch toe out on the rebound hieght the car drives.
I then spaced the balljoint down, the LCA arm down in various positions. Finally I found a setup that gets me 1/16 toe in and 1/16 toe in at both positions of compression and ride height rebound
That setup is, pinto ball joint in positions with no spacers bolted up. LCA is spaced 1/2 inch down. I moved my rack up as far as I could within the bushing slot I can fix the rack positions easy, I'm at the point of either buying a 1 inch LCA spacer and machine it down to a 1/2 inch or just Drill a new hole in the cross member for the LCA pivot and bolt the arm to the spindle again.
I can't really drill the member in the car, so it needs to come out.
Running a full 1 inch spacer gives me 1/16 toe in on compression but 3/16 toe in on rebound
-
Hey guys, I spent most of today mocking up and cycling my suspension to cure a huge bump steer problem. I've installed a mustang 2 rack and thought the initial setting was good, till I started having issues at the track over 150mph
My initial reading gave me darn near 15/16 tow out under power. So after looking st the data and finding the static, braking and non launch acceleration height I was able to plot all this. I found raising my rack and adding a 1/2 ball joint strut spacer netted me the best results at 1/16 toe in, in both directions
So my questions is, if I drill or slot the cross member for the raised position that 1/2 inch, will it be the same as the mockup spacer I have and I'll be able to take it out?
-
Well, got this project track ready. Racing begins next weekend with a local 1/8th mile top ten series
Borrowed some scales from a friend and all my hard work paid off over the winter. I was rewarde with a 2152lb race car with it 2326 with all safety gear and me in it
-
Got all this put together today. Caliper ended up perfect after I had to shim the inner bearing out. The hearings are closer together on the gm stuff so the outer bearing was binding on the spindles taper just before getting tight enough. So I found .030 worth of shim for a pinion, this was enough to get proper preload without bearing binding and proper caliper alignment
I'm pleased with the results, you can actually feel the weight difference in just spinning the rotor.
-
Recently I picked up a 280z to have a driver, so this car is being more straight up race car built instead of dual purpose. I'll still be able to take it down to the local coffee meets and car shows, just not the driver type I was wanting it to be. So it's all about weight this time. 2600 race ready is my goal and with as much power as I have I'm sure I'll be asked for more cage this year!
-
I forgot to cross post. Here is a post from a thread that got moved with my 8.50 pass
Hi guys. After a summers worth of test and tunes, new parts and modifying old ones, ran a new personal best yesterday The run was clean and straight, very happy with the results
https://youtu.be/m6_jfZbFEm8. Video from outside
In car video[/url] -
Been doing some work on this car. Updated some stuff up front, redid radiator and shroud along with moving it forward, dropping some weight too. Also updated to the borg warner race cover on the turbo
Got a kirkey seat installed, saved a bunch of weight there and moved me down about 5 inches
Working on a new alum dash setup and wiring up the efi a little tidier with all the add ons I did over last season
Powerglide parts are on the way
And what I'm excited about. Doing some googling I read on Hybridz that gm hubs will bolt onto the s30 spindle. After looking at a PDF of all the hubs, I chose the mid 80's G body hub. Replacing the 300z hub i setup everything around this hub is almost a drop in with rotor placement 1/8 closer and the wheel moving in 1/16. The 3rd gen Camaro would put the rotor in the same location for me but move the wheel out 1/16. Some minor matching of my own rotor hat and wheel spacer can solve this but over happy with the bolt on rotor and wilwood stocks a seal that fits the spindle too
The rotor no longer bolts to the back as it does on the 300z setup, rather its sandwiched between the wheel and hub. Getting the correct the rotor fitment means a 3/4 wheel spacer for me to keep the 300z wheel mounting surface location. I'll use 3 inch studs to make all this happen as one unit
-
I was able to draw one up tonight
-
Hey guys, did some searching with my goto places, but no real luck. I'm looking for a 240Z or just a Z logo in dxf format
Is there anything out?
-
Very nice. What size it that setup?
-
It's a drag car first and wanted more room for my turbo kit. Plus the weight transfer. My bellhousings mating surface is about 1/4 inch behind the firewall
-
-
I did an 80e and only trimmed the tranny and cut a hole for the Ecu connector. The whole stock tranny mount had to go away but very little hammering was needed
I just moved my motor back 4 inches and recessed the firewall and had some hammering to do but very pleased with the results. Nice tranny, even for drag racing
-
Went to Portland on Saturday. Track prep kinda sucked. Pedal fest at 8psi in first and second but held 18psi in third. I ran a 9.74 at 161.5mph Acceleration in drive is impressive.
-
Made my final licensing passes, and got video of my last run. 9.45@148. It's missing a little on the big end and very lazy on the hit
-
Went to an 1/8th mile track today and got 4 test passes in, after a bar change to make the car no go stage right, and a minor two step adjsuwkrnt, I was able to sneak a 6.17@122
Then went on in to Portland 1/4 mile and with the 6.17 tune up still in it the launched way different and and did this criss cross lean into a wheelie pulling left front then picking right front about 12 inches I'm told. I stayed in it and ran my only full pass tonight at 9.50@152 running it out at 11psi
I'm working on my license passes now and got my two launch only passes out of the way and I'll follow up with the remaining 4 next Friday
-
I remember the collector hitting the block and huge potential for accessories to fit up, unless something custom was fabbed. I ran mine up and forward after lengthening the forward cylinders runner for more of an equal length setup
And they were 1-3/4 inside header so they should be advertised 1-7/8
-
Some driveshaft slip yokes are splined all the way through and a dust cap seal is pressed in. Sometimes over the years these fall out or are beaten out by previous owners
-
I ran those headers last year. I made a new coil mount and moved them higher up the cover. I did have to run custom length plug wires with a 45* end and still used some fiberglass boost to protect the wires, especially the forward cylnders
-
Thanks guys. I really like how this car turned out
-
Most all my pics are in the gen 3 v8 section but thought I would share here
Just got my car back from paint and got it assembled last night. Still needs some minor work but all in all its ready for the strip. Interior needs some paint and seat covers and I need to finish up the flat drag wing that will be black as well. The wheels are plastic dipped so I can always change my mind there
The car was shot GM Atomic orange and it's absolutely beautiful in the sun light
I'll get some shots of the pump later tonight. But here is she is all assembled, just missing the prostock style drag wing


 [/url]


Bump steer fix, spaced versus new hole relationship
in Brakes, Wheels, Suspension and Chassis
Posted · Edited by nathaninwa
Well, got thencar aligned, ended up with .16 degree of toe through the travel, 1/2 degree of camber and 7 degrees of caster. I went 8.86@171.7 last night and car drove 95% better. Had some input but nothing sketch at all!