

ryanabab
-
Posts
98 -
Joined
-
Last visited
Content Type
Profiles
Forums
Blogs
Events
Gallery
Downloads
Store
Posts posted by ryanabab
-
-
After some consideration of what I wanted to do with the motor/carbs I was introduced to someone who rebuilds the SU for a decent price. The $700ish price tag on some of the popular rebuilding sites made me look into completely different motors. I researched the Ka24de like a lot of the 510 guys do and man it is a simple swap. Even the wiring doesn't seem too bad. However, I am moving the car to the lot close by my house (was at storage at my parents house) and without any electricity in the lot I think that swap would get annoying fairly quickly, especially if I need to weld or use power tools for extended periods of time. Keeping the motor seems like the only sensible option at this time. It is running so poorly I don't know if I'll be able to tell if the throttle shafts are worn (the rebuilder does not do the throttle shaft fixes and it used to idle quite well before I gunked everything up from sitting so I think it is good enough to get it on the road with a good cleaning and rebuild. Getting the carbs clean and gas tank cleaned should put me on the road. Brakes are finally done (what a nightmare) and it of course started running bad soon after from possible debris in the tank. Hoping to get this started on sunday and get the old stuff out for cleaning!
-
I ordered a T Fitting for the front lines and the line going from the master and then I used a the proportioning valve as the union for the rear lines. I can take a picture of it tomorrow. Another member here had done this and I liked the simplicity and getting rid of older parts that could have caused the problems. I ordered 2 of the T fittings the lines go into. The wire is now being unused because the pressure differential switch is deleted.
-
Progress with the brakes! Fitting a Wilwood Prop valve, deleting the block under the MC the brake lines feed into with the power wire, and bleeding with a handheld mighty vac seemed to make the car bleed correctly for the time being. Pedal has held pressure for a week now, with no leaks I can see, and when driving I hit the brakes hard and locked up the front wheels so its looking like I might have finally fixed the brakes for the most part. Small tweaking with uneven pad wear on the right rear but other than that I'm hoping I will be in the clear. Its been a long semester at school and a few weeks off to work on this and also my Dad's Model A is going to be a fun time. Paid a shop to fix the brakes while I was at school, only to have them work just as bad and thats what made me put the other parts in and do it myself. Lost all faith in shops now.. but its finally coming together. On the last drive back I hit a bump and all my gauges except speedo and tach (which never worked) went out. So I'll be searching for a loose ground or blown fuse possibly tomorrow. Ordering in a 4in 1 tach gauge 5 inch as well soon so I have all my gauges with newer senders in a very simple little place for reliability and ease of getting it on the road faster.
-
Hello, so after a semester at school I wasn't able to continue working on my car like I had wanted to, but I think I have made good progress with my brakes not wanting to act like they should. I added an adjustable wilwood proportioning valve, deleted the block under the master cylinder that the front and rear lines go into that has the 1 wire going into it(which was an uncommon size I had to order from eBay coming from Latvia(I ordered 2 so I have a spare if anyone is interested), and then rebled everything including the master using a handheld mighty vac brand pressure bleeder (partly because I'm running out of friends that want to help rebleed the brakes for the 10th time and I was able to get some air out I believe. I test drove the car just down the street and locked up the front tires (which are new 225s). I just wanted to update this thread because I hate unfinished threads that never post the result. I will be adjusting the bracket I made for the rear because the one pad is biting uneven and then possibly bleeding a little more and adjusting the prop valve for more rearward pressure. That, as well as the inner rod in the booster may or may not be within spec but so far she is braking MUCH better than she was, there is hope for her just yet!
-
I will try all this tonight I have a friend coming over to help as well. Hopefully this fixes it because my daily just decided that it would rather prefer to dump all the coolant out from the front of the engine instead of keeping it inside. Ah the life of driving a $500 miata... hey its got AC though and in Arizona that means a lot! Will post back here if this fixed my car hopefully tonight.
-
So after using the same master that oriellys gave me with the shallower bore (both ones I got from there were identical) and a little longer pushrod from the original booster it is starting to look like my problem has been solved. I took out the residual pressure valves, got pushrod length to about where I believe it should be, and put in the new booster. The pedal was rock solid after just bleeding the master. I don't want to get too excited because there still is a brake fluid leak but even turning on the car and pressing the brake pedal felt much better. I will hopefully be fixing the leak tonight and seeing if I can get the brakes bled (if I have enough friends at this point haha 3rd times the charm). I'll update this if this fixed the problem once the brakes are bled so in the future people won't just be left hanging like so many other threads I read.
As of now the reservoir is cracked.. in all my wisdom I overtightened it and it split on the bottom. Also the bottom fitting that holds in the residual pressure valve is leaking and I need to pull the master to tighten it without stripping the bolt. I am very excited to be finally driving it.. knock on wood..
-
I pulled the new 15/16 master cylinder apart and noticed that there were the springs with a plastic underneath the flare where the lines go in, I believe for drum brakes? Should those be removed before reassembly? I believe they are referred to as residual pressure valves. They were in both of the lines and I think somewhere I read about removing them for disc brake applications.
I took this picture from a write up here done by z car nut and could this be my pressure problem?
-
I have made sure the reaction disk is in place and thoroughly glued on, pulled it last night to check and make sure. It will not be going anywhere for the next 40 years or so. I remember seeing your posts in a few of the threads I have been reading. Thank you for helping all of us!
-
Now that you mention it the bleeders on the rear are facing about 3 o clock and 9 respectively. I will remove, block the piston, and then face them fully upright and re bleed the system with the new master and update everyone. Didn't realize that would make that big of a difference with them not 100% upright but still facing up most of the way. I will update this soon with the results. It is still well over 100 with the heat of the day and the sun on me hahah. Thank you for your help I appreciate it so much!
-
My thinking behind the pads are that one side of the pistons looks like they are almost bottomed out and if they can't expand enough could there be air pockets that are unable to be released? I am saying that because during some research one member mentioned he did this because as he said certain "racers" would do this for a more complete bleed. I have a new master coming in today and hopefully is the correct one. Otherwise where do you recommend I buy it from? The one I have now is a reman and I have heard from a few members that those are absolute junk. I personally have had good luck in the past with them.
-
The front calipers looks like the pistons have barely any room to move with the brand new big pads. Should I remove one pad and let the piston come out more so or would this not be an issue? I would put a spacer between the piston and the rotor so it would over extend. The calipers are on the correct sides as well. I'm thinking it has to be a mad master, booster, or an error in the pushrod length. I did have it set very close to where I believe it should be but no difference
-
I did do a brake upgrade, my rear drums were trashed so I put on 1985 maxima rear calipers with new rotors and a custom bracket I made, lines up good and all the pad is being used, I also did the toyota 4x4 fronts. I am using new rubber lines on all the calipers as well. Hoping this will make it a fun little track rat with the l24 and n47 head and a few other bolt ons. I can have the pressure I want with the car off but with it on the pedal goes to the floor. I am researching which brake booster I want to go with, right now for whatever reason it has the 6 inch booster even though the car is a 72. I have not removed it but it looks like it is original (or at least no other holes drilled in the firewall looking from under the dash) The pushrod actuating the master cylinder I believe is adjusted too far out right now because the pedal moves down a little and then feels like it bottoms out (unless thats just how firm its supposed to feel but I think its bottoming out) Brakes work marginally right now, barely slowing the car down. I plan to bleed again with the next master I have coming in today and readjust the pushrod. Also there seems to be no difference in the fluid when the pedal is depressed. I will let you guys know how the new master looks today. I think I also am planning to get a new booster and just stick with the 6 inch as it should be bolt in. Oh as a side not I did pull the pushrod to make sure that the reaction disk is in place and glued it on to make sure it doesn't go anywhere. I get the very audible hissing noise from the booster and seems like its leaking from that. The air check valve in the line is also facing the correct way, zero leaks anywhere in the system. I really need to type shorter... sorry
-
I have seen the pictures you posted here in an older thread and basically think of a third master cylinder, the one on the left for the zx was 1.02 inches, then the one for the 240z was .8 inches, now imagine mine being .5 inches. I did the on car bleed where you crack the bleeders and let the fluid go back into the master quite a few times and saw zero air bubbles after the first bleed. Same goes for all brakes around the car, I am getting a syringe for that method and also another master from a different supplier to make sure what I have is what I need. I just have never heard of anyone getting one and it ends up being much shallower instead of deeper like your picture shows.. would a poorly adjusted pushrod make for a soft pedal as well? I adjusted the pushrod so I could just barely install the master without feeling any resistance of the pushrod.
-
So I have very thoroughly researched this before posting here and I hope I don't catch any heat for this. I understand for the 15/16 master cylinder conversion onto my 1972 240z you are normally going to lengthen the pushrod that actuates the master so that it can reach and do its job. Well I bought this cylinder from Oriellys and it had no markings whatsoever on it. No Nabco or 15/16 forged on. I saw on the listing for it that it had a .9375 ratio 15/16=.9375. It did have the brake ports in the same position as the original and bolted on great. I am having issues building brake pressure and this may be a possible reason. The back part of the 15/16 master cylinder where the pushrod pushes is actually much more shallow than the same part of the 7/8. This would mean I have to shorten my pushrod instead of lengthening it like EVERY single person that I have come across and read about. Is this normal and I have just been confused the whole time or is this abnormal for a 15/16 master and I should try another one? This may be the reason I can't build any pressure in the lines because this cylinder is wrong. Any input would be appreciated!!
-
I don't know if I'm too late but I am currently running 15x10 -44 all around with the Wide ZG flares sold by silver mine motorsports (Quality was much less than I expected, hoping to get a replacement flare once I get the brakes fixed.. anyways) I put on 225/50r15s and the stretch isn't honestly too bad. Much less than I was expecting. There is less than a fingers gap between all flares yet it can go lock to lock. Only has the cheap emusa coil over conversion done. Needs some control arms to adjust camber a little and an alignment but so far they fit great

-
Very nice. Almost wish I would have spent a little more and gotten rims that would fit as nicely as yours. Hey I'd be driving right now if I did that haha!
-
Same flares that I bought! They are a nice addition, still haven't put mine on yet, but soon. The way I have been putting my pictures up is to upload them into a gallery on my profile and then simply clicking my media in the reply part (next to the smiley face) and then clicking the ones I want to use. Not sure if this is how everyone else does it but it does work great for me
-
I really like the control arms you made! I know I should buy some but can't bear to part with another $500 for a part that can be built for a fraction of the price. How much for you to tack together a set?
Might have to fabricate some for myself. Anything done to the front control arms?Oh also, what diameter tubing and fittings did you use? They look like 5/8 but I just want to be sure as this is something I probably will be doing very soon and this would definitely help me!
-
I believe you are stuck with what you got forever with these, however some coil overs are rebuildable. With the price being so cheap with these I wouldn't feel bad about buying another set or just seeing if I can replace a single coil over sometime in the future.
-
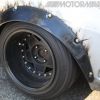
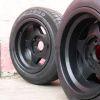
While I'm posting I have always loved the look of the Hayashi Racing 505's on these cars and looking at the Eagle series 028's that I bought I think it would be VERY easy to clone them.. I believe these might be forged.. not too sure honestly, they are heavy either way. But the 505's are 3 piece and pretty pricey. By that I mean I found a set with similar offset for $2500. No way I can spend more on wheels than the entire car. So here is my idea. I can get aluminum pieces made that would start thin and end thick to give it the recessed look at the edge of the spokes like the 505's then get a circle made to go around the inside of the rim so I can mount some bolts and give it the nice 3 piece look for a 1/10 the price. Might be a little rice but its not in the budget to get expensive rims and this would work in theory. After this I would probably get them powder coated black if I went that direction. Let me know if you think this is cheesy or in my opinion a great idea to get a cool look without the price tag. Here are some pictures I grabbed off google that you can clearly see the resemblance and visualize my idea.
-
I hope that Reverse and First are shot is not the case! I can attest to first working for about 15 feet. Hoping for Rebuilt and Furious as supercars.. yeah.. no
Got some more work done on the car tonight and last night. Actually got the girlfriend to do some car work!
So I finally finished the stub axles and they turned out great. Zero play and they spin smooth as butter!
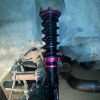
Also I got my coil overs in. Yes they are super cheap EMUSA coil overs but for $449 with the extra front brackets include for FREE how could I pass it up, budget build right? Speedyracerparts is the ebay username I bought off of. Ask for Ryan. He's the man. Unfortunately the extra front brackets were forgotten in the shipping order as its an unusual request but no matter they will be here soon enough.
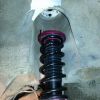
The bottoms of these coils slip right over the cut strut tube like a glove!!! I will attest to Jmai86 which I believe was the first person to do this, not sure, but his idea seemed great and cheap. I did not have to get mine pressed on like he mentioned, after I removed the paint to get a good weld the bracket slipped over and fit perfect. Oh I should also mention I did only get the rear right mounted and welded tonight. I also did cut off the old brackets that are used for these if you install on a 240sx. If you want these coil overs they were from an s13 240sx so 1989 is what I ordered them for.
I figured while I'm at it I can take a few measurements if anyone wants to do this swap in the future. I believe this is just about as cheap of a coil over option for our cars as you can get. $449 with all the brackets that you need is hard to beat. I believe this will be safe as well, there is no reason that under normal or stressed circumstances that there would be any way the welds would break or fall off so I feel safe recommending this to anyone else. They are essentially the same as a few other kits but with extra brackets you need to cut off. Laid a nice thick bead all the way across and my welds may be ugly but they have never broken. LOTS of practice building and repairing a go kart and friends exhausts. No pics of the welds yet... not sure if I want to show that hahah!I cut my strut tube to 1.4 inches just to have a little extra going into the tube and with the coil over bottomed out on the strut tube it measures 17 inches including the bracket.The stock one measured I believe 22 inchesAlso just for anyone else's sake that wants to go LOW I put the coil overs as low as they would go (keep in mind the studs were not sticking out past the holes in the top mounting so there is about another .75 ish inch that it can go lower. This thing will get VERY low if you want it to with these coils. Once its all done I will slam it and post pictures as I know being so low you scrape frame on a piece of paper is appealing
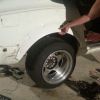
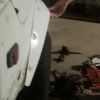
After I took off the old strut I was able to jack up the suspension with a wheel on and place my wide zg flares on and see what it looked like. The rotors are not back from the machine shop so the wheels will stick out a hair more and fit with less than a fingers width to the flares. I have a few pictures of these I will post soon but in the pictures it looks like they barely stick past the fenders which is NOT the case. -44 offset on a 15x10 definitely has some poke.. thank goodness for these wide fenders or I would have to run a ridiculous amount of camber on pulled and rolled fenders. Which is appealing..
Should be putting the coil overs on the front using my other bracket as soon as I get the rotors back and install the front hubs so I can see how much fender I'm going to be cutting exactly so I can get these flares on!!!
I hope this thread helps some people. When I was doing my research a few of the posts were getting old and the pictures no longer remained so if you need any other pictures while everything is apart let me know and I would be happy to oblige. So far I've been able to disc brake convert it and put coil overs on for under $575 not counting grinder blades and a few hours of measuring of course so I'm fairly satisfied. Always looking for new and interesting ways to keep it fun, cheap, and safe. We actually have the EMUSA coil overs on a club car we have as part of our car club at ASU and they seem to do the job. Should be taking that 240sx to the drift event in June with the club if we can get the gas tank replaced in time!
-
Did some more work on the car tonight. The rear stub axles were being such a NIGHTMARE. First the dust caps wouldn't go on and I forced one and it bent so I'm waiting for a replacement
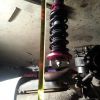
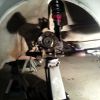
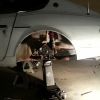
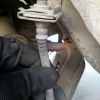
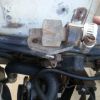
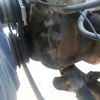
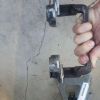
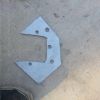
Got one side on and then after I tightened the stub axle all the way the stub axle was almost impossible to turn. So after finding out the dust seal wasn't all the way in and after fixing that it spins perfect! Much more annoying than I had imagined! I hope the fronts are easier!Here are the brake caliper brackets on so you can get an idea of what they look like. This is a very cheap way to get disc brakes. Total cost well under $100 so far.
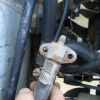
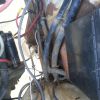
Check your brake lines guys!!!! These things could kill someone!
Also got my flares in today from silver mine motorsports and wanted to see how they looked
Should have a good look once its low.
Have some friends coming in for backup tomorrow so I can get it ready for coil overs!
Should have the coil overs in tomorrow and have the rotors getting machined as well tomorrow AND get my other dust cover in so I can finally finish up the rear. Coming together, should be on the road in 3 weeks or less. That is a personal goal just so I can keep myself motivated.
Also have been researching AC for the car but I wouldn't do that until I know for sure that I'm keeping the car for a long time.
-
Looks like either way it didn't end up being numbers matching. Either way it wouldn't really have meant much to me. Hoping this motor might have some head work or something of that nature.. once its all ready to go I'm going to run it at one of those cheap dyno days for like $35 just to see where I'm at.
-
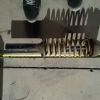
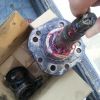
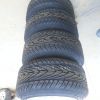
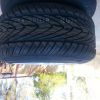
As promised here is a little more info on the car and some progress that has been done. I will be finishing up the rear tonight, except for getting the rotors drilled that will have to wait until shops are open tomorrow. Heres the rear stub axle with the new bearing pressed on and drilled for the new lug pattern. 5 lug here we go! Also got my khumo ecstas mounted and there really isn't too much stretch which I like. Just enough to where the tire will help fill out the flare and wheel well. 225/50/15 if I haven't already mentioned it.
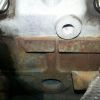
Also I was looking around at the engine and found some great news. Apparently at one time the P.O. put on a N47 head! That should come in handy, just checked the casting today and was pleasantly surprised because I was interested in doing that mod.
the second picture is l24 followed by a few numbers that do not match the vin numbers so I'm going to assume NOT numbers matching? Eh oh well. I won't feel bad if it blows now!
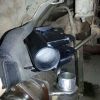
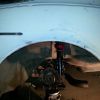
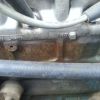
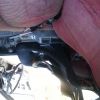
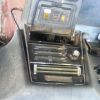
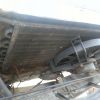
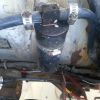
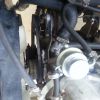
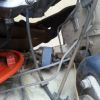
Another thing I did today was check out some of the ac system that was installed on this car by someone. Doesn't look like a sketchy install so I'm going to assume dealer or port installed and not a home job.. Let me know what you think from looking at the pictures! Another thing, where does the compressor mount if the alternator is taking up space on the passenger side of the engine bay? I found 4 bolt holes into the block on the drivers side which looks like a great mounting place for the compressor but all my lines are on the passenger side.
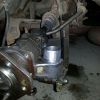
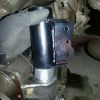
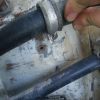
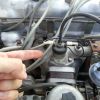
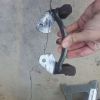
I found this thing.. not entirely sure of its purpose... first impulse is to not trust it..
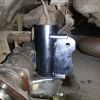
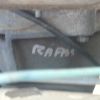
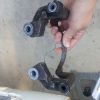
Found RAFAS written on the transmission. Don't know who or what RAFAS is but I like the sound of it. Definitely going to keep that on there.Now onto serious matters. These are the first pictures I took of the disc brake upgrade for the rear and it shows the bracket, crude but effective, and the caliper brackets. I will be welding a bar across to make up for the material that I took away from the bracket. If you google 1985 maxima caliper bracket you will see I cut out the beam connecting the two bolt holes together. But with the added strength from re welding on a new one but up top it will still be safe and cheap.should have both mounted tonight with the stub axles put back together ready to rock and roll once the rotors get redrilled
I recently found out it has one of those steering metal things (sorry I really can't remember what they are called, I'm sure excessive heat kills brain cells) to replace the old rubber that might be there. Another mod I was looking into not very seriously but nonetheless it has it and won't need another!Alright thats all for now, I will be working on it tonight and taking some pics. Might pull the valve cover and see what it looks like or try reading a part number on the cam.OH I almost forgot! NONE of the spark plugs were even tight! I noticed that black goo/oil stuff running down the block and loosened all the spark plugs by hand. They looked brand new so I figured why bother checking them.. THANKS HUTCH.. hopefully that might help my over rich situation with some new plugs that are gapped correctly and at least tightened haha.


 Got one side on and then after I tightened the stub axle all the way the stub axle was almost impossible to turn. So after finding out the dust seal wasn't all the way in and after fixing that it spins perfect! Much more annoying than I had imagined! I hope the fronts are easier!
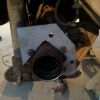

1972 240z Budget Build Long Be Warned!
in S30 Series - 240z, 260z, 280z
Posted
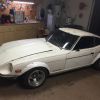
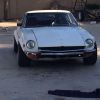
Well to give this thread an ending I took the car as far as I was able to. I finished the brakes, suspension, and got it looking the way I wanted but it started to run like crud right as I was leaving for school. Carburetor and gas tank needed to be gone through. I didn't have a good place to store it and work on it anymore after my parents were getting ready to move so I decided the best course of action was to sell it, instead of it just sitting for an unknown period of time until I could work on it (maybe several months to a year or more). Tried to sell locally and some jokers kept lowballing me, some of the Datsun crowd in AZ are morons. Popped it on eBay and ended up getting almost every penny back out of it that I put into it, so that was nice. People really loved that it was an almost ZERO rust 240z. Some kid and his dad bought it for what I'm guessing was his first car, so that will be cool that it will have new life being one of the coolest cars at his school.
Till next project fellas