

poortecher
-
Posts
59 -
Joined
-
Last visited
Content Type
Profiles
Forums
Blogs
Events
Gallery
Downloads
Store
Posts posted by poortecher
-
-
just a FYI, ross is out of town for the next week or so, so that's why he hasn't responded.
-
Ross makes some quality parts, so I wouldn't worry about the build quality of these, but I wouldn't abuse any set up like this very much. It would be ok for street, I think, but for any racing type situation, I would stay away from a spacer that thick.
-
It looks like they would work, as long as your wheels are the honda bolt pattern (4x100mm). Ross' stuff rocks too.
-
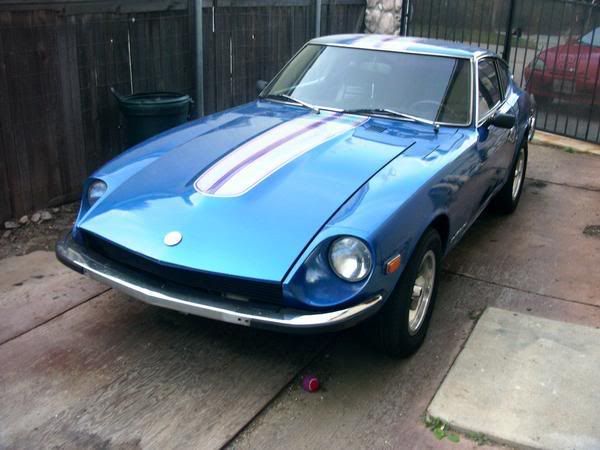
'73 240 for me. Bought it to drive early in '06, but it didn't take long for me to buy a truck and rip the Z apart. It's getting a 383, TKO drivetrain. I can't wait to finish it, which I'll probably still be saying 5 years from now.

-
I'm looking into the same thing right now. I haven't called any shops yet, but I was referred to these two shops by the machinist I use, who is an old hot rodder. (No one knows better than them!
)Foothill Radiator, Upland CA
(909) 981-4011
A-1 Radiator, Ontario CA
(909) 984-7848
I'm gonna paint it myself, and just let them boil and seal the tank, and cover it with roll on bedliner.
EDIT- I've heard some horror stories about some of the DIY gas tank liner kits peeling and clogging up the pickup in the tank, so I figure it's safer to have a shop do it. Though I guess there's no guarantee that they won't mess up either.....
-
So, my plan to convert my stock tank over to 1/2" lines to feed my V8 has reached a small hurdle. My plan was to copy another member's idea, outlined here. (Look at the last post) http://forums.hybridz.org/showthread.php?t=109424&highlight=1%2F2+inch+tank
I found a -8 AN fitting that is made to braze on a 1/2" tube to one side, and I thought that I would use this. But I'm not sure if the fitting is a steel one, which I would need to weld it to the tank. Does anyone even make a steel AN fitting? All of the ones I see are aluminum.
This is the fitting I was planning on using-
http://www.hrpworld.com/index.cfm?form_prod_id=500,24,363_3145&action=product
-
DatZun- no, it's on the RV parking on the side of my house. My firebird lives in the garage, so the Z gets stuck outside for now.
Dragonfly- when you replaced your doglegs, did you use a hole punching tool and re-make the factory spot welds, or did you just weld along the flange, such as at the pinch weld or in the wheel well
Eric
-
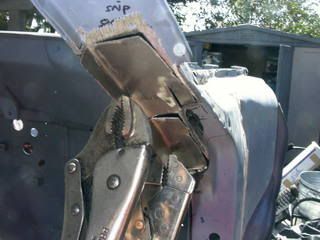
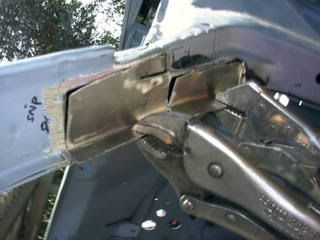
So, after a long, long intermission due to financial crap, I've finally made some progress. I finished up replacing the floorpans with 18 ga sheet and patched the rust in the A-pillar. I also made a set of pete paraska-esque subframe connectors out of 2x3 0.090 wall tubing.
Coming up are a set of MMS coilovers, vented 4x4 front disc and 240sx rear disc, and getting my hands on an R-200. Then I can save for my transmission and buy the JTR engine mounts and make a trans crossmember.
P.S. Are the dogleg panels a real pain to replace and get right? Both of mine are rusted, and I am debating whether to replace them myself so I can rustproof behind them. I'm just worried about it coming out looking like a hack job.
Anyway, onto the pics...
-
ya, I ordered a JTR manual in mid-January, and I got an email today saying that it had paid and shipped. The ball is rolling again!
-
Quick question. In your opinion, how much will thicker floor pans help with chassis stiffness? I just replaced my floorpans and I used 18 ga sheet for the panels. How much of a real, noticeable gain in stiffness could be gained by using say 16 ga? I'm also going to install a set of pete paraska's subframe connectors. Would it be worth the effort to replace the floors with a thicker metal? Or would the subframe connectors make the effort not worth the gain?
Eric
-
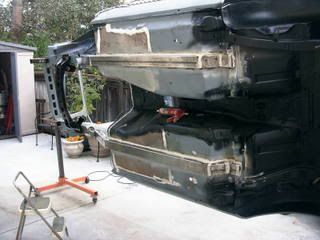
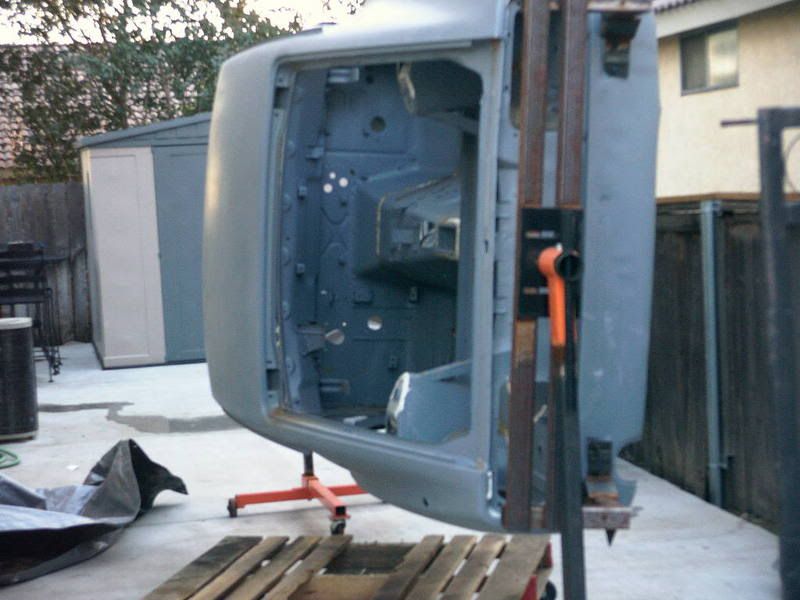
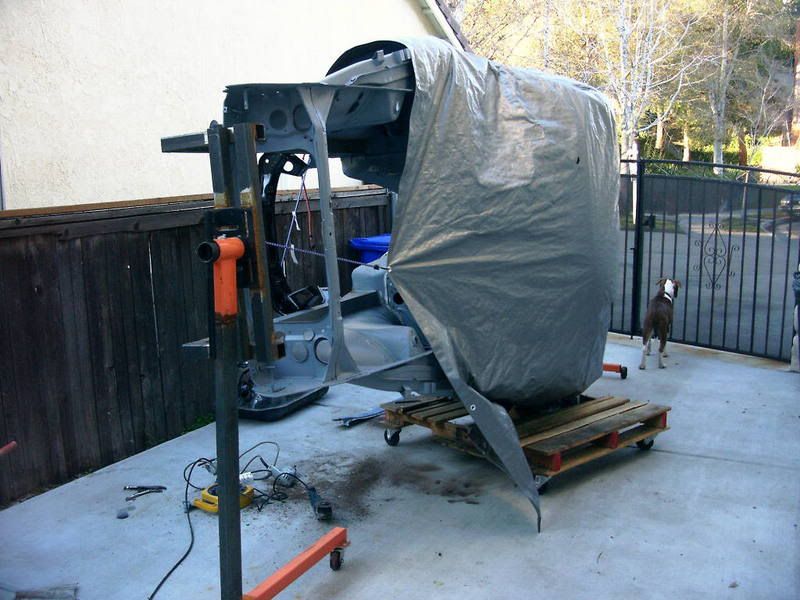
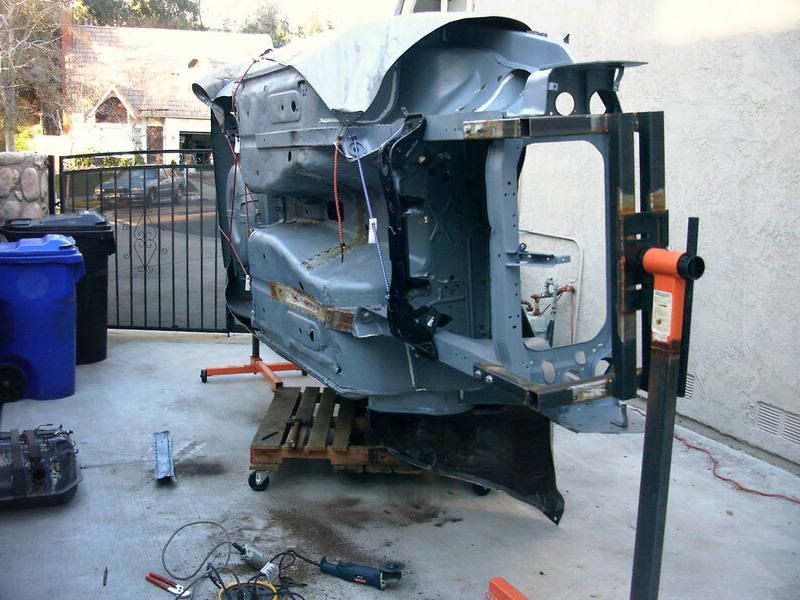
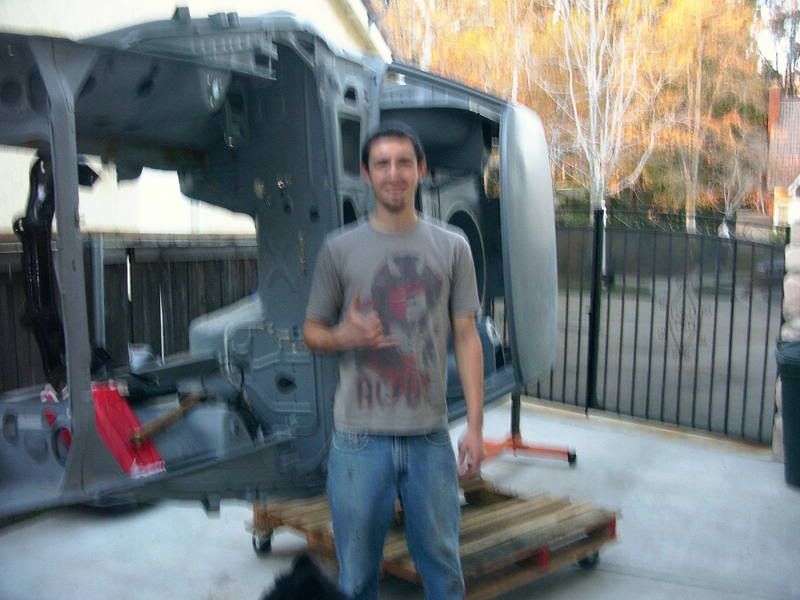
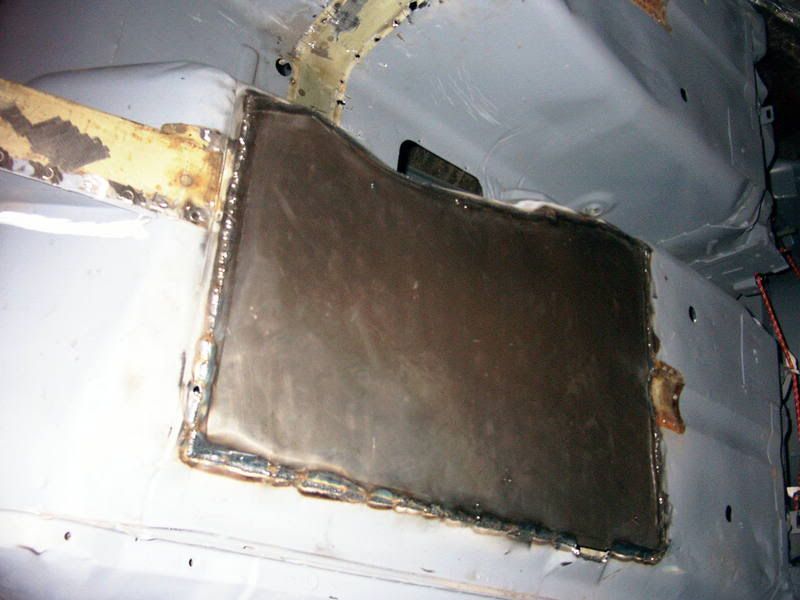
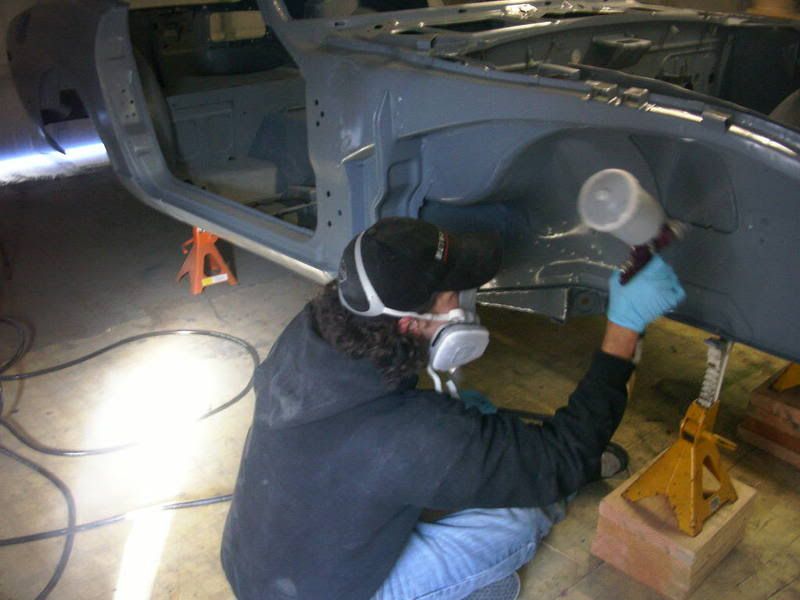
So I got back to my Z recently. It's been too darn cold and windy to be working outside lately. I built the rotisserie a while ago, and recently mounted the car onto it. I removed the hood latch bracket, trans mount, and other assorted odds and ends. Last night, I made a new floor pan for the passenger footwell, and I welded it in today after work. Anyways, here are some pics of my progress.
I know my neighbors have got to love this
">">My dog Tyson. 4 1/2 months old and already almost 60 lbs. He's gonna be a BIG pit bull.">">
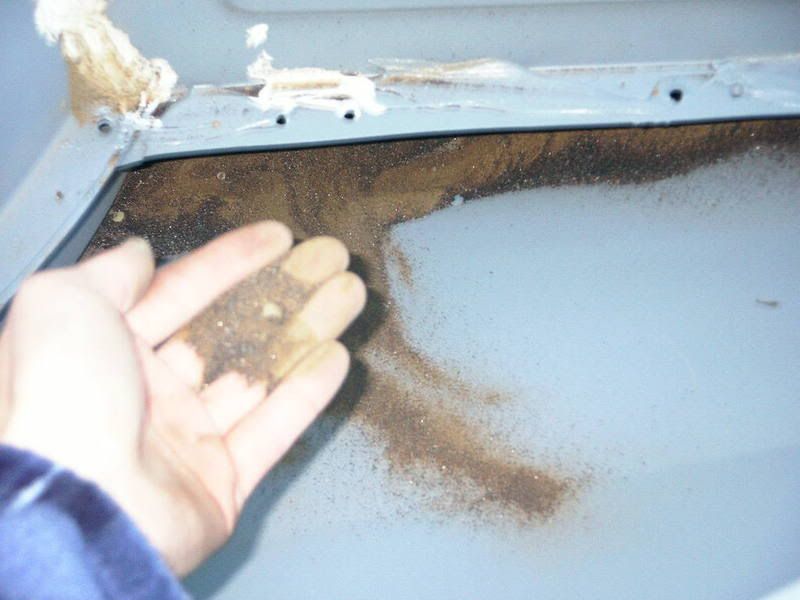
Everytime I turn the car over, I get about 10 more handfuls of this
">This area has me a little confused as how to go about removing the rusted floor pans, what with the frame rail being right there. Suggestions?
">Me feeling victiorious after the car doesn't come crashing down.
">">
They may be small, but they get the job done.
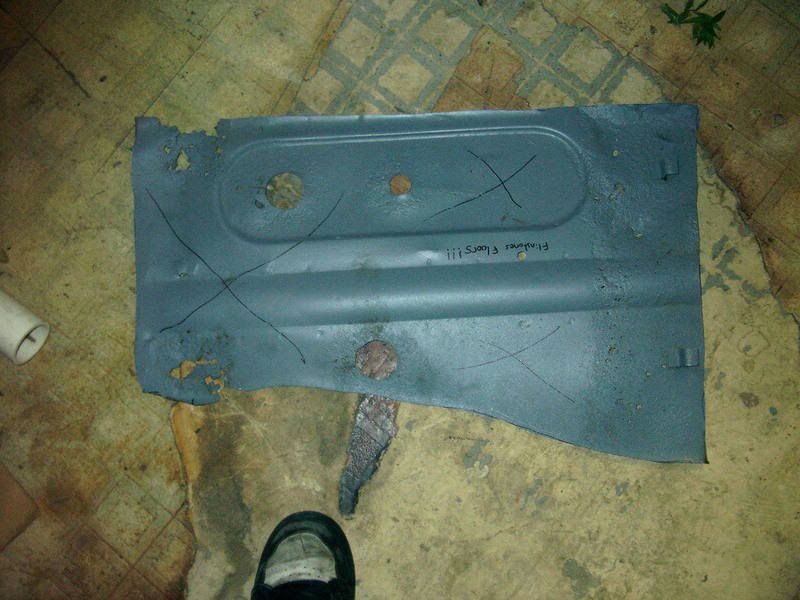
">Bad floors come out
">New metal goes in...
">">And before anyone points it out to me,yes I know it's not the greatest idea in the world to use flat sheetmetal for a floorpan. I was going to go buy a little vice mounted bead roller, but ended up not. The subframe connector is going to be going right down the center of the flat piece anyway, so I don't think it will cause a problem.....I hope.
So that's that for today. I'll probably finish the floors within the next couple days depending on school and work. If I didn't have to work, it seems like this car would be done in a month! But then of course, I am working and I still can't scrape up enough money to get it done. Oh well. Anyways, I'll post another update when some reasonable progess has been made. .
Until then, lemme know what you think.
ERIC
-
The plans, well...I'm not doing anything groundbreaking that's for sure. Just building something that I can enjoy for a long, long time. But yah, the plans go as such:
-383 (500-ish hp) with a T56
-R-200 w/ CV jointed halfshafts
-Coilovers
-subframe connectors and front and rear strut bars
-4 wheel disc brakes
-5 lug with some nice 17" wheels (american racing torq-thrusts?)
-keep the body pretty much original except for a front air dam
-keep the interior fairly original (autometer gauges, delete the console, make some custom upholstery with tweed inserts)
The basic look I'm going for with the car as a whole is an under the radar kinda thing (what is that? a datsun with some shiny wheels?) unless you take some time and look at the car. I want people to see the car and not notice that anything's been done to it unless you look underneath.
-
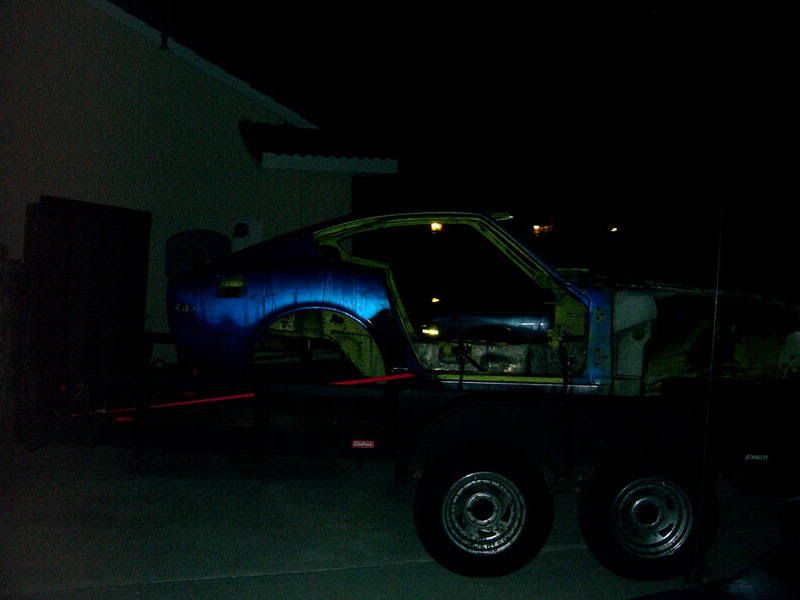
Bingo powershift! Ya, I just covered it in primer right now to prevent surface rust while I work on everything else before it gets painted, sometime in the next decade hopefully... Don't worry mull, i'm doing it the right way. Rusted metal comes out, new metal goes in. By the way dude, you've got guts. I would have taken one look at that car and started crying. You are an inspiration.
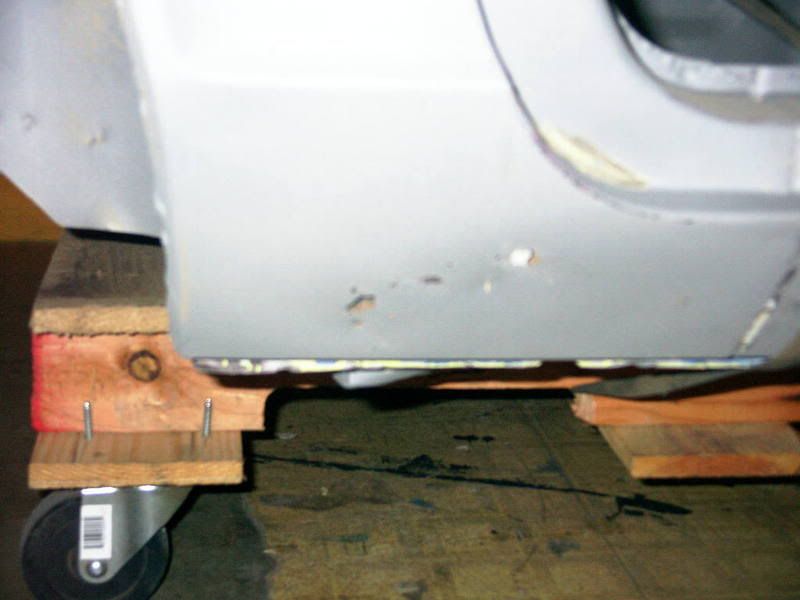
My "trolley" is just an old pallet i took from work, and I bought four casters from harbor freight and put it all together. I forget the exact dimensions of the pallet, but it sits just inside of the pinch welds and runs about the length of the floor. This thing worked awesome. My driveway has a bit of a grade to it, and I can move it up and down with no hassle whatsoever. Also, when we pushed it onto the trailer, the ramp had a good 20 degree angle to it, and my dad and I were able to push it up no problem. With the casters, the 4 1/2" ones I used worked fine. Rolled over the cracked up concrete and the road no problem.
-
I'm not sure on the final color of the car yet. I was thinking a gunmetal silver, but I already have a car in pepper gray metallic, so I don't really want a second of the same color. Dark blue? Maybe a really dark metallic green, like almost black. Who knows. I have got quite a while to decide, so i'm not too worried about it.
-
Haha, actually i forgot to take out the filler hose before i took it to the sandblaster. Oops. I'm sure it can stand to be replaced anyway. Someone makes them, right? I'm glad to hear that my car isn't so bad. But then again, i've watched all of mull's videos, so i can appreciate the difference. And yes, that super awesome lime yellow green is SO going back on!
*news report on tv in the background*-Yes, the 70's really are over...
*me*- NOOOOOOOOOOO!!!!
haha, i guess maybe not with the green stuff. no, i think i'm gonna por 15 it all then dynamat.
The sandblasting was actually really reasonable. The shop that did it (Crystal Sandblasting, Upland, CA) charged me $600. They used aluminum oxide over the entire car, and they dropped the working pressure when they stripped the exterior sheetmetal to control warpage. It seems to have worked, and it was a pleasant experience dealing with them, so I would recommend the shop for anyone around here.
-
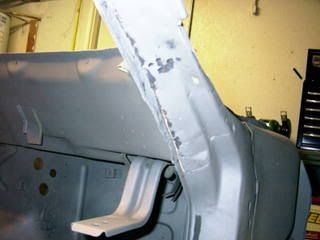
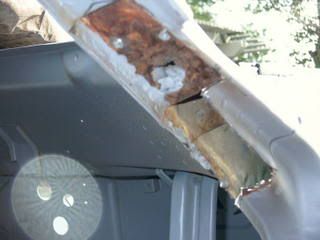
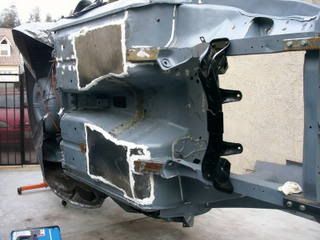
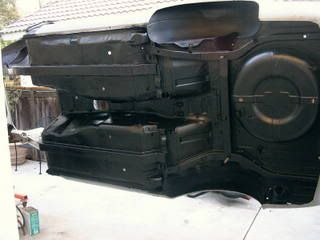
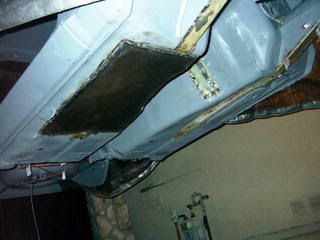
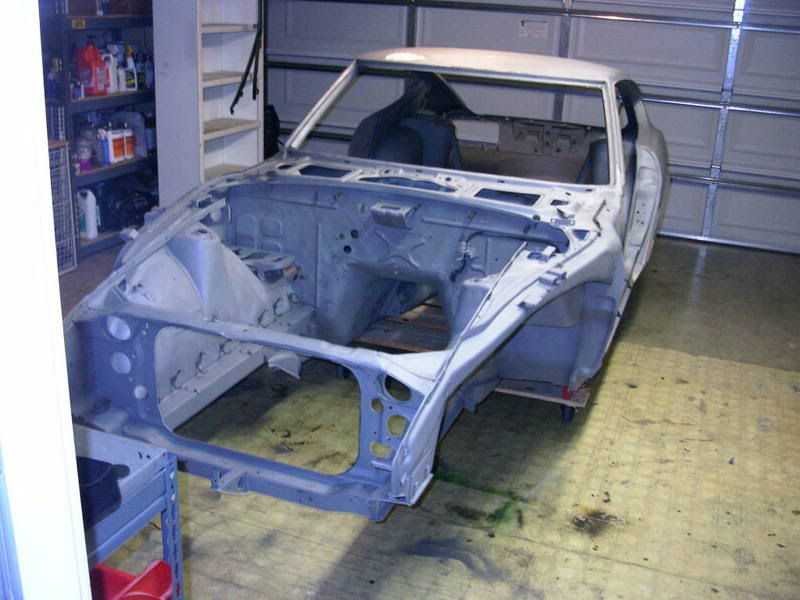
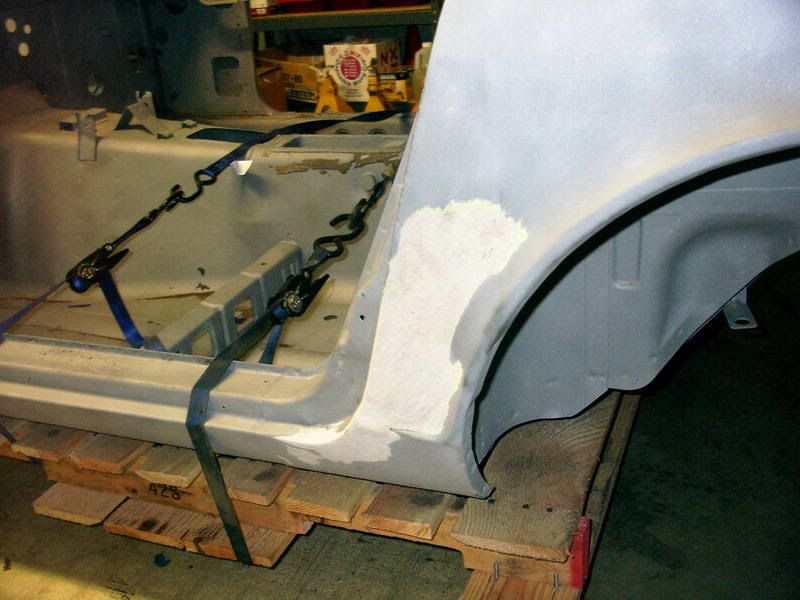
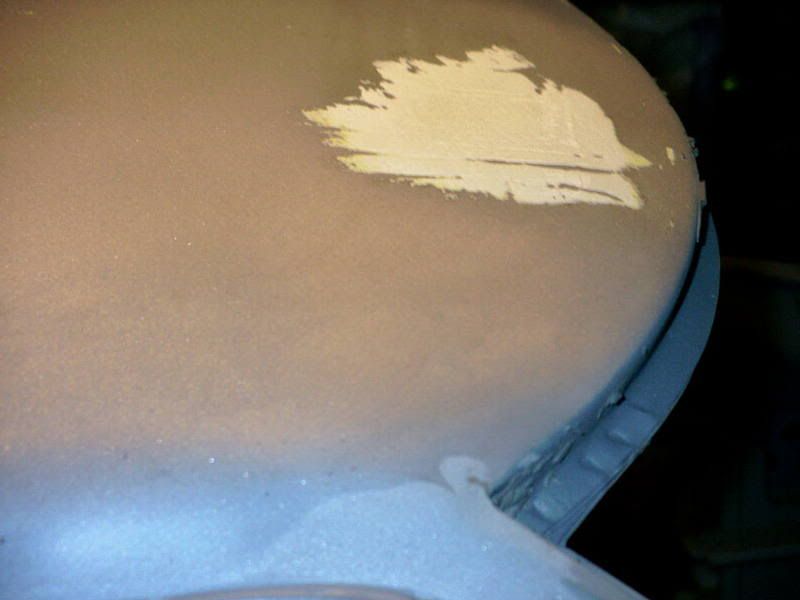
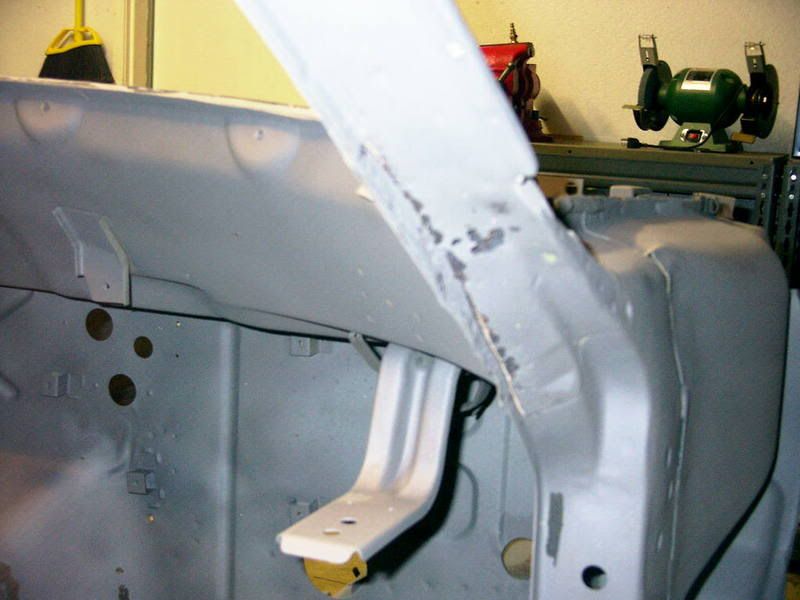
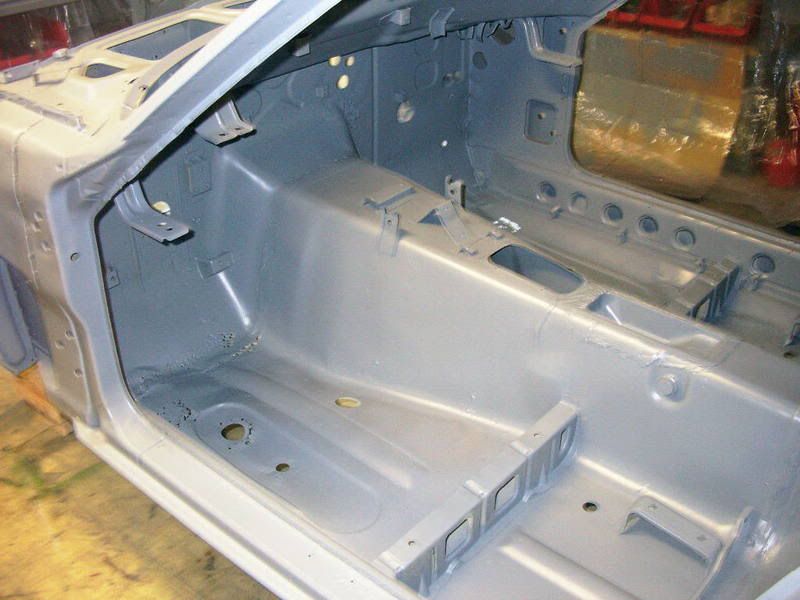
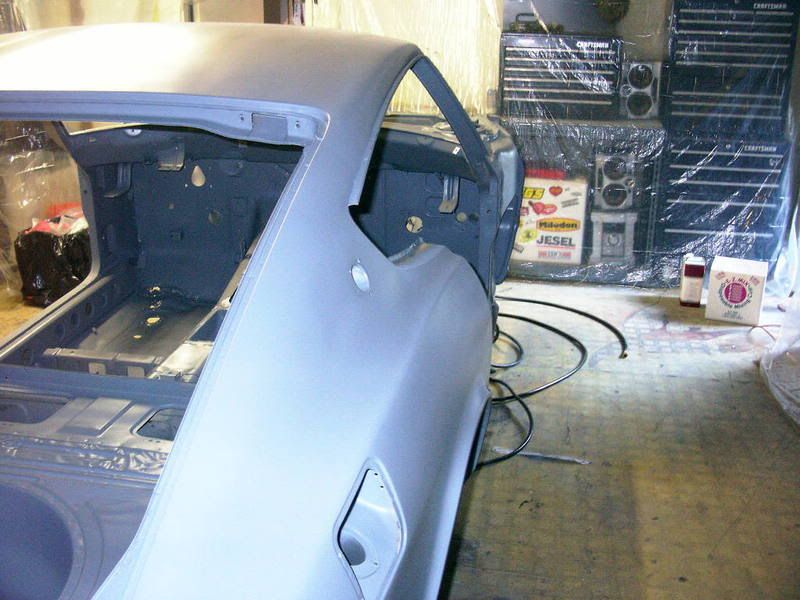
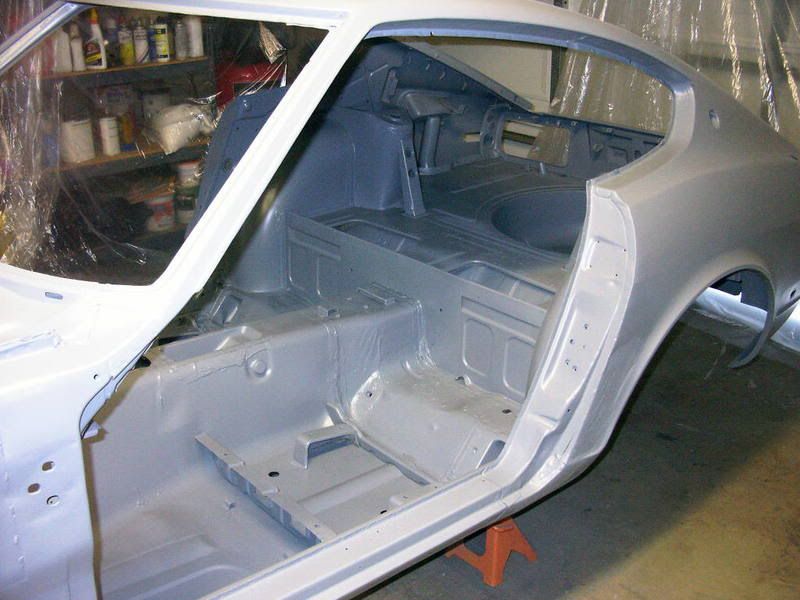
I finally got my 240 to the sandblaster a couple of weeks ago, after having the bare shell sitting around for what seemed like forever. It did reveal a few little surprises I didn't know about, as well as making the problems (read:R-U-S-T) I did know about really show themselves. There's a decent sized dent on the roof that was covered with bondo, as well as a whole bunch of bondo on the driver's side dogleg that could be hiding anything. Other than that, I have some rust on the pass side dogleg, the a-pillars need a fair amount of work (leaking windshield seal) , and it needs new floors. Other than that, I think I got away pretty clean. So I got the car into some PPG epoxy primer and now it's onto the metal repair and fab piece by piece.
Leaving for sandblasting (at 5:30 in the am, ugh...)
Back from the sand blasters. The car came out pretty good, other than the fact that they didn't get rid of the bondo......argh
Rust on the pass dogleg
Bondo on the drivers side (terrifying
)Bondo on the roof. I think a little shrinking and some hammering should make it ok
**insert long, drawn out, black-and-white era horror movie scream here**
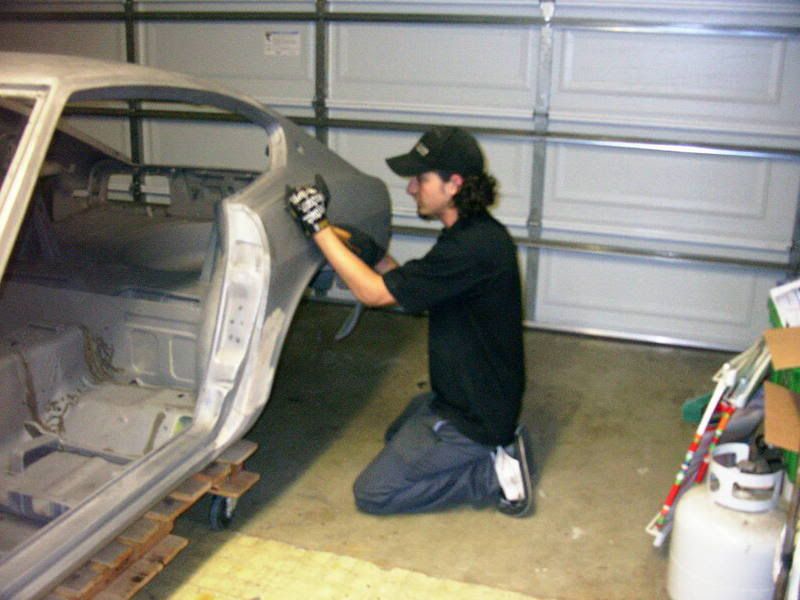
prepping for primer. that's me
killing brain cells-----v
finished product (PPG DP50LF)
So that's where things stand right now. Gotta get started on the rust repair, fab and swap. I'll post more pics and trials and tribulations as they come (which they inevitably will), but it will most likely be a while, as i need to get some work done on my firebird and jet ski first. I have to many projects.
Anywho, lemme know what you think, especially on the rust. I've never tried stuff that bad before... -
totally different indeed. i have a 69 firebird, so i know. as for size, the pontiac motor is larger than a sbc, and about the same as a bbc. however, pontiac didn't have a small or big block. the 326 through the 455 had the same external dimensions. the engine mount is different. the intake on a pontiace is separated from the lifter valley by a metal cover. i think a poncho v8 would be a little heavy for a z (i think they're around 550 lbs), but it would definitely be different! any questions in particular about a pontiac motor?
-
Hey wickie, what was the name of the shop that blasted your car? I live in the I.E. too (alta loma), and i'm looking for a shop right now. Did the same place blast the shell and spray the primer on it? Also, how did you like the etching primer? Will that seal the bare metal enough to leave just in that primer for a long time? Or does it need to be covered in epoxy primer on top of the etching stuff?
-
yup, ford made a 351, not a 350. but i think he was asking the difference between putting a chevy 350 or a ford 302. ya, vartyak260, do like strotter says and search, there is A LOT of information on this site, you just gotta look. happy hunting!
-
ssflyer, that's exactly why i don't want to do it at home. the blast media will get EVERYWHERE and i'll have to spend forever and a day cleaning it up.
-
chevy did make a 302. it was built by chevy to put into the camaro z/28 to race the car in the trans am series, which had a cubic inch cap of 305 ci i believe. factory (chevy) 302's are extremely rare, but you can make one yourself by putting a 283 crankshaft into a small-journal 327 block, creating the necessary 4 inch bore and 3 inch stroke, the perfect recipe for a high RPM screamer. but anyways, fastzcars, you are right. when most people talk about a 302, they are talking about a ford engine.
-
PEPPER GRAY METALLIC!!! I have my 1969 Firebird painted that color and it looks friggin amazing in the sun.
-
Johnc- So i don't really need to remove that tar-mat junk on the floorboards under the carpet? Well, I'll talk to them and find out exactly how they want the car prepped. Also, I was planning on spraying the car with a few good coats of epoxy sealer/primer as soon as I got the car back, because it's going to be sitting on the rotisserie for a while while I do the rust repair, subframe connectors, and whatever other metal work I need to do. Would that be better/worse than the WD40 method?
-
Just like Zhadman says, that would make a HUGE mess for me to clean, and something tells me I would be at it for a long time, as opposed to a shop getting done in a day or so. Plus, if i'm going to spend 600-700 dollars to do it myself, i'd rather spend an extra few hendred dollars and save myself the hassle.
DavyZ- Actually, other than those areas described above, i think i got away with a solid car. The rockers don't seem to have any rust, the battery box is solid, frame-rails are good, etc...Also, I've already begun looking in the yellow pages, I was trying to ask if anyone has had experience with a shop and could give me impressions first hand. Sorry if I didn't make that clear earlier.
Johnc- $1000!!!!! Jeez, I was hoping it would be less than that. But you say you had your car done there? How good of a job did they do? I guess if Nissan used them they can't be total hacks haha. I am going to strip the car down to the uni-body and put it on a rotisserie first, as well as taking off any bondo and trying to get most of the factory undercoating off of the underside as well as the floor boards.


 Anywho, lemme know what you think, especially on the rust. I've never tried stuff that bad before...
Wheel Show! Post your pics of you wheels
in Brakes, Wheels, Suspension and Chassis
Posted
hey marcg, on the 450z in the first pic, how wide of a spacer did you use?