
SpeedRacer
-
Posts
757 -
Joined
-
Last visited
-
Days Won
1
Content Type
Profiles
Forums
Blogs
Events
Gallery
Downloads
Store
Posts posted by SpeedRacer
-
-
In reference to the "A Different Brand of Z" thread I am sorry to continue this discussion of a locked thread but I feel that I must defend John Washington. I have dealt with John off and on for over fourteen years and have never had a problem. He has always and, I mean always, provided excellent products AND service.
A case in point. Back when I was building my Ferrari GTO replica my wife bought me a Alpha 1 GTO type dash from John for my birthday. Well, like most of these projects, mine took many years to build. By the time I got around to installing the dash I found out it didn't fit. So I called John and explained the problem. He apologized that he should have quizzed my wife further, but I have an early car and the dash fits the later 260Z's, etc. After having the dash sitting in my garage for 3 1/2 years John tells me to ship it back for A FULL REFUND!
A lot of people contact me about building a Ferrari 250 GTO replica so I have referred many of them to John over the years and nobody has ever come back with a complaint so I will continue to provide John with my highest recommendation.

-
 1
1
-
-
I used the Precision kit and found it to be very complete. Some of the little door pieces were not in the kit but it included all the major weatherstrip for the whole car. I think you can find it for arround $250. http://precisionrestorationparts.com/catalog.html
According to their web site the kit contains:
- Windshield Weatherstrip Seal - WCR 241
- Cowl Panel Weatherstrip Seal - 66321 E4100
- Front Door Opening Weatherstrip Seal, Right Hand - 76801 N4600
- Front Door Opening Weatherstrip Seal, Left Hand - 76802 N4600
- Outer Quarter Window Weatherstrip Seal Right or Left Hand - 76834 E4101 x 2
- Inner Quarter Window Weatherstrip Seal Right or Left Hand - 76836 E8200 x 2
- Hatch Outer Upper Weatherstrip Seal - 76910 N3000
- Hatch Outer Side Weatherstrip Seal Right or Left Hand x 2 - 76911 N3000
- Hatch Inner Weatherstrip Seal - 76912 N4500
- Upper Door Weatherstrip Seal Right Hand - 80810 N4520
- Upper Door Weatherstrip Seal Left Hand - 80811 N4520
- Door To Fender Seal, Right Hand - 80931 N4501
- Door To Fender Seal, Left Hand - 80932 N4501
- Lower Door Weatherstrip Seal Right or Left Hand - 80935 E4101
- Rear Window Weatherstrip Seal - 90305 E4100
Their old kit had problems with the door weatherstrip being to thick so you had to slam the door but I think that is now corrected.
-
Hey John,
Really, really good to hear from you and, yup - it is me all right. Glad to see that you are still in and growing the business. I am also very glad that you have the tooling for the Alpha One GTO kit as I was afraid the kit was going to disappear. With that in mind you might want to check out the FAQs/Body Kits & Paint section here under the 250 GTO Owners thread as there was a guy looking to buy a kit and we suggested he contact you. http://forums.hybridz.org/topic/50042-250-gto-owners-thread/
The car has been running good so I have just been taking it to a few shows and cruise nights. Peter from Australia (Boy from OZ) was here last year and drove it. BTW, if you ever run across an incomplete 250 California Spyder kit please let me know.
Take care and stay in touch.
-
The car looks fantastic Peter! The transformation when you painted it is amazing and it is great to see so much progress.
-
BTW the company that sells the kit in Australia is Classic Revival http://www.classicrevival.com.au/250gto.html
I would also keep your eye on eBay as both incomplete and complete kits show up once in awhile.
-
Ahhhh... that would be a picture of my car in my posting above and not Chelle's.
I have contacted McBurnie in the past but found him to be more interested in bigger things. Anyway, it appears that his Thunder Ranch became Custom Coachwerks and is now Rock West Racing. I know nothing of Custom Coachwerks except the pictures they had of GTO kits that seemed to be either a model or other cars (including mine) taken off the web. I tried to contact them but the never got back to me.
The molds have gone through many hands and ended up at OM Sportscars in the UK but they seem to have gone under. You can find a good list of the kit's history on John's Replica History web site. http://www.reactionresearch.com/gtorr/ReplicaHistory.html
I think John Washington can supply a coupe version and a non-tilt front end but you will have to check with him.
The kit is a lot of work but worth it in the end so good luck.
-
That is a pretty old, but good article, on Chelle's car. Unfortunately I think she sold it quite some time ago.
Anyway, you can still buy the kit from John Washington over at Reaction Research. John is a great guy so I would give him a call.
-
When I lived in Rochester Hills, MI I had Guardian Auto Glass in Clawson install mine. http://guardianautoglass.com/
They had a very low price (I supplied the rubber weatherstrip) and they did the installation in my garage.
-
Think I did this before but my memory is gone.
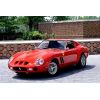
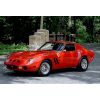
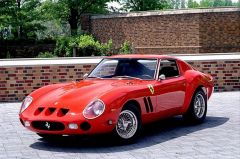
1972 240Z based 1962 Ferrari 250 GTO replica.
-
1
-
-
FYI - Here is a list of all the 33 250 Ferrari GTO's as well as pictures and their history. http://www.barchetta.cc/All.Ferraris/by-serial-number/ferrari-by-serial-number/model-index-60-64/model-summary/250-gto-index/index.html
-
What the???? Is search broken????
Listen to Miles and here is a link to JTR for you http://www.jagsthatrun.com/Pages/Datsun_Z_V-8.html
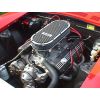
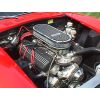
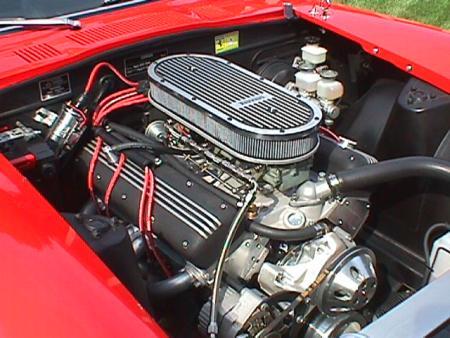
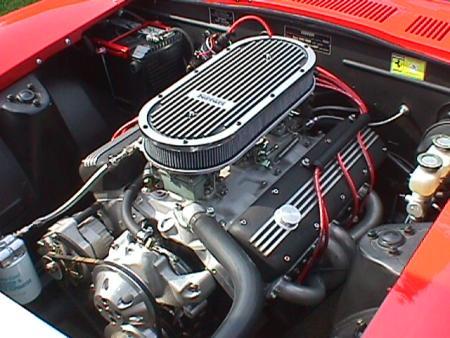
Pictures are of my 327 CID Small Block Chevy (SBC) w/ T-5 trans in a 1972 240Z
-
Tokyo Drftr - those are the sad excuse for hood hinges. They bolt to the front of the body where the Z car hinges were and the you drill a hole in the fiberglass appendage sticking down from the hood. A loose fitting bolt with a locknut serves as the pivot point. DON'T USE THEM! The best solution I have found is to make a pair of brackets that you can mount old Corvette hinges on.
-
Yeah Boy from Oz, a legend in my own mind LOL.
Tokyo Drftr, based on your photo those are genuine Ferrari lights (although your are missing one rear turn signal). The guy in Italy that used to make those lights for Ferrari passed away some time ago and nobody took over his business. Therefore, new ones are pretty rare and worth more money every day - like over $200 to $480 EACH!!!. http://www.ferraripartsexchange.com/turnsignals.htm
I don't know why you are not going to use them but I would not "give" them away.
-
John Washington from Reaction Research http://www.reactionresearch.com/automotive.html has been making and selling the VeloRosa (Ferrari GTO spyder) kit for the Datsun Z car for years. Give John a call. Not only is he a great guy but he knows a great deal about convertible Z cars. I believe he sells a reinforcing kit that fits entirely within the cockpit and does not require a roll bar.
-
Boy from Oz is right on with the 2 large panels as they fill in the blank opening when you remove the tail lights. The other 2 curved pieces should be bonded to the rear of the front fender panels. They sit up against the Datsun body and seal off the area between the rear of the front fender and the body. I am glad you have a pair of the third item because they go on the interior of the car and close off the space made where the rear side windows were removed.
Good luck with your build.
-
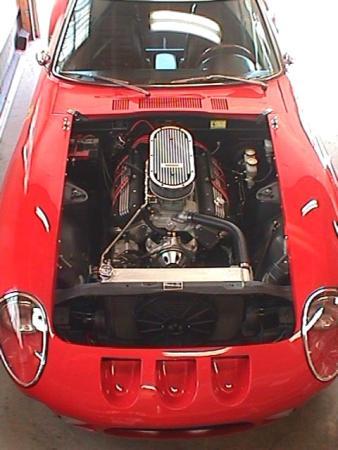
The distributor did not free up that space. Its the fact the engine is mounted so far forward and not in the "JTR" position.
Here is what the very small MSD (8570) looks like when its in the JTR position (PLUS another 1/2 ich further back).
-
Hey Kaiserser and welcome to HybridZ!
You have come to the right place. First, get youself a copy of the Jags That Run (JTR) manual. http://www.jagsthatrun.com/Pages/Datsun_Z_V-8.html You will need to determine what method and/or kit was used to do the SBC conversion. If it was the JTR method, with the engine set back, then the T5 or T56 shifter will come right up through the original hole in the tunnel and console.
If not I highly recommend that you remount the engine using the JTR mounts. I have a Camaro WC T5 in my car and it is a great transmission with good ratios and smooth shifting. My Z car was originally an automatic but it was easy to add the manual stuff. The bracket is already in the car for the clutch pedal so go to a junk yard and pick one up along with the rubber stop, linkage and clutch master cylinder. The rest is in the JTR manual.
When you are done it should look like it came from the factory that way! -
Hey Rob240z - They are Kurtco Rockerboxes but I am sorry to say that they went out of business quite some time ago.
BTW they are in this car.
-
I think we did this before but here ya go.
-
I am a firm believer in the KISS (Keep It Simple Stupid) method when it comes to engineering changes and a sticking throttle is something that you don't want to deal with. Even though I have a Tri-Power setup on my car you can very easily do the same basic installation. Buy yourself the shortest Lokar universal throttle cable and appropriate carb bracket. http://lokar.com/product-pgs/throttlecables-kickdowns/tc-kd-pgs/throttle-cables.html
Depending on your carb you may want to buy the whole kit which includes the highly recommended dual return springs. Don't worry about the length when you buy it is as you will end up cutting it to the correct length.
Next, remove all the old throttle parts including the throttle bracket and bell-crank.
Install the new Lokar throttle bracket on (or under) the carb depending which one you purchased. Remove the cable from inside the housing and the measure and cut the housing to the right length. Keep the bends wide and remember that the engine will rock on its mounts so do not make it to short. Remove the clevis from the gas pedal end of the cable and reinsert the cable in the housing. Now insert the new cable through the original hole in the firewall. Hook the end of the cable onto the stock pedal by inserting it through the original slit.
Next mount the other end of the housing onto the carb throttle bracket. Measure and cut the cable and install the end and ball on the carb. Be sure to install the redundant set of springs.
I think you will find that the throttle will operate very smoothly and you will no longer have a problem with sticking. I have been running mine like this for over ten years and never had a problem. -
Old post so just an FYI but it looks like a company called Carrera CoachWerks in El Cajon, CA 92020 purchased Thunder Ranch back in July of 2012. http://www.carreracoachwerks.com/ I don't know anything about them even though they use a lot of pictures of my car on their web site. http://www.carreracoachwerks.com/250-gto/
-
Hey Michelle,
I can not believe you are really selling your 1962 Ferrari 250 GTO replica after all the time and money you have put in that awesome car. I noticed this list out on eBay today http://cgi.ebay.com/ebaymotors/?cmd=ViewItem&_trksid=p3984.m1423.l2649&item=280913367388&sspagename=STRK%3AMEWAX%3AIT so I guess its true - and its a no reserve auction!!!!
Speed
-
I have often thought about and looked at buying a 308/328 Ferrari as well. They are great looking cars that are a lot of fun to drive. The bumpers are funky on the some US versions but absolute stock versions will probably go up in price some day. BTW, GTS versions are generally worth more that slick top GTB versions.
Unfortunately they do rust but, if this one has spent its life in California, then it’s probably OK. Check the bottom of the doors, sail panels and bottom of the rear quarter panels for rust and/or repairs.
And, it’s very important that you get all the maintenance records. First, make sure that the timing belts have been replaced. Scheduled belt maintenance is at 30,000 and 60,000 miles. It is an interference engine so you MUST get them changed on schedule! If you have it done the price on average will usually be between $3,500 to $4,500 dollars depending on the local labor rate. BTW, most people change the clutch at the same time because you have to drop the engine to change the belts anyway so a $6,000 bill for the 60,000 mile service is not unheard of. At 56,000 miles it’s just about due for the belt change. Also, if maintenance records are available, make sure they are genuine.
The transmission synchronizers (especially second gear) are a bit on the weak side so make sure there is no grinding of gears on fast up and downshifts.
You didn’t say what year but the early versions had four two barrel Webbers that are difficult to repair and keep in tune.
And yes, parts are VERY expensive! There are very few substitute parts available but sometimes you can use FIAT parts (FIAT owns Ferrari) which are identical and about on quarter of the price.
If I was buying it I would have a local Ferrari technician check it out for me.
Hope this helps and good luck.
-
A lot of people use the Camaro bell housing but I used a 1984 and later Corvette bell housing along with a 7/8†bore Wilwood (Tilton) master cylinder through a braided stainless steel line to the stock Corvette slave cylinder. It may be more expensive but it is a much better solution.


manual or electric choke
in Gen I & II Chevy V8 Tech Board
Posted
I would (and did) go with electric. Easy to hook up by just adding to a connection on the "+" side that is hot when the ignition is in the "on' or "run" position and most will require a ground "-" connection as well. Grounding to the carb stud or bolt will usually work.