

kj280z
-
Posts
539 -
Joined
-
Last visited
-
Days Won
1
Content Type
Profiles
Forums
Blogs
Events
Gallery
Downloads
Store
Posts posted by kj280z
-
-
Man - I have been disconnected and just found out about this today.
Beyond anything else - I felt like Ross was my friend. As JohnC mentioned Ross and John spent several days at my house in Florida. I used to speak to him frequently...
SOOO sad right now...
I'll miss you Ross - sorry I didn't hear sooner....
If there's anything I can do for his family - if they are following this thread, please reach out to me...
-
Yep, both are in place and have caused no problems.
Same here - I left both check valves in place - works fine - I have Toyota calipers and vented rotors in the front and the 240sx calipers with 300zx rotors in the rear. Also used the 10 inch 280z 2+2 booster. I made custom lines with the different threads on both sides... easy!
-
My 260 has this problem, i believe. It is like a Buzz, starting at about 65 or so, pretty bad. Guess I'm heading uptown to look for laser pointers, etc..I suspected my half shafts before I read this, but now I don;t know. The half shafts, with a dial indicator at the middle will deflect about .o10 with moderate pressure, Anybody ever checked this? I took them apart and regreased and they looked pretty good to me.
I know of 5 more (in addition to the ones mentioned previously - so yes the problem is more wide spread than initially thought) LSX Z's that have had their drive shaft bolts loosen, so as I've stated in the past, every Z that has done the conversion should verify their driveline angles.
As far as your comment on the half shafts... I was running the stock half shafts initially, and experienced the vibration. I then converted to 300zxt CVs and the problem was the same.
The John's Cars Tranny mounts that I've inspected are not consistent with the tranny heights (The mount bends are inconsistent) - Every one I've checked is slightly different... start there first - I'd bet your trans is up too high... Then side to side is probably off as well...
I'm really surprised this thread hasn't generated more concern - I see it as a huge issue with the JCI kit
-
Wow!!!! is all I can say when it comes to actually covering a set of panels, I have a new found respect for upholstery guys cause it aint easy!! I tried to make a set of covers for the factory door panel (two in fact) and maybe Im missing something but it was a pain in the ass!!! It didnt work out at all!!, it buched and crinkled and no matter how much I stretched and pulled ... it didnt look good and sure as hell wouldnt be something I would sale.
So... I changed the process for the better... or so I think. I decided to cut out a template of the factory panel insert, padded and covered it before glueing it in place and tying it down. I Then I covered the perimeter in the faux leather and wrapped it all up for what I think is a bad ass finished piece. The end product is very tight to the fiberglass and in the corners that have a tendancy to lift, and will of course fit all the factory handles and what knots. My fiance used to like the "Speaker" panels better but now she thinks the factory panel "looks more stealth" I kind of agree with her, But! I gotta have my soundz.
So... after many conversations and lots of trial and error I figure a fair price would be $450 for either covered panel and $85 for the covered handles with door cups and window switch plates. That price is subject to change as I will also be advertising on EBAY but for all the members here I'll keep it at the $450 price.
I also would need you to send me your upper door metal pieces with your purchase so that I can continue to sale complete units.
As far as colors go, its kinda limited; the inlay color is available in black, brown, tan, saddle and red. The Perimeter color is limited to black and merlot. If youve got your own fabric I can probably work with that as well.
Pics!! whatcha think?!?!?
I like the way you covered the panels without the speaker pods because the outside border looks great... If you had a version with the speaker pods done like that instead of the way ya did the one with the speaker pod I'd be in... Lemme know!
-
I'd like to get a set of the door handles in fiberglass... if you have them I'm paypal ready!
-
-
I claim a set - please email me with the total including shipping to zip code 33547
Regards Ken
-
I'm in!!
As you can see I was the 2nd or 3rd one to commit way back in August...
I hope I'm one of the next ones to get my panels so my daughters can have them under the Christmas tree for me...
Don't let me down!
-
Olkie Dokie folkies,
Here is how I attach the panels to the upper panel, sure, theyre are probably a million other ways to do it so think of this as just one example of many.
1st pic:This of course is simply the factory panel with the vinyl pulled back, Note: I did not remove the material from the door upper panel, its still in tact. This of course would only be the case if your vinyl is in good shape and you intend to re-use it. Also Please note the alingment of the door upper and the door card (the corners meet pretty flush... this is important as it is the main point of alingment when installing the panel)
2nd pic: Remove the factory panel, it pops off/away from the rivets pretty easily.
No pic shown: Remove the factory rivets from the upper panel.
3rd and 4th Pic: align the rear edge of the new panel to the factory upper metal panel and clamp it into place. (Note: Im using the carbon panels that the painter messed up but the install is of course the same for both applications)
5th and 6th pic: Now flip the panel over to show the oblong holes your going to be drilling through into the panel. Note: your drill bit should not scare or other wise widen the existing hole in the upper panel but should create a clean hole through the new panel.
7th Pic: now drill out the holes and find the corresponding rivet size to snuggly fit the new holes, washers help securing the panel but arent necessary. (Note: for demonstration purposes I used long rivets but shorter ones are required)
8th and 9th Pic: the panel is now securely attached to the door upper
10th Pic: Now just simply glue the panel down, tuck and secure the edges and your done. (Note: I didnt go over the fact that you still have to drill out the provisions for the new pins) Also, you can use staples to attach the new or existing vinyl to the new fiberglass panel
I'll go over drilling out for the new pins tommorrow, I knew it was something I forgot!!!
Your done! go drive it like you stole it.
My kids would like give these door panels to Daddy (me) as their Christmas present to me... In order to make that happen I'd need to get my set shortly... Is that a possibility? I'm ready to make payment and could pay extra for shipping to insure they make it on time
-
Ready to make full payment plus shipping when ready.
Me too - Also waiting to hear if you received my deposit
-
FREAKIN FINALLY!!!!!!
I hate Bondo! its not so bad on a flat surface but geez sanding a deep pocket = pain in the (fill in the blank) .... you get it!
So the plugs are all but done, another coat of primer a few small holes to fill and a final sanding and they're off to the painter (a different painter) for clear and bada bing bada boom ... molds sometime next week! bout time right? and no one could be happier but me. Now I can get back to my 510
Here are a few pics of the passenger door plug...looks pretty darn good.
Looks great! Can't wait to get mine! I never received a confirmation when I send my paypal payment (could be my problem since I opened a different checking account that it's linked to) - Please let me know if you received it
Any odea on time frames for when they'll be ready to ship?
-
Nice write up! I did this upgrade several months ago and have one minor note to add. On the brake booster, the 280z had 2 different boosters for the coupe and 2+2. My 75 280z had the original booster. I upgraded to the 10 inch 2+2 version. In addition I'm using the Wilwood 7/8 clutch master which is smaller than the Tilton which some folks are using. Everything fits great!
-
I'd personally like to modernize the entire interior. All interior plastic panels modified to give the car a modern "factory" look... Console, door panels (already in progress), rear plastic side panels with speaker pods... Ect ect ect
-
My next project is to section some BMW stock fender flares (metal) into the fronts and rears. I have been wanting to do it for years. Not as radical as StealthZ but another creation that should "look factory" when complete.
-
I'm ready for my panels!
-
Nice job! We've received some different info from Wilwood on the rear portion of the MC having to remove the pressure valve. I will try to re-verify...
In the fittings for the brakes lines - Great to hear the stock lines can be used by swapping the fittings from the old MC - I didn't have one to use to try that so I just made the lines which worked as well...
I have 2,500 miles on this setup now and I'm very happy - I did not remove the rear pressue valve and it seems to work fine... more to follow
-
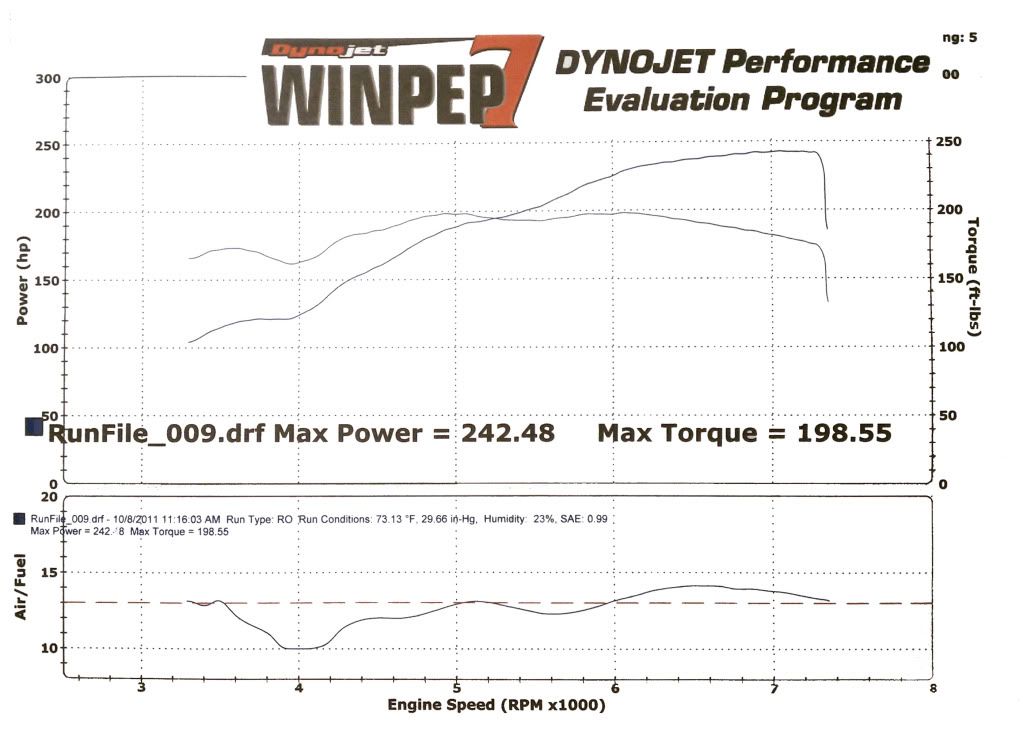
Been chasing head gasket sealing issues. Finally think we have them resolved with a MLS gasket.
Made 223HP on DynoJet with leaking head gasket. Now that it appears that the gasket leak is fixed, here is the latest dyno plot:

I figure it's making close to 300HP at the crank.
Doing a track event in a couple weeks. I'll post the results.
Pete
SWEET!
-
Okie dokei folks,... finally started the second mold for the "Speaker Door Panels" got the pod bonded into place. I'll let it cook over night and start foaming and sanding a basic shape tommorrow and with any luck I should have a viable mold sometime next week..?
More to come next week!!!
Looking good - for my set the speaker pods and the door latch holes are all I need - I can customize mine as needed from there... Nice work! Looking forward to getting my set!!!
-
Hey guys
We've been trying to login with my fathers ID which is either nek3431 or DatsunKen
Hit the signin link, enter the username and password hit enter and it brings you to a blank white page... after we tried to login again we got locked out for 15 minutes - there's no way to work around it... just keeps doing it...
Here's the url of the blank white page:
http://forums.hybridz.org/index.php?app=core&module=global§ion=login&do=process
-
Hey Chaz - Go out and take some nice pics this weekend and post them up - some night shots as well...
Also, the color on the car is 370Z Magnetic Black - It has a very interesting flake in it that gives the lines some extra accent in the sun... I hope you guys get to see the car in person someday. I know the guys in the NJZCC and the NY clubs are bugging him to bring the car to some local meets before the northern weather turns...
-
Chaz
You're going to need to post a lot more pics now
-
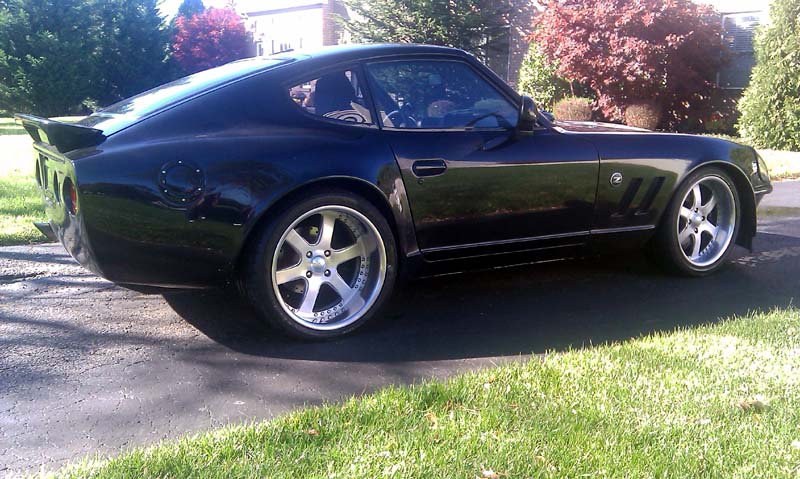
Now thats what I'm talking about, very nice indeed. I see you keed about it being stealth, as that looks menacing
. More description and info on the body work and wheels size and make please.The body work has SOOO many small details... Notice the fuel filler door, the shaved gutters and emblems, hand made airdam, custom blinker cones just to name a few... start looking you'll start to see a bunch of things. I like the fact that if they're not apparent and hard to pick out then it usually is an indication that they were executed well. The rear fenders are the 280YZ's with fender lips to match the front, Subtle Z front fenders and everything else was hand made one off kinda stuff... The doglegs are custom to blend back into the body etc etc etc - haven't even mentioned the rear yet.
Those are Boze 18 inch custom wheels.
Look around it's all "Stealth" <grin>
-
-
Hey all,
I thought I'd share some pics of StealthZ. My Dad and I did all the custom Body Work... see if you can pick out all the custom "touches" that are subtly done to almost every panel on the car -
Have fun - enjoy - Sorry the pictures aren't the greatest - professional photo shoot coming soon... Rags and Clive installed the LSX driveline... Car is located in Toms River NJ Owner Is a member here - Chas - pipe in if you'd like
 . More description and info on the body work and wheels size and make please.


1973 240Z V8 for sale
in Cars for Sale
Posted
i like it