
ECUAdam
-
Posts
38 -
Joined
-
Last visited
Content Type
Profiles
Forums
Blogs
Events
Gallery
Downloads
Store
Everything posted by ECUAdam
-

1973 240z 5.3 / ls1 microsquirt build
ECUAdam replied to ECUAdam's topic in Gen III & IV Chevy V8Z Tech Board
Install. Fabrication. Test. Paint. In that order, and that order only. This is the first step of many to follow. I plan on getting this thing driving good and then taking it to some track days, shaking it down, and enjoying it all summer long. This winter I will install new floor pans, frame rails, and powdercoat my suspension. After all that is done I will get it painted. I will put the car on a rotisserie when I perform all that work so the motor will be pulled again anyway. This car is on the 20 year plan, or atleast it feels like it. Paint is the last thing this car will see. -
1973 240z 5.3 / ls1 microsquirt build
ECUAdam replied to ECUAdam's topic in Gen III & IV Chevy V8Z Tech Board
I wish, I hunted for about a year. I finally found one on craigslist that was a 5 hour drive from my house (each way). They are going for crazy money now... The T-56 is always the missing piece to all these swaps and the sellers know it. -
1973 240z 5.3 / ls1 microsquirt build
ECUAdam replied to ECUAdam's topic in Gen III & IV Chevy V8Z Tech Board
Thanks for all the positive replys. The gas tank fill has a gasket and should not leak under acceleration. I'm hoping to get back to the shop this week and maybe hear it run... All I lack is time and money. -
1973 240z 5.3 / ls1 microsquirt build
ECUAdam replied to ECUAdam's topic in Gen III & IV Chevy V8Z Tech Board
Out with the old... In with the new... I wanted to run dual exhaust out the back, and there is no good way to do it with the stock tank. I decided to cut out my spare tire well and make a custom fuel cell. It is made from 3/16 aluminum. Here is the first weld of about 2000 to come... We slowly worked and beat the metal around a tire. It takes a lot more force to bend this sheet than I thought. We finally got it into a circle and welded it together One of 200 test fits...lol More welds... It took a solid hour non stop to weld the bottom of this thing. Weld a little bit, turn it, clamp, repeat. We got the top cut out and started mocking everything up Sump made and welded on, I went with -8 fuel line just in case I decide turbo this in the future I got the hole drilled and tapped for the autometer sending unit, fuel return welded on, welded the top to the bottom, and the filler neck attached. The filler neck will go to behind the license plate. I stole the idea from this guy http://www.revvolution.com/blog/2013/06/rick-s-masterpiece-ls3-swapped-1977-datsun-280z The license plate bracket was from a 1970 Camaro. I welded some tabs on the bottom of the tank so I could attach some clamps to the fuel line. We also had to do some welding on my radiator. I just bought an el-cheap-o from ebay. We had to weld a steam port onto the radiator for the motor to hook into. I also had to weld a slightly bigger neck on my top hose to get a better fit on the radiator hose. I used the hoses I found recommended here on hybrid z Part numbers 22478 and 22625. I also got the Lokar Universal cable and had to fabricate some brackets to make it work. All this little stuff takes so much time.... -
The car started off in this thread ( http://forums.hybridz.org/topic/105090-my-1973-240z-ka24de-t-conversion/ ), but has taken a different direction because the KA developed a rod knock. I have been collecting parts for about a year and a half. I am hoping to include a bunch of information on the stuff I figured out with the help of the hybrid z forum. I bought a truck motor first. I just picked up a pull from a local shop. I do not know anything about what vehicle that it came out of, but it is for sure a 5.3 because of how the pistons looked. The first thing I did was pull the heads and oil pan off the truck motor. As we all know, the truck oil pan would drag on the ground so I bought and f body oil pan, windage tray, and oil pickup. I then put a new oil pump, timing chain, and gears for good measure, No better time than the present, right? All buttoned up on the bottom. All cleaned up, ready for new gaskets I had been told that the LS head bolts were one time use, so I ordered some headstuds. I put f body 241 heads on the motor. I also put the car intake on the motor. The belt routing took some time to figure out. I used this thread ( http://forums.hybridz.org/index.php/topic/95229-cheap-low-mount-alternator-setup-for-truck-accessory-dr ) , other sources, and a little trial and error to figure it all out. I used an f body lower alternator bracket with 3/4 spacers behind the bracket (If you look in the photo below you can see the spacer). Also as mentioned on the thread I linked I had to drill and tap a hole for the second bolt to go into. I had to buy a pulley ( the same pulley that is on the tensioner) and space it out a little bit to mount onto the fbody alternator bracket. The crank pulley is from a truck. When I went to put the cars intake on I found out that the trucks water pump hit on the cars throttle body. I had to source an Fbody water pump, tensioner, and 3/4 of an inch spacers behind the water pump to line up with the belt. The clearance for the battery terminal on the alternator is very good going this route. So here is the list of the parts to use a truck motor in a 240z with a car intake and a low mount alternator: Truck crank pulley Fbody oil pan Fbody windage tray Fbody Oil pickup Fbody water pump Fbody tensioner Truck alternotor 55" x 13/16" belt extra pulley ( the same pulley that comes on the Fbody tensioner) 3/4 aluminum spacers for water pump. 3/4 inch spacers (2 of them) for the alternator 2 Allen head M10 x 1.5 bolts 140mm long After all that parts swapping and spacers, we get this... ( Dont worry I cleaned up the crank pulley) If your also wondering why the harness and sensors look weird, it is because I decided to control fuel and spark with microsquirt I went with the tried and true JCI kit.
-
As the title syates, I'm looking for a set of jtr headers. I prefer that they are not ceramic coated, but if the price is right ill buy them. I have to cut the flange off and weld a vband on the headers so the coating would be a waste. Pm me or reply to this thread if you have what I'm looking for. Thanks!
-
My 1973 240z KA24de-t conversion
ECUAdam replied to ECUAdam's topic in S30 Series - 240z, 260z, 280z
Yes that is as low as i could go with the Megan coilovers while still keeping preload on the springs. If you went with the emusa coilovers you could go lower in theory because they have a shorter body. With all that said, there is no way that i would go lower and still drive on the street. I have about 1.5 inches of clearence on my crossmember from the ground. Thank you for the compliments on the car! -
My 1973 240z KA24de-t conversion
ECUAdam replied to ECUAdam's topic in S30 Series - 240z, 260z, 280z
Yes I am able to turn the wheel with out rubbing, but I am running 15X9 -15 offset I have been really bad about updating the build thread. But fortunately I have been pretty good about working on it when I have a free moment. New job + getting married + selling/purchasing a new home + working on z = no Hybrid Z updates. Sorry. I did finally get it to a point where I can drive it on Thursday and I was pretty excited because I wanted to take it to the ZATTACK show this weekend. I had a good time at the meet. I saw a bunch of nice cars, got a ton of compliments from all different types of people, and got to meet several local z enthusiast that can help me source some of the hard to find parts I will need to complete my build. Enough typing, here are a few pics Xylemer shot in his driveway. Dont be too critical of the pictures, he shot them in about 2 minutes while trying to diagnose an idling issue on my rusty junk. Enjoy! Here is the spook spoiler that I am thinking about trying to get from Xylemer. He put it on a timer so we could hold it in place to see what it looked like. I am too fat to be laying on the ground.... -
Where exactly is the ground for the tail light harness?
-
I have a 1973 240z, and I have some funky stuff going on. When I turn the left turn signal on it seems to work fine. When I turn the right signal on I get a very dim blinking on every light on the right side taillight and even on the reverse lights (both sides)... Anyone have any idea on what is going on? I have looked and looked to no avail. Thanks in advance for any suggestions.
-
My 1973 240z KA24de-t conversion
ECUAdam replied to ECUAdam's topic in S30 Series - 240z, 260z, 280z
I didnt use a kit. I had my rear sleeves machined through a machine shop and used the megan sleeves from the 240sx coilovers. My rear sleeves are lighter and are not stepped on the inside like the other peoples (I am by no means knocking he other brand Just stating why I did what I did). With the sleeves done this way you could probably slam the rear frame on the ground. But on the front with the megan sleeves I have it as low as I can go in my pictures. But on the other hand If you use emusa brand coilovers, the actual strut is shorter so a lower ride height can be achieved. I am looking to get around 400, but really anything over 300 and I am going to be happy with it. I have been working on my car lately, got some more work done, still tons to go.... Here is the rear lower control arm. I have obviously already cut and cleaned it up for welding. Here are the sleeves that I had made. These are better IMO because I can thread the coilover all the way down, where as the other ones you can buy are stepped in the inside to prevent it from threading all the way down. This is my sleeve pushed on waiting to be welded. I left about a 1/4 inch all the way around the bottom so I could weld the strut tube better. This is the sleeve welded up for good. I forgot to take a picture for the cutout for the camber plate on the top, so I snapped one from below. I didnt want to lower/raise the car again.... Sorry Here are the tops of the rear after I welded and faded the into the body. It came out looking pretty good If I may say so myself. Thanks for looking! -
My 1973 240z KA24de-t conversion
ECUAdam replied to ECUAdam's topic in S30 Series - 240z, 260z, 280z
Ok a little more progress today.... First thing you do to put these coilovers on is sawzall straight through the lower strut. In this pic you can see the sleeve that was stuck (after it has been cleaned and loosened). The sleeves I am using in the front of the car are actually the megan ones that come with the 240sx coilover kit, but I cut all the brackets off because they are not needed. Here is me holding the sleeve ready to be beat on using a big hammer and a wood block (so I dont damage the threads on top). I went ahead and beveled the top of the cutoff strut and also beveled the bottom of the sleeve to help assist it to go on straight. This is the top of the strut tower where I cut the hole so my coilover will clear and be able to slide so I can adjust the camber. You can see where some of it is cut through and some of it was just scored. I found the best method to cut the rounded sections was to score it the best I could with the cutoff wheel, then use a body saw to finish it. This method actually worked very good. Here is the front after I got everything welded up. Now I just have to finish the rear..... I also almost finished running the fuel supply line and am getting close on the wiring to at least hear it run. I just want to get all the work that I need a lift for done so I do not have to drive 20 minutes every time I want to work on it. To be honest I am a little overwhelmed at how much has to be done to this car to get it where I want it.... one day. -
ATTN: 15x9 Shakotan Owners
ECUAdam replied to Soup's topic in Brakes, Wheels, Suspension and Chassis
I was just going to run the 240sx calipers on the rear, If I am not mistaken they should clear (If I am wrong please tell me so I dont waste money). I am not at that point of my build yet, I just want to see it make smoke and move under it own power first. Then I'll worry about stopping. I just started my build thread in the s30 section. -
I have had a love affair with the S30 chassis for a long time and found a decent chassis with minimal rust. I had been talking about buying one for so long that when the opportunity to purchase the car arose, my future wife didnt even give me **** for buying it. I knew from the beginning that I wanted it to be powered by a Ka24de with some boost, and I wanted to set it up for some track days. Enough about my love affair, here are some pics of my limited progress.... First thing first I wanted to make the engine run in the floor of my garage. I figured if I could wire it up to run in the floor, then I could definitely make it run in the new car. It was surprisingly easy to wire and make run. This is the car before I started to take things out. The PO had taken out almost everything off this car, Everything.... After a long day of cutting, tacking, cussing, and welding with my 8 dollars of scrap steel from clark iron and metal I got the engine about where I wanted. BIG THANKS TO MIKE AT TRACK ONE FOR THE HOOKUP ON THE KA FOR CHEAP!!!!!!!! (After I sold the automatic trans that came with the engine I have a whopping $50 in my driveline) I thought I had cleared the crossmember so my oil pan was not the lowest thing, but I then realized the corssmember was not fully bolted up......FAIL I gave up for the day and tried again the next weekend with better results Round 2.... I am going to run Megan S13 coilovers on this car using some ingenuity and help from Xylmer. With his help we came up with a better design for the adapters that is about 1/3 of the weight of the zcc ones. I am by no means knocking his product just wanted to try my own thing. I got in a hurry and did not take photos of the install, but I will when I do the driver side. I went ahead and did the mod to delete power steering and run the water pump and alternator off one belt. This is achieved by using a single cam KA alternator brackets, and running a different size belt. You also have to run the single cam KA thermostat housing to clear the now moved alternator brackets. Hopefully Ill get some time this weekend to finish some wiring and finish the drivers side suspension. I cant wait until this thing will move under its own power. I already have antique tags for it lolz!
-
ATTN: 15x9 Shakotan Owners
ECUAdam replied to Soup's topic in Brakes, Wheels, Suspension and Chassis
They are hyper black and I do plan on running flares. In order to get the look and fitment I am wanting I am going to have to run spacers. When I get to that point of the build I will post pictures and the spacers I ended up using. -
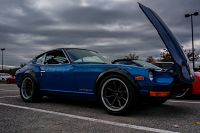
ATTN: 15x9 Shakotan Owners
ECUAdam replied to Soup's topic in Brakes, Wheels, Suspension and Chassis
Here are my 15X9 -15 Aleica's with a 195 45 I cant wait to finish my 240sx coilover installment and test fit them....