
Blown77Z
-
Posts
405 -
Joined
-
Last visited
Content Type
Profiles
Forums
Blogs
Events
Gallery
Downloads
Store
Posts posted by Blown77Z
-
-
I bought Moog ball joints for my 77 280z. They've been working great so far.
-
Is there any way you could sit in the seat (to press it down) and then measure what the distance is from the seat to the roof of the car is?
Some people, despite being similar height, may not have as much head room as you if they have a longer torso.
Seats look great btw!
Thanks ! I think they look great too !
Here's a picture of me sitting in the seat. I did measure the actual seat with me sitting in it, there was no change in seat/roof measurement.

Final install
-
NOW for the measuring write up for you guys
ALL of the following pictures are from the drivers side mount. I assumed the mount was equal on the passenger side too.....I'm 5'11 and they fit me GOOD
Rear mounting bracket
Front mounting bracket
Measured from the rear bracket to the front bracket, outer edge to outer edge
Length of the front bracket
Length of the rear bracket
Height of the rear bracket
Headroom measurement
-
I've been looking for quite some time now for some nice seats to replace the 30+ year old ragged out seats in my 77 280z. Well, now I have some !
I picked these up from misterZ on the board yesterday. Cool guy to talk to with some nice toys in the yard
These are 03? S2000 seats that were already modified to fit the 280z chassis, PERFECT find for me!
-
Thanks for the quick reply!
Sadly, I am combining two 1973 Zs into one - the recipient of the motor was a shell, so I never saw it run. The dashboard donor car has run in my recent past. I haven't changed anything from the stock harness other than the three wires identified in my first post.
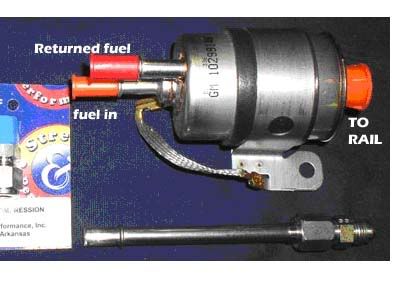
Yeah, last night i dropped the walbro, and confirmed that the flow arrow followed the fuel lines correctly. The filter's flow arrow is always visible, and I am using this picture as reference for the fpr, knowing that the return and inlet labels are switched.
Today I am going to start at the rail and move backwards to see where I can get fuel to pump back into a gas can.
Electrical system: Did you put a test meter on the wires BEFORE wiring it up? If not well............
Fuel system: Are your braided fuel lines brand new? If they aren't new, check them GOOD, I had a similar problem when I got my car back on the road. I had no fuel coming from the pump to the rail. Turns out it was my fuel line...it had ruptured on the top of the line, so it didn't leak any fuel (an obvious sign of a bad line) and was pulling in air from the ruptured portion making a gurgling sound thru the line when it tried to start
Are you using an adjustable FPR near the fuel rail?
-
There is a digital 240-280z in the new Disney Cars 2 movie
-
I'm straight north of you in Florence, AL, about 7 hours away from you. I have a buddy in Pensacola who I visit a few times a year. If I ever get my LS2/T56 done, we will have to link up. Last year with my L24 and CLSD, I was having trouble with wheel spin before I went to drag radials and that pretty well took care of it. I was finally letting clutch out fast from up to 6,000rpm and had no wheel spin when tires were hot, still spun if they were cool. We have 4 really friendly local to pick from. You'd be welcome to try out my drag radials on a hand full of passes.
That would be AWESOME! Definately let me know the next time you come down to Pensacola
Congrats! I see some 7's in your near future. What is the mod list on the LS1?
My LS1 is bone stock w/ the exception of the Sanderson headers and a cold air induction kit. I'm also running a single 2.5 exhaust out the back of the car. I'm looking at adding an e-cutout and underdrive pulley soon to free up some HP. My goal on street tires is a 7.99, so I'm VERY close to it
-
What was your wheel spin like? Were you hooking up or just spinning like crazy?
A little wheelspin from 1st-2nd shift, nothing really bad. And a little wheelspin off the line around 2.3-2.4k rps launch. The car bogged a tad off the line at 2k even, so finding the "sweet" spot is a pain... I did launch it higher, closer to 3k, on an earlier run and spun the tires ALL the way to redline LOL and ran a 8.3x
-
I posted a NEW best time last night @ the Emerald Coast Dragway 1/8th mile. I ran a new best of 8.02 @ 92 on 245/45/16 Toyo tires set to 25 psi
I JUST got the car back on the road after 2+ years of paint and body work. I wasn't planning on running anything spectacular since I'm rusty on the track, guess that wasn't the case.....
Was mainly focused on getting the right RPM launch settings figured out with the T56 setup. Was dumping the clutch around 2-2.3k RPMs getting 1.97 60fts. I've cut 1.85 60s before, so I need to work on those too. I also ran a 8.08, 8.05 and then the 8.02, pretty consistent I say ! Needless to say I was STOKED at last night's runs
-
Wow man, that looks like a lot of work. I keep thinking maybe I could do this kind of job myself too, but then I see an experience like you just went through and I start thinking that a professional might do a better job. I mean there's a reason it's so expensive to have it done right. You went through 19 Months of heck to get a decent finish. If I put away 100 bucks a month for 19 months I could get a decent finish as well, and not have to do the work.
I applaud you though, it's always good to see a project finish.
We'll see where I am when I get to the body/painting portion of my cars.
How much did the total job end up costing you?
Phar
A LOT of work is an understatement
The bulk of the cost included the air compressor, paint, and paint guns was around 900-1,000, plus an additional 100-200 in various sanding pads, body filler, etc... and at LEAST 100+ hours of work over the past 19 months or so. I wanted the experience of doing it myself, but I will NEVER do this again LOL. There's no question about it, a professional WILL do a better job That's why it costs so much, they deserve it. -
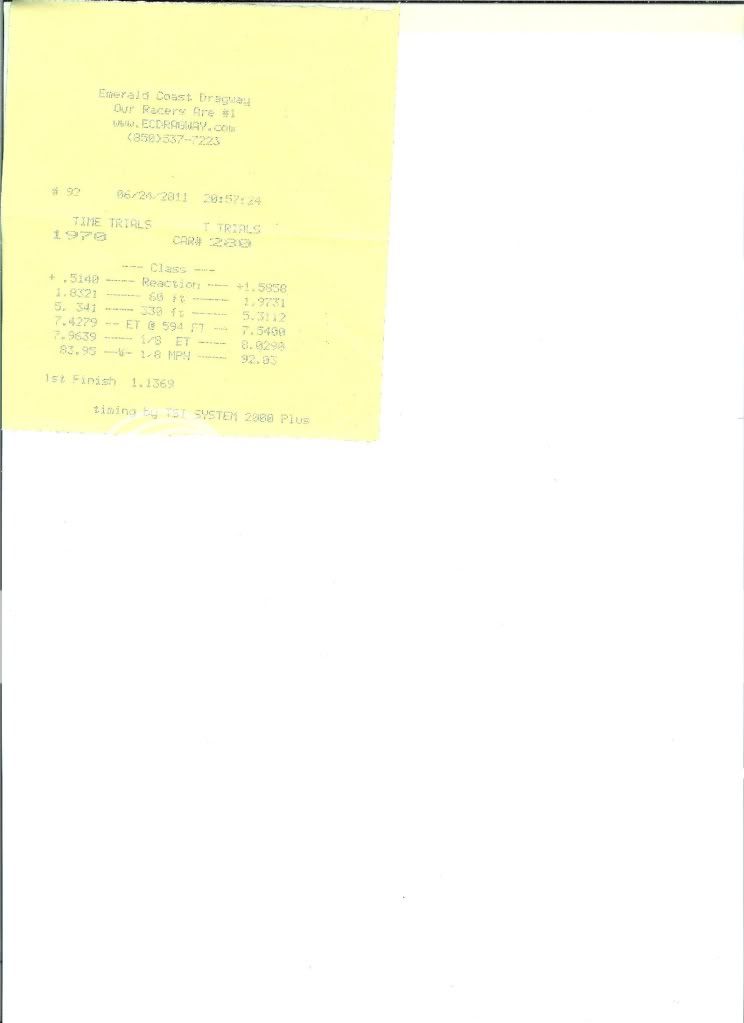
Base coat / Clear coat DONE.
Finished the car, took ALOT longer than I expected (19 months total). I still need to polish out the clearcoat. Has a little orangepeel in it, but I knew it wasn't going to be perfect. It looks 100% better outside in the sunlight than it does under garage lighting. Will I do this much body work / complete paint job again.......NOPE
NOW to get it put back together, mount the front bumper, install front/rear glass, change oil, replace fuel then MAYBE I can drive the car again! What a HELL of a journey this has been LOL.
-
More pictures of 3.0 work. It's NOT 100% perfect, however, it's 100% OK by me. I didn't expect it to come out looking like a professional did it
I just want this thing back on the road. -
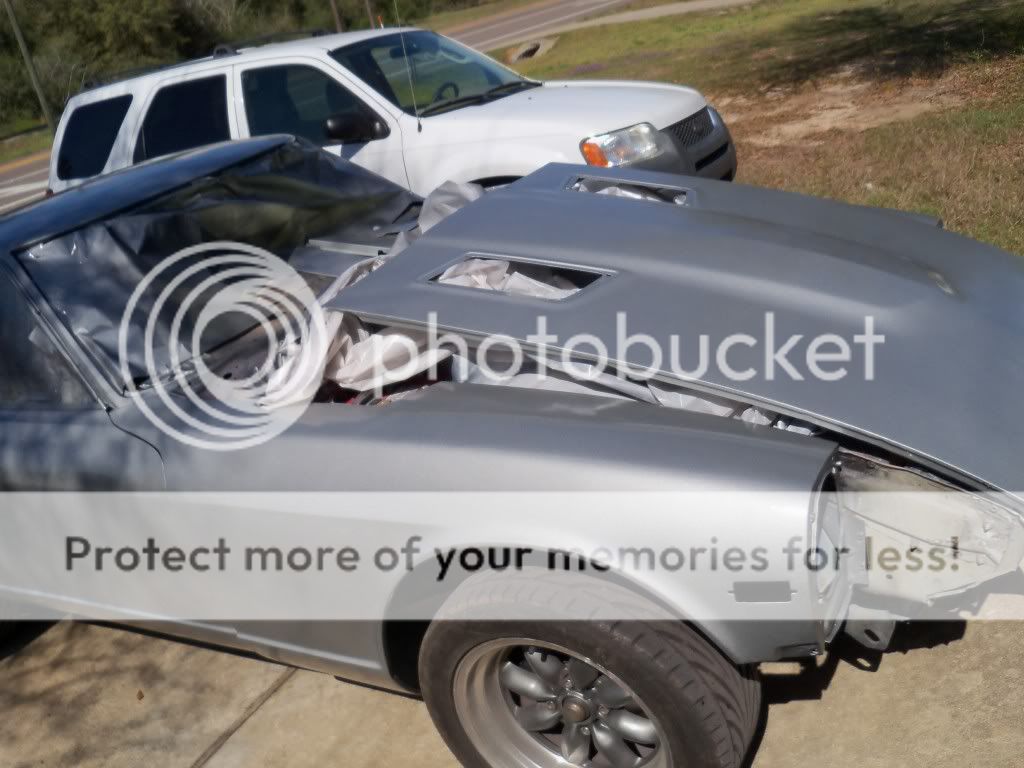
Body work / primer 3.0 COMPLETE.
Sprayed the primer on this afternoon. I've worked on this car off and on for the past 3-4 months (again). I had to add to some of the body work to make it right this time.
First coat of primer:
Third coat:
First coat:
Third coat:
-
It's not used. I made a support for the bottom of the airdam out of a sheet of aluminum that fit inside the lower lip of the airdam (attached with RTV) and attached to the bottom of the radiator core support. Without something down there the whole bumper/airdam just hangs from the bottom of the sugar scoops.
This is what I don't like about that bumper... I'll be doing something very similar to mine when I get around to it.
-
Replace your bushing in your transverse link too.
-
Hoping to get some help on a throttle body change. I have a magnuson blower on a Lq4 motor with a 75mm D.B.W. throttle body . I'm considering going to a ls7 90mm but concerned about any electronic issues. I know that it would require a pigtail change,3 to 4 hole adaptor and tuning changes but not sure about any other electonic issues. Also I may try to adapt an LS7 mass air sencor if possible. I'd appreciate any information. Dan
Could you post pictures of your engine setup !!! This is going into a S30 chassis right?
-
You can run anything you want at PSCA.
BOTI and IDRC wont allow Chevy V8's in class racing but I race in their brackets where anything goes.
Well, your car IS an OUTLAW!
-
Have any of you installed an LS engine with a new, clean, stock radiator? Has anyone tried this, and suffered from overheating before going to an aluminum unit? Has anyone retained the stock fuel lines-are they truly inadequate? Has anyone retained the stock fuel tank and just added an aftermarket high-pressure fuel pump, filter and regulator? If so, was the stock wiring to the fuel pump ok? What is my best option for a "stand-alone" engine wiring harness and ECU? Have any of you actually broken your R180 before switching to an R200? Specific experiences from builders/racers only please.
I had my stock 280z tank boiled/recoated for me. It works great.... however, I had to add inlet/outlet fuel fittings for my aftermarket fuel lines. I do believe the 280z gas tank was the only one that came with internal baffles... I'm also using a high flow external inline fuel pump bought from JCI and an Aeromotive filter and FP regulator. The stock wiring was fine on my car for the fuel pump.
You can have the STOCK ECU flashed for cheap. VATS, secondary O2 sensors, EGR, AIR is what most people have removed from the programming. This is what I did for my swap.
-
Cable knows his **** for sure ! All of the previous responses hit on the MAJOR portions of the swap. Just follow most of the build threads to get an idea of what other people did. That's what I did when I built mine. Another thing you will have to think about is the rear end. The stock 240 R180 rear end with the stock axles = eventual failure behind the LSX...
-
ARE YOU USING THIS SPRAY GUN TO SPRAY PRIMER TOO???
if you are.... that gun needs meticulous cleaning after using primer in it.
if you're only using it for the basecoat and NOT the primer....
that crap that came out of your spray gun looks like you did not strain the paint when you poured it into
the paint cup OR you didn't clean up your gun good enough when you used it the time before.
whatever you do DON'T just 1200 grit sand the bumps and clear. been there done that and it messes up the metallics. you need a light respray of metallics.
what i'de do is 600 wetsand it smooth and apply a light coat of basecoat to get the metallics uniform, then clear coat it. if you clear over that crap there is no way you can buff or colorsand that so its smooth.
it will be encapsulated in the clear. you dont have to sand the whole panel. just 600 the crap in the paint.
your paint will stick to the unsanded paint because its still fresh and will melt into your previous spray.
holy crap... people are still using red lacquer spot putty. wow thats old school.
don't apply that stuff too thick, it takes forever to dry and shinks big-time.
i applaud your energy level on this project. you must be YOUNG with lots of energy.
If you're an old guy like me then i'de like to know what vitamins you're taking.
I'm using different guns for the base and primer
The paint was strained into the spray gun canister and the gun was cleaned prior to spraying !! Still leaning towards application error (to far away). I'm going to find out next time I spray for sure ! I'm going to put a light coat over the "fixed" areas like you mentioned, not just clear coat it....it looks horrible atm lol.
-
 When I did my door (first body work/paint I ever did) I was amazed at how much my nasty paint surface could be rectified with wet sanding.  I had serious orange peel (rattle can) which was easily knocked down with 1000 wet and block.  It polished up quickly with the buffer and compound, and looked totally glossy and smooth.  After that door, I had had enough.  I can't imagine how tired you must be from all that work.  Looking good though.Â
Yeah, it's tiring to say the least! I've been working on the body off and on for the past 4 months or so, maybe longer I don't recall anymore lol. I'm almost to the point where I say the hell with it and leave it as it sits
I have a new found respect for the body/paint PROS out there that do this daily! Now I know why professional work costs so much for a GOOD product !
-
Doing body and paint work for the first time can be challenging. Trying to get the correct answers to problems confusing.
Your base coat issues appear to be related to mixing and application of the materials. To help several questions need to be answered .
What type of spray gun andwhat size compressor are you using ?
What paint brand are you using and are you using all their recommended products ?
Are you measuring out your base and stabilizer/reducer or bartending it ?
Please review this link it should get you answers that will be helpful. It doesn't matter what brand your using the problems result from the same issues
http://pc.dupont.com/dpc/en/US/html/visitor/s/trouble/PDSG_Home.html
I would recommend a little more practice with your base before attempting to spray the panels again. Paint and clear isnt cheap . Also, you really should spray the entire car at one time ,especially with silver, for best color uniformity.
Your best bet for success will be to check with your paint vendor and see if the base can be recoated. Some manufacturers basecoats may lift if not recoated within specific time windows. Better to be safe than have a bigger problem.
Good Luck
Good advice
I'm leaning more towards material application since this is my first paint job.
I'm using the tcpglobal HVLP spray gun kit. Base coat tip size is 1.4 on my gun. My compressor size is more than enough
CH 3.2hp 60g compressor. Air pressure is set to 29psi at the inlet (10psi at tip).My materials are Limco paint and transtar primers. ALL materials are compatible and bought from same supplier. All materials; base coat, hardener, reducer are measured with proper equipment
My paint supplier told me I can recoat the base with no problem after I wetsand it. -
Did you spray a guidecoat and then block sand the car before laying down the final color?
It just seems like a number of low spots and body filler transitions are showing up in the highlights from the camera flash.
I'm in the process of fixing the low spots/body work areas again. I could see them clear as day once the color was sprayed
Yes, block sanding is a must for me and anyone doing bodywork however, I know the final product will NOT be perfect or show car quality. I've already accepted that I will have some areas that aren't perfect, but to me it will be a great success and learning experience for sure !!! -
I just called my paint supplier / painter and he told me I can use 600+ and wet sand them down until they are gone and then check to see if I have to re-apply the base or not.
I just rolled the car into the sunlight to see how the paint looks outside and wow it looks good IMO !


T56 expert help needed
in Gen I & II Chevy V8 Tech Board
Posted · Edited by Blown77Z
What RPM is the engine at in 5th gear @ 35 mph? My LS1+T56 has a terrible bog in 6th gear if the RPM is @ 1.5k or lower.
Have you checked for any squeals while the tranny is in neutral? Try running the RPMs up and down while in neutral.