
gacksen
-
Posts
61 -
Joined
-
Last visited
Content Type
Profiles
Forums
Blogs
Events
Gallery
Downloads
Store
Posts posted by gacksen
-
-
Hello,
have lost a lash pad at high rpm on the autobahn yesterday. Luckily pad was laying next to the valve.
Looks like the retainer of cyl. 2 exhaust is toast and i will need to replace it. Bought the car several years
ago but do not have any specific infos on the motor except as L31 and reworked E88 head. No info
on cam and springs. Has E30 marks on it but already got mentioned looks like a regrind.
As i did not work on that motor before i have read that geometry and wipe pattern is important
for the rocker am. of course also valve lash. in regards of the valve lash i do not have any infos
about the values it should be set as don´t know what cam or regrind it is. Also unsure how many valve jobs
the head actually had in its lifetime.
Have understand that first you set the wipe pattern and then adjust the valve lash. If the wipe pattern
can´t be adjustet right you need either thicker or thinner pads to get that done.
Did measure the the OD of the valve springs and it is roughly 1,37" 35mm. Looks like reinforced springs with
bigger diameter or is this the original size ?
Had a search in google to find out more about valve retainers with higher walls to accomodate thicker pads
that they have more stability but only could find some nissan motorsport items that are no more longer
available.
Anybody of you guys know where to buy such valve retainers or how to solve the problem with the
geometry of the setup ?
Any help highly appreciated :)

-
Hi Gents,
anybody of you running ITB´s in the Z ? Have ditched the triple weber 45´s and setup up the jenveys with an aftermarket ECU and wideband lambda.
My question is at what AFR are you aiming at idle / part throttle and WOT ? not sure at what the engine likes so far.
Have tuned some honda K20´s with the wideband and had them until 50% throttle at 14.7 and then slowly to 13.0 at full WOT.
Maybe somebdy can shed some light ?

-
the alcantara dash looks yummy !
-
depends on what you want to have. there are people that like it stock. others like it slightly modded and the other guys go down the full route.
if would like to have a fully modded Z would get that kit and put a big engine in it. if it won´t deliver as it looks would be senseless.
remembers me a little of that built :
https://www.youtube.com/watch?v=DfaC0YIU26k&index=1&list=PLVCFddyDNwsbdZFZhmBEVrD0T_rAiJLXM
-
So madkaw/RebekahZ: regarding the cost of widening...ironically enough, with these wheels, it was more than the wheel itself. It was $215/each.
Blu: RebekahZ reminded me of something important to note before you make any decisions.
When I originally got the 17x8.5 +4, it was based on research I had done on here and in speaking to members on this board who had Rotas that I felt had perfect fitment on non-flared S30's.
When I got the Rotas, for some reason they actually sat too far outside the wheel well. I came to the conclusion that it was due to the fact that all of the members on here that I had asked for their wheel size, likely had stock suspension whereas I have AZC LCAs and coil overs.
In any case, since the wheels had already been purchased, I had to go through a rather arduous process of getting them to fit underneath the wheel well...kind of a backward way of doing things unfortunately.
Because AZC LCAs are adjustable, I moved them inward as much as possible but it still wasn't enough, and I was limited by the length of the halfshafts which wouldn't allow me to move the arms any further inwards.
I ended up getting some custom shortened half shafts from Driveshaft shop, which allowed me to move the arms in farther as you can see here:
For those unfamiliar, the AZC LCA comes default at parallel to the ground, here you can see I rotated the arm's tube downward, which pulled the whole arm inward. Then I had to drill through it and insert a retaining bolt to prevent it from rotating back outward (which happened several times to disasterous effect throughout this whole process!).
I did a mini write up in the Drivetrain forum, I'll look for the link.
The whole process was such an ordeal, I guess I tried to block it from my mind! But nonetheless, it is important for anyone to know if they decide to try this.
Have the same ACZ LCA ..... only thing that worries me is that the tube on each side is only secured via clamping force. have thought about getting
a hole drilled on each to secure them with bolts once found the right setup.
-
One of my 1 3/4 full-race headers with a Zstory exhaust (std rear muffler) on the ex-Paul Ricard circuit :
https://www.youtube.com/watch?t=171&v=KSiGA_cBBS4
Thanks Samuel.
looks like the guys had some fun
thx for sending over the header. have received it in the meantime but could not put it in yet.
-
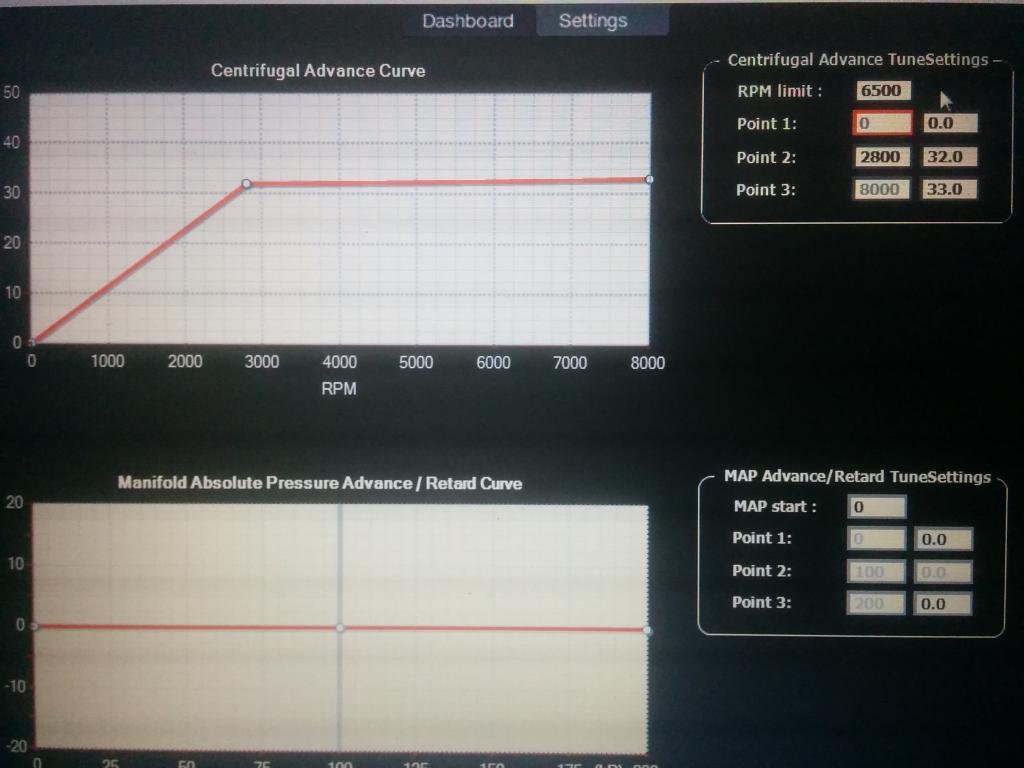
Your RON Calculations to North American Octane ( R=M/2 ) looks about right. So you have good quality gas available.
The simplistic curve you attached in the last post can be improved on a bit, but it's not bad. You don't need to Taper the final few degrees all the way to 8,000 RPM. Anything over about 3,700 to 4,000 RPM can be flat lined across the Axis.
Assuming an idle speed of 1,000 rpm, which is good for a 270- 280 degree cam. Try this for 98 RON fuel.
Note: This is a fairly sophisticated curve, taken from Tech Info from Haltech and 123. . The 200 RPM and 700 RPM set points are Optional and can be eliminated if not needed.... but it does help smooth things out.
RPM BTDC
Point 1: 200 10 ( Cranking RPM. Reduces load on starter )
Point 2: 700 15 ( Stabilizes idle and prevents stalling . Value = +2 over Idle Timing. )
Point 3: 1,000 13 ( Idle RPM )
Point 4: 1,200 14 ( Start of mechanical curve )
Point 5: 2,800 30
Point 6: 3,700 33
Point 7: 8,000 33
This will give you a very nice curve with good idle stability, a quick ramp up which is good for Torque and then the slow taper for the last few degrees to avoid detonation. 98 RON should handle this curve well.
Note the higher timing figure at 600 RPM. This is to prevent stalling upon quick stops. Especially helpful in Autocross or if Air Conditioning kicks in. On cars without an IAC valve, ( Non EFI ) this is a simple method to stabilize idle. Keep this RPM set point figure set to approx +2 timing degrees more than idle timing degrees.
After that you can take some Vacuum readings and let us know what they are and when they are stable.
I do not know if your Weber 152's have built in Vacuum ports. Some do have ports for attaching Manometers to each barrel and some don't. The manometer ports are used for balancing carbs, but they can be used as a Vacuum source for other purposes.
Edit: Important!! Always verify the programmed timing settings with a Timing light. How the distributor is " Physically " timed affects the total mechanical timing programmed in. ( 123's Website seems to have their Instruction links scattered all over the place ).
thanks a lot for your detailed explanation. makes perfect sense. will get that curve onto the dizzy once i have my front fenders back from the paintshop.
less parts on the car means more talking once the police pulls you over
-
thanks for all the support and detailed descriptions. bought the car used in CA last year and the engine builder passed away in the meantime.
what i do know from the mechanic of the seller is that the CR should be around 9.5 and cam should be around 270 - 280 of unconfirmed lift and duration.
he told me that he remembered total davnce should be 32 and as per their test not exceed 34.
as for the fuel in germany we have 98 RON octane available almost anywhere. if needed 102 octane is also available at some stations a little extra but normally i use the 98.
i remember there there had been some country differences :
( RON Octane Rating x 0.95 = AKI Octane Rating )
98 RON Octane x 0.95 = 93.1 AKI Octane (US measure)
102 RON Octane x 0.95 = 96 AKI Octane (US measure)the most simplified curve i could do would be the the curve in the attachment.
do i get something wrong or has the weber dcoe 152 an advance port ?
-
thanks Zed
will need to take the car on a dyno to get an AFR plot and try a revised curve.
in general would have thought about something like this ? after having read the postings.....
-
Hello,
just had a quick look at the curve the guys at the carb rebuilt shop put into my tune 123 dizzy.
as for the all the other cars i know the total advance should come in around 2500-3000rpm or am i wrong ?
3x 45 webers with vac disconnected.
have attached dyno sheet and dizzy print
-
after the new gearbox had been in i tried the following. adjusted the slave pushrod so that no slack had been on the fork. drove the car and crunch had been there in all the gears. more noticeable in 1/2/3 than 4/5.
next adjusted the pushrod on the slave with more force means the throwoutbearing pressing on the pressure plate with not engaged clutch. after having done this there was also crunch but not that bad as before.
this would bring me to the conclusion that the slave has not enough throw to fully disengange the clutch. next step is either to reduce the bore of the slave or increase the bore of the master or do both to increase
throw on the slave. is my math wrong in this point ?
the dizzy is the tune 123 with disconnected vac. this had been the tune that was one it after it had the triple weber 45 rebuilt and was on the dyno. have read a lot of threads and the consens seemd that the the all in
advance should come in between 2500 and 3200 rpm so i aksed myself why in this case they bring it in quite late at 4000.
-
will go also with the RKR but with smaller tyre sizes like 225 and 245
didnt do much those days due to regular work. put in more interior and hazzled around with the headliner. finally got it in but it felt as you need 10x hands to get it done properly. sides had been way more easy with the heat gun.
front windscreen is back in now. exchanged the gearbox to a fresh rebuilt one with perfect synchros and still not shifting properly. bled the clutch and it was not getting better. have taken a deeper look into this and it seems
a wrong master slave combo had been used on the car. currently in is the regular 240z master and the slave with the adjustable pushrod of the 240z. ordered the pathfinder one and a 3/4 master of a toyota and will switch rods to
make it fit. hopfully will have enough throw after that.
btw. one of you guys is familiar with the dizzy curves on a L28 ? just have taken a look at the 123 tune that had been on it and it looks like the all in advance is quite late ?
-
would be interessted in 3/4" primary pipe Full-race header. do you have a quote for s&h inside europe ?
-
thx for the pictures. i do get the point now in moving them upwards that they won´t sit as low.
had to much regular work the last weeks so could not motivate myself to get back working on the car.
got it back from the paintshop two weeks ago that got rid of some overpainted old rubber seals and
in the meantime fabbed up new TB for my rover v8
-
had the same problem with the maxima calipers on the rears and if on the car almost impossible to bleed.
remove them that the bleeder is pointing straight upwards and it will work.
-
took my trans out those days and managed to brake the cover plate as seen on the picture.
anybody one in the garage that is not needed ?
thx for help
-
fixed the greddy gauage problem. chinese crap
fault had been the greddy control unit. if each sensor get´s connectedwith one wire to the greddy loom and with the other one to ground no problem. inital wiring had been correct. normally
would need to replace the control unit but it seems an easy fix and i dont have to sent it back where i bought it overseas.
as for the flares tried it today with some tape and pushed them around. no problem to adjust them higher but getting away
of the hole behind the wheel is not possible without welding plates in to get the look with the rear wheel in the middle. if you put
metal in would bring me to antoehr paint job
need to put on the front fender first to have an impression with the raised rears. at a higher position the fender flare
is almost aligned perfectly with the regular lip but of course still the gap on the rear.
-
hm quite strange. thought i wire it the easy way via the fusebox but same issue. with just ignition on gauge works perfect and shows values straight away. with engine running gauge does not update values.
ign i took from the fuse box now green solid cable. continious mains from horn circut at the fuse box and minus direct from the batt.
if the wiring would be wrong the gauge shouldnt work at all with ignition on ?
-
just read the thread with the zg ones. youre right mine are way to low. have found a picture
of 240hokes car with the first attempt i guess.
if you compare front and rear height quite a difference. my wheels are not that
special with beeing 16x8 et0. will put some spacers under front rear to adjust ones
flares are fitted. will need to sort an issue with the wiring of the greddy gauage today.
didn´t think it could be that complicated to find +- and ign power. took + from the clock
power supply. put in a new line for - to the batt that the gauage will read fine and hooked
up the ign power to the solid yellow cable of the old water oil gauge. when ign is turned
on gauge reads perfect and updates values right away. once the engine is running
gauage sort of hangs up and just updates values every 30 or 50 seconds. suspect it has
something to do with the ign power of the old gauage. maybe some sort of voltage regulator
inbetween.
-
Nardi Classic (black leather + black stitching)
NRG Short Hub + NRG Quick Release 2.0
Haven't driven out of my driveway with it yet. But much easier to get in and out with my Sparco seat.
that looks like a nice combo
what sparco seats do you have ? -
Yeah, forward. Not a fan of when the back sits further back. Here's mine a few years back...
looking good
played around yesterday a bit with the position and if i want to close the rear gap with the fender flare my bolt positionwoulnt be any more on the flat metal part it would be almost on top of the fender lip edge.
-
don´t know the actual size but it fits perfectly. get the old gauge out use the outer ring. press in the greddy gauge in the inner ring use some
glue to fix it and job is done.
-
thx for the input. the front portion sits very good and snugs just over the edge. will try to bend the rear part more inwards and get new pictures. problem on the rear part had been the edge of the fender. will take a look at it the next days. bought the fenders from rhd japan and manufacturer is restored.jp your marugen look nice. perfect fit
just finished most of the wiring today
-
thx a lot this will help
had to get some new gauges in the dash.


Lost a lash pad at high rpm ! Need help
in Nissan L6 Forum
Posted
Hello,
i was having a look in google to find something out but even with the part number of the nismo retainer versions i could find no supplier of them.
My current valve spring OD is 1.37" or 35mm. Could the valve retainer be the regular stock one ?
Also have taken some pictures of the pad and rocker arm. Wipe pattern is way way off. Had the car checked over by a friend last year but seems
he did not set the lash correctly or check the wipe pattern. Maybe it´s good that it happend so ill read myself into this matter and will
try to make it as good as possible. I am no professional mechanic but i do not have to left hands and did plenty of work already on the car.


Also wondering if it is normal when the valve is closed that the rocker arm is not touching the lash pad ?