
4.8240z
-
Posts
64 -
Joined
-
Last visited
Content Type
Profiles
Forums
Blogs
Events
Gallery
Downloads
Store
Posts posted by 4.8240z
-
-
Thank you seattlejester
 . I feel it is also worth mentioning to anyone getting ready to attempt this that my car was on a home built chassis jig i fabled up prior to this when all these repairs were done. I am sure it could be done just as easily if the car was straight and level and well supported on jack stands, just keep flex, sag and twist in mind as you set up and work.
 -
I finally got my firewall/battery tray/frame rail repairs all done and i figured it may benefit someone down the road who is sitting where i was a month ago wondering how the heck to go about it. This is my first patch panel i have ever done besides the floor pan i did prior to this so any constructive criticism is welcomed. I patched the firewall before i even started the battery tray but did not photograph it at all next time i will take significantly more photos. My methods of patching the firewall were quite simple however. i cut out all the rust in one big piece, i then took that piece flattened it out. Then the sheet was placed on a sheet of 20ga sheet metal where i traced it out i then cut it out on the outside of my sharpie lines leaving me 1/8 or so to work with. From there i patiently trimmed down the top half portion of it till the piece fit in the opening. I found a piece of scrap pipe that matched the oem curve in the firewall simply made the bend with my hands then tacked it in. from there i trimmed the bottom half in place with a cutoff wheel and pneumatic reciprocating saw till it fit snugly and tacked it in. after that i tapped the bottom 1" around the front of the new floor pan using a dolly to caress it some used some zip screws to pull it all together and spot welded the flange then welded the rest of the patch panel up, don't forget to drill your floor pan for spot welds prior tot his step. If your doing this go VERY SLOWLY with the welding. I knew this and still ended up with a considerable amount of warpage i had to hammer and dolly out at a later date. Also if you are not going to be able to get to a area at a later date such as areas between flanges or inside frame rails spray it with some sort of weld through primer prior to welding it in.
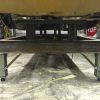
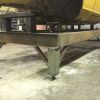
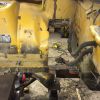
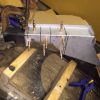
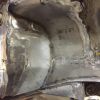
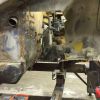
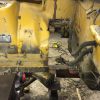
When all this was done i started cutting out the battery tray and the frame rail till there was no more pitting in the metals and i had some nice metal to weld too. Here is what i was left with.
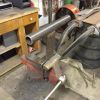
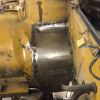
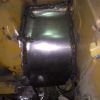
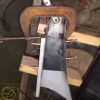
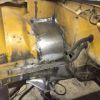
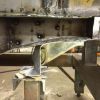
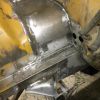
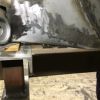
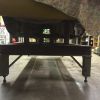
At this point i was a little nervous having never made a patch panel from scratch but i went for it anyways. Attempt one was on a buddy's slip roll and we got the main bend down good, but when we tried to english wheel in the top compound curves we oil canned it severely. if nothing else it was a good excuse to use a english wheel for the first time. Attempt two we made a cardboard template transferred to plywood routered it to a rounded 3/4" edge and used body hammers to shape it around the curve while cutting relief cuts in the corner where the curve meets to get it to all shape accordingly. For the big bend that tapers down to the frame rail on this one we continued to use the slip roll. This patch panel would have worked but was not as aesthetically appealing as i would have liked so i cut off the compound curves and started over.Here is the trick to my final success a home made T dolly made in 20 minutes out of some scrap flat stock and pipe all cleaned up with a wire wheel.I then used the template i had made by tracing the line i had cut at the topmost two compound curves of the battery tray. This may sound confusing but i simply took a square piece of cardboard pushed it up where a flat piece of sheet metal would have fit in the hole i cut out and traced the topmost part of the removed section. Once i had it traced i added 2 inches out from that line to compensate for the bend i was yet to make, then i made sure it all lined up somewhat with the bigger radius i had already made on the slip roll, added a little excess to that cut as well and trimmed it all out. After this i shaped it with a T dolly and hand dollys, while trimming consistently for quite some time. I did not replace the flange to the fire wall as i figured a consistent weld would suffice.Here is the panel tacked in place.Here is the panel welded in place.I trimmed a little more off of the frame rail from the picture above so that the seam of the sheet metal weld and the frame rail weld would be staggered in hopes of not causing a weak link. I then cut the replacement frame rail from Zedd Findings to the length of the section i had removed making sure that all my cuts were very square and straight. When i test fit the section it did not contact the tc rod box as much as the original rail did so i cut the bottom most section of the frame rail free from the side pushed it down around the tc rod box till it fit how i liked while the replacement piece was clamped in place and then tacked it with some small scraps of sheet metal to span the gap. Down the road i trimmed a piece of 16 ga to fit that opening after tracing it onto a cardboard template then to metal. I then welded it all in ensuring great penetration then smoothed it all out.After this i built a insert that extends back into the replacement section of the rail extending all the way past where i had to cut it to form around the tc rod box. Leaving 3" out the front to slip into the original rail in the car. I figured this would give me peace of mind about the but weld and the modifications i made to make it fit around the tc rod box. Here are some pictures to help make sense of this.After this i drilled a good amount of spot weld holes in the original frame rail where the insert would go and in the replacement section where the insert would go and did a test fit. I used a level along the length of the existing rail on top to keep that line nice and straight, and a string line along the side to line it all up while measuring off the driver side frame rail to double check. When it all fit nicely and i got all my welds and drilled holes cleaned up for a nice fit i welded it all together and heres what i got. All my welds may not be apparent in the picture because i would weld and smooth in somewhat of a pattern to allow cooling time.After this the backside of the frame rail was still open so i cut the bottom of my welded in battery tray replacement panel so the whole cut line was centered on the backside of the top flange of my frame rail replacement. I then made a template of the missing piece, cut it oversized, then trim fit repeat over and over again till it fit snug. Don't rush this you don't want to get the the end and be disappointed with the final product. Here is what i had when i was done.I did construct my own tc rod box as well from 16ga sheet metal but this post has already gotten far too long so maybe i will do another write up at a later date. I apologize for the lengthy wording and lack of pictures, i did not plan to turn this into a write up till i got more into hybridz halfway through the process, so i will be more prepared next time.
-
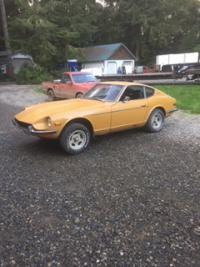
It's a dang shame that parts car is in such rough shape the body lines looked incredible. I'm sure when it was in its prime that car looked incredible.
-
Perfect thank you I will shoot you over a text here very shortly. That makes sense with the certification I guess doing a window mod myself would make it pointless to get a steel bell housing in the first place then. I do definitely see where the benefit of the window comes in though and I really do want one so I may have to go about it the same way you are. Anyways I will text you here shortly thanks again for all the help.
-
I have looked a decent amount into transmissions now and I have friends running a quite a few of these different setups and here's what we have found. Keep in mind however none of these men were driving there cars gently in any sense of the word. I have a one buddy running a world class t5 in a built sbc s10 on 295 Mickey thompsons and if he drives it regularly like he did last year he will blow about two used transmissions a year. This may be because he's running used transmissions but they seem to shift and be in good condition when he installs them. I have another buddy that has a fox body equipped with the oem t5 and his oem t5 lasted till over 100k getting beat the crap out of, the car does not produce a lot of Hp however it is all stock with bolt on's. Another one of my fox body buddies is at 491whp with a turbo and he could not get world class t5 to last more than a couple of events. He now uses a tko 600 he installed about a year and a half ago and has beat it up a lot since then and last I heard it is still shifting great. I have heard from a decent amount of people and know one personally that all say avoid buying just a used t56 alone, there is usually a reason there separated from the engine and being sold alone, the gentleman I know personally that got his from a gto had to replace second gear. However there are many people on here that have had great luck buying used ones so that is just one mans opinion take it with a grain of salt. As for the 4l60e I had one in my pre runner Silverado using a 4.8l with a whipple supercharger and I could not get one of those things to last me more than a year on 35" tires in a lightened up Silverado, because of how many times I had to swap them out after a full day of work then school I hate 4l60e's I do however wonder sometimes if the gentleman building my trannys was a idiot since I was young, dumb and went with the lowest bidder, who was building them in his basement in Tacoma so that's just something to think about. The 350z transmission doesn't seem like a bad option I had one in a vortech supercharged 350z with 391whp and it held up for the short time i drove it and I never heard any complaints from the buyer. I did however only drive it for about two weeks before It had issues I got ticked off made a rash decision and sold it so I can not truly vouch for that transmission. My only personal usage experience with a t56 was in my c5 z06 it had around 450-500whp and it held up great the year and a half I had it beating the crap out of it the whole time, launching on 315 drag radials constantly and running 11's after installing a tick adjustable master cylinder for smoother shifts it is my personal favorite for any tranny I have owned. After taking all this into consideration here is my consensus. If you want to go in a straight line, build over 1500hp or are willing to use paddle shifters a 4l80e is a great option, even oem they seem to handle some pretty crazy power. For me a manual in a road race car is a must so the two options I came down too were the jerico dog box or a t56 magnum. Both are very expensive yes but here is my way of looking at it, I don't want to build a car with a $2000 dollar weak link so every time I step on it I'm scared the trannys going to give and I end up being scared to drive the car how I built it to be drove. I personally will be purchasing a t56 magnum they are rated for 700ft lb of torque which I was told means they failed at 1400ft lb of torque when tremec tested them. In our little light cars that leads me to believe it shouldn't even be sweating at 700hp from a turbo 4.8l which is my goal.
-
That is fair, my only fear is of taking the faceplate off the transmission after paying 3k for it I don't particularly want to start disassembling it. Certification is not my greatest concern at this point although I'm sure it will become a concern eventually. I was buying a new t56 magnum anyways so no bell housing was included. But with a target horsepower of 700hp my concern was more on my clutch removing my ankles, ever since watching that video I was showed on ls1tech called death of a trans am I'm a bit spooked and that car had around 500hp when that happened. I wonder if you can make a window on the bell housing that has a bolt on cover to keep the bell housing in certification.
-
Just watched the YouTube video he does a really good job of explaining it. It actually doesn't seem to bad when in engine is out of the car. I'm still a little nervous to pull the faceplate off of the trans since it is the most expensive part I have ever purchased. But the video gave me some re assurance and I'm going to go for it. Would you mind positing up some more picture of this "window mod" you speak of I'm curious if it's something I can do myself.
-
Wow that seems like quite the complicated process. I just got my qt bellhousing last week and will order my t56 magnum next month. I assumed I would just bolt that bad boy on there and carry on but apparently it's not quite that simple. I will have to figure out how to find out if I need a shim with no oem bellhousing. Thank you for doing this write up though, it will save me a significant amount of research and time.
-
Are you concerned at all about taking to the shop when you are all done and having it tugged on and that messing up any of the work you have done this far. I had the same issue with my car and built it on a jig and straightened it there. I did not take measurements the same way you did though and am a little concerned it may need to go to a frame shop to get perfect later. I simply made sure the jig was perfectly level square straight then made sure the rockets were equal distances off the jig on either side. Then I leveled the engine bay frame rails front to back. Then any other suspension mounting location I leveled from side to side. This is just my first car restoration project I've done whatsoever so I'm trying to figure out the best way to do this.
-
Dang that is looking really good. I am getting ready to put the same kit on my car. How did you figure out how high up to cut your quarters and inner wheel wells without fitting the wheels first.
-
I'm getting ready to install a 280yz kit as well how much trimming was required to get the kit to sit flush with the body?
-
Perfect well that is good to know I definitely see a set of these being dabbed up in my future. Thanks to all of you who have blazed the trail on this one.
-
I have heard that you aren't supposed to weld chrome alloy with a mig welder from a friend of mine who works at art Morrison. However he is a very paranoid individual that enjoys finding things that may cause problems, he's a good friend of mine regardless but this the truth. With that being said has anyone that has put there chrome alloy mig welded control arms to use experienced any cracking or failure? Did you have to do any special heat treating? Or did you just weld it and you were good to go? That's what I'm really hoping for since I only have a mig welder.
-
Did your 3m wand work well to spray into the frame rails? I thought about using one but was afraid it wouldn't works well since I heard por 15 was a weird consistency. I have yet to work with por 15 so I apologize if this is inaccurate.
-
So it sounds to me like the best case scenario for oils pans is a ls2 or ls3 corvette pan. Is either one of these two better than the other? And do I need to get the pickup tube and windage tray from the same vehicle. I will be purchasing very soon so I can get started on the motor install
. -
Thanks for the heads up seattlejester I will make sure to drill a vent hole before I weld the rail closed. I have been using zinc weld through primer in any location of welding. The area I really wanted the por 15 is in the front section of the frame rail where I cannot reach with an aresol can. If I did this I would leave abou 4" from my welds with no por 15 in these areas I will be able to use a wire brush to prep and spray with weld through primer. Thank you for the product recommendations john c I will purchase those as soon as possible. Does anyone see problems with using por 15 in the sections of the frame rail where I will not be welding? There is already surface rust in there and I need something that will adhere directly to rust since I can't prep the inside of the rails, I also need a product that will treat the rust so the rails will not eventually rust through.
-
Perfect thank you for all the input guys, I finished my battery patch panel tonight I'll weld it in and fix the frame rail on Thursday. As for the por 15 idea my reasoning for using it was because it adheres directly to rust. I will not be able to prep the inside of the frame rails so I was not aware I had other options. Also I didn't think the por 15 would contaminate too much since it will be on the inside seam of the spot welds and butt welds. But I have never worked with it before and I definitely do not want my welds to get screwed up. I do have some weld through primer in a aresol can, but that will not work for shooting all the way down the rail. If you guys have any suggestions of products or application techniques I would love some ideas. This is my first rust repair project so I'm still a newbie.
-
Looks like you are doing some great quality work. I am in the same process now I just finished up my battery area patch panel tonight and will take on the frame rail repair next. It might not be a bad idea to coat the inside of your frame rails with por 15 or weld through primer while you have access through your patch holes.
-
I apologize for the upside down pictures. I uploaded them all tonight and am still trying to get them right side up.
-
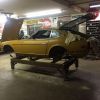
So now that i finally have my chassis level and where it needs to be i can begin my rust repairs. In the engine bay i have removed all of the deeply pitted metal from the battery tray and am left with this.
I have a new zeds findings engine bay frame rail in my possession already but i would really prefer to not have to re locate my sway bar and front crossmember mounting locations as well as my tc rod box since this section of the frame rail only had minor internal pitting. My idea is to por 15 the inside of what is left of the original frame rail. After it is treated and painted i would brake up a piece of 16g a sheet metal to the internal dimensions of the old frame rail and the new 6" back or so of either side of the location of the butt weld. I would then drill multiple holes at two different distances on either side of the seam which would allow me to spot weld in those locations. Finally i would butt weld the seam between the old and the new rails. After all this i would think the seam would be just as strong if not stronger than the rest of the rails. But this is my first body work and frame work experience ever so I'm hoping to get opinions of those that have experience with this. I am a good experienced welder it is just the idea i am looking for opinions on thank you. -
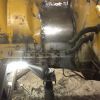
Alright guys so after putting my car on the frame jig and trying to level it for quite some time i discovered that the driver side tc rod box was a little over 1/2" lower than the passenger, probably related the the minor bump the car received in the rear passenger bumper mount location.. So to resolve the problem i built some supports for the tc rod boxes and drove the driver side up till both sides were evenly spaced off the jig as well as level. In order to push the tc rod box up i simply used door shims from home depot and drove them in will a hammer. As of now all the the pinch welds front and back are within 1/16 of 5 7/8 off of the jig. All of the cross member mounting locations are level side to side, and the engine bay frame rails are level as well. I'm hoping this will ensure a straight chassis after i do all of my rust repairs and ensure a true perfect alignment. Anyways enough with the boring stuff lets get to the pictures.
-
This part of the forum has been especially useful in my rust repairs, thank you to whoever the person was that made this happen.
-
Thank you seattlejester for the measurement sheet that will definitely come in handy. After some careful measurements I found that my driver side tc box was over 1/2" lower than the passenger side. Since the car was already on the jig j was able to fabricate some supports and use shims to drive the box up to the correct height. I will be printing off the fsm measurement sheet tonight and will make sure that I drove it up to the correct height. But as of now the chassis is perfectly level from side to side at both crossmember a and trans mount. As for front to back I ended up taking measurements off the bottom of the pinch welds and got all those measurements perfectly even as well. For some reason leveling off the tops of the rockers in the door will never appeared to be accurate with everything else. But once I measured off the pinch welds and got those even and pushed the tc rod box up everything else fell into place. My computer is not doing so hot now but once I have access I will post up some pictures. Thank you all for the help.
-
Wow for your first big jump into body work you are doing some really high quality work. Before listing those flares off your parts car for sale you should consider transferring them to your car. Little like that from ztrix.com and go for 2k with everything. Plus that one already looks awesome it's just too bad the car is in such rough shape.

How I Fixed My Battery Tray and Frame Rail
in Fabrication / Welding
Posted
Sorry about the bad quality guys last time I could not get the pictures onto the site because I emailed them to myself too large so this time I went small. When I get access to my girlfriends computer again this weekend I will re post the pictures.