sippelcj
-
Posts
23 -
Joined
-
Last visited
-
Days Won
2
Content Type
Profiles
Forums
Blogs
Events
Gallery
Downloads
Store
Everything posted by sippelcj
-
Thanks for the interest. I could try blanking off the holes but since I created these directly from a scan of the original it will likely be difficult. I thought about trying to recreate the models from scratch but there hasn't been enough interest in these to justify the significant amount of time it would take. Would you still be interested if it's not possible to remove the holes? I would charge $100 for them unfinished and $200 finished either painted or fabric wrapped.
-
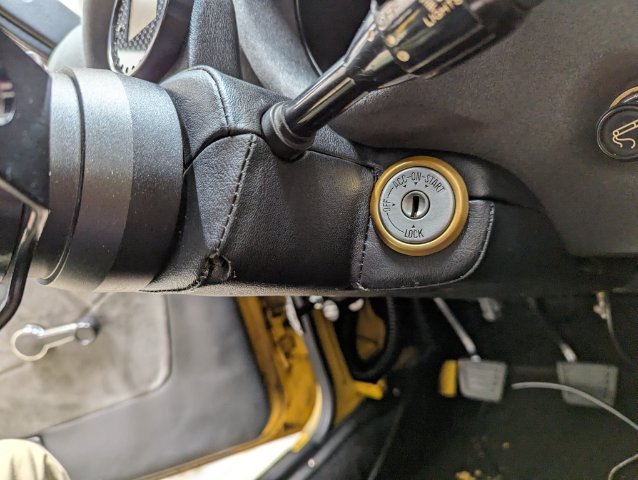
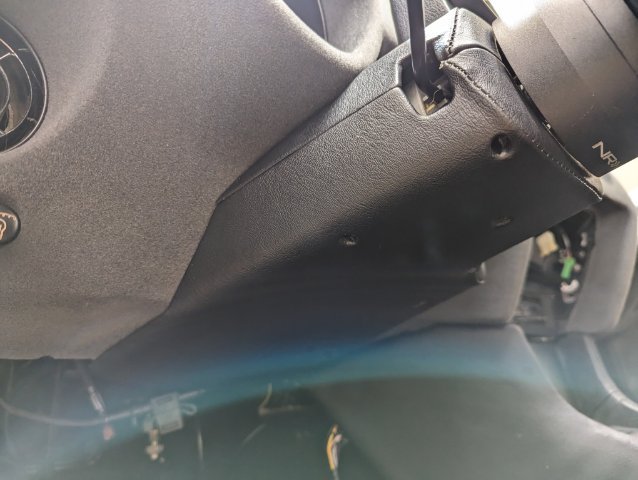
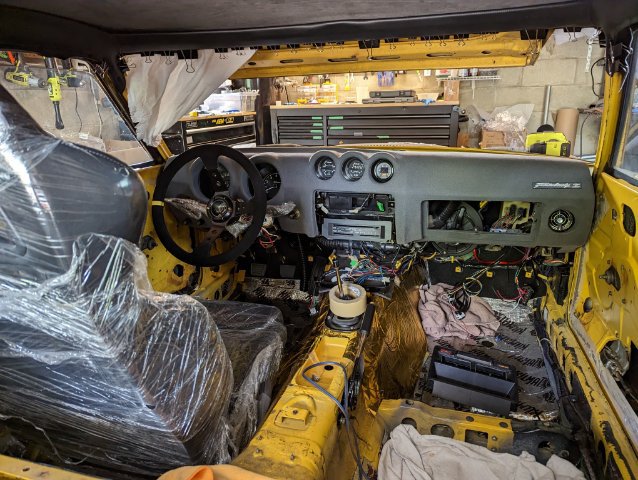
Installed on the car now. The rest of the interior is just about finished, I'll likely start a separate thread for that as I 3d modeled a few other hard to find parts as well. Also I still have two other sets of the column covers printed if anyone is looking for a replacement.

-
Got around to making some vinyl covers for the set I will be installing to match what I upholstered the rest of the interior in. They aren't perfect but they will do the job just fine. It was a decent bit of work to get them sewn up and glued on, painting them would have been much easier.
-
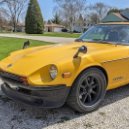
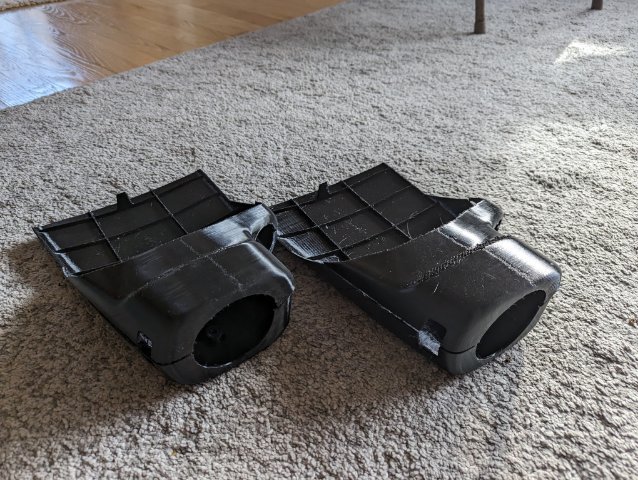
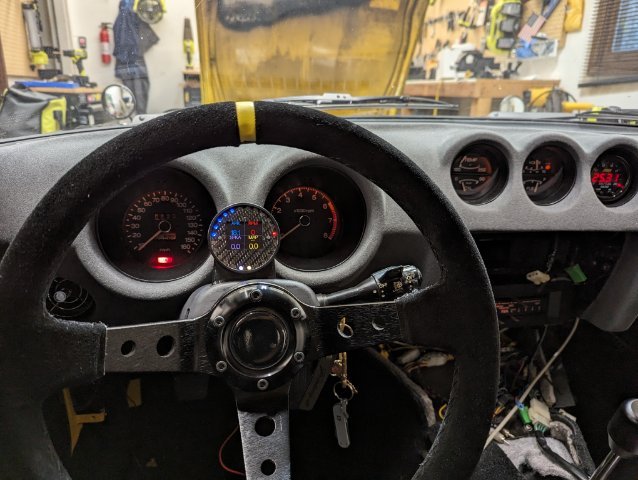
Alright I have two complete sets printed. The finish didn't come out as nice as the prototypes because this material (PETG) is harder to work with but they are functional. I tested sanding and painting this material and it worked without issue but I plan to fabric wrap mine. @ihavearustedz @mutantZ Feel free to send me a PM and we can work out payment/shipping if you are still interested. I was thinking $100 for the upper and lower piece, I'm not really making money on these considering how much time I invested getting them produced but they will be significantly more durable than any original parts. Also if anyone is curious here is the gauge pod I designed to mount onto the upper cover. I just drilled holes in the cover to mount it. It's a 52mm gauge pod but the gauge I have has a 60mm face, but still does not block view of tach or speedo at all, even though it appears to in the photo.
-
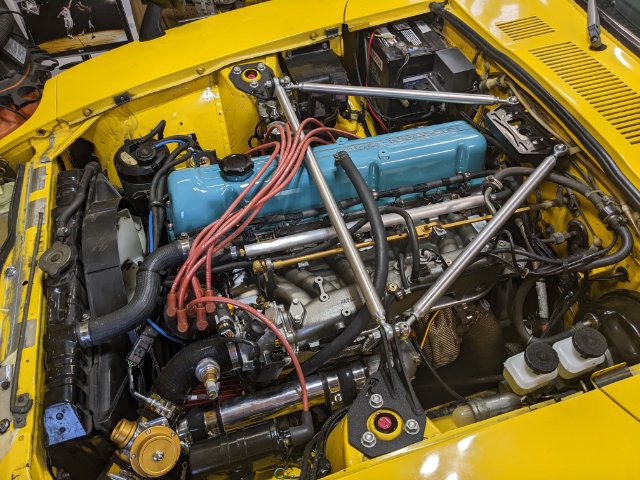
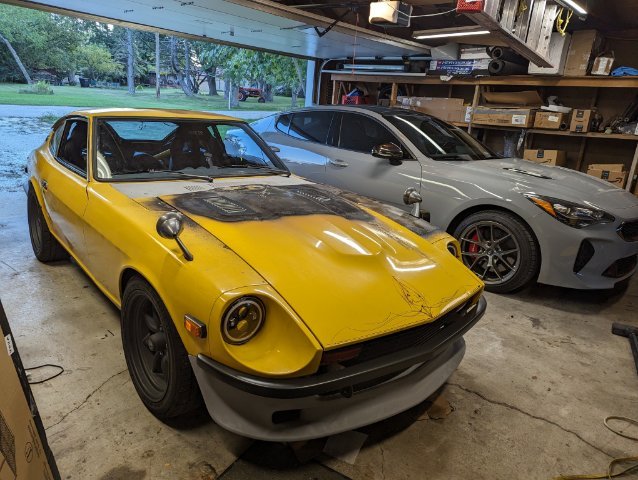
It's been awhile, been super busy between trying to get the car drivable and regular life responsibilities. Writing up progress posts has been a low priority but I do have a few detailed write-ups in progress I still plan to share eventually. For now I'm pleased to share the car is on the road and driving again! Finally had a chance to take it out for some longer drives last week after getting it running and moving a couple months ago. Felt great driving it again although I was very nervous as last time I drove it didn't go so well 🔥. Currently running on wastegate pressure (6-7psi) and an ultra conservative spark map it's definitely making a little more power than pre-turbo and power delivery is nice and smooth. Next big priority is getting it 100% tuned, the fuel maps are looking pretty good but it seems pretty difficult to tune spark on the street so I'm planning on booking some dyno time next spring. I've done a bit of research but If anyone has any megasquirt spark tuning tips I am all ears! I made some DIY knock ears and the engine is definitely audible but its not super loud through the ear muffs so have to concentrate a bit trying to listen for knock on the road. Put the damaged hood back on for now, its too far warped for me to fix. I found a fiberglass hood locally so that will go on eventually. Powder coated valve cover and also did any other brackets that had to come off. Used AN lines for fuel this time and routed them slightly differently. Apex Engineering front brace which had some fitment issues. Also reinforced the firewall/fender using the apex fender braces. Interior is about 90% done, mainly just the center console is left to purdy up. Still need to patch some rusty metal around the gas tank and rear bumper but otherwise just about all the pre-existing rust has been fixed.
-
It's been awhile but I am working on getting some final versions printed. We ended up moving to a new house so I had a lot of other priorities. Started a few prints last week but had a bad roll of filament that jammed on me multiple times and ruined some multi-day prints. The lower covers take 2 full days to print and the uppers are about 1 day so it might not be soon but I am working on it.
-
I am done printing prototypes, just need to finalize any print settings and I will have a few sets printed. Also a few little things still to figure out such as the proper screws to use. The ones for the oem covers don't quite work as the posts on these are thicker and thus need a screw with a slightly smaller head. I'll also be printing a gauge pod for a gauge I'm mounting between the tach and speedometer, the final version will mount the gauge slightly lower than this one.
-
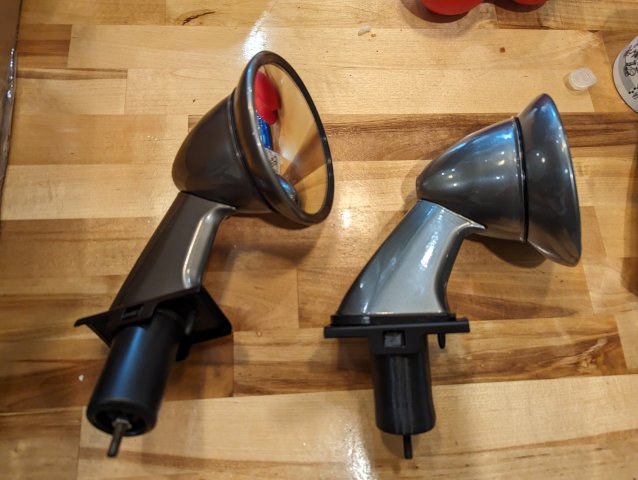
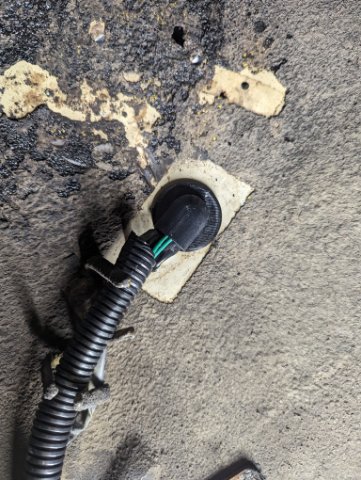
Alright printer was backed up finishing other projects but finally had time to print a full prototype for the lower cover, fitment is looking good, just need to make one more slight tweak and finalize the best way to print such a large piece. Somewhat off topic but here is some of the other stuff I have been designing and printing: Replacement fender grommets for headlight wiring, same style as OE. Replicated all of the plastic pieces on the Fender mirror reproductions I had, and designed some TPU gaskets to hold new mirrors in place. The housings are powder coated black chrome.
-
Will definitely contact some venders once I have them finished. I know It's been awhile but I have made some progress on the lower cover but that one takes a very long time to print and I'm trying to get the fitment as perfect as possible. I should have another revision printed in the next week or so which could be the final version.
-
Thought it might be helpful to post my experience and some lessons learned after just completing a restoration on a cracked dash. I found a lot of different methods/tutorials online and it was hard to tell which of those methods were best long term. Heres where I started: Crack Filling At first I cut out and filled the cracks with fiberglass reinforced bondo, but when moving the dashboard around I saw that the dash flexed enough to create some new hairline cracks. So If you are going to bondo any of the cracks, it seems absolutely necessary to skim coat the entire upper dash if you want to ensure it doesn't crack again. Also, my dash was pretty badly damaged so it was a good idea to cover the entire top in bondo anyway, as it would likely just crack again in the future. I also experimented with plastic welding (I used cheap off the shelf plastic welder from Harbor Freight) and for smaller cracks this method seems superior to bondo filling. It was able to flex with the dash so I would expect it to much more durable. For smaller cracks and a dash that doesn't have a brittle top this seems like a superior repair. I followed a process similar to this: https://www.polyvance.com/video/dashboard-repair/cracked-dashboard-repair-padded-dashboard However if you have many large cracks it will be extremely time consuming and probably not feasible to plastic weld every single crack. A ton of cracks, and the "skin" on the top was very brittle in some spots. Initial crack cutting and filling Coating the entire dash Many rounds of sanding and coating and sanding and coating to get to a nice smooth surface. Take your time and look at any reconstructed curves from every angle to make sure it matches the existing shape. I can't understate the amount of time it takes to get this step right. I painted it black mainly just to give it a uniform color to see any final issues. Flocking Prep From the start I planned on flocking the dash, and even though the flock has a lot of texture to it you still want the dash to look completely uniform before moving on. Any slight variations in texture could show through after flocking. Glue Application Highly recommend a helper for this. I applied with a combination of a brush and small roller which worked well. I could have sprayed it but was concerned with getting good coverage in the harder to reach areas. I also experimented beforehand with trying some other glues, but the flock-it brand glue by definitely seems to be the way to go. 3oz of flock may not enough for a full dash unless you want to try and reclaim it in the middle of the coating process which I wouldn’t want to mess with. Flocking Application The instructions say 10-15 minutes working time but the glue stayed very sticky for much longer than that. I started rushing a bit trying to apply as fast as possible and It seemed completely unnecessary. I think it would have been better to take time and focus on an even application. The glue took a long time to fully cure, It was tacky for days and took about a week to fully harden, so I would plan on letting it sit for awhile. After flocking, the charcoal grey which matches very well to some other charcoal grey microsuede I am using in the interior. Installed in the car Also flocked the inner cower trim to match Feel free to ask any questions, hopefully this helps someone going through the same process! My full build thread here:
-
I’m way behind updating progress on the build, a few of these topics will be gone into more detail in a separate thread but want to get caught up at a high level here. -New radiator, electric fan conversion and custom shroud made from a baking sheet(The shroud was probably more work than it was worth). -All fuel/oil/water lines remade with AN fittings. Heat protection for any lines anywhere near the exhaust. -All Clutch lines and master replaced -All engine bay brake lines and master/booster replaced. -Majority of interior done and/or ready to be installed later. Pretty happy with everything for having never done upholstery before. (Will be following up with more detailed thread) -Remade firewall pad -Redid my toolbox mounted 6.5 Subwoofers (Will be following up with more detailed thread) -Hvac system disassembled/refinished and reinstalled. -Cracked dash filled, refinished and flocked. (Will be following up with more detailed thread) -Gauges refinished and reinstalled into dash. -Replaced the RB25 turbo with a GT2860RS, the plastic compressor wheel was damaged and I tried to replaced the wheel with a cast aluminum version but it got stuck on the shaft and I broke the ceramic shaft of the RB25 Turbo. Compressor housing powder coated gold and turbine housing coated with Cerakote. -I attempted to repair the hood but it was too warped for me to get to fit perfectly. I plan on getting a fiberglass one eventually but this one will work for now. -Working on designing and 3d printing replacement steering column covers. The end goal is to integrate a gauge pod into the upper cover. Details here:
-
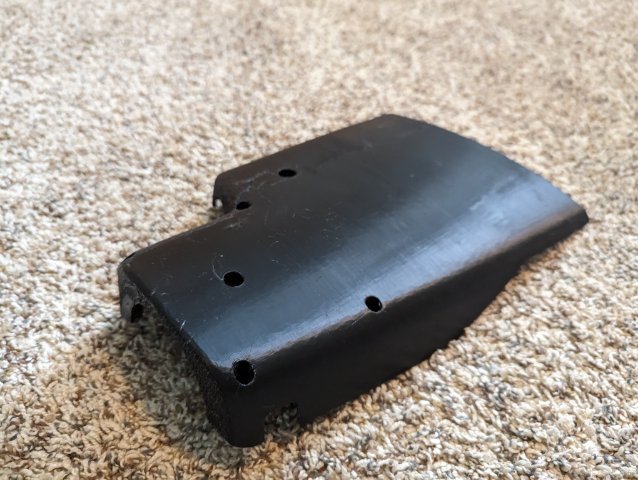
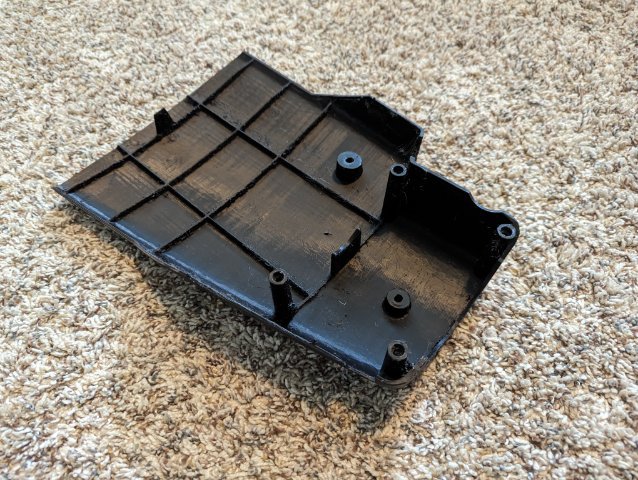
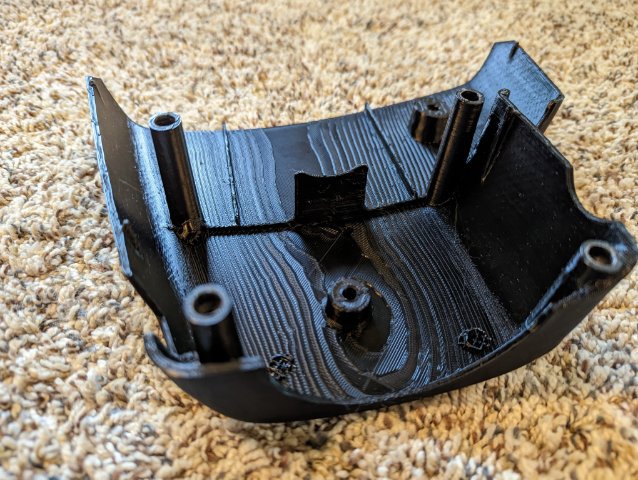
Had some difficulties creating the model for the lower cover so took a bit longer than expected but but finally have the first prototype. Fitment is pretty good for the first print but will be making some tweaks to get it looking as good as possible. I chopped off some of the model to reduce print time. Heres how it looks connected to an oem upper cover.
-
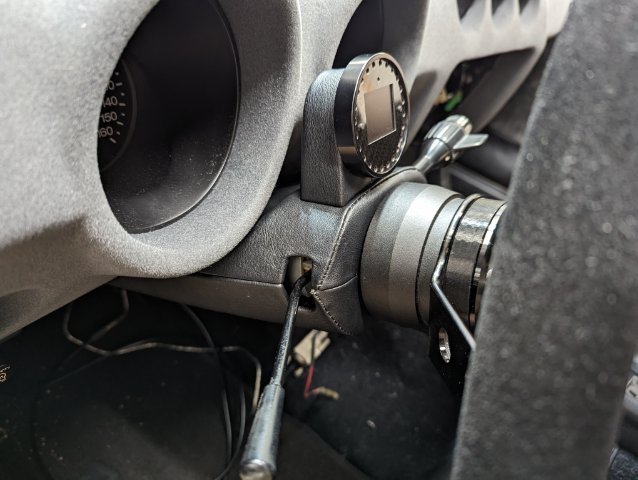
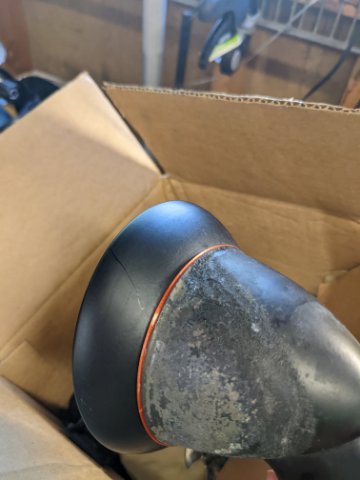
It's the factory trim ring that I powder coated candy gold from prismatic powders. I had an engine fire which is why I am now redoing the whole interior. I started a build thread here but I haven't updated it in awhile, should probably get on that.
-
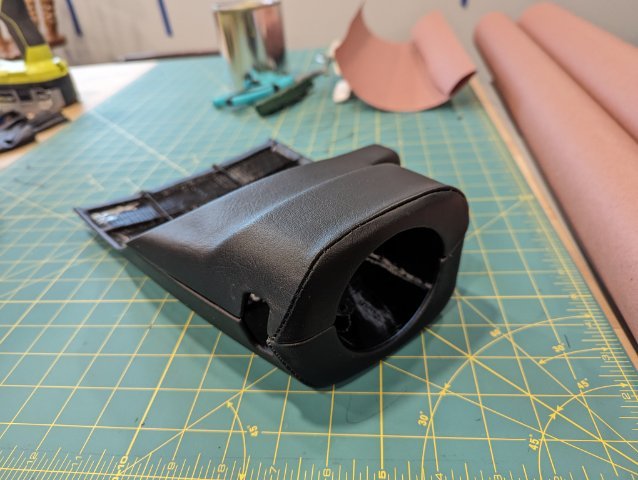
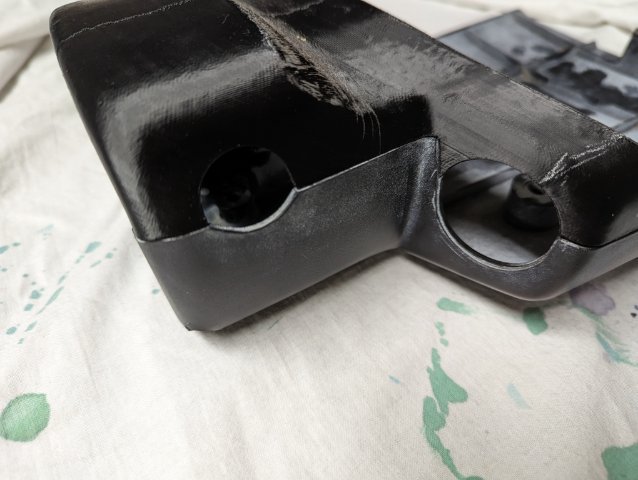
I spent a lot of time tweaking the model to get as perfect of fit as possible and am finally done. Really happy with how its looking so far. Next step is to experiment with the final print materials and then work out any printing issues and the upper cover is done. Here are some pictures of it fitting up with an oem lower cover on my car. @mutantZ @ihavearustedz Also want to make sure you understand what the raw finish will look like. The final print will likely look the same or very similar to this piece, ill just be using a more heat-resistant plastic. But because of the way this piece is printed the faces that face the dash have some rough marks where the printer has to print on top of supports which is shown in these pictures. These could be filled/sanded and painted but I wouldn't be doing that with the raw finish option. I'll start working on lower cover reproduction soon, but it could a month or two as its pretty time consuming and my time to work on it is limited.
-
It's not really thicker by design but it will definitely be more durable than the OEM piece. This plastic will flex quite a bit before it would break. Was also debating using heat set nuts to avoid plastic threads stripping which would require all new hardware but haven't gotten that far yet.
-
Sounds good! The lower cover could take awhile to complete. I have not started working on that model at all yet, and I will have to recreate all the mounting holes from scratch. The upper cover is very close to done. Here is the latest print, just tweaking the alignment pins on the rear and getting the fitment as good as possible. I'll post updates to this thread when I have them. Thanks!
-
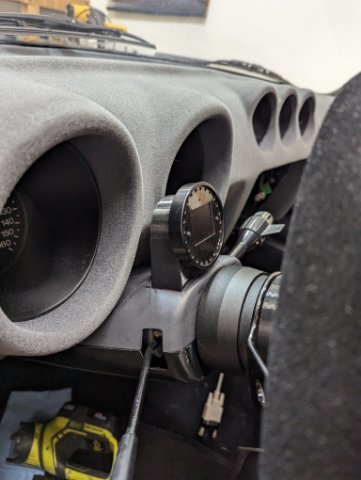
I am almost finished with creating a reproduction upper steering column cover for 74-78 260/280z. Looking to gauge interest to see if this is something anyone would be interested in purchasing from me once I finalize the part. They are hard to find in good shape used and are often broken. I had the idea because I wanted to make a integrated 52mm gauge pod that sat right between the Tach and Speedo, and the column cover I had was in pretty rough shape. I haven't decided if I would print the gauge pod version as a single piece or print them as two separate pieces and join them after. I will be 3d printing them in PETG and would plan on could either sell them raw, finish them in an oem like paint, fabric wrap, or flock. The prototype pictured below was printed at the lowest quality so the final products will just need to some light sanding and paint to look like oem. If you are interested let me know what you would want and how you might want it finished Upper Cover Lower Cover Gauge pod to mount onto an existing cover Upper Cover with integrated gauge pod Finish options Raw Paint Fabric Wrap (Vinyl would be easiest, leather/microsuede might not stretch enough) Flock Im thinking rough cost would be around $50-75 for the column covers, $25 for the gauge pod. Probably a little more for fabric wrapping. If I can cover the cost of the time I spent making these models I could start producing other small parts as well. I already have a rough 3d model for the lower steering column cover created.
-
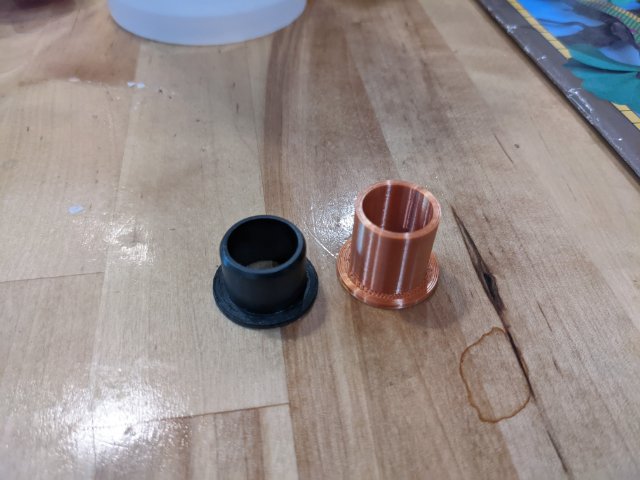
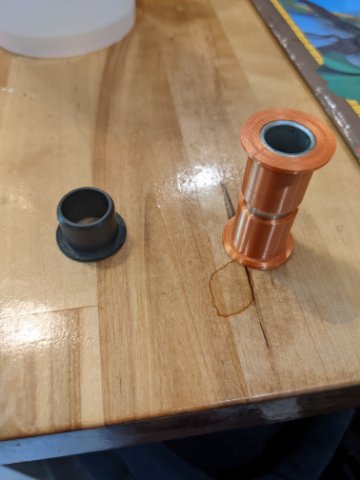
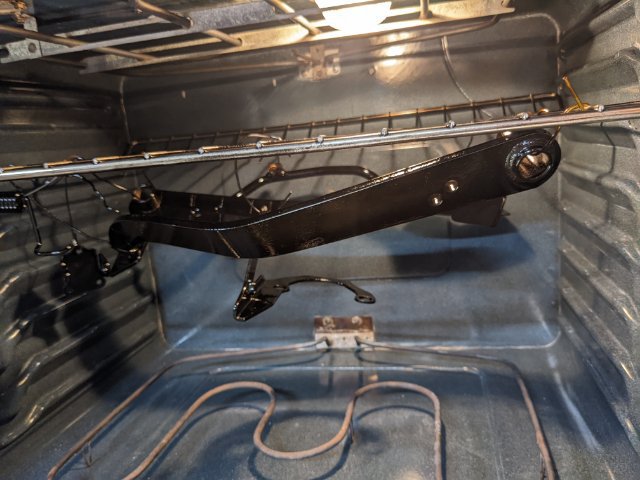
Gave anything in the interior that might be visible a few coats of base color so it would look like factory again. Decided to invest in a DIY powder coating setup, purchased the eastwood dual voltage gun and the cheapest kitchen oven I could find. After doing a few parts the investment was 100% worth the cost and space the oven takes up. The finish is extremely durable and the learning curve is not very steep. Started sandblasting a ton of parts, starting with the pedal box and anything else I needed to start getting the car put back together. Would then clean with a metal etch, throw in the oven for an outgassing, then apply the powder and bake. I had previously bought a 3d printer and thought it may come in handy for some automotive projects but never to this extent, most of the plastic around the pedal box was ruined but luckily one of the bushings was good so I could use it for measurements. No idea what I would have done without the ability to make replacements. It took a few tries but after a few adjustments to the model was able to get some bushing printed that functioned like original Also started modeling a replacement for some fender mirror plastic as the driver side got cooked. And some other things I powder coated, and there will be a lot more coming up in future posts. Polished finish on the intercooler pipes was ruined so decided to brush them by hand and clear coat them Tested out powder coating some bolts, the correct socket barely fits over them anymore but the finish is plenty durable to install and remove a few times and they look great. Before and after on a used hood hinge I bought and mine was destroyed when the hood got cut open.
-
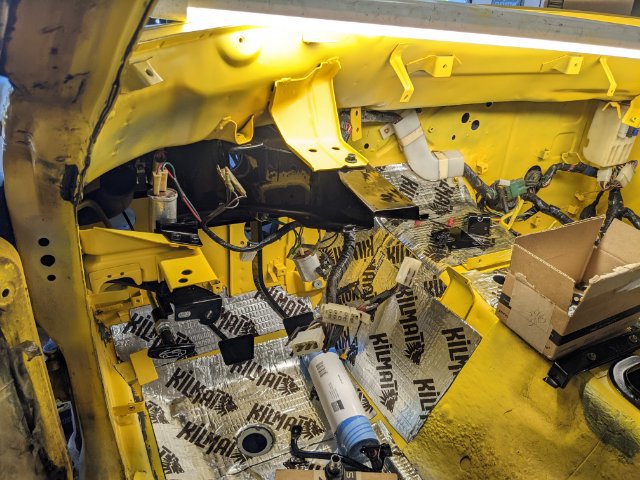
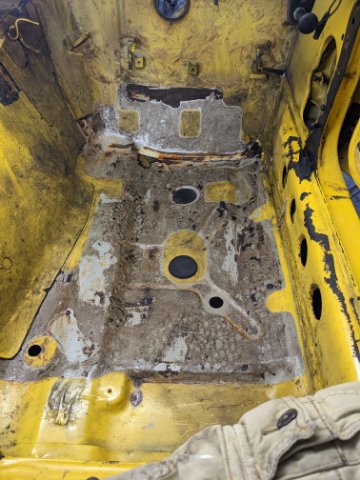
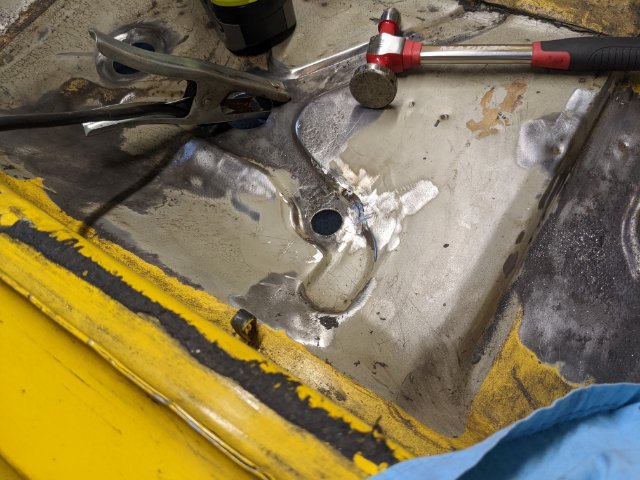
Completely forgot about updating this thread, have been making good progress, planning on getting caught up soon with everything that's been worked on. Been a little all over the place working on different parts of the car so will try and group similar things together but still keep everything in chronological order. There was a little bit of rust on the floors so stripped them completely of the sound deadener and replaced some of the metal. Got them all cleaned up and primed with epoxy primer. Then seam sealed and of the joints that got stripped away when I was wire wheeling. A Tar remover worked very well for the residue left behind after removing the sound deadener The Frame under the front left fender and firewall were primed as well.
-
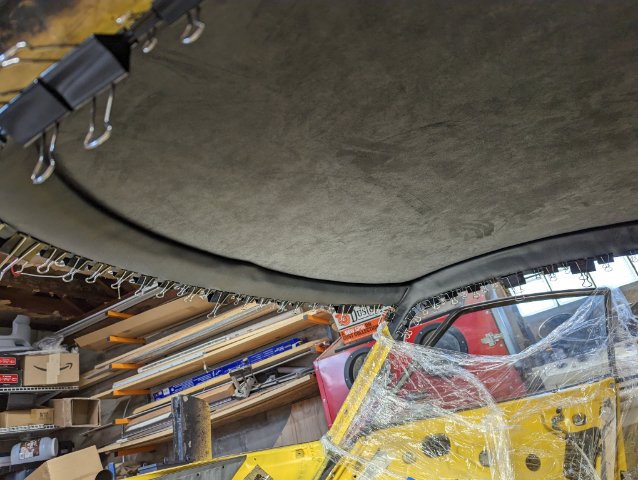
Thanks for the input. Luckily I didn't have much rust to deal with, however getting it vapor blasting still would have been a good idea. I have it all done now but it was not fun. I have a cheap portable harbor freight sandblaster I used for the really tight corners. Made an absolute mess but did the job. The first thing I did when I bought this car was go over the entire thing looking for rust, (including using an inspection camera inside the panels) and found a few spots hiding in the usual rust areas that I patched but otherwise the shell is very clean. One of the previous owners had it undercoated early in its life, and they even hit the inside of most of the panels, the stuff is terrible to remove but It appears to have done a great job. The majority of the rust from this job was just from the car sitting for a couple weeks after getting blasted by water. Getting the partially burnt glue off the headliner was fun - a ton of adhesive remover and scraping. Adhesive remover did a good job at removing the soot though too. At this point just have to give everything a final wipe-down and have a tiny amount left on the rear hatch. Going to coat the inside of the cavities just in case there is any residual smell that could come from there. Then most of the interior is going to get covered in sound deadening. As far as the burned metal goes, that was a concern but the more I think about it the less it worries me. The bulk of the heat was at the firewall between the hood latch and brake/clutch reservoirs, and at cowl in the same area. The cowl area is pretty well boxed up and after spending some time beating the little bit of warpage out of that metal, it does not seem abnormally weak. However since I am doing metal work in this area anyway I'm planning on adding some structural bracing as I would like as much stiffness in the chassis as possible. I will be doing this: https://www.apexengineered.com/store/p67/Front__Fender_Brace.html and switching to a stiffer front strut brace that spreads out the load more evenly across the firewall - https://www.apexengineered.com/store/p66/Front_Strut_Brace.html and may add some other little braces here and there but haven't quite figured that all out yet. Comparing this to driving any modern car and you really notice the chassis flex. Also because the factory throttle linkage uses those plastic ball joints it's ruined, so switched to a 240sx throttle body and have a throttle cable all setup now. Did this and drilled out the ball on the pedal to attach the other end of the cable.
-
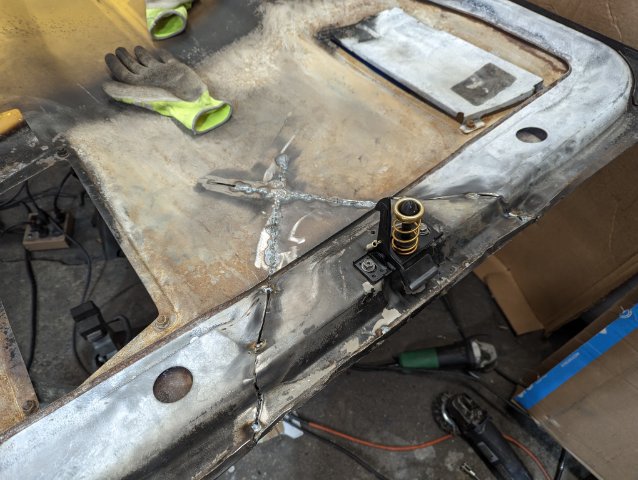
It's an idea I would have thought is complete overkill before this but I appreciate the offer and will have to do some research and get back to you. At the very least it wont be leaving the garage without some sort of extinguisher. Making good progress on the build. Car is all stripped and just working on lots of cleaning, metal work, and sourcing parts. Already have about half of what I need, and doing some upgrades where it makes sense. Fender is mostly beat back into shape, and started on some of the other repairs I needed to do on it eventually Sparco R100 Seats fitted to the factory rails. Requires drilling a new hole in the rail and slotting the brackets that attached to the body, which takes a little bit of adjustability out of the rails. For the drivers side I had to weld an extension on the outside most rail to get enough width. Also had to bash in the transmission tunnel a little bit, plenty of room on the exterior to do so. They barely clear the B pillar. Tons of scrubbing on the interior to get all the soot off. Exterior wiped up pretty easily. Cleaning up all the metal, had some rust around the radiator support that needed attention eventually anyway. Fixing the cut into the cowl from the firefighters, it didn't turn out great, but it's passable for now. I don't have much experience finishing thin sheet metal so made some mistakes. Will either clean it up further later or a little bondo will cover the imperfections.
-
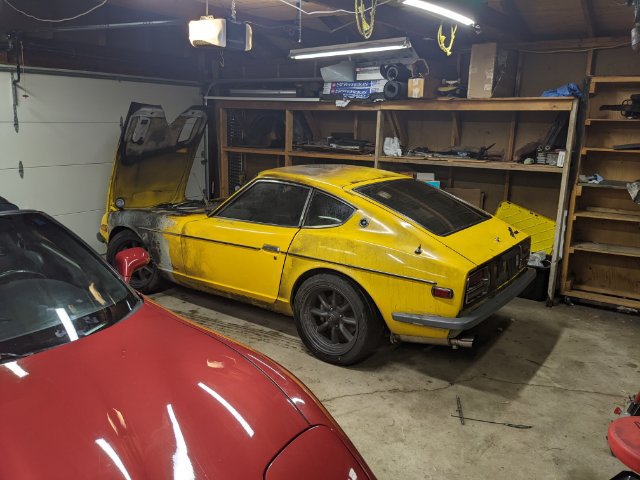
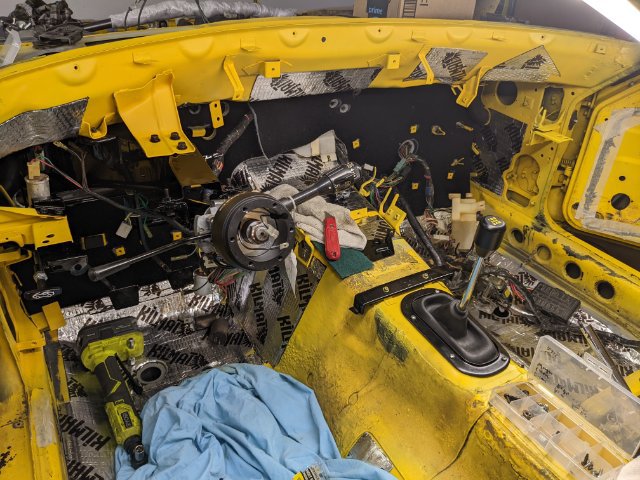
Some updates from the first week of progress: Car is back in the garage, had to get all my shelving space reorganized to make room for all the parts. The day I decided I was keeping it bought some secondhand seats. Engine bay wiring harness is toast. Got the dash out, all the HVAC vents melted over everything and made an absolutely mess. The dash is not salvageable and all the trim around it was damaged beyond repair. Wideband still works! Fusebox is undamaged. Majority of engine bay wiring and rubbers/plastics cleaned up. Almost done stripping interior. Luckily I had the majority of interior behind the seats out of the car when the fire happened.
-
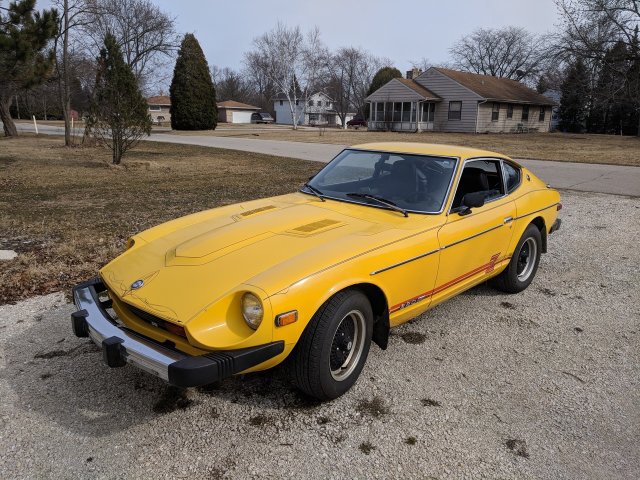
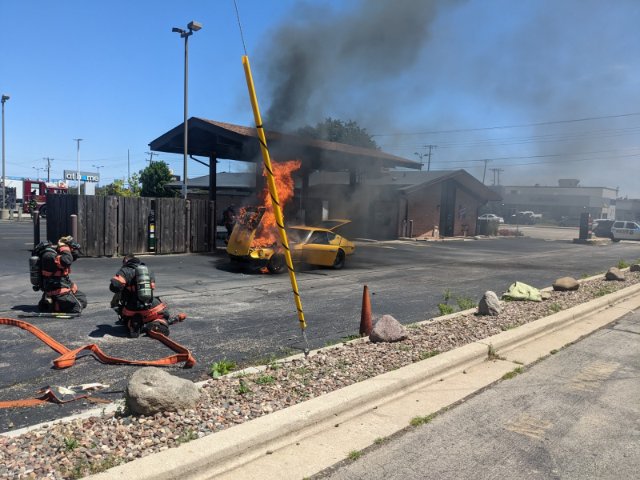
Figured I should start a build thread for the work I will being doing restoring my 77 280z back to its former glory after an engine fire which has done significant damage to anything near the firewall. Ever since I had first seen an s30 I dreamed of owning one, but was quite intimidated by the aspect of maintaining and or restoring an old car. At this point I was familiar with the basic mechanics of cars, but had somewhat limited experience. Before having enough money to afford a decent example, I had casually been looking at them for years before deciding to seriously look sometime in 2018. I was looking for a running and driving example, that would require little to no major rust repair or mechanical troubleshooting. After around 3 months of looking, I found this car near me which seemed to tick all the boxes. I purchased the car close to bone stock, with minimal rust with plans of slowly upgrading the stock components while still driving the car. The car was still in its original color 411 Sunburst Yellow with the car having been repainted at least once. Everything on the car worked, although the brakes did not inspire confidence and the suspension was very unpredictable. The interior was all original, and in very good condition. Even the dash was un-cracked but had a couple holes drilled in it from a previous owner. Each year I would do a couple months of work on the car and drive it whenever possible for the rest of the season. Over the first few years I did the following: Welded on Bad Dog Frame Rails, some other minor frame rust repairs Fiberglass 240z style bumper conversion, Air dam 17" Rota Rkr wheels, Sumitomo HTR Z3 tires Silvermine motors coilover conversion T3 Big Brake Kit Front/Rear Wilwood Master/Prop Valve New Brake lines T3 Adjustable Control Arms, Front and Rear T3 Strut braces, front and rear JDM Fender Mirrors And this point the car was transformed into something that was very fun to drive, but still had some quirks due to the factory EFI. Also it had a leak at the exhaust manifold (Which I found was due to a broken stud) so the car constantly smelled like raw exhaust, and my wife refused to ride in it. Considering I had to remove all the manifolds anyway and wanted to go to a standalone ecu, I decided to add a turbo to the stock block. Turbo parts list: Pallnet Fuel Rail with 440cc Injectors and Aeromotive FPR OEM 280zx Turbo Exhaust Manifold, port matched to heads and turbo 82-83 280zx Turbo Distributor Hi Flow oil pump OEM RB25DET Turbo Megasquirt MS2 Extra v3.57 ECU - Godzilla Raceworks plug-n-play Megasquirt Harness Custom 3 inch downpipe, 2.5 inch cat-back Cheap intercooler and BOV, 2 inch piping I was still in the process of tuning the car (I had dialed in the low load and cruise cells pretty well) when driving back from a car show I heard a "puff" noise and thought I saw a heat wave come out of the passenger engine vent. I immediately started to pull over and as I was doing so started to see a significant amount of smoke then fire. I attempted to put out the fire with a thick moving blanked I had in the back with no luck. At this point my brother who was in the car with me called 911. After a few minutes of stewing I ran to a restaurant in the parking lot I pulled into and asked for an extinguisher, but by the time I was back to the fire was large enough to where It didn't seem worth risking my life. The fire department arrived pretty quickly, but at this point the fire was very large and I assumed the car was toast. I do not know exactly what failed, as I double checked the lines and clamps before every drive after the fuel upgrades, and this trip was no exception. Prior to this I had driven the car for longer trips on hotter days. I had planned on putting a fire extinguisher in the car, and I would have likely been able to put out the initial fire with one. I receive some money from insurance, but it will definitely not cover the full cost to repair. After a few days of going through the insurance process, I started to think about the possibility of fixing the car. I started to research all the parts I needed, I was able to find everything I could think of. The idea of the car going to an auction and possibly rotting away in some lot really bothered me, so the idea grew and grew. After receiving the final settlement numbers from insurance, I decided to restore the car. Short Term Plan -Strip interior and engine bay, catalog what needs replacing -Source damaged interior panels, attempt to save fiberboard panels -Throughly clean soot off the interior metal -Fix as much metal as possible and paint firewall with engine still installed. -Replace engine bay wiring/rubbers/plastics -Get engine running again Long Term Plans -Replace/Repaint damaged panels -Full Custom Interior -Rebuilt L28 Turbo Engine The good news is I now have a little more freedom with the rebuild, as I am not nearly as concerned with keeping the car as original as possible. I have already made some decent progress with stripping out the bad parts, so will have more updates soon. If you want to support the build feel free to help out here - https://www.gofundme.com/f/save-this-77-280z-from-an-engine-fire?qid=c7564888fee54be9ce9af1b741471ffa


.jpg.a12cbf8064ece0979b1b768e29eb75ba.jpg)
.jpg.e99e9d8b523eb54a3b07566585d30e8f.jpg)