
jbc3
-
Posts
418 -
Joined
-
Last visited
-
Days Won
3
Content Type
Profiles
Forums
Blogs
Events
Gallery
Downloads
Store
Posts posted by jbc3
-
-
Dale,
I have the S&S long tubes and mine are just barely (paper thickness type clearance) missing the driver side mount. No rattles.
As far as the AC goes, I have less than 1/4" clearance and it has yet to be a problem. Some things are just tight ( shrug)
-
Jody:
Just saw your post. What's your impression of the McLeod clutch? Is your flywheel stock?
BTW, thanks for the PM about the heads. If I can raise some funds, I'll get back with you.
Bryan
The street twin requires a larger master cyl and you have to run the McLeod flywheel, it's a package deal. You can get a steel flywheel or an aluminum one. The aluminum flywheel is more expensive. I tried a bunch of clutches and none of them could hold the abuse until I got the McLeod. Either way, it's over 1K.
Jody
-
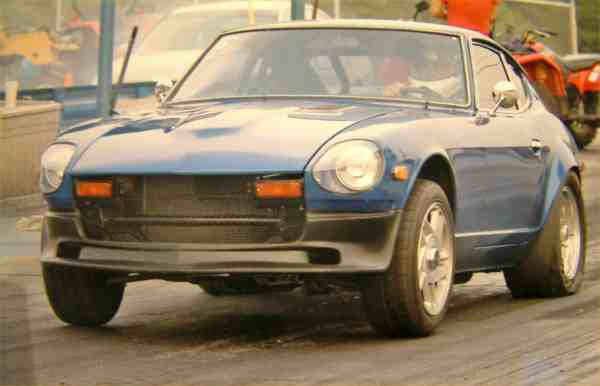
My LT1 came from my 96 Z28 (which is back to sort of stock). It is a 385 stroker motor, only 10.4 compression, ported stock heads, 58mm TB, 1.6 RR, ported intake, custom tune (Lt1-edit), cold air intake, GM 847 cam, and long tube headers.
T56 transmission, McLeod street twin clutch, R230 and Ross' billet stub axles.
The numbers are in my sig as well as a video of it at the track.
Now the motor is under the knife. I am installing some raised runner Trick Flow heads, a welded and ported LT4 intake and a much bigger cam. It should be fun

Jody
-
I took the F-body gas pedal and cut the cable end off and welded it to the stock 280Z pedal. Then I used the stock f-body cable. It bows up slightly, but fits just fine.
Jody
-
I used the factory condensor and then just had lines made with ends to go right into the factory evaporator. I bought a dryer with a pressure switch fitting when I bought all of the lines and fittings. I took pictures of all of the fittings and angles and sent them to Ray Everett (his web page is listed on an earlier message). He made sure I got all of the right fittings, plus his price was half of what anyone else wanted for them. I did not have him crimp the lines, since the fittings need to be clocked correctly. I also bought the lines a little long and cut them myself to fit. I dry fitted all of my lines, marked them and took them to a local parts supplier that has a high pressurre crimping set-up. Worked perfectly.
If I had a drawing, I'd be more than happy to send you a copy, but I basically took a piece of cardboard and eyeballed it where I thought the bracket would go. Then I started cutting, until I thought it was close. I actually bolted my compressor onto the cardboard to make sure everything lined up. Then I traced the outline onto the billet and pitched the cardboard.
Jody
-
jbc3,
When you have a minute could you try reloading the pictures of you a/c lines. All I see are 3 boxes with a red x in the middle.
Thanks,
Danno74Z
Try these, for some reason my other web space seems to have gone down.
-
I have been running the S&S headers on my D port heads without any problems.
Jody
-
The lines below the AC compressor are to my remote oil filter. It is mounted on the frame rail just behind the radiator. I needed to move the filter out of the stock location because I am running a Canton Oil pan and long tube headers, which created a clearance problem for the oil filter. In those pictures the AC lines are not on. I ran all of my AC lines on the drivers side of the engine bay. I'll look for a picture with the lines installed. If not I can take a picture of the car now, but I am in the process of installing my Trick Flow heads, bigger cam and new intake. That fitting in the box is the stock F-body line off the water pump with a bleeder screw. I re-used as many of the stock hoses and fitings as possible.
I went out to the garage and snapped some pics of the lines.
-
I noticed that in your picts. Is that a JTR radiator or the equivalent (fin area 20.75 x 17.5)? I was thinking I may be able to squeeze my Z28 fans in there staggering them like you did using a homemade bracket.
Yes it is the JTR radiator and brackets. I took the stock Fbody fans out of the shroud and made brackets for them. Nothing fancy, but they pull a TON of air. They just barely fit. I tried actually using the factory shroud and trimming it, but this worked out so much better IMO. I have the factory 2 stage fan control set-up with relays. It works great.
Jody
-
Stock F-body fans
No power steering!
-
I bought a 3/4" 6061 billet plate for about $30. I made the initial shape out of cardboard and cut the aluminum out on a friend's band saw and finished it with a belt sander and a drum sander. (I also made my LT1 A/C and power steering delete bracket out of the same piece of aluminum.) It also needed a pulley to help get the belt around the bottom of the water pump ( same as the Bower bracket). To get the correct alignment of the bracket, I mocked it up with stacks of washers spacing it off the block and driver side head. Once I got it to line up, I cut 1" billet aluminum rod with a center hole drilled in it to the right length for the spacers (I had that laying around). The parts from Ray Everett were only a couple of hundred dollars and the remaining parts I scavanged off of my doner F-body. I had a belt from my Suburban in the garage and it almost fit, so I bought one 2 inches longer and it fit perfectly.
-
I have the stock F-body A/C compressor running my A/C in my 280Z. I made my own mounting plate and mounted my compressor on the drivers side. It actually comes out just along the outside edge of the valve cover.
I made my bracket in a similar shape and to the Bowers bracket, but mine is made of solid billet aluminum.
I also had this guy help me get all of the correct adaptor parts and hoses to make my A/C work. http://www.rayeveritt.com/Parts/Hoses/Hoses.html
Good luck, Jody
-
The 2 places that seem to be getting the best press and times on the LT-1's are Lloyd Elliott and AI (Advanced Induction) http://www.advancedinduction.com/AiHome.htm
Call Lloyd and talk to him, he is very personable and does a great job. Look at my earlier post.... see who ported the heads I am putting on.
Jody
-
Bryan, sent you a PM.
It all boils down to buyer beware. These advertized numbers are usually exagerated or they "forgot" to mention that their test car happened to get a few other upgrades in the process of installing the part that they are advertizing. It is a shame, but typical.
Jody
-
Bart,
365 crank HP out of just a cam and tuning.... doubtful. That would be an 80 HP gain without touching anything else! The stock computer and wiring are pretty good. There is a 7000 rpm limit to the stock PCM. If that system is planning on spinning a stock bottom end beyond 7000 to get those HP gains, you are asking for trouble.
If you are looking for cranking up the HP on your LT1, I am selling my stock LT1 ported heads w/ 2.0/1.56 Manley valves, 955 springs, Titanium Retainers , ported intake and cam that are on my LT1 in my 280Z now. My f-body made 378 RWHP (estimated 430-440 crank HP) with these heads, intake and slightly smaller cam on the stock bottom end and the stock computer with an LT1-edit tune. I also had 1.6 RR's, a 58MM TB and headers. It's the whole package that gets you the big gains... not just one thing. When I stroked the bottom end I didn't see the HP gains I would like to have, so I am upgrading the heads. I still have the flow sheets for these heads and I may still have the dyno sheet. These heads flow 252/197.
I am upgrading to Lloyd Elliott stage 3 ported, 217cc raised runner Trick Flow heads, welded and ported LT4 intake, and a larger cam. I still plan on using the stock computer. I have the motor half apart and hope to get it back together within a couple of weeks. I am swamped at work right now, so I can not devote a ton of time to the swap. I am soooooo glad I put heat in the garage.
-
I also felt that I wanted extra protection back there, so I figured that roll bar tubing was much better than nothing. I cut the stock bumper brackets so they would still bolt to their original lcation to the frame, but still fit behind the rear valence. Then I bent roll bar tubing so it would fit behind the gas tank and attach to both brackets and welded the tubing to the brackets. I also have roll bar tubing between the front bumper mounting points for the same reason. In the front I cut and drilled holes in 1/8" steel plate that would bolt into the stock bumper mount holes, then I bent the tubing to follow the shape of the hood and welded it to the steel plate.
You can see the front bar in this picture.
With the grill and covers over the old bumper dents it is less noticable.
-
Here are pictures of my install and cut up canton oil pan.
http://forums.hybridz.org/showthread.php?t=98544&highlight=canton
-
Mike,
Your set-up should be similar to mine as far as the headers and Canton pan. Sorry to hear it's just not cooperating. I guess we need to use a bigger hammer
Jody
-
Mull,
I feel your pain. When I first laid out my roll bar, I was planning on using the stock seats in my 280Z. At some point, way after the roll bar was welded in and within the time when I was getting ready to start the motor in the car, I decided to use the leather seats out of the donor 95 Z28. The seats are taller, wider and thicker than the stock seats, but they are so much better looking and so much more comfortable, so in they went. I modified the seat brackets to get them as low as possible, but the seat position is just a little tall and a little too forward to be perfect. At some point (probably never), I may remove/modify the brackets that the seats mount to and modify the roll bar... until then, I have decided to just suck it up.
If your car is still stripped, I'd go ahead and lower the seat mounts. Do whatever to get it right before you get to the point of no return and never do it. Besides, you need to do this and video the floor drop and foot-well extension for your next video production
Jody
-
Like Mike mentioned, I have these flares and they feel plenty strong once they are mounted and a lip was made for the flare opening. I was actually very surprised at how solid they feel once they were done. I was worried that they were too thin and weak also. I have a set of the small front MAS flares that I never installed since I was able to get the front wheels and tires under the stock fender. (Someone make me an offer... they are collecting dust)
Here are several pictures of my flares. You can get an idea where I mounted mine. These are the pics I posted awhile back showing the 295/50/16 tires I installed on the rear.
Jody
-
 1
1
-
-
The issue I would have with the stock oil cooler is the clearances. The long tube headers created an interference problem with my set-up (I am not running the oil cooler) and I had to install a remote oil filter adaptor simply because I couldn't fit a filter between the Canton oil pan and the headers. I moved my oil filter up on the frame rail just behind the radiator. The stock oil cooler lowers the oil filter mounting position down about 1 1/2 - 2", so it amplifies the clearance issue, but I think you could actually make it fit with a remote filter adaptor. The stock oil filter is short, but I have always used the PF35 or 1218 filters wich are almost double the size. If you were to use the larger filter and the oil cooler, the filter hangs way below the oil pan anyway.
Every conversion set-up is different. Try it, mock it up, check clearances and do what works for you. If you are going to use a remote filter set-up, adding a cooler in the line would be better in my opinion.
Jody
-
Here are a few more trashed tranny pics for your viewing pleasure. The crushed tranny came out of a friend's car. The 3 shift detent clips broke out of the 3/4 syncro and the tranny went into 4th and 1st at the same time. 1st won
. 396 stroker LT1 with a D1 supercharger, 611 RWHP. By the way, those 3 detent clips are like $2.00 each. It can be the smallest thing that can cause alot of devistation.In the last picture you can see the splines where the 5-6 main shaft have to lock into, in the top of the 1-4 countershaft.
-
The 5-6 countershaft is splined the entire length. You can see the splines in your picture. There is no way to install this wrong. You can not get the snap rings on if it is not on far enough. Besides, the mainshaft is also splined the entire length where the countershaft goes... Newer transmissions (ones with less than 10K on them you usually have to use a puller to get it off. Older transmissions, it will slip right off. If the main shaft is shot or the teeth on the 5-6 countershaft are shot, the same thing could happen also, but I think you would notice. If the teeth in the countershaft broke off cleanly, they would not fall out into the transmission. They would ride in between the 2 shafts and fall out when you pulled it apart. (unless the PO is not fully disclosing what he found when he pulled it apart)
Personally, I'd pull it out and pull the tailshaft off and run it through it's paces with something on each end where you could put some torque on it so you can see the problem. DS yoke on one end and a old clutch disk on the other end. It will be obvious.
Jody
Here is a picture of a real magnet mess !!!!
-
The 5/6 shaft end may be shot. To add to the problem the 1-4 countershaft may also be toast, since they interlock.
The main shaft holds 1-3 gears and synchros and in the tail, it holds the 5/6 countershaft. (remember 4th is also your output shaft) The 1-4 countershaft (driven gear as it's called in the manuals) has a splined opening that the 5/6 gear shaft locks into. If that spline is damaged, it will act just as you describe. If that is the problem, you are looking at major $$$ for a repair. I think the 1-4 countershaft is like 1100.00.
I actually have a spare 5-6 shaft and 5-6 countershaft.
Reverse is on the main shaft, so if your problem is the 5-6 shaft end, reverse will probably still work.
By the way, I think I can get 130mph in 4th.
Good luck, and I hope this is not what you find.
Jody


Not using gaskets on headers
in Gen I & II Chevy V8 Tech Board
Posted
I run the 1406 Felpro gaskets.
Jody