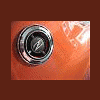
Sparky Posted January 31, 2011 Share Posted January 31, 2011 Started my Speedhut gauge install in late November and have slowly destroyed the interior and engine bay in a "while I'm at it" manic state. I've had lots of time to think about how to install these things and was lucky enough to have two full sets of extra gauges in my shop ranging from the original 240Z gauges that are in the car, a set of 260Z gauges and a set of 280Z gauges. I brought them all out and broke them down into pieces as I saw something I liked. When I was examining the gauges I noticed that the bezels on the 280ZZ gauges have an angle formed into the plastic ring that in stock form create a small hood or eyebrow above the stock gauges. After staring at it for a good while I took the bezel and a gauge to the car and placed them in the dash, as I did that I noticed that the bezel itself is an almost perfect fit with the 2 -5/8" gauges. Once I put the bezel and gauge in the dash I noticed that if I rotated the assembly I could increase the angle at which that gauge faced the driver. After pondering how to jam the gauge in the stock housing while still using the 280Z bezel to increase the angle of the gauge I came up with this: these are all the bits and pieces needed. one 280Z bezel (oh and the clock bezel is different so you'll need to grab an extra gauge at the junkyard to make this work) One aluminum mounting adapter, one modified 240Z back and of course the gauge. here is the photo showing how I'm aligning the gauge in the housing before I button it all up. here is the front of the gauge after it's back together, you can see the adapter poking out from the housing, this needs to be trimmed off or you'll never fit them in the dash, I saved this step for last after I made sure everything was lined up right. And here is the profile view showing how it all comes together. After measuring and calculating the needed angle and depth of the gauge I cut through it with a hack saw saving both pieces. After this I sandwiched it all together using longer SS screws. This took some time to get it all working properly. and there it is in the dash, it's tough to tell how the gauge sits but when the dash is in the car this new angle is perfect! I can't wait to get the rest of the gauges in but the way things are going it will be a few more weeks before I have all the other stuff taken care of in the car before I can put the dash back in. I really like these gauges and hope they work out like I think they are, I ended up buying the fuel level, oil pressure and water temp in 2-5/8 and the AF ratio, fuel pressure and boost gauge in 2-1/16. The tach is the 4" unit and the speedo I'm still trying to figure out if the GPS or VSS version is what I want. Quote Link to comment Share on other sites More sharing options...
ktm Posted February 1, 2011 Share Posted February 1, 2011 Looks good. Why did you do this instead of opting for the 2-1/16 gauges? I used that diameter and was able to install them in the stock housings as well. I used the front metal piece with the bar cut out as the mounting point for the gauge. Quote Link to comment Share on other sites More sharing options...
Oddmanout84 Posted February 1, 2011 Share Posted February 1, 2011 Looks good. Why did you do this instead of opting for the 2-1/16 gauges? I used that diameter and was able to install them in the stock housings as well. I used the front metal piece with the bar cut out as the mounting point for the gauge. 2 5/8" seem to "fill the holes out" a little better, plus I personally like the idea of a remote button rather than pushing directly on the gauge. Still, I wonder what it would be like to go with the smaller ones. Its annoying that they only offer the A/F ratio gauge in 2 1/16". That's my two cents. Quote Link to comment Share on other sites More sharing options...
Sparky Posted February 1, 2011 Author Share Posted February 1, 2011 (edited) Looks good. Why did you do this instead of opting for the 2-1/16 gauges? I used that diameter and was able to install them in the stock housings as well. I used the front metal piece with the bar cut out as the mounting point for the gauge. There are plenty of reasons to go with either size. I have a preference for the larger gauges as in my mind they fill out the stock locations a bit better (as Oddmanout points out) instead of having what looks like a gauge bezel in another gauge bezel. I know my approach is certainly much more complicated than others but i'm extremely satisfied with the results as only those very familiar with the model will notice aftermarket gauges (hopefully). I finally figured out how I want to mount the tach and speedo so I'll tackle those next. Plenty of other stuff to do, intermittent wipers, new Haltech location, new compressor housing inlet, new crank case vent system, new battery location, keyless entry, SS engine bay fasteners and possibly windshield washers... Here is a photo that better shows the angle of the new guages: all that started from a malfunctioning fuel gauge. geesh. Edited February 1, 2011 by Sparky Quote Link to comment Share on other sites More sharing options...
kamikaZeS30 Posted February 6, 2011 Share Posted February 6, 2011 I was looking into getting some revolution series gauges for my v8 swap car, as well. Every single install I've seen here looks amazing. The 4" gauges are the best/easiest fit in the stock tach/speedo locations, right? My problem is I'd rather avoid losing any instrumentation, but it seems the only way to get the gauges I want in the stock space available is to get the Quad combo gauge and opt for the 2 5/8" tachometer. When I'm driving on the street, I don't really even "use" the tach, I just have this feeling that aesthetically it'll look "funny." It's also about $350 cheaper to buy this set-up than to buy the tach, speedo and the six other gauges I want separately. Does the stock Z fuel-level sender work with their gauges? Quote Link to comment Share on other sites More sharing options...
Fire604 Posted December 24, 2011 Share Posted December 24, 2011 I hate to resurrect the dead but I'd like to know if the OP has completed his install. If so, any finished pics? I'm working on the same project with 4" GPS speedo; 4" Tach; 2 5/8 oil, volt, and water; and 2" fuel level and fuel pressure. I eliminated the stock radio and relocated it into the glove box and created a custom filler in the console that I mounted the 2" fuel gauges. The console fab is done, the old gauges are out, and I'm just running the wiring and preparing to mount the 5 that go in the stock locations. Any update would be appreciated. Quote Link to comment Share on other sites More sharing options...
Recommended Posts
Join the conversation
You can post now and register later. If you have an account, sign in now to post with your account.