Randalla
-
Posts
31 -
Joined
-
Last visited
-
Days Won
1
Content Type
Profiles
Forums
Blogs
Events
Gallery
Downloads
Store
Everything posted by Randalla
-
Sorry, I misunderstood. Yes, re-checked the relationship between the cam and the crank and everything lines up properly.
-
Not sure what you're asking, "on ignition." I'm measuring the maximum amount of distributor timing, which comes in at about 3000 rpm. I'm not running a vacuum advance. Are you referring to something else?
-
bradyzq, I was a little mystified by that fact as well. When I dyno'd it I was running 34 degrees of total timing. I have since dialed in another 2 degrees to 36. The rpms were even lower until I changed out the SU needles for some that were much richer at top end. I'm going to try an even richer needle at top end to see if I can bump the rpms up a bit. Any other ideas?
-
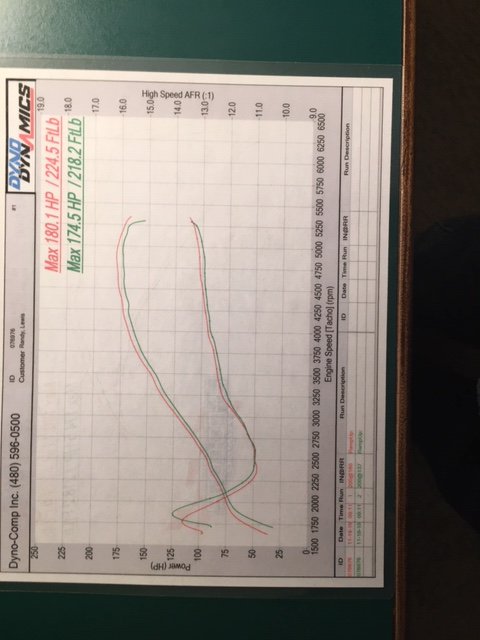
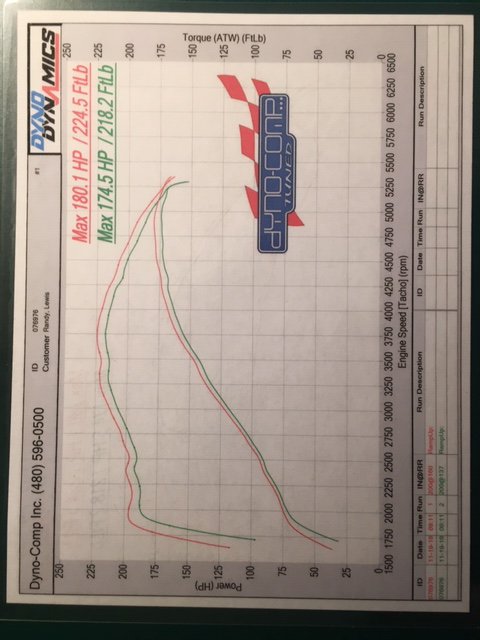
The top sheet overlays torque and horsepower. The bottom sheet overlays horsepower and AFM readings. I have some work to do to lean out the AFM at lower rpms in order to flatten out the curve. Likely will be experimenting with some different needle profiles. Car is very fun to drive and was build to be very streetable with zero detonation issues. Planning to open up the spark plug gap slightly from .032 to .035, dial in 2 additional degrees of timing and re-check valve clearances and I may tighten them very slightly. Oh, and obviously I'll try higher octane fuel next time (91 octane).
-
Just had a baseline pull done on my 72 240-Z with NA L-28 motor. The block is a F54 with dished stock turbo pistons, E-88 head with valves unshrouded and and some port work, cam is 480 lift/276 duration, running stock cast iron manifold with 2 1/2 inch exhaust and straight through glass pack muffler, Pertronix ignition, re-curved distributor running 34 degrees of total timing, SB profile SU carb needles and ITG foam air filters. Pull was with 87 octane fuel. Best pull was 180.1 HP and 224.5 Ft Lb Torque. No dyno tuning to date but with some very minor adjustments believe I can squeeze another 10 HP out of her.

-
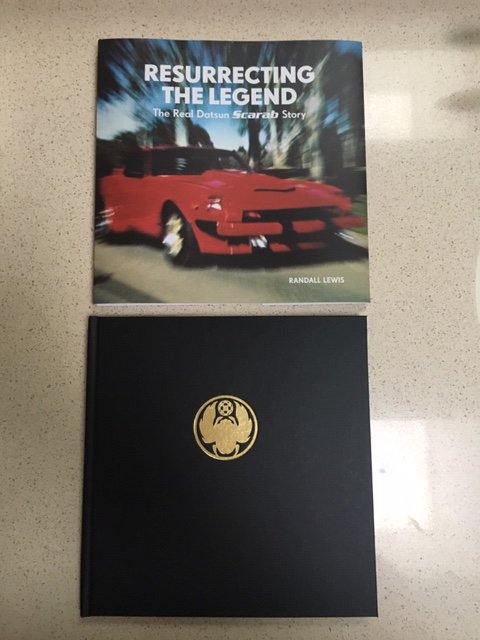
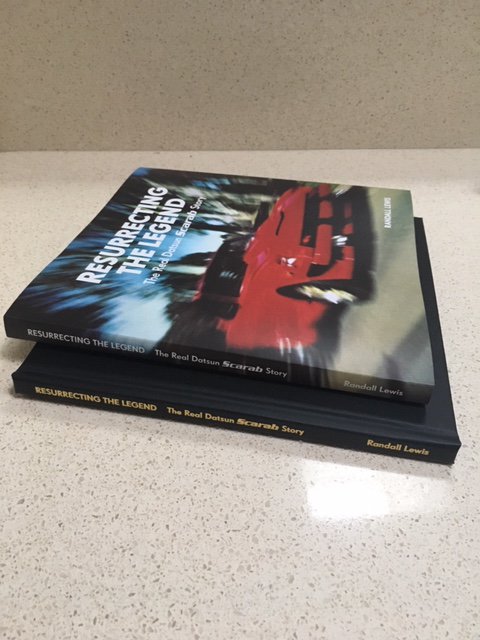
I should have also mentioned that a very limited number of hard cover editions of the book were also printed. The hardcover versions were intended for Scarab owners as a companion to their cars. Brian Morrow has about 20 copies left and would be happy to sign them for anyone interested. Unfortunately, because of the small print quantity, the printing cost was quite high. These are available at his cost of $100 each to anyone interested in a collectible for their Z library. Books come shrink wrapped (unless you'd like them signed) and have a paper jacket wrapped over a black cloth cover with gold foil stamping on the cover and spine.
-
“Resurrecting the Legend – The Real Datsun Scarab Story,” is a meticulously researched 104 page book documenting the history of the Scarab Engineering Company and its cars from 1975-81. Over the years there have been many myths perpetrated that are addressed and refuted in the book. The book is based on personal interviews with the company’s founders and employees, all of whom had gone underground more than 35 years ago. The development of Brian Morrow’s very first Scarab is chronicled as well as the events at each of the three shop locations, leading up to the company finally being sold. With nearly 90 color photographs and illustrations, the book defines what a Scarab is and its roll in automotive history. By the mid-1970s, domestic muscle car performance had been emasculated, and by association so had the egos of their drivers. The Scarab was so much more than a Datsun Z-car with a transplanted Chevrolet V8 engine: it was a completely re-engineered automobile, with each system and component carefully considered, improved or replaced, to realize Morrow’s goal of creating a well-balanced machine capable of shaming all comers. Road Test magazine said it best when it wrote, “Subtle as a chain-link jock strap, the Scarab will not only blow 99 percent of the cars on the road in the weeds, it’ll do it in style.” Books are available for $35 with free shipping to the lower 48 states by PayPal at parallax.randy.lewis@gmail.com
-
FYI, I'm down to my last 2 sets for sale on eBay till more components arrive and I have time to produce additional products.
-
The level of fuel in the float bowls is the first step to be taken before making any other fine adjustments to optimize “runability” (other than valve adjustment). In my experience Float-Sync gets you to the baseline as quickly and accurately as possible. I learned, like most of us, the way to set float levels is to remove the float bowl lid and measure the distance between the lid and the top of the float when the cover is inverted. What I have since learned is how imprecise this approach actually is (in terms of optimizing engine performance) because of so many variables. Some of those variables include whether the carbs are being run with or without float bowl gaskets, how many turns down the jet nozzles are set, if the float valve is fully opening and closing, if the float bowl lid has short or long ears and if floats are intact and their buoyancy is the same in each float bowl and I’m sure there are a number of others.
-
I just posted 3 additional Float-Sync sets on eBay for those interested.
-
Thanks for your interest madkaw. I sold all the units I had for sale during the first seven day auction. I'll be re-posting additional units in the next couple of days so please check back. I'll post the date here as soon as I have a chance to get them back up on eBay.
-
Guess I may be a little, late but in good company nonetheless.
-
Thanks for the feedback guys. I also rebuild SU's and have for years. I was looking for a simple way to make sure floats were set properly before sending the re-built carbs back out. These have worked great for me and for those locally who field tested them for me before I listed them for sale. Wow, I guess I didn't know the exchange rate between the Canadian and U.S. dollar was so far apart.
-
Yes it is.
-
I've been working on a new product for the last six months that I'd love to get some feedback on. I've always known getting the floats in SU's set properly, and knowing for sure they were set the same in both carbs was important, but the method of doing so always seemed imprecise and less than elegant. I developed Float-Sync to know precisely where floats were set and have a visual reference, without removing the float bowl lids. On three screw SU's, there's a threaded plug in the float bowl that can be easily removed to substitute Float-Sync. The level of fuel in the float bowl dictates the level of fuel in the jet nozzle. This is a big deal for SU carburetors because the fuel level in the jet nozzle directly impacts engine performance. When the engine is running, a vacuum is created in the SU carburetor venturi that pulls fuel out of the jet nozzle, mixing it with air and drawing it into the engine. If float levels are adjusted too high, fuel puddles at the top of the jet, allowing too much to be drawn into the engine, creating a rich condition. If the float is adjusted too low, it's harder to pull fuel out of the jet, creating a lean condition. A rich condition can cause plug fouling, poor fuel economy, gas fumes, diluted crankcase oil (contributing to blow by and reduced engine protection), and in extreme cases potential for an engine fire. A lean condition can cause the engine to stumble, back-fire, ping and run hotter than it should, creating the potential to burn valves. Float-Sync allows you to see precisely where your floats are. You can see the fuel level, with the engine running, throughout the entire RPM range… all without opening the float bowls. You will never wonder again if your floats are adjusted correctly. I'd be interested in your feedback and suggestions. I listed a few sets for sale on eBay last week to gauge interest. Thanks
-
Don't yet have the headers I will be using, but they will likely be jet hotted square port MSA headers.
-
A few years ago I bought an extra L28 engine that had just been completely rebuilt by Jasper, but never fired. The engine sat in storage with my cars for the last four years and I've finally decided to do something with it. The block is an F54, with dished pistons, and the head that came on it is a P79. This combination provides a very low compression engine. The engine will eventually be transplanted into my 72 240Z. My goals are to increase performance over my tired stock L24, be able to run on premium fuel without detonation and to have the engine run equally well (relatively speaking) with my stock SU's or 40mm tripple Webers. I'm not touching the bottom end of the motor at all at this point, so the options are with the top end (head choice and upgrades). I'm well aware that the dished pistons may not be ideal for power but I'm trying to do this on a budget, while keeping this car very driveable. The head will receive a mild cam (approximately 270 lift) and no matter what head I end up choosing, ports will be polished and the valves will be unshrouded. I have three heads, an E31, E88 and the P79 currently on the engine. With the dished pistons I know I need the E31 or E88 to up compression where I want to be, somewhere around 9.5 : 1. It seems the two heads each have pluses and minuses. The E31 has a smaller quench area, will provide slightly higher compression than the E88, but has small exhaust valves, which I'm assuming may be a detriment with the larger displacement L28. I've been told I can swap in L28 intake valves on this head but this would require cutting some of the combustion chamber away to accomodate them. This would also seem to compound the smaller exhaust valve issue. The E88 head, with larger quench area can more easily be refitted with L28 intake valves and already has larger exhaust valves stock. It will however produce a bit lower compression motor than with the E31 head. I've been told there are two versions of the E88 head (an emission version and a higher compression version) but don't know what I have or how to tell them apart. So, my question is what way would you go, and why, given my goals and pocketbook, Would appreciate any and all advice. Again, I'm not touching the bottom end, so please don't suggest replacing the pistons with flat tops. Thank you.
-
Thanks guys for the input. I ended up cutting about 1/2 inch forward on the tunnel and also installed a short throw shifter, which solved the problem. Just finished it up today.
-
I have just installed a L28 with 4-spd transmission in my 1971 240-Z. While everything bolts up fine, I find that the shift lever hits the tunnel when the trans is in either first or third gear. When the inside rubber boot is installed the lever won't even go into gear. The easy fix is to cut out about 1/2" at the forward edge of the tunnel but I'd like to know why I am having this issue. I've tried substituting three different shift levers, each with a different profile, but I still have the clearance issue. I seem to recall hearing somewhere that the 1971 240-Z had a slightly shorter drive line but that should not impact the dimension from the engine mount to the point the shift lever comes up through the tunnel. Anyone else have this same issue?
-
Actually a 240Z has an L24 not an L28, but that makes little difference. I've had ten of these cars and most ran fairly quiet. This one is unlike others I have heard. Thanks for the tip regarding removing one ignition wire at a time to eliminate piston/block issues. I've heard of that before but forgot to try that. I'll also try the ATF in the crankcase to see if that frees something up. Something obviously could be stuck with the engine sitting for so long. I've also checked to make sure all the lash pads are in place (they are). Wondering if bad seals would ever cause ticking like I am experiencing??? Still a bit of a mystery.
-
I have a 1972 240-Z that I have been resurrecting after the car had been sitting for 6-8 years. The engine runs with good power and even idle, but has a ticking in the top end that I have not been able to correct. OK, so let's eliminate the obvious things. I first did a valve lash adjustment cold, to spec (.008, .010). The tick persisted so I re-adjusted the valves, hot to spec (.010, .012). No difference. So, then I began to look for missing or broken pieces (everything is there and nothing is broken). I turned the car over with a remote starter with the valve cover off and watched to make sure everything was moving as it should. At this point I discovered one of the holes on the oiling rail was plugged and thought I had found the problem as that cam lobe was a bit dry compared to the others. Notta, same ticking noise after reassembly and running the car. The cam lobes all look good with no excessive wear or damage. The nose seems to be coming from the middle of the valve train rather than the front or firewall ends. I used a stethoscope to eliminate a rod knock. The noise is definitely valve train related. So, what are the next things to check without pulling the head off? The motor has about 140K on it, has good compression and does not burn oil.
-
I have a 1971 240-Z with the original engine in it. I bought the car knowing it had a blown head gasket, intending to pull the head and fix it. After pulling the valve cover, I'm now suspecting the engine sat for years because of the scaly rust I see on the cam, timing chain and gear. I have not yet pulled the head or oil pan but expect to see a similar condition when I do. Two questions. First, has anyone successfully resurected an engine like this without a complete disassembly and rebuild. Second, I have located a low mileage, running, fuel injected N42 engine with N47 head that I could swap in but I'd like to convert it to SU carburetors. I've read that the N47 head is not be tapped for them. Is anyone here currently running this combination that can advise re: feasibility?
-
In the process of trying to resurrect a friends 1973 240Z that has been sitting for at least five years. I have done all the usual things to get it going again. The car now runs but only when the key is in the start position with the starter energized. As soon as the key is moved to the run position the engine immediately dies. I've eliminated all the usual suspects and changed out all the ignition parts, distributor cap, rotor, wires, etc. and even went to Petronix electronic ignition. After all those changes I still have the same problem. I'm now wondering if the ignition switch is the problem and thinking maybe I can hot wire around the switch to eliminate that possibility. Help me here. Am I forgetting something or overlooking the obvious???
-
I'm in the process of resurrecting a 1973 240Z. I've looked at 2 1973's and both have a electrical and mechanical fuel pump. My 1972 240Z's have only the mechanical pump. First question is was there a change made at the factory on 1973Z's and what is the purpose of two pumps? Currently I am not getting any fuel to the fuel rail at all (the tank has been cleaned and there is fuel in the tank). I supposed it's possible that both pumps are in op but not very likely. My next step is to use a glass jar of fuel just below the mechanical pump to see if that one working and then work backward. Any thoughts?
-
Having just changed out the stock air cleaner and filter for the much more free flowing ITG's I now find I'm flowing so much air that the engine seems to be choking when I accelerate from idle. The ITG's are oiled foam filters and I am running aluminum air horns inside them. Clearly I need to get more fuel to the carbs to offset all the fresh air the carbs are now receiving. My thoughts at this point are to richen up the fuel mixture by turning the screws out a little bit at a time, drop the needles into the piston slightly to more quickly get fuel off idle and if that does not work satisfactorily, experiment with some different profile needles. Has anyone experiened this issue and what did you find that worked??? The engine has stock internals with no other real perfomance mods.