fp280z
-
Posts
41 -
Joined
-
Last visited
Content Type
Profiles
Forums
Blogs
Events
Gallery
Downloads
Store
Everything posted by fp280z
-
Do a search on this site for "weber fuel pump" and you'll find tons of options. After trying a bunch of options over the last few years, I've been very happy with: Mallory Comp-110 pump w/ pressure bypass plugged Mallory 4309 Return Style Regulator in the engine bay Autometer Fuel Pressure gauge 3/8" aluminum send (and return!) lines I have a fuel cell so the system goes cell->bigfilter->comp110->3/8" line->little filter->4309->3/8" return. Then the carbs are fed off of one of the ports on the regulator. It's important to have a good fuel pressure gauge when messing with this stuff, most Z carbs (SUs, Webers, Mikunis) like to see around 3psi. This is probably overkill for a street setup but it is an option and it works for me. Remember all the pieces have to be matched to work together for optimum performance. Keep searching this site. You're not getting many replies to this thread since this has all been covered before...search is your friend! -Rick
-
LOL! Believe me, I thought about it. Maybe after Nats when I can get a half day or so on the dyno. I know from my motor specs it may look like I'm made of money but I'm at the end of my budget at this point. It would definitely be interesting and hopefully educational for everyone else to see mysterious #8 side by side with Mr. OA in back to back dyno pulls. BTW, "preith" on the Classic Z car forum suggested that he had a bogging issue in the same RPM range and it turned out to be cam timing: http://www.classiczcars.com/forums/showthread.php?t=31841 I didn't set my cam timing but my engine builder did and I know that he advanced (or retarded?) it to get a little more low-end torque for autocross. I need to follow up with him. -Rick
-
Ack! That doesn't sound good. I realize that a little stumble is quite common for triples on a Datsun but mine really seems extreme and got a whole lot worse with the free flowing exhaust. Also, on these dyno runs there's no opening the throttle, it's already WOT when the run starts. I guess varying the load may affect the intake tract velocity the same way though? -Rick
-
I don't know if this is too much data (I'm an engineer, can there ever be too much?) but I was hoping someone could assist me in honing in on the root cause of my issue and I always enjoy the threads that have a lot of data to go along with the HybridZ troubleshooting! Ok here's the deal, the SCCA Solo National Championships are less than two weeks away, I spent all last week thrashing to install my new Stahl header and fabbing up an exhaust for it, dyno'd on Saturday and got some decent numbers up top but I seem to have introduced (or exacerbated) a bad bog between around 2250rpm to about 3250rpm. This is a terrible place for a flat spot on an autocross car. Obviously, eliminating the bog is my goal but even reducing before next week it would help tremendously. Attached is the dyno chart from Saturday and a chart from April that is pre-exhaust work, the only major change between the runs. As you can see, the exhaust work really woke up the motor above 3250rpm! These dyno runs were performed starting with a load at WOT at 1800rpm then then removing the load and allowing the car to accelerate the drums, at least that's how I understand the basic concept. I only mention this because this method takes most of the mechanical action of the carburetors out of the loop (in other words, this is probably not an acc pump issue, progression drillings, etc.) Also plotted on the dyno charts is the AFR for each run. I tuned the jets so that the target of ~12.9 hit just over 5350rpm and the upper AFR "step" in the midrange was a little leaner than that but not dangerously so. Based on my understanding of the carbs (I have read the Mikuni manual and several Weber books) that seemed like a logical tuning plan. If I'm way off base here, please educate me. Maybe the "step" is a clue? At the point of the bog the AFR goes way rich (<10:1) and the torque drops. The same dip in the AFR is on the pre-exhaust pull but it's not as drastic, and you can see a similar dip in torque. So, it looks like this issue may have been present before just not as bad. One troubleshooting step I tried at the autocross today was to drop the main jet down one step and the air down two. Seemed to help a little and the in-car wideband didn't look too lean but I have not been back to the dyno. I also leaned out the idle circuits which helped the idle but didn't to much for the bog. Here's the other pieces of the puzzle: 13.5:1 GT2 motor .540/292 cam Stahl Header 1-5/8" primaries 2-1/2" to 3" Y-pipe to Magnaflow muffler Mikuni PHH44 carbs 39mm venturis 170 mains (165 mains) 230 airs (220 airs) 55 pilots 35 pumps Fuel pressure 3psi Electromotive XDi, crank triggered, timing is set to 15 at idle and 36 total by 3000rpm. Spark plugs are a half-season old, autocross only. Valves adjusted beginning of the summer. That's about it. I was hoping one of the carb gurus may have seen something like this in the past. Or it's something simple like my jetting being way off. I would welcome any technical feedback, I enjoy learning about the carburetors but books don't really tell you everything. At this point, a "dude you didn't have to write a huge post, it's obviously ..." would be great too. If it's just a matter of dropping jet sizes, I can do that and if I need to head back to the dyno, it's a possibility. Even if so, I'd love to know the theory around "why". Thanks for reading. -Rick

-
http://www.typeischeap.com/stahl.html Wrapped up my Stahl header and 3" exhaust project last night. Should get me through Nationals after which I'll pull everything and get the header ceramic coated. I went with a basic Flowmaster Y-pipe this time instead of a true merge collector. Some odds-and-ends from the project: * The collectors ended up sitting horizontal so I had to clearance the tranny tunnel a bit to get them to fit (not sure if this was a build issue or if they're all like this) * I had to cut some extra thick Nissan exhaust washers in half and weld them to the header flange to match the intake thickness * The wideband o2 sensor placement is not ideal but the ideal spot was obscured by the tranny crossmember. Other than that it went surprisingly well, the ports on this header were almost perfect from Stahl and very little port matching was required. That said, I don't think I'll ever do this again without a lift, my back still hurts! Lots more pics on the link at the top. Enjoy! -Rick
-
I'm about to pull the trigger on a new set of Stahl headers and have one question for those that already have a set (anyone?): There is an option on the two 3-1 collectors to be slip-on or weld-on. My first instinct was to have them welded onto the primaries but was wondering if there are any installation issues with this. In other words, are slip-on 3-1 collectors a good idea to facilitate getting this thing in around the steering shaft? Or does it fit fine with the collectors welded on? BTW, just for reference I'm getting a set with 1-5/8" primaries with 2-1/2" collectors. Will be building a 2-1/2" Y-pipe to 3" exhaust for it. Thanks. -Rick
-
Good info, Jon. This bracket is one that I made myself, not the TEP bracket but it is similar. I'll keep an eye out for vibration issues and redesign if necessary. -Rick
-
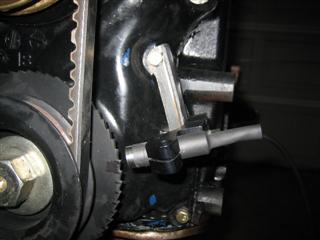
I found your thread and the same lack of information about the XDI on this forum as well. That's fine, just means very few have really been there yet. I think most Z folks are Megasquirt users by nature. That's cool, but all I wanted was spark since I'm running carbs. Anyway, I'll try to post my findings with the XDI system to hopefully help others like you. There may be 1 or 2 more out there. The motor I bought for my car had the Electromotive trigger wheel already installed and the distributor port already plugged so I decided to try out the crank trigger thing. I bought the XDI box from Steve at TEP since he had the best price on the XDI, DFU, and sensor package. The only thing missing at that point was the crank trigger sensor mount. I bought an aluminum Porsche crank trigger mount off of eBay and fabricated the attachment to the front cover. I had to add a layer of heat shrink to the sensor so it would be snug in the Porsche mount. Some pics are attached. For more info and bigger pics check out my website: http://www.typeischeap.com/new.html As you can see from my webpage, I',ve mounted the box, coils, and sensor but haven't wired everything up yet. That's planned for this weekend. Hope that helps. Let me know if you have any other questions. -Rick
-
Thanks guys. Jon, you reminded me that I forgot to mention another contentious mod that I did during the project...slotting the crossmember pickup points! Also, I built a lower panel for more gauges and will be installing a wide-band and fuel pressure gauge below the pod that's already there. Plus, I performed an "alternator downgrade" using a smaller Toyota AE86 alternator instead of the more common ZX or GM 10si/12si units. Pics of the new stuff will be up soon... -Rick
-
Just wanted to say thanks to all the folks on this forum for all the great ideas on here. I used the search function extensively over the past month in a half while doing some major work on my autocross car. There was so much good information and opinions on this board that I didn't even have to post any additional questions. For those searching, some topics I covered were seam and/or stitch welding, firewall patching, strut tower bars and bracing, the Arizona Z Car cast aluminum oil pan (yes, you do need the ZX pickup), and all types of good gauge info including all the necessary adapters for our old L6's. You can check out my progress here: http://www.typeischeap.com/new.html Motor, hopefully, goes in this weekend! Thanks again! -Rick
-
So, after reading lots of Powerforce damper posts on this forum, I cleaned and lubed up the crank nose, made sure the woodruff key was properly aligned, cleaned up the keyway in the damper, and got to work. I also made a mark on the top of the damper corresponding to the key slot to ease lining it up. The thing was still a bear to install. Very tight but the new "motorsport" crank bolt had plenty of thread to pull the sucker on there with an impact, it took a lot of torque though. As with anything I do, now that it's on the stress begins. In an effort to help me sleep at night, what's the easiest way to check that the pulley went on correctly? Meaning, the key is correctly in place and the back of the pulley is not mushroomed around the key. (Yes, doom and gloom.) The engine is out of the car on a stand. I've already sealed the oil pan so I'd rather not do that again if I don't have to. I do have a full set of gaskets. Pull the oil pump? Or can you see all the way down there with the valve cover off? After install, I stuck a piece of cotter pin into the damper key slot and it stopped after going in about 1/2" so I know the key did not fall out completely. Any opinions would be appreciated. This is an autocross car that gets 5-10 minutes of use every other weekend so it's not like the pulley's going to come off on the highway but I want to make sure I do what I can to make sure it's safe. Thanks. -Rick www.typeischeap.com
-
Ahh, there's what I need. See the "thackery" washers. Those came with my manifold. Looks like the rubber cushions and cup washers might be worth checking out. The soft mount plates are tempting too since the ones that I have are plastic (plastic is a better thermal insulator though, I'd guess). http://www.rdent.com/pages/carblink.html -Rick
-
Posting my "solution" just in case anyone comes across this thread and has the same issue. Buzz was right! It was the liquid filled pressure guage. Swapped it out with a non-liquid filled unit and pressure is rock steady even after the engine is nice and warm. Thanks. -Rick www.typeischeap.com
-
My Cannon manifold came with a set of "anti-vibration" washers that look like very flat two coil springs. Does anyone else hate these things? If I tighten them down according to the instructions, the carbs seep gas from the rubber isolators. If I tighten them down more than that, they break and/or are rendered useless for their intended function. Any other options here? I think the nuts are nylocks, can I just replace these useless anti-vibration washers with flat washers? Thanks. -Rick www.typeischeap.com
-
Picked up a new half-shaft u-joint from the Nissan dealer this morning and ordered three more. Thought I'd share a few observations about the ordeal and also I've got a question. First off, I broke three out of the four u-joints at the Mineral Wells ProSolo last month. Sticky Hoosiers, 100 degree heat, and and uphill drag start all compounded in a bad way for my car. The Autozone in town had two Neapco and one Neapco Brute Force u-joint. We bought them all and replaced one Saturday at lunch after breaking that morning and one Saturday evening after breaking that afternoon. We broke the third on Sunday morning and rolled the car on the trailer. The new Autozone u-joints held together, the tired Spicers that were on the car were the ones that broke each time. So, I started looking for replacements. I didn't want to have the same MW experience again so I decided against the $14.99 Neapco u-joints. I found the Spicer part number (5-1505X) and ordered four. I received four but the bearing caps were too small for the yoke jounals. I confirmed this by measuring the bearing cap and comparing to the one remaining Neapco unit that I had from MW. I will be returning these. Anyone seen this before? Next, I got the Nissan part number from the website below: http://www.atlanticz.ca/zclub/techtips/ujoint/index.html The 37125-21025 part number did not show up in the Nissan dealer's database. The number that did show up was 37126-VB925. I took the one they had in stock and tried it on one of my half-shafts and it appears to be correct. This u-joint is not solid but does not have any grease fittings. Anyone familiar with this part number? Lastly, the 37126-VB925 came with several color coded retaining clips of varying thickness. Anyone know which I should use? Common sense tells me to use the thickest ones, just wondering why there are so many. Thanks. Rick Martinez www.typeischeap.com
-
Anyone mount their Carter rotary fuel pump (4070) inverted? As in upside-down? I believe that the manufacturer advises against it but I think I've read some posts saying it was ok. Since my fuel cell hangs kind of low, the only way I could get good flow to the pump was to mount it upside-down. Otherwise, the bottom of it would have to be way too low. So, anyone do this with satisfactory results? What are the drawbacks? Reduced pump life? Pressure regulation issues? Safety issues? BTW, this is on an trailered autocross car that never sees the street so it has to be reliable but it's never run for long periods at a time. Thanks. -Rick http://www.io.com/~rickm/fp280z
-
Here's the scenario: Triple Webers on an L28 with mods. Holley fuel pressure regulator with fuel pressure guage attached to one output port. Other output port attached to 5/16" hose going to carburetors. No return line. Input port is 3/8" hard line from a Carter rotary fuel pump mounted next to the fuel cell. Flip the fuel pump on (this is a racecar) and the pressure guage goes to 3psi. Start the car and the pressure remains steady at 3psi. Then, as the car warms up the fuel pressure will gradually drop down to 0psi. Car still runs and drives fine with the guage reading 0psi. Pinching the hose to the carbs causes the guage to deflect slightly. Anyone experience this before? Is this normal? What's up? BTW, I had the same pump/regulator setup when I was running SUs but the pressure guage is new with the Webers so I'm not sure if this was happening with the SUs... -Rick http://www.io.com/~rickm/fp280z
-
Oops! Forgot to mention that these are for triple 40DCOE18s... -Rick
-
I've gained a lot of valuable info on tuning my Webers from this site, now I need parts! Before I go out and spend a bunch of money on new jets (which I'm not opposed to doing) I was wondering if any of the ex-Weber gurus out there have any jets/chokes/etc sitting around collecting dust. I'd be willing to take them off of your hands for a fair price. Thanks! -Rick http://www.io.com/~rickm/fp280z http://www.io.com/~rickm/fp280z/new


.JPG)