fp280z
-
Posts
41 -
Joined
-
Last visited
Content Type
Profiles
Forums
Blogs
Events
Gallery
Downloads
Store
Everything posted by fp280z
-
I've been wanting to post a build thread for my new project but was banned from bimmerforums years ago for some reason that I don't even remember, too many for sale posts I guess. Seems like it's common for Z guys to also dabble in BMWs (this is my second E36) and since this is HybridZ it is probably just as common for us to embark on the LS1 path so I feel like I'm part of a small but completely awesome brotherhood here! I especially want to thank BRAAP (Paul?) for his build threads, they have been very helpful! Getting a new domain setup so I can post some pictures but in the meantime I've been using a Facebook page to track my progress. LS1 and T56 are in, Vorshlag kit is mostly together, working on ABS and rear suspension now: http://www.facebook.com/e36ls1 The FP car is still in the mix and is running better than it ever has. I managed a 3rd place podium finish at last year's SCCA National Championships but I'm taking it easy this year (new baby!) Anyway, will post more as I have time... -Rick
-
Very sad to hear about this. I bought many great parts from Ross over the years for the race car and they have all performed flawlessly. Rest in peace.
-
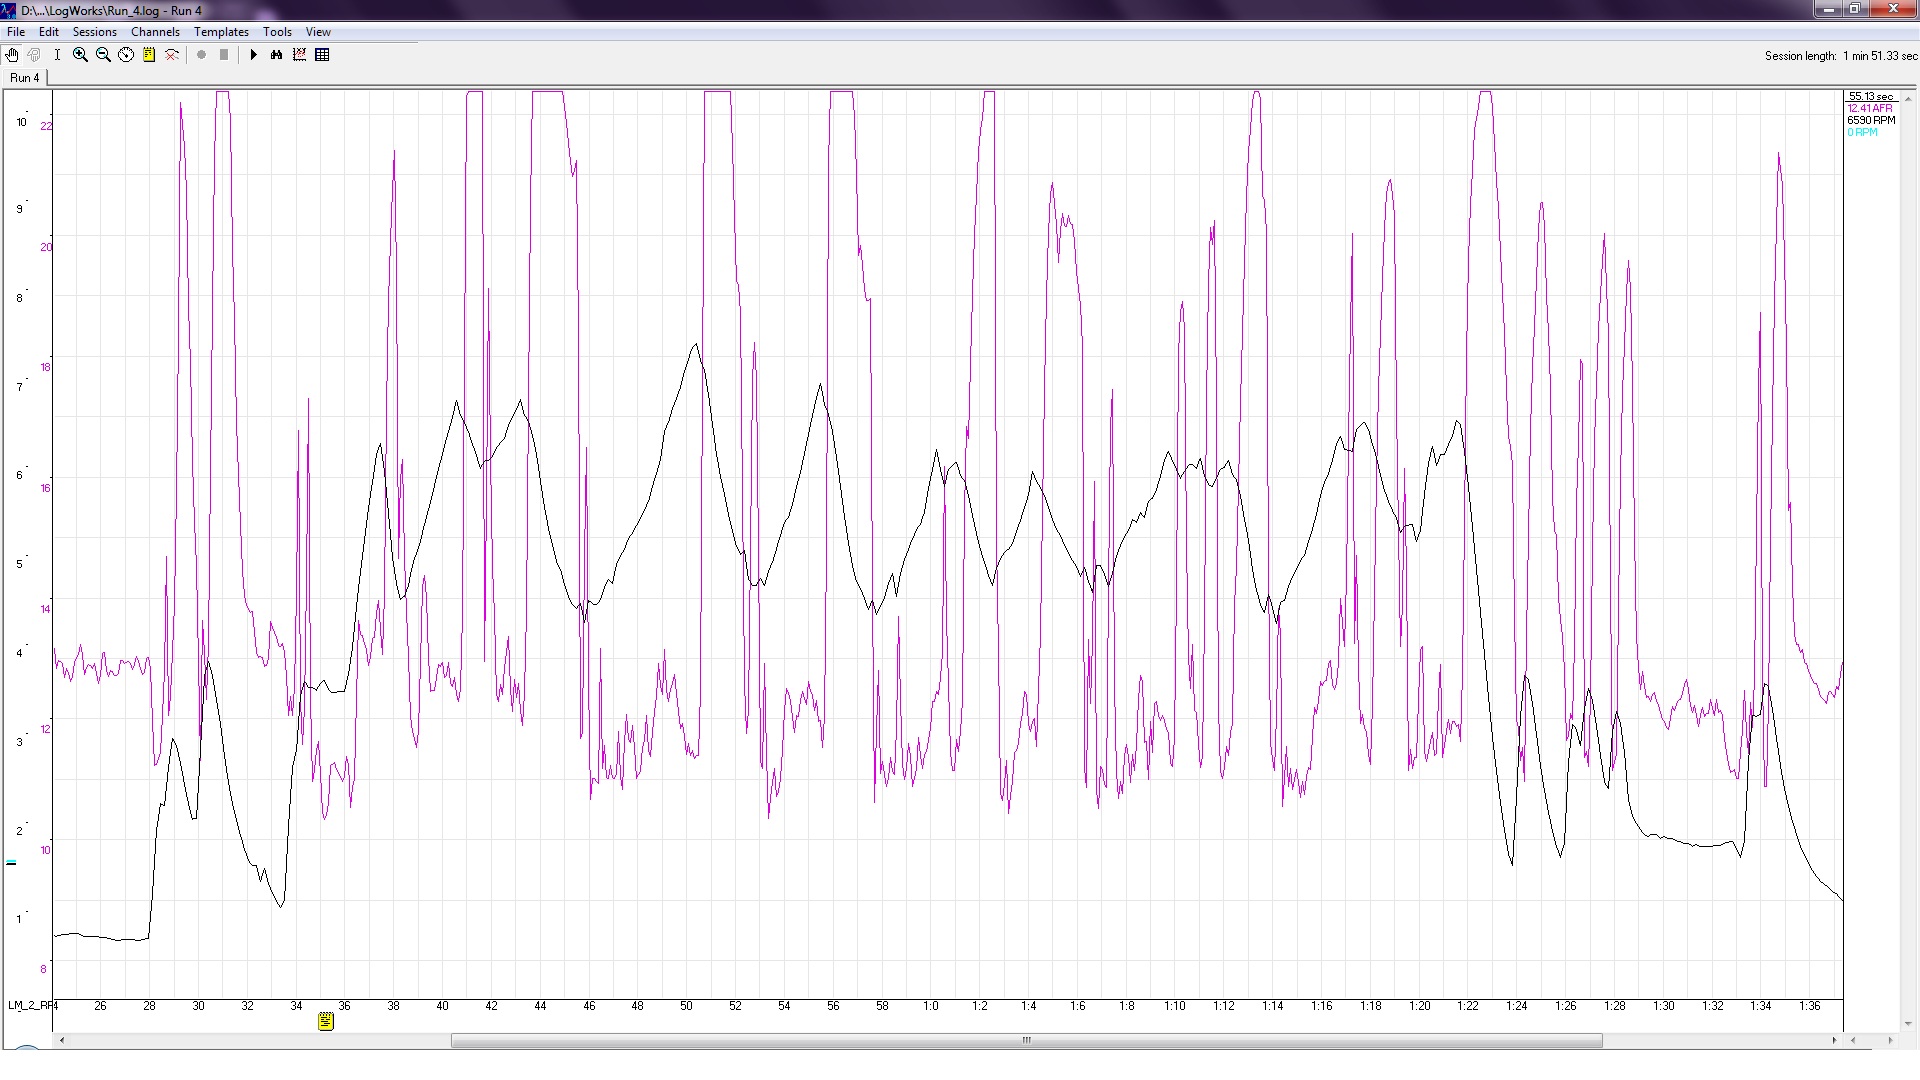
Car seemed much improved this weekend, plenty of power out of the slow corners now with just a hit of bog but clearing up very quickly. Course didn't have any extended high speed areas so I'll have to test the high rpm drop off on the dyno. Will be interesting to see how the AFRs map on the dyno. LogWorks data log attached and the same run on video here for correlation: Full data log here if you have LogWorks: http://www.typeischeap.com/Run_4.log As always, feedback on the data is appreciated. Enjoy!

-
Some progress today, ohm'd out all of the ignition wires and found #1 to be bad. Around 500kohm vs. 300-700ohms for the other wires (Taylor 8mm Spiro-Core). I don't think I've checked the wires since I built them in '08, shame on me. Swapped in the 60 pilots too and reset the idle. Will test it out (and data log) on Sunday at the autocross!
-
I use an old clear BIC pen to set the floats, not as elegant as Keith's tool but should be just as accurate if not more so (e.g. you don't have to watch the sight glass to determine when you hit fuel). I've reset the floats since I've been to the dyno, definitely need to get back and see where I'm at and get a new baseline. No mechanical fuel pump here, fuel pressure stays at 3psi all the way through the dyno run according to the dyno guy watching the gauge. Another thing about the dyno is that is should not be dependent on the accel pump. They floor the accelerator under full load, wait for it to stabilize at low rpm, and then the dyno reduces the load to a set level and the rpms climb for the run. To me this seems a bit "artificial" so I've also been digging through my LM2 log data from the past few events to see if it is consistent with the dyno.
-
The most interesting thing about Keith's paper is that he suggests starting tuning with the air corrector instead of the main jet which is opposite of almost every other side draft book/reference out there. Good reasoning behind it though and it's worth a shot in my case since I've tried almost everything else jet related. Until now I've only made "fine tuning" adjustments with the air corrector. Tuning would be much easier if the car were street legal. I have an LM2 wideband datalogger but my only tuning opportunities are the autocross course (not ideal) and dyno. Luckily I have a friend that runs a dyno but even friend prices can add up! So, I like to queue up ideas/experiments for the next dyno trip, keep 'em coming if you have any thoughts! Thanks!
-
Good resource, thanks!
-
The build in '08 included brand new carbs and ignition. About the only thing I reused was my Cannon manifold. Leaning out the AFR so that the peak was above 14 still did not provide power all the way to redline although it did improve the dip/bog at the low end of the rpm range. The only other fuel related theory I could come up with was that the mains were somehow not coming on early enough and causing the lean area in the AFR graph. I thought about grossly reducing the air jets as an experiment to see if that would allow the mains to come on earlier and narrow that peak. If so, then I could move both the airs and mains down to get the average AFR in the right place. I believe I'm at 155/205 with 34mm venturis right now but I need to verify that. This dyno run above was made when I switched to the 34mm chokes so I don't remember exactly what jets I ended up on after tuning. Hard to believe that the mains are not coming on until almost 5000rpm though, anyone experienced anything like this?
-
Completely agree that the AFR is the concern here but I don't know root cause. I've tried quite a few things over the last few years, float levels, fuel pressure, etc have been checked and rechecked. The AFR "step" is perplexing, are the rich ranges the anomaly or is the peak the anomaly? If I change jet sizes I can get the whole thing to move up but then the peak AFR is too lean. I need to smooth out the AFR curve...
-
The race motor in the FP car has had some power band issues since it was built, it just doesn't want to rev much past 5500rpm with a significant drop in power at 5000rpm. I've checked or replaced almost everything external to the engine, gone through the carbs many times, and have even been through a rebuild. I'm now suspecting cam timing. The cam was timed originally in '08 by the engine builder (advanced a few degrees for autocross was my understanding) and I reused the original marks during my recent rebuild. I timed it during the rebuild just to make sure I got it on the right tooth but would like for someone to "check my work" and let me know if these measurements make sense or could be contributing to my issues. Cam card is here: http://www.typeischeap.com/cam_card.jpg Most recent dyno is here: http://www.typeischeap.com/RM2AFR.JPG http://www.typeischeap.com/RM2T.JPG A couple of things about the dyno curve that highlight the issue, 1) really great torque at 3000rpm, 2) "stepped" AFR that is rich (bog) at low rpms, steps up to a decent AFR for peak torque, then back to pig rich for the drop in power and brick wall... Cam timing (measured at .050 lift) is: Intake opens 23 BTDC Intake close 52 ABDC Exhaust opens 55 BBDC Exhaust close 18 ATDC This is the first time I've tried measuring cam timing so let me know if the numbers above do not look correct. Here's an old thread from the original build with more information about my setup (yes the bog is still there): http://forums.hybridz.org/index.php/topic/69511-mikuni-boggot-data-need-some-analysis/ A local autocrosser suggested it may be a bad coil pack but I would think that the AFR would go lean on a misfiring situation? Yes, it's a lot of fun on courses that keep me between 3000-5000rpms but that doesn't win autocrosses! Any other ideas? -Rick
-
In the final stages before reassembly of my FP motor and had a few questions for the engine builder folks. Short story, this is a 13.5:1 autocross motor that started life in a GT2 car and was converted to autocross specs (different cam, wet sump) a couple of years ago after I bought it. JE pistons, Carillo rods, worked head, etc. More info and pics of that process on my website if yer interested. Anyway, the crank broke last August and fast forward to now, everything is back from the machine shop mostly ready for assembly (still have a list of to-dos like setting the ring gaps, etc). The block and crank were tossed and I had a stock F54 block bored and honed to match the JE pistons, new piston rings, new-used stock crank checked for straightness, micropolished journals, and balanced with clutch/flywheel. Head got a valve job and new valve guides. Everything else disassembled and cleaned. New Rebello damper to hopefully extend the life of this crank. This is personally my first rebuild ever but I've done almost everything else on an L6 over the past 10 years. I have read the "How to Rebuild" and "How to Modify" books and the FSM. And I still have questions! Goal is to have a reliable power plant that I can autocross for 5-7 years before a teardown. With no oil leaks! Here goes: 1. I'm running a 3/4 NPT to AN hose to an external breather off of the crankcase breather outlet. Do I still need the "mesh" inside the block? Would just running the sheet metal baffle be sufficient for this setup? 2. The JE piston instructions show the ring gap aligned to the thrust face of the cylinder bore for one of the rings and then the other 180 degrees out. I was planning instead to use the standard L6 orientation described in the books referenced above. Opinions? 3. Recommended method for securing/sealing the NPT plugs in the oil galleys (or is it gallery? seen both used)? Books mention "epoxy" but no particular type (old books obviously). Some posts have mentioned loctite, is that sufficient? Or do I need a specific epoxy? 4. I'm trying to avoid RTV this round. I've used it in the past but would like to get away from it for anything touching oil. Planning on using Permatex 2A on all of the engine gaskets using the goop gasket, finger tight front cover/oil pan/etc., wait overnight and then torque to spec process. Any other recommendations? I have the AZcar competition oil pan and MSA competition gasket. 5. Final wipe down of bearing caps/races before installing bearings, should this be "wipe all traces of oil off the cap and back of the bearing using solvent" or "wipe down but leave a film of fresh oil on these surfaces"? This is pertaining to the bare metal on the caps/races, obviously the face of the bearings and bearing journals will get oil/prelube on assembly. Thanks in advance for any help. I know some of this stuff is general knowledge out there. Any other tips also appreciated. -Rick
-
Mine was a bench grinder stand out of an old Datsun wheel and scrap tubing. -Rick
-
Got a set. Will PM you pics. Make me an offer. -Rick
-

Show Off Your Engine Bay! Pics Wanted, L-series
fp280z replied to philipl's topic in Nissan L6 Forum
Here's mine... -
Show Off Your Engine Bay! Pics Wanted, L-series
fp280z replied to philipl's topic in Nissan L6 Forum
Very nice! -Rick -
Automotive Specialist in Round Rock. A good autocross friend of mine is the service manager and I don't take my cars anywhere else. Ask for Dan. http://www.jcautospec.com/ -Rick
-
Custom wheels for race rubber?
fp280z replied to 2eighTZ4me's topic in Brakes, Wheels, Suspension and Chassis
Why do you need 17"s if you're using them for race rubber anyway? If you drop down to 16"s then you can get a set of Real's for relatively cheap in any width/offset you want: https://www.rsracing.com/rscatalog/asppages/rrw-pro616.asp I've been running 16x10 Real wheels from RS on my FP car for 7-years now with no issues. Also, when I was looking around for 15"s I ran across these: http://www.bogartracingwheels.com/wheels/rt4lug.jpg They will custom build any width/offset you want but I suspect the cost to be similar to the CCWs. -Rick -
First up, fixing broken stuff: http://www.typeischeap.com/clutch2008.html Second up, go faster than Tom (or at least buy more stuff this year): http://www.typeischeap.com/suspension2008.html -Rick
-
Did you ever install Todd's CV kit? I have one that I'm installing in the FP car this month along with my suspension upgrades. I'm going to take some pics and do a writeup afterward since there does not seem to be too much information on this site about the kit. BTW, I agree with Jon that there are cheaper ways to get CVs on a Z with an R200 but I was impressed by the build quality of these and wanted a complete solution without having to source rebuilt axles, etc. Plus, as Preith already mentioned the ability to swap out the CV joint very easily is appealing. -Rick
-
Anyone know of a source for the M10 studs that are pressed into the stock 280Z R200 stub axles? I know these are usually replaced with the CV axle but I'm using the Wolf Creek CV setup which bolts to the original stubs. -Rick
-
The XDi kit that I bought included a 6" wheel but I run a 5" since that's what was installed on the motor when I bought it. It also works well with the stock timing pointer. A bigger wheel can be better since the tolerance of the air gap between the wheel and sensor increases as the diameter of the wheel increases (see the Electromotive instructions). Other than that the size is really dependent on where you want your magnetic sensor to mount and whether you want to keep the stock timing pointer. The only other thing to consider when going with an off-the-shelf damper and trigger wheel is that you may be limited on sensor mounting position based on the indexing of the wheel. I assume most will be infinitely adjustable but that might not be the case. I indexed my trigger wheel myself so I was able to set it so that it matched my mag sensor mount design. -Rick
-
Since the headlight buckets also serve as mounting points for my (and most) aftermarket front air dam(s) they tend to get pretty beat up by hitting cones year after year. I was thinking about switching to the metal buckets before mounting my new air dam to limit cracking. Anyone know the weight difference between the fiberglass and metal Zcar headlight buckets? Or any other prevailing reason to use one or the other? Thanks. -Rick
-
Here are some pictures of revision 2.0 of the trigger mount on my car as it currently stands. The magnetic sensor mount is from Ebay and the rest I hacked up out of some 1/2" aluminum plate. I need to pull it and clean it up a bit (remove some of the extra metal) since it was kind of a rush job at the time and I don't actually own a bandsaw but it is functional and solidly mounted! The trigger wheel on the crank pulley is TIG welded directly to the pulley. It's not a harmonic balancer, just a plain old pulley. If I was going to use a dampener then I'd probably shell out for the Rebello with attached 60-2 wheel. -Rick www.typeischeap.com
-
Direct from Stahl. 1-5/8" primaries with 2-1/2" collectors. -Rick
-
Yep, I was there. And that huge sucking sound that you heard wasn't an intake or turbo, it was my driving. Then the car broke on my second run on day two. No matter, still a very fun Nationals. -Rick