

OldAndyAndTheSea
-
Posts
794 -
Joined
-
Last visited
-
Days Won
10
Content Type
Profiles
Forums
Blogs
Events
Gallery
Downloads
Store
Posts posted by OldAndyAndTheSea
-
-
To properly dim LEDs you need to use pulse width modulation, which is more complicated than I care to get into. You can simply limit current, but that's not the "correct" way to do it.....and I deleted my stock rheostat years ago. Coming from those damn, color condom covered, incandescent bulbs, I wanted BRIGHT. I got it. But, despite what the pictures show, they are not offensively bright. Since I've put the interior together, I've made a habit of going out and just sitting in the car, especially at night - for that very reason, to test brightness. I find them quite nice to look at in a night setting. Clear light. Easy to read. I should also note that I have light green eyes, so I'm fairly susceptible to light sensitivity.
-
Good to see the car going back together.
What's weird is that it never occurred to me that I could put insulation in my garage without dry-walling over it. How long did it take you to insulate it? I would love some insulation, a bit of heat, and more than two(!) goddamn outlets. And some maybe even some light.
Thanks! And yeah, although I'm already searching for brighter wall coverings to help my new lighting as much as possible. If you aren't going to drywall, Id suggest searching for white backed insulation. I wish mine wasn't brown - so I guess something white/gray will go over it. And I seriously chuckled over the two outlet comment.......I've worked like that in the past, and I know what that's like.

First picture is all the pieces I used. It was basically a prototype that ended up working well, so I kept it. You would only need the stuff on the right of the picture since you have a horn button to fill the space in the center of the wheel.
The springs and bearing balls go in the cylinders of the piece in the upper right. Balls make contact with the nubs in the quick release, and the wire ends are held to the square nuts in the other piece that is pressed on top. I think for you I would just integrate the nuts into the lower piece.
Second picture is everything pressed together. Third picture is how the bottom of the hub looks with the piece inserted. Fourth pic is the assembled wheel(minus two screws).
Do you know if your hub is the 2.0? If it is, I could just put one of the modified pieces together and mail it to you. I have extra pieces because the springs come in packs of 10 and the balls packs of 100. Actually, the hubs probably have all the same center bores, so it might work for any NRG quick release.
That's awesome, very clever work! Let me investigate my situation a little bit and, if needed, I would gladly throw you some money for one of those parts.
To add, I think if you have one of the nice, modern horn buttons you won't need any of this. They should be designed to work with a removable hub. If you're using an old school button I don't think that's the case.
That's what I need to confirm. Thanks so much for the input.
Thanks for the support everyone. It really means a lot.
An ice storm late last evening knocked power out before I could post yesterday's update.
More fiddling after composites duty.
90% of the wiring has been tucked out of the way. One more day should finish that up.
notched.
almost looks like it belongs. Pre welting.
Welting. I can't get enough of this stuff. It saves my ass all the time. haha. Magic.
Best part is - Everything still works! For now at least.
Soon...
-
Once you wire your horn in, the steering wheel won't be removable, correct? If you're interested in keeping it removable I have some pictures and CAD files you might be interested in. We have the NRG 2.0 release in our racecar, and I 3D printed a piece to go in the wheel hub that allows us to use the horn wiring as a PTT circuit while keeping the wheel removable. It would be simple to make that work for your horn.
Wow! that sounds incredible! I'd love to take a look at the files. Anything you're willing to provide would be thoroughly appreciated. Thanks!
I never cease to be amazed by the ingenuity of some of the people here.
More progress....
Drilling holes in virgin carbon.
Proportioning valve hole
I'm going to eventually make a little shift boot for the valve body.
Blinker indicators relocated
-Working- Hazards
And where my GPS speedometer sensor is going to be mounted. I'm going to notch the vent piece where the wire exits, and with the fender welting I plan on using should make for a clean install.....hopefully.
Getting there. Making progress every day.
Also bought some new shop lighting. Sam's Club was selling these for $34 a piece. For that kind of money, I couldn't afford not to. I ended up with six. And to those who have bore witness to the terrible lighting (and subsequent pictures) that my garage provides, hopefully you'll notice a difference. I sure do.
Impromptu shot - you can actually see the true color of the car. Definitely the brightest the shop has ever been.
Between the wood stove and now the lights, damn - the shop is becoming quite the nice work space. At least compared to how it was....
-
I got distracted with boat building obligations earlier in the day, but I'm using the heat this evening to work and putter on the car.
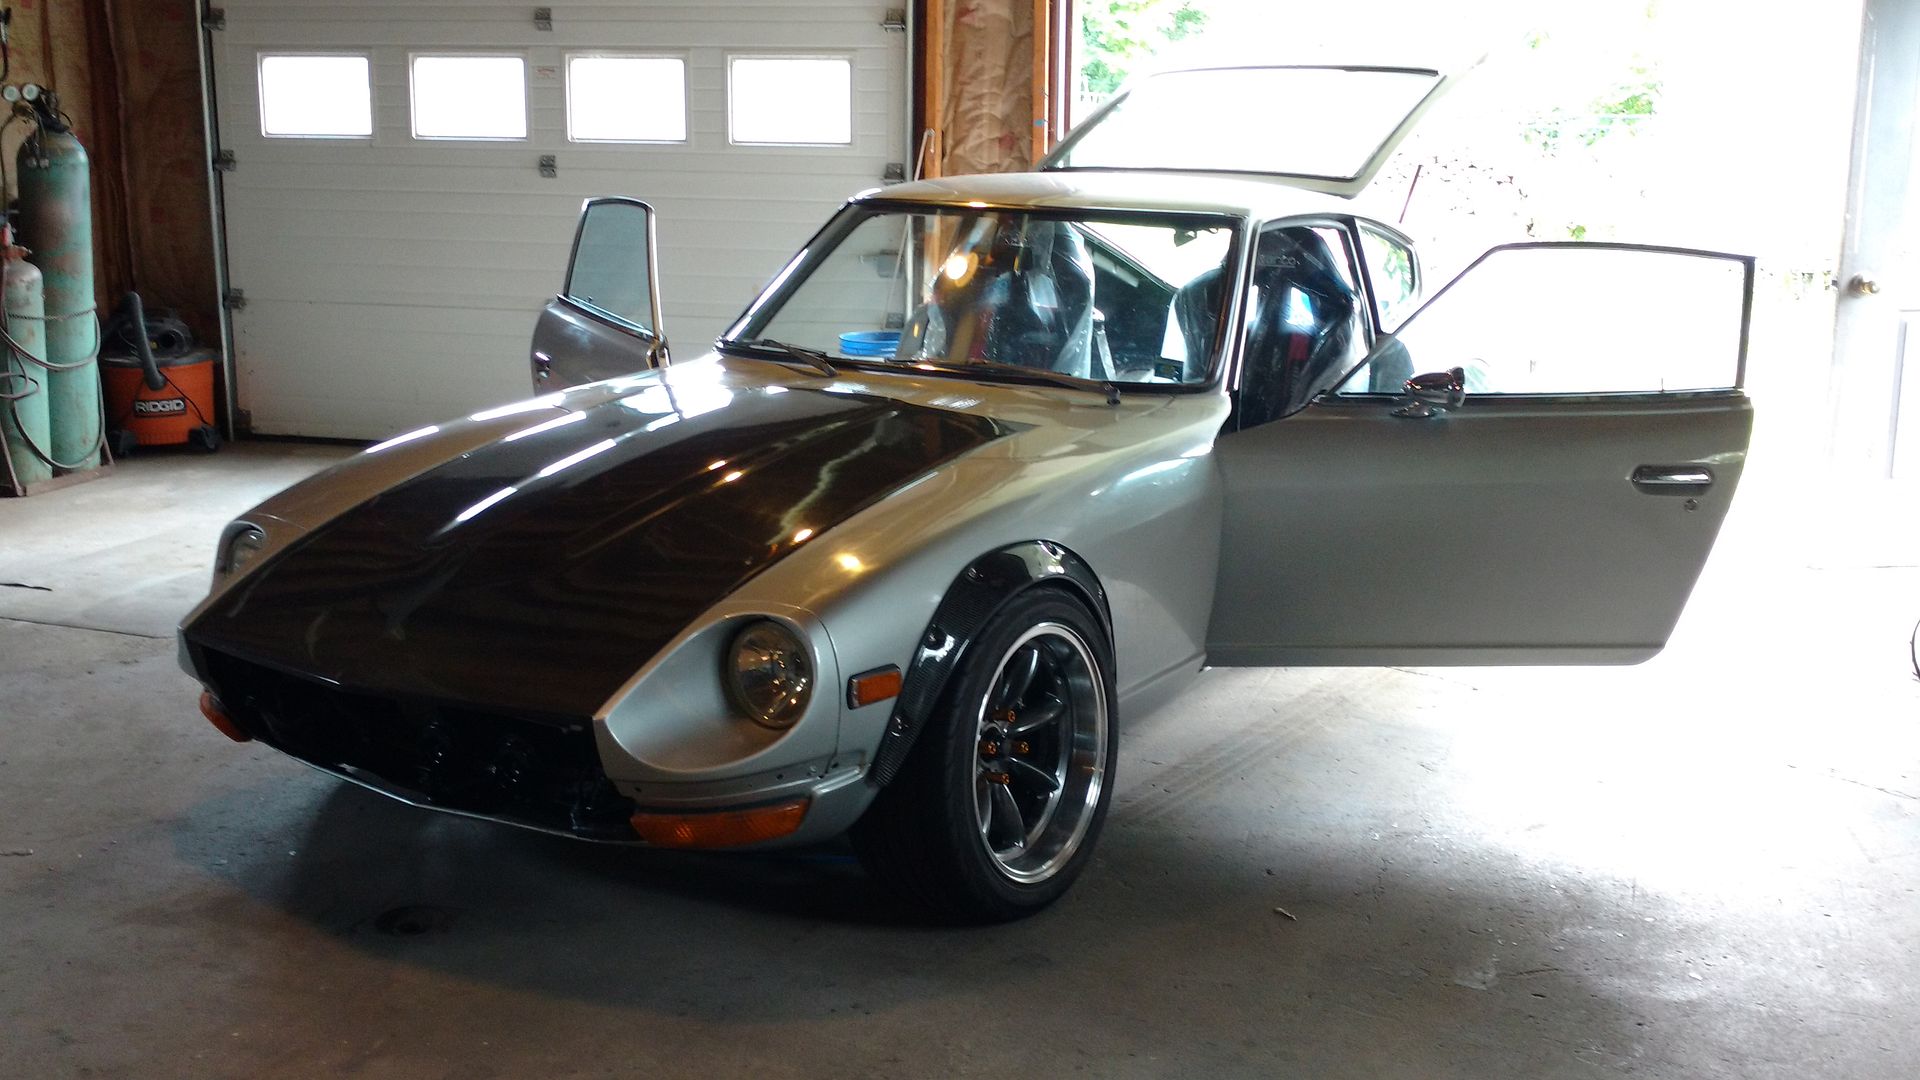
Quick release - installed. Feels good all tightened down. I was expecting slop, and was pleasantly surprised by the lack thereof....
Dusty carbon (cause I'm a THAT guy) release.[/url]
Also roughly mounted the A pillar gauge pod. Now I can get and idea of what needs to be chopped/modified. Then it gets the flocking treatment.
I still need to find my horn button haha.
I'm heading back out now, just came in for a bite. I'll be attempting to play with the fusebox cover. We'll see how far I get. -
Dash looks great!
Barring anything unforeseen, it's really looking like you will have the car on the road this summer! Are there any tracks for drag racing or club nights for autox or something down around there? Might be fun to get a mini meet going with the Rochester guys.
Pretty crazy looking at all the snow you guys got. Up here in Kingston we didn't get any, just a whole lot of wind.
Here's hoping......And the nearest track that I know of is Watkins, which I'd totally be down for a trip. I know a lot of the ZCCR people make an annual trip to the Glen.
We had gale force winds too, I think that's what helped the massive accumulation. Absolutely dumped on.
Quick batch of updated pictures, while I'm taking a short break from working. Slowly finalizing things. Tucking remaining wires, and lots of time consuming tedious things...
I'll be chopping the center console and fitting the fuse box cover with its components soon. Probably next step...
-
It hasn't stopped snowing in two days.
Many feet in some places.
So I've done a lot of this...
A little bounding with the pups...
Ralph loves the snow.
Calypso...she just likes being with me.
So in between plow sessions I've made some serious progress on the 240.
Today is D-Day. The day the dash goes in.
Rewrapped, and "tidied" up. Ready for the dash.
But not before I, once again, make my mark. It will hopefully be some time before I sign this again.
A shit ton of expletives, and about 4 hours, later.....
a little teaser.
Gauges are functioning, the heater blower works, as do the cables controlling the air flow and temperature. I think it's safe to call the project a success.
Lots more to do, but I'm feeling good.
More tomorrow fo sho. -
Yeah, I agree. I don't feel they would work in all situations, aesthetically, but juxtaposed against the carbon comes off nice in my opinion. There's beauty in simplicity.
Day started off rougher than expected. Decided to thumb wrestle a razor blade. Spoiler alert: Razor won.
whoops.
Other than being a masochist....
I'm getting close. All the gauges work, and are accounted for.
Now it's time to hunker down, and wait out the storm.
Gotta love lake effect. -
Got the heater controls labeled. Has a vintage racecar look. I like it.
Cheap, easy, and reversible; Nothing wrong with that.
Other than that, I'm just rewrapping the dash harness, and taking my time routing and organizing the wiring.
Nothing else picture worthy.....yet. -
I'm finally regaining control of my schedule. I'm now back to a reasonable amount of projects once again.
Ladies and Gents, today we return to our normal scheduled program: Turbo 240z
I fixed my blinkers!
Blink!
Blonk!
Oh how I've missed your song, you beautiful bastards.
This was such a pain in my ass for so long..... And something that prevented virtually any further interior progress from happening. Not anymore.
For anyone curious as to how the hell I could get hung up diagnosing and repairing the blinker circuit here is a really quick explanation as to the cause of the problem.Skip over this next paragraph if you don't care about Datsun blinkers (I don't blame you)
The blinkers on these cars are unnecessarily complex. All current for the brake lights, blinkers, and hazard lights is distributed through the hazard switch. When my blinker switch was activated, the hazard switch would lose 12v, at the blinker circuit. Once I figured out why the **** that was happening, and re supplied power to that portion of the hazard switch, the blinkers worked. Sadly, Nissan ran full current through the switches, themselves, which can lead to some problems, and are usually prone to premature wear, and or failure. Overall, just a ****ty system. The design is archaic. Works now though. haha
tl;dr: Blinker bearings needed fluid. Topped off; solved. Blinks for days.
Now. the. dash. goes. in.
Time to confirm all my gauges are functioning, tidy up the harness, and then proceed to install the dash.
A simple ten dollar label maker will potentially be the perfect tool for labeling my heater panel controls. I love the classic minimalistic look. I'll stick those suckers on tomorrow.
I've got the time, and am now HIGHLY motivated. Lets do this....
Also, for those wondering about Tiny house stuff. Yes - still a go. Project evolved into a passivhaus custom design. Something a bit more serious than originally planned. But in the end it will be something truly special. We are changing detailing almost daily now, but once we have the drawings finished, I will post them. Nothing worth sharing now, aside for the following picture. My architect is one of my best friends, he owns the white IX I occasionally post here. This is us today, returning from the site, mapping the building location and projected absorption bed location. I can't wait to share that story as it evolves. More on that later.
Currently I'm dealing with procuring a percolation test in January. I've always been, and always will be, a glutton for punishment.
Here we see the AWD IX, hunting the RWD E, in its natural habitat. -
Appliance I believe.
-
^^Yeah, I'm quite smitten with the place now. The thirty degrees over ambient obviously doens't apply linearly. Its basically saying that now my baseline in garage temperature when it is in the single digits to teens outside is about 40-45 degrees. Which is amazing in comparison. I don't think the stone helps you any, if anything it holds the chill until you can heat it up, much like a slab floor. That could be part of your problem as well.
The e30 is now winter ready. Sweet. Waiting on some BMW stickers for the centers. Good 'nuff for salt and snow.
Tomorrow I bring the Mini into the shop to do a little touch up on that as well.
Then....it's 240 time. Can't wait. -
The shop space is roughly 20x30 in the front. And the same mirrored on the reverse side. Two separate spaces.
It takes about two hours for the wood stove to come up to temperature and you start feeling heat at the far walls. I've only insulated about 50% of the space so far, and that alone makes a noticeable difference. Before insulation the inside temperatures were at best 10 degrees above ambient. Now with my limited insulation progress, it was 30 degrees warmer inside, than outside, with no heat source running. My doors are insulated, which helps a bit I imagine as well. The fan helped a lot too.
I'm actually kind of giddy when I think that it's currently a snowstorm outside, and I just got done painting automotive urethane paints in my garage. I've never had paintable winter temperatures before. This is a nice change.
-
I made most, if not all of the albums public. Hoping that did it. I think I figured out the right way to post with flickr. Now it won't link you to the flickr page when you click this newest post. Yesterday's is still messed up.
Got the e30 wheels painted. Going to try to mount my new tires tomorrow.
Good enough to throw some winter tires on.
The Pepper White should look good against the red of the car. -
Congrats, looking forward to lots of winter updates now!
We are getting hit pretty hard with snow up here in Kingston right now. My 240Z was put off the road yesterday - pretty happy to have lasted this late into the year
Yeah, you and me both. I expect to be spending a lot more time out in the garage as well. Wow, yeah you got a long season in, that's for sure. I am so jealous, and can't wait until my car is functioning as intended once again.
I still can't sort out my damn blinkers. I'm not getting power to the switch, when the switch it engaged, but the blinker switch itself tests correctly, and is getting 12v. I'm starting to suspect the hazard switch, despite working properly, it may not be allowing current to go to the switch when the blinker is engaged. From my understanding, that's how the circuit works. I can manually light up my left and right sides of the car by manually jumping power to the correct contact on the switch. Very frustrating....
Photos are private.
Should be fixed. I can't seem to figure out the new mobile photobucket app, so I transitioned to Flickr, and am still undecided on if I like it or not...Let me know if you can't see the pictures.
-
I've been raging to prepare for winter.... Lots had to be done, and lots has happened since my last update.
First, most importantly, check out my bitchin' Halloween costume. I rather enjoy scaring children. ...and this year was bountiful.
But seriously....
I painted my e30.
Aside from the obvious rust repair, I tucked the bumpers, blacked the trim (except key pieces), and paint matched the plastic trim to slightly modernize the appearance. I'm pleased with the result. Looks good for a pre facelift sedan.
Front flaps.
And I'm currently refinishing my extra set of bottlecap wheels, to toss my Nokian studded tires on. I'm hoping to spray those Pepper White tomorrow. I bought that paint to touch up the Mini.
I already used some of it to repaint and refinish a 1950's Huffy bicycle for my Mother's birthday.
I also repainted the Frontier. It had some dents, wear and tear, and a little scale developing along the rocker panels..... and sadly, I pulled the Whaler...
...But I bought a drysuit to continue sailing into the winter!
Here my brother is testing it out in 45 degree water. One of my bucket list items is to sail my harbor all twelve months of the year. So, until the water freezes, I'll be on the lookout, at the ready to sail at a moments notice - with Gopro in hand.
And for those curious as to my latest composites gigs, nothing special - a couple repairs.
Recoring a 26' Chris Craft Scorpion transom. Using devinycell foam, and mahogany in key areas for extra compression strength, where through hull fittings occur.
And I did some work on this 1968 Lightning in trade for a wood stove for the shop.
New stack.
I'll beautify that later :laugh:
It's a Vermont Castings: Resolute, which if you know anything about the company, they name their models after America's Cup sailboats, so that just adds to the overall coolness factor for me.Also added a TV, for some guest entertainment. It's becoming quite cozy in here.
Ecofan! These are really cool thermally powered fans.
But most importantly, what are the temperatures?
Anyone who has followed along through a winter with me knows my biggest complaint is a cold shop. At its worst, the garage would literally be only a couple degress above whatever outside ambient temperature is. So I bundled up....and complained.
Now, today we got our first taste of snow. The first real test of the stove.
This was the temperature outside.
And here is the temperature inside.
Baller.
....And I haven't insulated the ceiling yet. This a great news. I have heat! Palpable, noticeable, sweet sweet heat!
This is a big deal. And while despite, as you have noticed by now, once again there seems to be little to no 240 progress, I actually see the garage modifications as actively working to push that project forward. This will make all subsequent work much easier, and the environment much more tolerable....arguably pleasant, actually.
Feels good. No, it feels great.
Stay tuned. I have not disappeared. -
^^ Thanks. I'd love if I could ever install it....I still can not figure out my blinkers...It's very frustrating.
The moment I rolled the car out of the garage it would seem jobs immediately took up the space (and my time)....and I've been ramming since.
First a carbon jet ski repair.
Then my friend's E30 to get it road worthy again.
Had some rust to repair, and a general once over, as all the sub frame was removed recently for a refresh. Its a 200,000 mile driver.
Success.
...but the day before, when we were working on the IX, a truck went completely out of control, at an undetermined speed, and crashed in my yard - causing massive damage - but no one was injured, which is astonishing.
Here's a quick run down of what happened.
The IX owner, his brother, and I are working on the IX, on the day before it was road ready.
I'm installing a side skirt with the brother, and we hear a noise.... A low rumble off in the distance, but the distance is getting closer; the noise louder.....
I didn't know what to think. At first I thought: thunder...... but it was too long, and soon progressed to sounding like rolling, twisting, metal which turned deafening. I then thought the back roof of my garage collapsed.
The IX owner was the only person to catch the incident visually. When he saw what was happening, a truck was airborne, rolling sideways through the air, at about 30 mph he guessed. IN MY YARD. Not the usual Tuesday. No, Sir. haha
Hooooly. shiiiit.
I'll paint a picture the best I can.
I live at the top of a hill. The speed limit is 30mph.
Here is where he entered my yard. We are in his oncoming path. You can vaguely make out his tire tracks.
At the corner of my property he hit the curb (where the officer is standing), and completely demolished a 10" ornamental cherry tree (you can see the tree deposited between the two larger trees).
...managed to snake his way between the two serious trees and the house. Unbelievable luck. Despite all I'm about to show.
RIP buddy. Good plantin' ya.
He took out a small cemented pole that held a birdhouse. RIP bird - sorry for the rude awakening - no kidding, straight merked an unsuspecting starling.
Bounced off the 60' blue spruce, which gave no mind, and he deposited part of his aluminum wheel, forever, in the tree. Where he lost his wheel? The curb? I know not this information...
...and then proceeded to drive straight over a 8" well casing. Oh man.
This is what I'm guessing sent the truck airborne, and perpendicular, rolling directly through 4 sections of my fence lengthwise.
"Hey buddy, you can't park there."
Driver has a small cut on his finger. A testament to wearing your seatbelt, and modern safety standards I guess. I honestly thought I was a first responder to a dead man. It was a violent crash. He (male: 60ish) doesn't remember anything, but was conscious on scene.
Either way, in order to do what that truck did, it had to have been mooovin'. It would take a lot of energy to do that, hitting all that he hit, uphill no less. My bet is 60-70.
I'm just happy everyone is safe. That could have gone so much worse than it had. The damage sucks, but it's just stuff, and that's what insurance is for. But that said, my cars are regularly parked directly in that path. Had this been any other day.
...Luckily. Safe and sound!
...so that's complicated life a little bit.
But hey! Look Datsun progress.
Fresh rebuilt axles....Thanks to Eiji at Datsun Spirit. Great customer service.
Also....I'm tired of being cold.
Commence winterization.
....However, this fall has been beautiful. Better than summer, by far. Kind of like the June we never got this year.
So I'm still trying to be out on the water as much as I can, because I know it won't last.
Thanks for bearing with me. -
-
So I did some suspension stuff.. As fate (or Murphy) would have it, the blinker switch I bought was returned to sender only an hour away from my house. So while I wait for the switch to cross the country for the second time I decided to work on the list.
I did originally order the wrong tie rod end for the passenger side, so I got that replacement, powdercoated it, then proceeded to do a really really rough preliminary suspension set up, to get a baseline.
This is also the first time the car has been outside in three years. She's freakin' dirty, the alignment is comical, and there's white paint spattered on the rear driver's tire..... but I think she's purdy. Lots of potential.
I need to finish the alignment, and install the sway bar end links now that I've got a rough base setup.
Here are some teasers to show some semblance of a functioning car.
That's enough fun for today. Tomorrow I continue where I left off - sway bar end links, and dreaded bump steer adjustments.
Regardless, it feels great to have a rolling shell again. Real great. -
Hahahahaha! That's awesome. The brand of paint that worked for me is from Tractor Supply Co - their Majic tractor and implement paint.
I'm either going to use a little dab of super glue, or maybe even a zip tie to hold it in place.
-
Switch didn't arrive today, as hoped, so I did some other stuff instead..
Finally bled my brakes. Everything appears to be holding pressure. They work great!
I also solved another random challenge on the list. Since I deleted two of the heater vents in the dash, I need to cap off the no longer used openings in the blower,
Seen here. Note: the middle, rectangular, opening is still used for the center vent in the dash.
After measuring, and inquiring as to where to procure a cap that is about 59.30mm OD, I got nowhere pretty fast.
A couple brews, and some investigating, later.....
:lol:
Turns out the cap to a specific type of spray paint is basically interference fit. Like, I honestly couldn't find something to fit this more perfectly. It's freaking hilarious. No reason why this won't work.
So yeah...I made a little progress.
Brakes working is a big deal. Now my rolling chassis can stop..
...that is... when it rolls. -
-
So in order to figure out what the hell else needs to be done, I made a list. Now I have some direction. If I get bogged down on one aspect, I'll take a look at the list and tackle something else until nothing else remains.
My friend brought over his multimeter, so I got around to testing the switch.
Here is a list of the acceptable range
...and here I am testing between pins 2 and 3, in the neutral position, which should give a reading of greater than one ohm. So that one is off, as were the following other tests. So unless I did something totally wrong in testing, I think my switch is bad.
But, I'm also skeptical, because it was the result I wanted, as I honestly have no idea where else the problem could lie at this point.
So I just bought a restored, tested, switch. Hoping to get that by the weekend, then I will really know what the next step is. Will it be:
Dash install?
or
Douse in gasoline and see how hot she'll burn?
Until then, I'll keep whittling away at the list. Oh the list. -
^^ Any and all of your questions can be answered by the master, Kurk (fricfrac). This is his handiwork, I highly recommend his service.
Andy, I believe [referring to the rear trim panels] that is what's called "lack of attention to detail"...
Yup. If you want something done right (to your liking), do it yourself.
These cars have taught me that.I got stuck doing some maintenance to the BMW last night... Somehow I locked myself out..keys inside, remote location. Luckily I was able to break in using a Bondo spreader, a couple feet of brake line, and a door stop. That's good, cause that's literally all that was available.
Also to the guy on the internet who said it is way easier to tie a slip knot and loop it around the lock knob - you can go **** yourself, Buddy. I spent an hour trying that stupid technique, cause "you'll damage seals with a slim jim". That failed. 45 seconds with the ol' brake line technique, I was in. I should have just gone with my proven method from the start, but I thought I would be smart and listen to the internets first..... Doh!
..so I didn't get as much accomplished as I had hoped, but I at least installed the new blow off valve, and can take that off the list.
Freakin' dust man......killin' me.
I'm planning to black-ify the outlet, and any other contrasting blue to the blue of the engine. I'm still unsure how I will do this, I may powdercoat the outlet (maaybe, if the powder doesn't build to influence flow) and have even entertained the idea of some black nail polish. But needless to say, that will become much more subtle as time goes on.
It's raining today, so I'll be garaging it all day. Not sure what my direction is going to be. Hopefully my friend brings over his multimeter, and I'll try to diagnose blinkers.
Time will tell. -
Hey, remember me? ....I know it has been some time.
My summer has been a whirlwind, and I am finally only now regaining control of my schedule.
This was probably the busiest I have ever been in a summer. From composites gigs, to coaching and racing, it's been crazy.
Some random shots.
Rescuing an Opti.
Taking kids sailing on a J30
Modern 8 Metre goodness.
Classic 8 Metre goodness.
And teaching the race team sailing students how to foil on the moth. This was very rewarding.
Now that the sailing season is coming to a close, I've finally started to turn my attention back to the car (I know, I know, where have you heard that before?).
I've puttered in the last couple of months, nothing of note, but made small bits of progress when I could.
I've also misplaced my damn multimeter, so until I find that, the blinkers will have to wait some more.....ugh.
Added some more carbon...although I purchased this from a competitor, mainly as an experiment to compare quality/fit/finish etc....
It's polyester, it's heavy, it's been sanded and cleared to the edge of its life, and the fit is moderate......all of that said, it ends up being 3 parts I didn't have to build tools for, so that's worth the 300 bucks to me.
These pieces will work, but it does irk me a bit that they wouldn't have thought to orient the twill in the same direction on the center panel, as on the outer panels... Although it is not an issue as it is entirely covered by the license plate, so that's just me nit picking a bit.
Sneak peak.
So yeah. Expect more from me, and this thread on a more frequent basis. Summer is dwindling, it's time to get the hell to work....damn slacker...


 [/url]


Luna: The cause of, and solution to, all of my problems
in S30 Series - 240z, 260z, 280z
Posted
calZ Thanks so much! I'm going to do some horn work tomorrow. We'll see what I determine. Thanks again!
Did a little chopping. Mounted the lens for my relocated high beam indicator. Sweet.


Then proceeded to mount a switch for some under dash LED lights.
Grungy.
Naked.
Powduh
Everything tucked.
Feeling good.
Tomorrow I'm going to play with my horn and see if I can make that work. Then the interior is pretty much buttoned up. Aside from modifying my a pillar gauge pod, that is.
Then it's back to mechanical work. Yay!