Rod in NC
-
Posts
48 -
Joined
-
Last visited
Content Type
Profiles
Forums
Blogs
Events
Gallery
Downloads
Store
Everything posted by Rod in NC
-
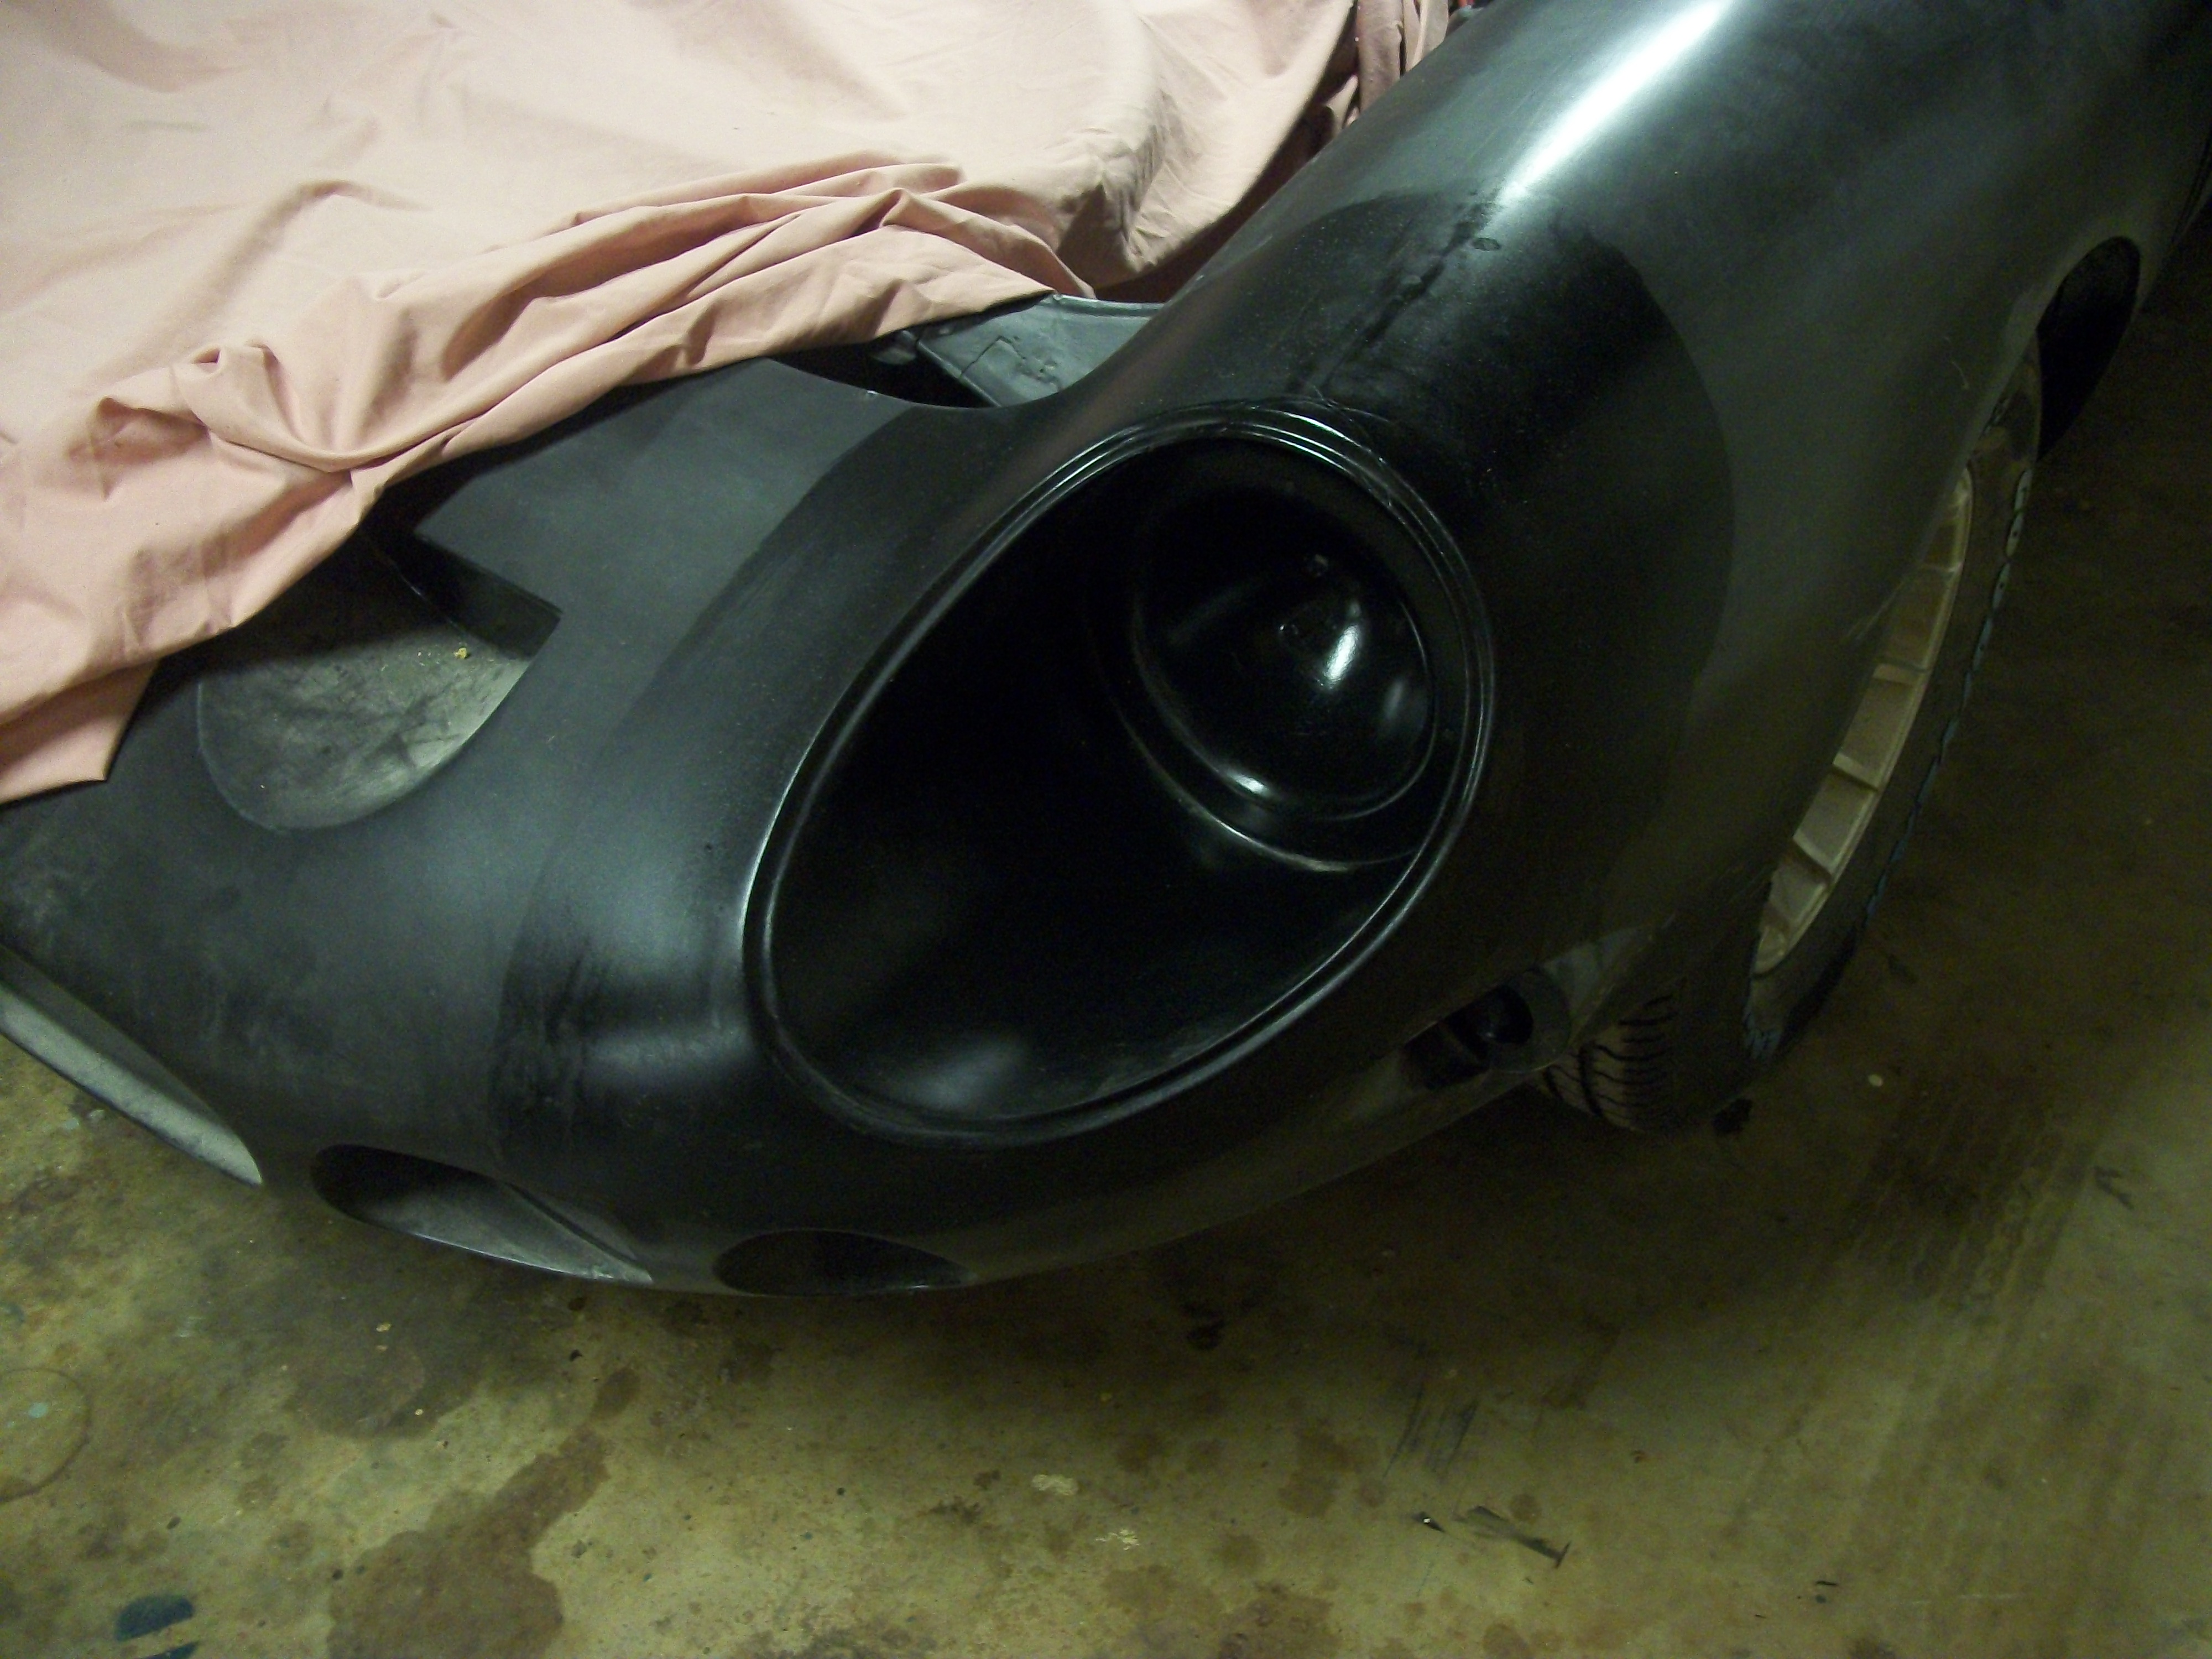
Hi Mark, Have you done a set of clear lenses to mate up to the Tom McBurnie (ThunderRanch) 250 GTO kit? I am VERY interested in a pair! Thanks. I've attached a photo of the front end for reference. -Rod 1974 260Z Thunder Ranch 250 GTO kit 350 SBC V8 w/ T5 Trans R200 Rearend w/ 300z CV joints

-
spend the money....book is well worth it. parts drawings, pictures, wiring layouts, etc. Once you buy it you won't want to give it up either. -Rod 1974 260Z ThunderRanch 250 GTO kit 350 SBC with T5 tranny R200 rear end with 300z cv's
-
Thanks for the quick responses, guys. Based on the feedback, it does looks like it has the Triumph TR6 straight 6 in it that would make me think it is the 2500M as well from wikipedia info . I had never seen one of these cars before. Thanks! -Rod
-
Not a Z-related topic, but drove by a house the other day took a couple of pics of the this car out in the backyard. It looks like a early bmw z3, but the roof configuration confused me. That is not a removal hardtop. Any ideas? This is driving me nuts, and I've been google-ing around with no luck. -Rod
-
Here are the pages from my Winter 1985 Kit Car Quarterly (Vol 2, No 1) magazine that does a build up on the Alpha1 GTO kit. I particularly like the statement about fitting the front clip. "If you have difficulty getting it to fit, you may have to make some minor modifications." That was a severe understatement in my case, trying to get the front clip to line up with my door skins so far.... I put these in .tiff files for quicker upload.....let me know if you can't open them and I'll try again with jpegs -Rod pgcover.tiff pg6.tiff pg5.tiff pg4.tiff pg3.tiff pg2.tiff pg1.tiff
-
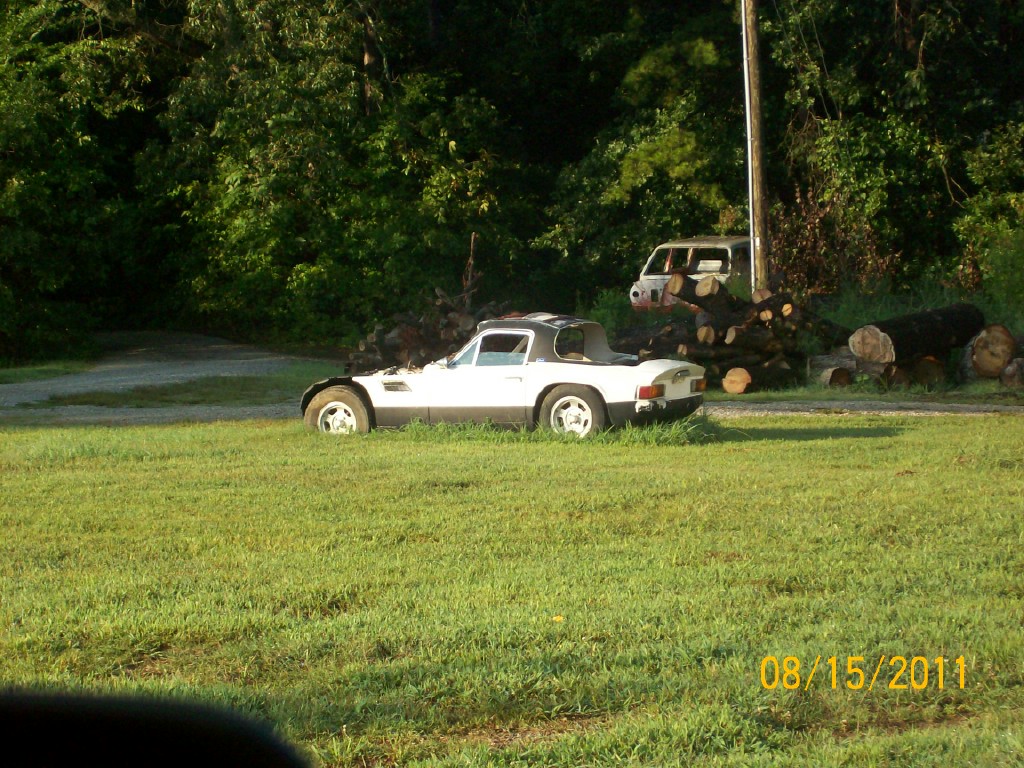
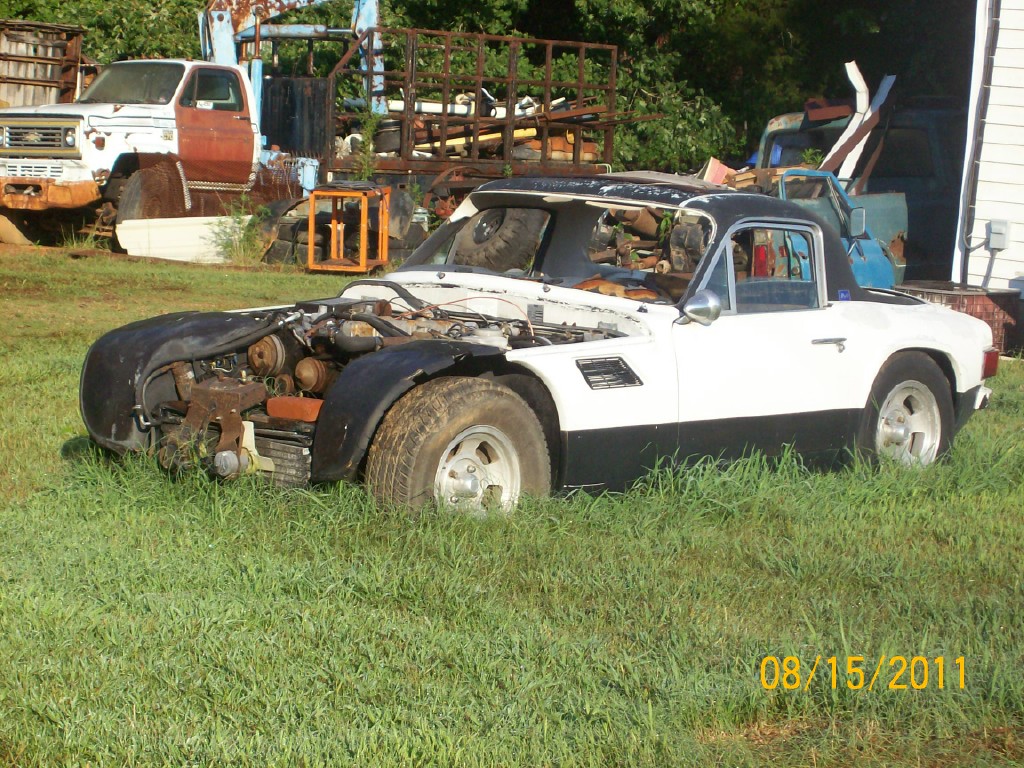
Looks like nobody has posted here for awhile...... Purchased my kit from Tom McBurnie at ThunderRanch. I have the rear tub bonded in place....I replaced the Z's rear hatch with a fixed rear window and small boot. Still a long way to go. Currently fitting the door skins and front clip into place. YouTube video at 350 SBC with T5 transmission, edelbrock intake/carb and HEI distributor. Cherrybomb glasspacks with pacesetter exhaust tips in front of rear wheels R200 rear end with 300zx CV joints Anybody else here on the east coast working on one of these???
-
That may be it.....I'll pull the master back apart and see if there is any noticable damage/tears to the interior seals. Before that, I'll watch closely to see if the rear reservoir fluid level goes down slightly and the forward reservoir rises slightly, which would mimic what you say above. Thanks for the tip. -Rod
-
yep...coming off a port on the back of edelbrock intake manifold to the booster. check valve is correctly oriented in vacuum line. I won't be able to get back on it until the weekend....I'll do a complete four wheel brake bleed one more time. -Rod
-
nope...stock z master. I'll play with it more Monday night.
-
Yes, bled the entire system after installing the master cylinder. Yes on having adjusted the pushrod. Stock aftermarket master cylinder. Both you guys mentioned the pushrod adjustment....maybe I don't have it set right. I've got roughly 1/8" of free travel on the pedal before I feel resistance. I'm going to try and hook up some plastic bleed lines to the bleed screws on the master cylinder and pump fluid through the bleed screws back into the reservoirs to see if any more air exists, but I've done that setup twice already with no air coming through the bleed screw. -Rod
-
Ok, first doing my final check before doing a test drive around the neighborhood. Brake pedal travel seemed a little soft. I popped the hood, and watched the reservoirs on the master cylinder while I pushed the brake pedal down (with the reservoir caps still in place). It's probably air, but it just looks like the fluid is trying to burp up in the reservoir. Repeats consistantly no matter how many times I stroke the pedal. I have bench bled the master before installing. Is there a chance I've got a clogged line and the fluid has no where else to go? Brakes will stop the car when pushed in and out of the garage, but I don't understand this large displacement of air/fluid in the reservoir. If I remove the reservoir caps and push the pedal, I'd have a mess. Any ideas? Thanks. -Rod
-
Modern Motor Sports
Rod in NC replied to lgoodson@pacbell.net's topic in Gen I & II Chevy V8 Tech Board
High quality parts from MMS. I put 300zx CV's in my 1974 260Z to my R200 rear end and Ross provided a great instructional document to help with the conversion using his welded hubs. -Rod 1974 260Z 350 sbc with T5 transmission R200 with 300zx CV ThunderRanch 250 GTO body kit. -
What is your ground clearance?
Rod in NC replied to Rod in NC's topic in Gen I & II Chevy V8 Tech Board
Thanks for the feedback....I'm looking to do 2.25" through two glasspacks near the driveshaft, then through a couple j-pipes and L-pipes to come out just in front of both of the rear tires with a Pacesetter dual tip resonators. I want the look of side exhaust having the long muffler along the rocker panel. Larry, I will keep your heat shield in mind as I route the pipes under the floor pan. -Rod -
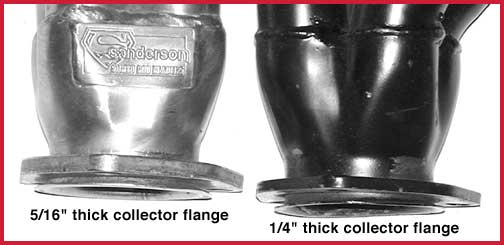
Hi guys....I think I have the wrong collector flange setup on my Sanderson header-to-exhaust pipe connection. Attached is the pic from the JTR website showing the blockhugger headers that I have. The three-hole flange plate is loose and can be spun around the flared port. I guess I have never seen one of these types, and am just used to seeing a flat triangular flange to mount to. Question: Can I bolt up a standard flat 3-hole flange with a standard flat gasket to this header, or will that leak? I'm building my own exhaust for the car, and need to make sure I use the correct mating flange on my header pipe. The more I look at this, I think I might need a donut-type gasket and a flared pipe on the mating header pipe to mount to the header. Right now I just have a standard 3-hole flat plate welded to my header pipe which I was going to mount to the header flange. Any clarification would be helpful. Thanks. -Rod
-
Shortblock and T5 installed ?
Rod in NC replied to Drewz75t's topic in Gen I & II Chevy V8 Tech Board
Even if you don't have the intake yet, install the distributor (after the block/tranny have been lowered into the car) into the hole in the block to make sure you have distributor clearance to the firewall before you drill the holes to mount the transmission crossmember to the car. -
I'm in the process of routing my exhaust off of my sanderson headers...I bought the flowmaster header toobs (yes, correct spelling) and just wanted to see if my ground clearance is about like everybody else. At normal ride height my stock oil pan is 5.5" off the ground. Routing my 90 degree exhaust pipe from my header and under my stock mounted oil filter and inboard of the slave cylinder, the bottom of the exhaust pipe is only 4" above the ground. If I try and tuck my exhaust pipe up anymore, I will be too close to the oil filter. I was just curious if everybody else was sitting about that low. I've got the JTR kit, Tokiko shocks/springs. I like the look of ride height when viewed from afar, but I guess I will have to avoid any speedhumps in parking lots! -Rod
-
Holley Red fuel pump runs, but no fuel to carb
Rod in NC replied to Rod in NC's topic in Gen I & II Chevy V8 Tech Board
Pyro, thanks for the feedback...sounds like I've got some upgrades in the future. I'm going to lower the pump a little bit more and go with a line coming from the drain hole. Compressed air and a thin wire have been unsuccessful in clearing out the blockage in the original pickup tube. Thanks. -Rod -
Holley Red fuel pump runs, but no fuel to carb
Rod in NC replied to Rod in NC's topic in Gen I & II Chevy V8 Tech Board
I'm hooked up to the lower of the two ports to the right side of the fuel sender on the side of the tank. I pulled the hose off the outlet port of the tank, and stuck it in a plastic jug of fuel. Turned key on and the pump pulled the fuel fine up to the carb. I blew into the outlet port of the tank again, and can barely produce air bubbles in the gas tank. My next feat will be to see if I can push a stiff wire (like a coat hanger) into the outlet port of the tank and clear out an apparent obstruction in the pickup tube in the tank. If I can't clear the obstruction in the pickup tube, I'm thinking of converting the drain plug on the bottom of the tank into a 90 degree fitting to run the fuel from there over to the pump. -Rod -
Holley Red fuel pump runs, but no fuel to carb
Rod in NC replied to Rod in NC's topic in Gen I & II Chevy V8 Tech Board
Ok, I just went down to the shop to fool with this some more.... I removed the hose from the inlet side of the pump. I took out the filter. I then blew into the hose to see if I could produce air bubbles in the tank. It was very difficult to produce air bubbles, which leads me to think that pickup tube in the tank is restricted. I went ahead and hooked up the hose to the pump and tried it. I did hear the tone of the pump change, but it only produced a trickle of fuel into the plastic jub near the carb. I'm going to see if I can snake a small wire into the outlet port of the tank to see if I can dislodge any blockage, then I might try a couple quick blasts of compressed air into the outlet port of the tank. Any other ideas before I resort to pulling the tank to mess with further? Thanks. -Rod -
Holley Red fuel pump runs, but no fuel to carb
Rod in NC replied to Rod in NC's topic in Gen I & II Chevy V8 Tech Board
Thanks for the feedback guys. 1) I've confirmed the pump is wired correctly. 2) I will confirm that I've got the pump inlet hose hooked to the outlet port on the tank and not the return line into the tank (i've currently got it hooked to the lower of the two outlet pipes, and the other is capped off, since I won't have a return line). 3) I'll take out that filter between pump and tank and relocate it between pump and carb (after I get fuel flowing). 3) I'll add some more fuel to the tank, but I'll try and pull some fuel from a plastic bottle into the pump to confirm that the pump IS wired correctly first. I'll feedback once I find something. Thanks. -Rod -
Guys...1st tiime virgin install here....I'm getting ready to fire up the V8 for the first time and I've just put in a Holley Red fuel pump. I've poured about 3 gallons of fuel into the refurbished fuel tank. I've got a fuel filter between the tank and the pump. I've got the hose unhooked from the edelbrock 600cfm carb and stuck in a plastic bottle. I crank the fuel pump for about 30 seconds, and no fuel comes out at the carb. I'm about ready to pull the inlet line to the pump and try to pull fuel into it from a separate plastic bottle to 'prime' it and see if the problem is between the pump and the tank. I've read that the Holley Red needs to be below the fuel level in the tank...I've got mine mounted in roughly the same spot as the original Z pump, which is about even with the sender unit in the tank. Any ideas before I dig deeper. I'm hoping that it is just some crud that got pulled into the fuel filter. I also removed the fill cap to make sure that I wasn't creating a vacuum. Thanks. -Rod
-
star washers under flywheel bolts? yea or nay
Rod in NC replied to Rod in NC's topic in Gen I & II Chevy V8 Tech Board
thanks so much, guys....I always like to make sure on this kind of thing. no washers, install with loctite. -Rod -
star washers under flywheel bolts? yea or nay
Rod in NC replied to Rod in NC's topic in Gen I & II Chevy V8 Tech Board
The ARP website says ok to use loctite instead of assembly lube, and no mention of washers...I'm leaning that way. -Rod -
I had my flywheel resurfaced, and wanted to run this question past you guys. I bought new ARP flywheel bolts, and I was trying to decided whether or not to install star washers under the bolt heads. The research I've read says red loctite will suffice. The ARP bolts did not come with star washers in the package, but some other flywheel bolt packages have star washers included (based on the auction pictures on Ebay). I'd like your all's take on whether or not star washers are needed. Thanks. -Rod