-
Posts
265 -
Joined
-
Last visited
-
Days Won
1
Content Type
Profiles
Forums
Blogs
Events
Gallery
Downloads
Store
Everything posted by ukcats07
-
Wow, just checked this forum on a whim and saw this response. No problem, glad it helped.
-
Just came back from the only local driveshaft shop here (at least that I've found) with a quote for a new driveshaft for my 302 swap. $340 for a <300whp driveshaft. T5 slip yoke, 1310 u-joints and NEAPCO flange adapter. 22.75" overall length (flange to flange). Does this seem high? I like the idea of buying local, but everything I've seen online leads me to believe I should paying somewhere in the neighborhood of $200. Any thoughts? Any good online dealers? Found a whole slew of them from google, just don't know which one to go with for my swap. Thanks
-
Okay, so I've been pulling my hair out over this problem of mine. I've got a 302 and T5 in my 240 (see another thread for pics) and it's basically a longblock at the moment--no accessories. I've got a reverse rotation water pump with the timing cover that has a mechanical fuel pump opening. I've purchased a set of serpentine pulleys from summit (part # MCH-1000) with a smooth water pump pulley. I would like to be able to use these pulleys without running AC or PS. I know I need an idler pulley, or belt tensioner, in order to get the reverse rotation on the water pump. I see a couple scenarios: 1. Buy this (link) $80 belt tensioner setup to get the correct routing. However, I have no idea if it will work with me using the old style alternator brackets (these ones) (i.e. will it all line up). 2. Buy some aluminum and drill holes, etc and mount a standard 6-rib pulley to it similar to 74_5.0L_Z. If I go this route, what pulley do I need? Cheapest autozone pulley available? Any considerations for making my own setup? Drill the holes, line it up and bolt it in? Also, any need for a 130 amp alternator? This will be carb'd with no stereo system, etc. What year/model should I be looking at for my alternator donor? Thanks, Doug
-
I'm looking to be able to search for parts that fit my 5.0L 302 without specifying a make/model etc. I know that Napa will let me search for parts without specifying a car, however I want to be able to search for all parts that meet certain criteria, not just anything with the words "water pump" for instance. Napa seems to be the best as it gives a lot of extra information online that I can't get with O'reilly, autozone, etc. Example: I want to see all water pumps that fit a 5.0L 302 whether or not it's meant for an '83 cougar or a '90 crown vic. Any ideas?
-
Sorry for the late post. I've been in the middle of a move and I've finally got settled in to our new place. I used a foxbody style oil pan with the dipstick in the pan. My block doesn't have the dipstick hole. I paid $80 I believe on eBay for mine, however I would recommend Summit's package deal...part number FMS-M-6675-A58. They either didn't have it when I bought mine, or I just didn't realize that they sold a kit. Probably the latter seen how I bought this early-on in this swap. Hope that helps.
-
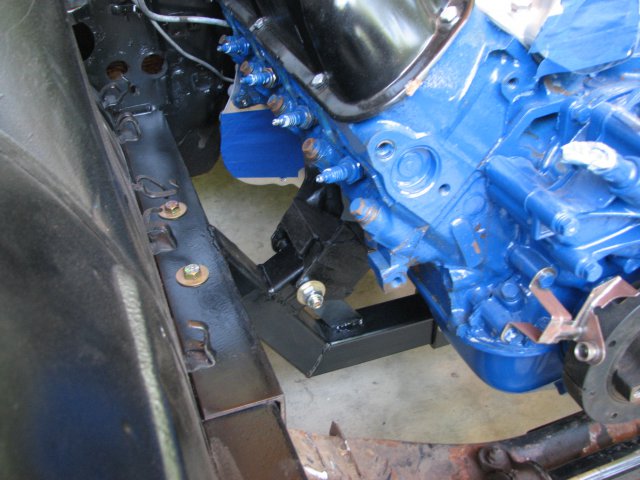
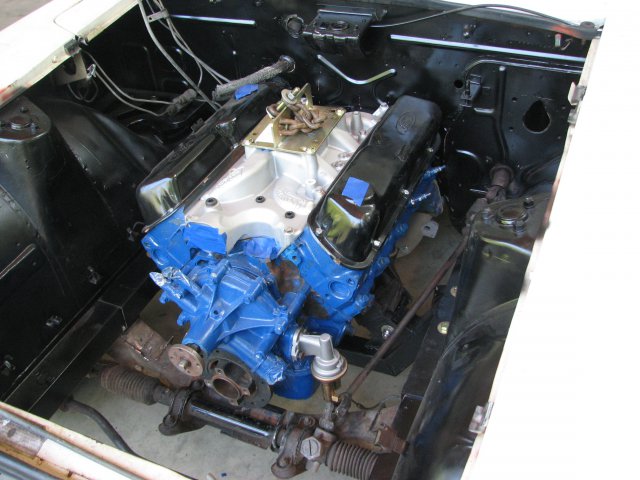
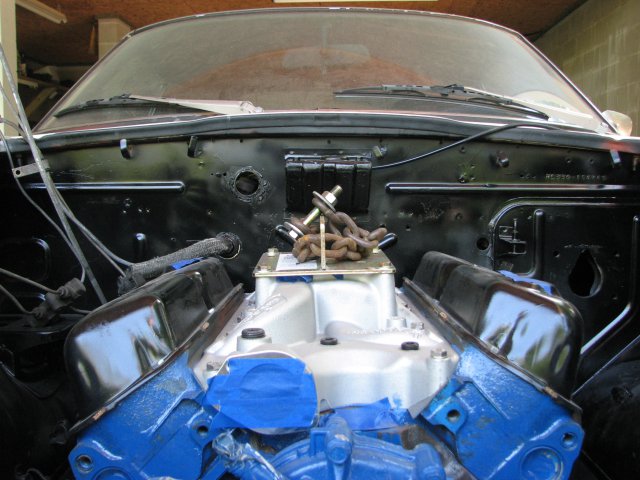
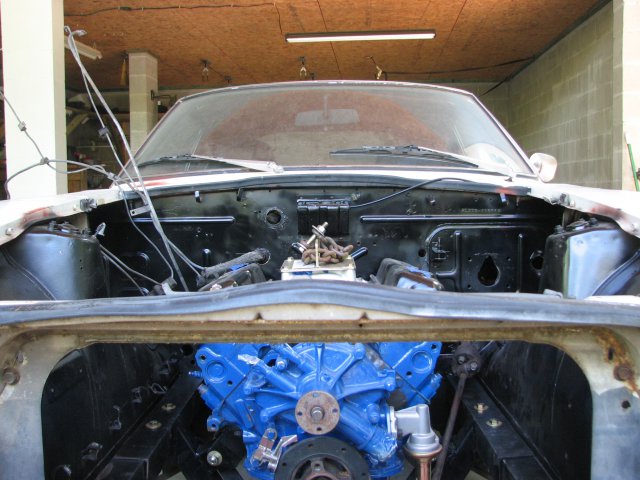
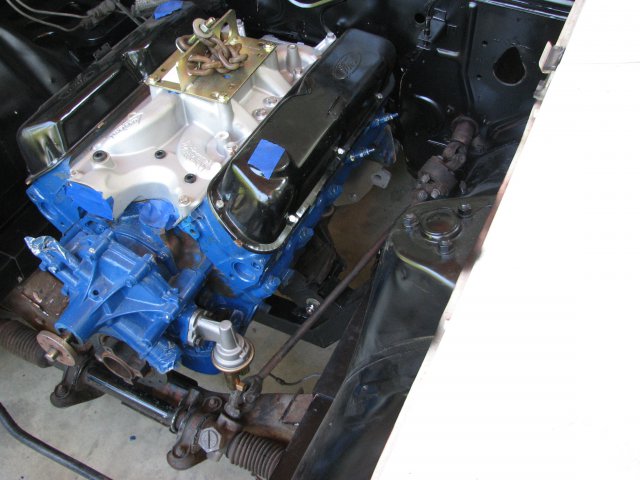
Okay, here's some pics of the motor and tranny sitting in the car. You can see that this mount sits the motor a little high. I probably could have gotten away with not massaging my driver's side header had I used this mount in the first place...oh well. It can actually sit lower by reducing some of the height in the vertical square tubing with the pipe welded through it. It actually sits high and far back enough that I might be able to drain the front sump
-
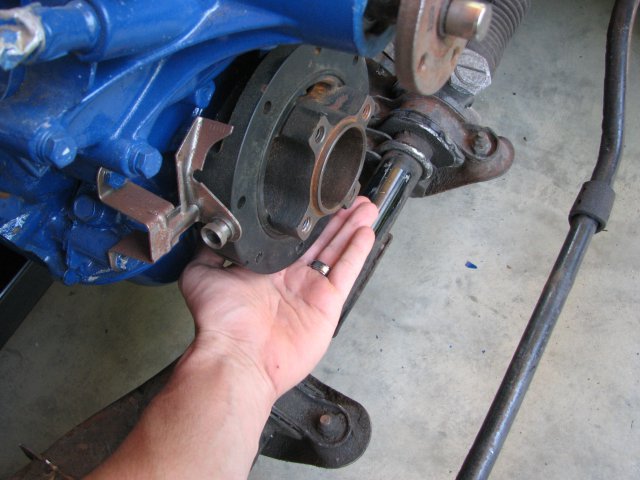
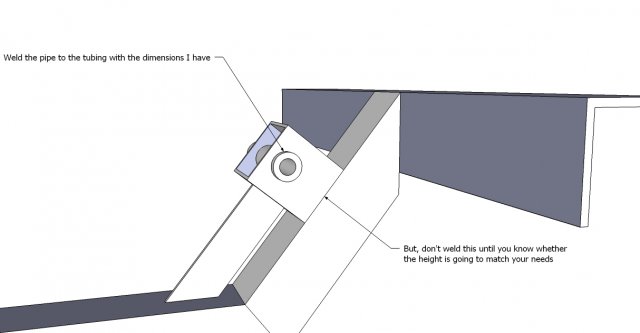
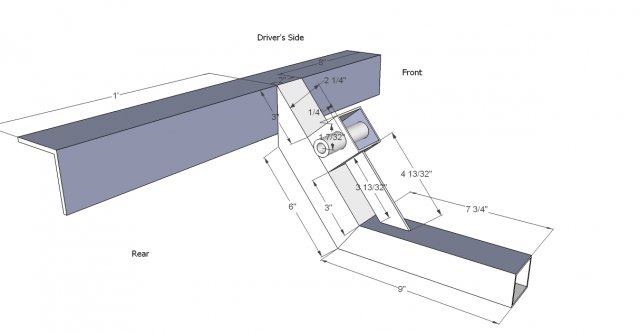
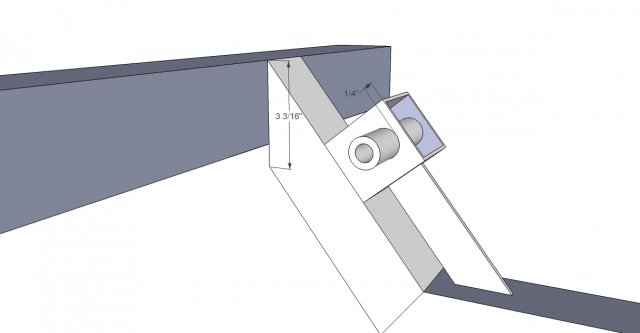
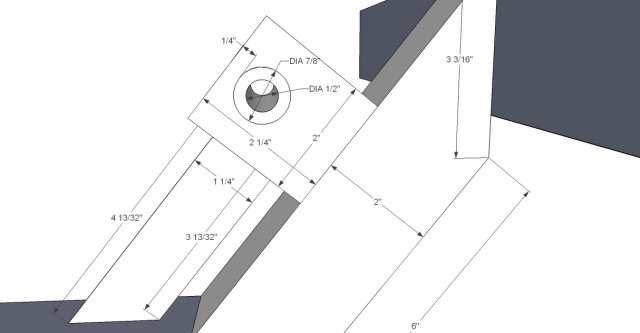
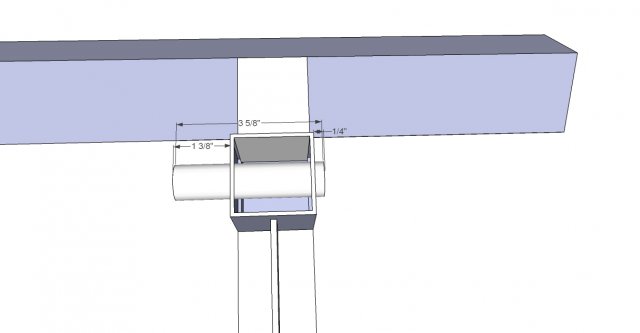
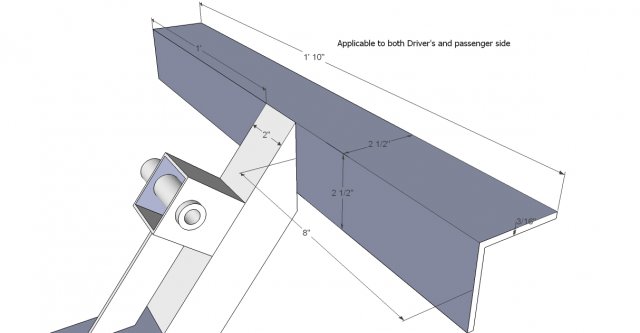
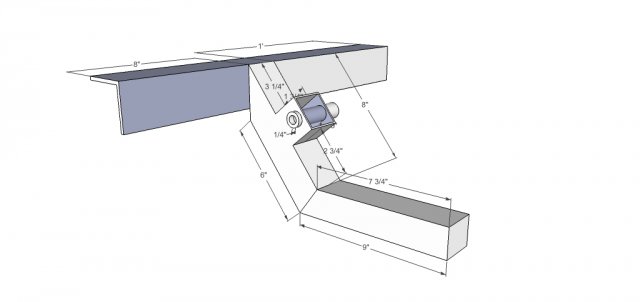
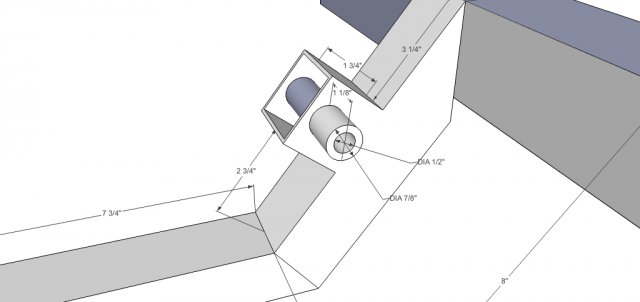
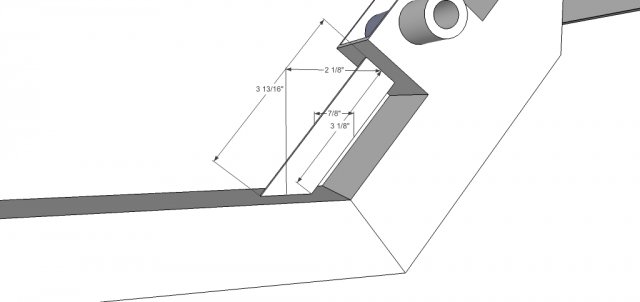
Not a problem. Hopefully it helps you (or anyone for that matter) get your swap going. If you're going to use these drawings, I would recommend that you have the angle iron and square tubing made with my dimensions. Put it in your car and see where it lines up with your motor. You might have to take a little off the 22" angle iron to line up with your motor mounts. Also, before you have the vertical square tubing (the ones with the pipe) welded to the tubing coming off the angle iron, I would check that my heights don't put your motor too high for your liking. I would recommend you get the square tubing/piping piece welded as is and leave a little extra on the bottom if you can visualize what I'm saying. That away if it's too high, you can cut some of the height off and lower the motor a little. With my motor in the car I can put my hand between the damper and the crossmember that's how high it sits. I also have my motor pushed back basically as far as it will go (the heads are less than 1" from the firewall). Anyway, here's the driver's side. Again, if you need me to take snapshots from different angles, or put in more dimensions, I'll be happy to. I'm actually about to go put the motor back in, so I'll try to post some pics of how this mount sits the motor in the bay after tonight.
-
From what I've read, the 351W will fit the same. I've attached some Google SketchUp 2D jpgs for your viewing pleasure. This is the passenger side for now. I'm in the process of modeling the driver's side. Should have it up tonight. BTW, I'm using Duralast part number 2257 engine mounts. From a late 60's mustang I believe. Let me know if you can't make out any of the dimensions and I'll take some more snapshots in Google SketchUp. Or, if anyone wants a copy of the sketchup file, I'll just email it out or make it available on a share site. Edit: forgot to add the mount brace
-
I should clarify that I didn't buy a messed up cradle from Brian, I had mine made from his drawings. After re-reading my post it kind of sounded like I got a defective one from him. Brian's cradle is really nice and I would probably still be using it had the person who welded mine not messed it up. I also really prefer the late 60's Mustang motor mounts and how they just slide over the tubing--1 bolt and it's in. If you plan on putting the 5.0 in the Z, definitely buy the JTR transmission mount first. Drop the motor and transmission in the car and bolt the transmission where you want it to be. Then mock up the cradle using the cardboard. I think it maybe took me 2 hours to make/cut/position the cardboard exactly where I wanted it to be. Super easy. Oh and you're going to want to invest in a knockout punch. $30 from Lowe's/Home Depot. Made making the holes for the tubing not only exact, but way way way easier than drilling. I hate drilling.
-
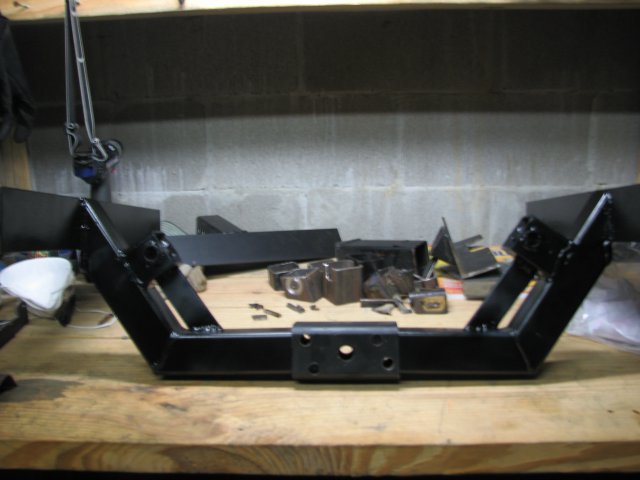
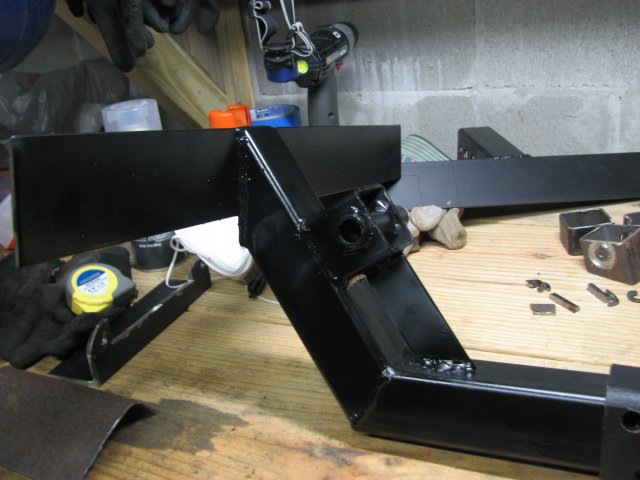
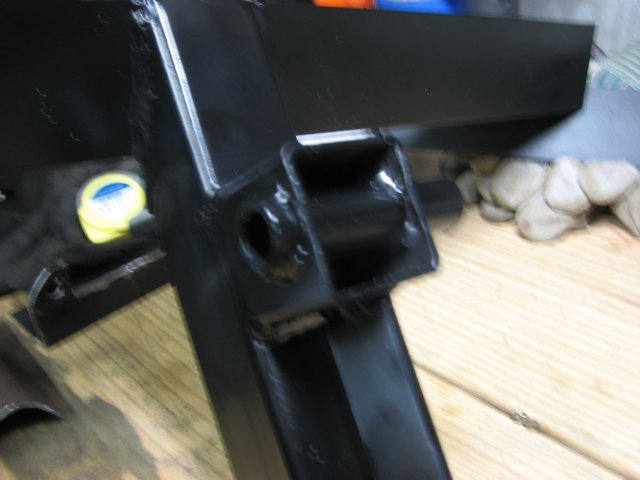
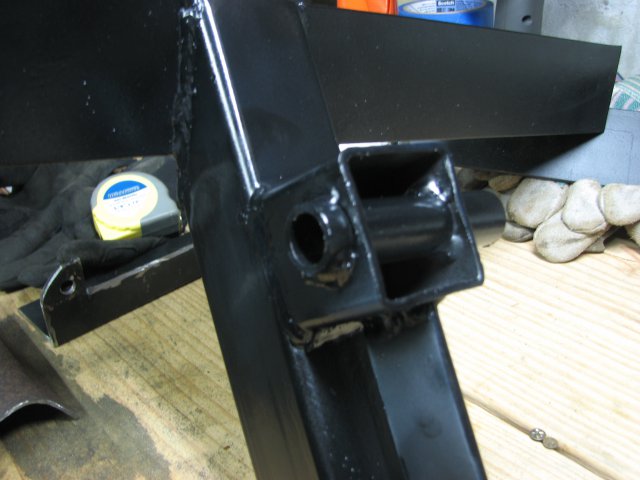
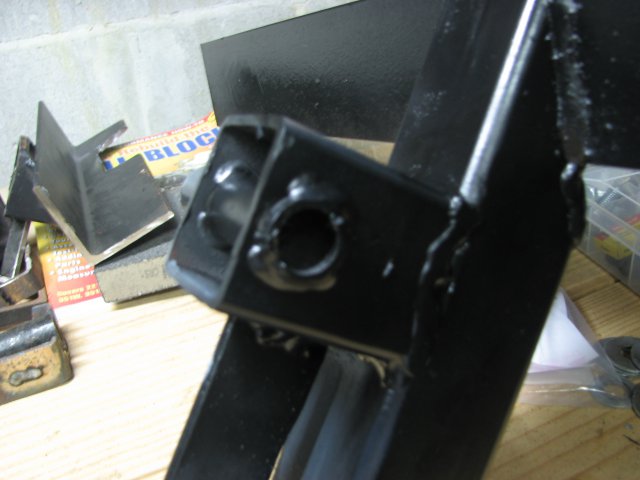
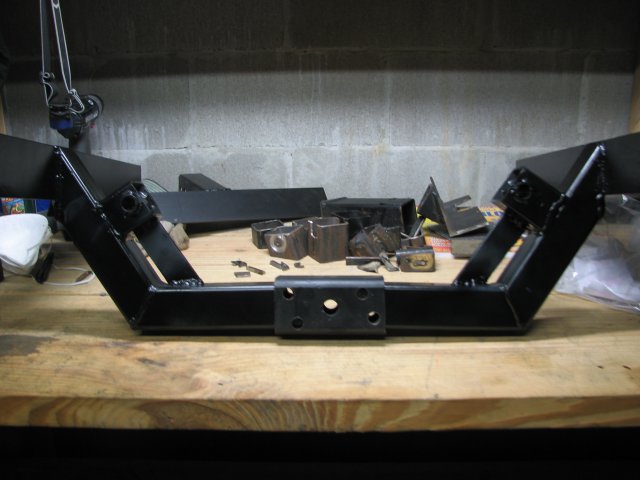
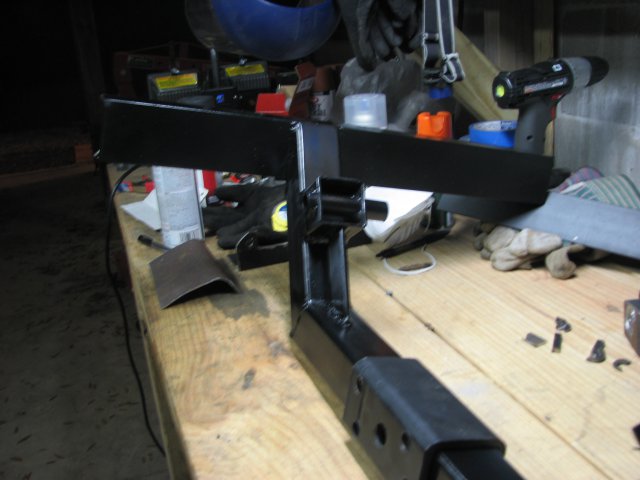
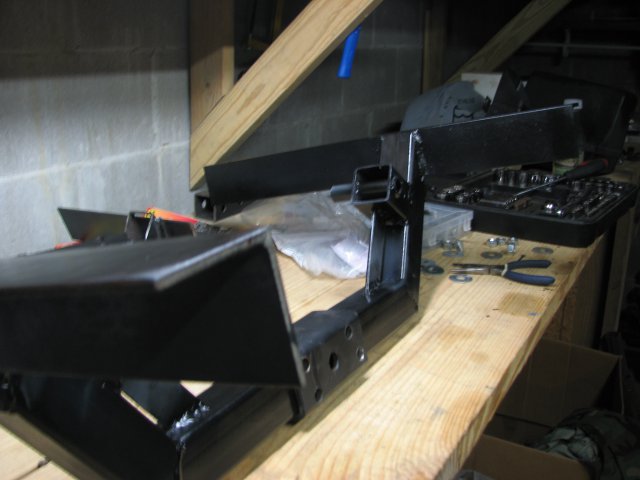
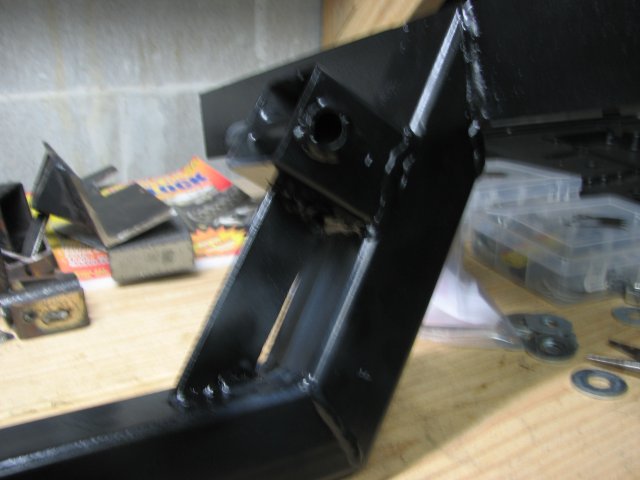
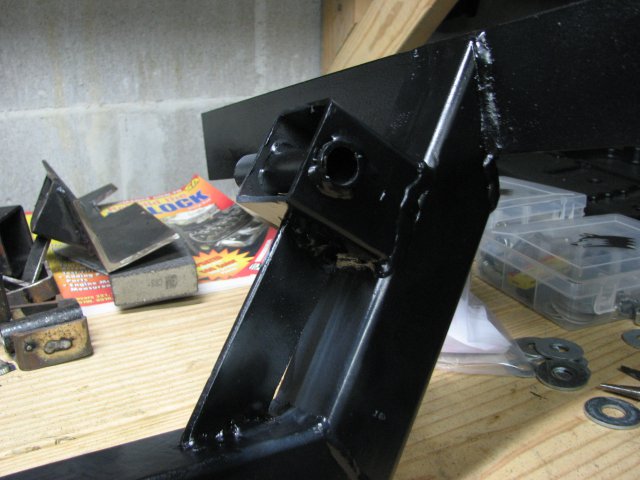
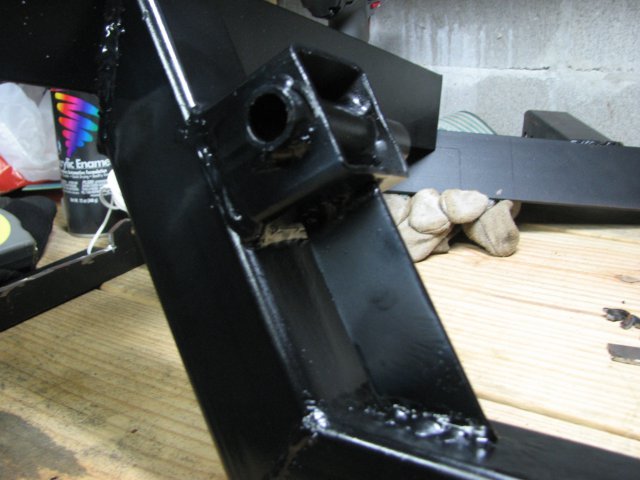
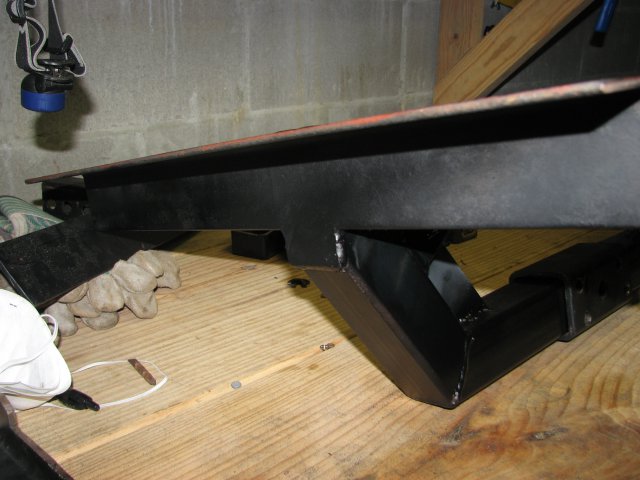
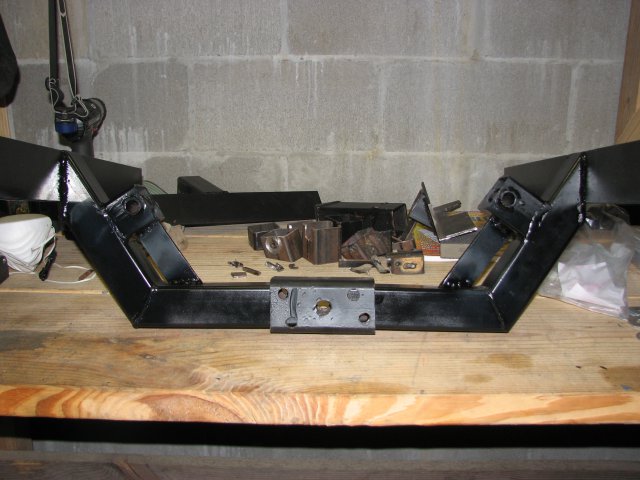
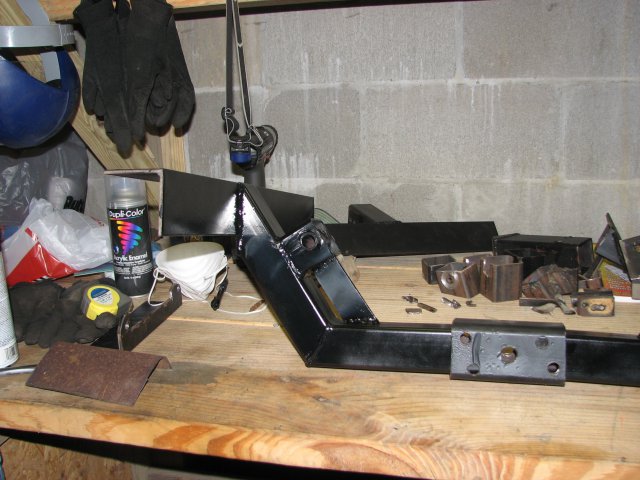
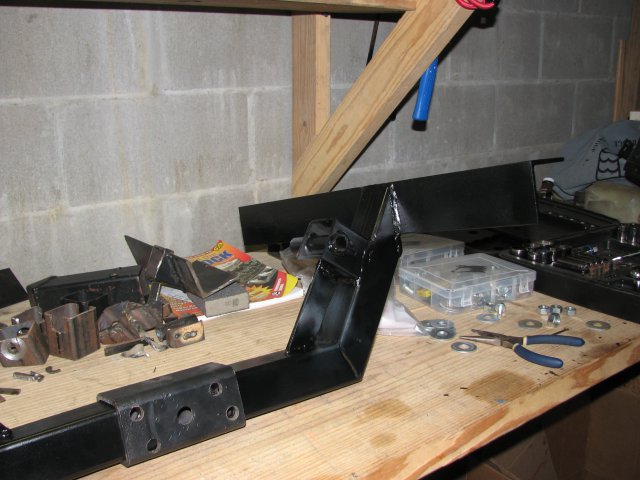
I had originally used Brian Laine's setup. His setup is awesome and I'm glad it's out there as it got me started on this whole project in the first place, however, the number of bolts that needed to be jimmied in to place was becoming kind of annoying. I was also pretty leery of the welds as they didn't look like they got very good penetration (turns out I was right after I cut the old mount for spare metal) and one of the tubes wasn't welded perfectly straight. I used er34gtt2000jp's mounts as inspiration for my current setup. It was actually pretty easy to make. Just made some square tubing out of cardboard and cut away with the motor and tranny in the car. Had the tranny bolted in the place I wanted it to be, and just cut the cardboard to fit. Once I had my cardboard cradle/mount taped up, I took it to the local steel shop and said "here, make me this with these exact dimensions". "Also, weld it here and here" and they said "cool, that'll be $50". $50 for the steel and welding, cut to to my exact measurements. Ironworks Steel in Fort Walton Beach if anyone's close by. Anyway, here you go. I think I put a little too much clearcoat last night as you can see some light spots in the pics. Also, all the pretty (read: critical) welds were done by a professional. The only welds I did were the two braces. They actually didn't turn out too bad for my first time. BTW, that middle piece slides off and makes installation a breeze.
-
['m using a Ford T5 behind a 302 -- 10.5" stock clutch. I plan on buying the Tilton 7/8" univeral master cylinder.] I know that I can buy the CNC brand universal push cylinder and mount it to my bracket I made, but I was wondering if there is any reason why I can't just use this slave cylinder instead? Or for that matter, any SC that I could mount in the correct orientation. The one I link to is $16 vs. the $70 I would have to pay for the CNC unit + pushrod. I'm assuming it all depends on bore size and whether it can be mounted on the side of the T5? The SC I linked to has a 3/4" bore size vs the 7/8" bore size of the CNC SC. What problems will I run into by using a smaller bore size? Sorry for all the questions, I would just buy it and try it out if I was at a point in my build where I could do such a thing!
-
For those of you who have a T5 bellhousing that pivots on the far side, i.e. the fork is "pulled" towards the engine, I stumbled across this solution. http://www.britishv8.org/Articles/Clutch-Slave-Ford-V8.htm Uses a push-type slave cylinder mounted with a bracket aft of the clutch fork. The bracket looks simple to make and the pictures on the site make it even easier. I haven't personally tried this yet, but I'll be picking up the metal today and possibly the SC. Found this as well for those who don't want to make the bracket http://home.bresnan.net/~dazed/test#3
-
Wow. Been a while since I've been on here. Drove 1000 miles, both ways, for Christmas with two kids and a van full of crap, I mean stuff needed for this trip. Got back and bought a 2003 Z71 Avalanche to replace my 240,000 mile Ford Exploder. Hopefully it will last as long. So before Christmas I was able to get the motor and transmission in the car and take the car off the stands. Wow. I had become so accustomed to having the car on stands that it felt really low off of them. I kept checking the shocks and struts to make sure they weren't bottomed out! My parents got me a Weiand 8142 aluminum intake for Christmas, so that's going on soon along with a decently sized list of other things to get this motor running. Here's some pics for your viewing pleasure. The pics link to my album with about 30 total pics. Don't mind all the surface rust. I got sick and lazy and didn't cover my car up. Of course we had about two days where thick fog rolled in all throughout the day and covered everything in water. Guess I should know better than to leave stuff uncovered in NW Florida.
-
Well the motor and tranny are in!! Here's a recap of what's happened since the last post. -cut about an inch off both sides of the angle iron, nearest the firewall. Thought this would be sufficient so that I could push the motor back a little farther...turns out the transmission was hitting the datsuns tranny dog ears, ugh. Had to pull everything back out and get the angle grinder out. -cut the dog ears out and think that I'm home free and that the motor is going to just move right in. Wrong. Get it all back in only to see that the tranny is still hitting the dog ears. Turns out I didn't cut enough. Really pissed now because it's evening time and I couldn't just pull the grinder out and cut what I needed to. -before doing all this I put my new flywheel and clutch kit on the block. I did not think that putting the flywheel on was going to give me such a headache. I had a hell of a time getting the bolts to line up and thread nicely. Oh and I found out that a) no lock washer grade 5 instead of 8 bolts c) over torqueing (due to reading the wrong spec) the pressure plate bolts equals a snapped bolt. Luckily I only snapped one bolt and decided to knock it off and wait until I had the right equipment before moving on. -sometimes I amaze myself at how stupid I can be. Here's a conversation between myself and myself concerning whether or not to fill the tranny before putting it in the car innerself: I'm pretty sure that all of this fluid is going to come out the back of the tranny when i go to put it in the car Self: nah, and if it does this bag that I put around the output shaft should keep it contained until I bring it back to level $15 and about 2 quarts on the carport floor later my innerself prevailed...I'm retarded. So day before yesterday I got all the cutting that I needed done, put the motor and tranny in and it slid back exactly where I wanted it to with no problems..yay. I now have clearance for the damper (which is what was driving all this anyway) and I'm pretty sure the "massaging" of the header is acceptable now as well. Bolted the tranny in with the JTR mount and it's nice and solid. Haven't been out to the car yesterday or today as I am not feeling good at the moment. Hopefully tomorrow I'll feel better and I can get the car off jack stands and make sure everything is peachy. I'll post pics shortly when I get to my laptop (iPhone on the crapper at the moment).
-
Thanks V8 Unfortunately my setup didn't give me enough clearance to not have to "massage" the headers. I might be able to move the motor slightly to the passenger side, however I would have drill all new holes and they would be too close to the existing ones I think. Either way, since this last post I spent last night putting the motor, with tranny in tow, back into the car to see where I need to drill for the tranny mount. Turns out I didn't have enough clearance for the balancer so I took the angle iron out and chopped about 1/2 inch off the end so that I could push the motor back farther. I'm going to spend tonight bolting the flywheel and clutch kit in and change the T5s oil. I'll bolt it all together and try to get this thing mounted for good:mrgreen: I'll take pics and post if I have "uh great success".
-
I need to figure out how to make these pictures smaller....geez
-
So I guess I'll use this as my build thread FTM. I'll start one in the member's section at some point... A lot of things have happened since this last post...moved from base housing to a nice house outside the gate with tons of room to work on the car. Changes since this last post: -Cut the cross-member in half and used a sleeve in the center--much easier -picked up a set of the Patriot block huggers--fit great, but I need to "clearance" the driver's side for the steering shaft (where's that pencil torch and sledge at?) -finally drilled the mounts and x-member and the motor has sat in the car under it's own weight...yay! Still need some hardware (bolts aren't quite long enough) before I can put it in for good....i can see the light--pinprick, but it's there. I'm going to bolt the tranny up tomorrow and put everything back in (lost count of how many times so far) so that I can put the JTR mount in place. Then I'll take it all back out so I can put the clutch, etc. in and then back in it will go. I'm stoked that it's almost ready to be put in for good. Still have a lot to do inside the car, on the engine and basic maintenance before any rubber is burned. Here's some pics of the motor in tonight. It's tilted towards the rear a little much due to no tranny. Damper and front sump have plenty of clearance when the motor is tilted forward in the "normal" position.
-
Damnt...I was so worried about steering shaft clearance that I didn't even think about firewall clearance.. What's kind of funny is that I have the motor about 20 feet from me out in my shed, yet I was looking at my pictures posted here to see if I actually did have clearance..lol. Just went out and looked and the pass. side manifold is for sure not going to fit. Looks like I'll be picking up a set of headers. Any suggestions? The JTR ones are for a SBC and I would have to "massage" the summit SBF shorty headers to clear the steering shaft...might be what I end up doing seen how I'm kind of following Z8Driver's write-up. Oh well. Nice motor and Z btw. How close are you to finishing? I use my dad's Z (was my first car when I turned 16, 9 years ago) for insipiration. No V8, but he has done a superb job on it.
-
I'm going to pick up a Weiand intake and Holley 4160 carb. I got the motor as a rebuilt longblock with a nasty looking 2bl intake and carb that definitely needed upgrading. I get my JTR transmission mount tomorrow and after measuring it and the crossmember and drilling out the holes, I'll be ready to put the motor and tranny in....:mrgreen: Still need some parts (intake, carb, starter, etc.) before I'm ready to start it up...but it will be in the car. One milestone at a time. Btw, sandblasted my manifolds and valve covers today and painted both black. Put a clearcoat on the valve covers and they turned out real nice. I hope the clearcoat holds up to engine temps...I think it will.
-
Using Z8Driver's drawings, I had my motor mount cross-member welded up and the following pics shows it mocked it up on the stand as well as the 240 it's going in. Going to the sandblaster tomorrow morning to make those stock manifolds look a little better... I haven't drilled the mounts or the square tubing yet, going to put the motor in the car and sanity check my measurements first.
-
AutoZone Moly EP grease for cam break-in?
ukcats07 replied to ukcats07's topic in Gen I & II Chevy V8 Tech Board
Thanks grumpy, I was hoping you would answer....straight and to the point. I appreciate the response. Doug -
Will any molybdenum di-sulfide grease work for a cam break-in or should I just go ahead and order some cam break-in-specific moly lube from summitt, etc.?
-

Intake manifold and timing chain cover bolt sizes
ukcats07 replied to SmokeyTheBear's topic in Ford V8Z Tech Board
I actually just bought some last night..lol The timing cover bolts are 5/16-18 thread size and pitch. You'll need four 2" hex cap, flange bolts with one washer for each for the bolts around the damper area. Same thread size and pitch for the two smaller bolts behind the water pump, but make them 1" with one washer. I got mine at Lowe's for under $5. Don't know about the intake manifold...I need those as well. My motor is an early (1976) model 302 with the dipstick in the timing cover, if it makes any difference. Hope that helps. -
Yeah, I wrote that last post wrong. I ordered the Canton main cap bolt with the stud for the pickup, not an actual main cap. I ordered the summit pickup for rear sump oil pans (part # 123459) and it all fits perfect. Now I'm extremely confused on bolts for attaching the timing cover and water pump.. I see kits for aluminum timing cover and aluminum water pumps and ones for iron timing covers and aluminum water pumps but none for alum. timing cover and iron water pumps..ugh. I'm guessing that it does matter which set I buy otherwise why would there be different sets for different combinations. Any insight from anyone? I have an early model alum. timing cover with the dipstick in the front (which I will be tapping and plugging).
-
Thanks Jim I picked up a standard volume pump at Auto Zone and the pan fits nicely. Unfortunately I didn't realize I needed a main cap with a stud for the rear sump pickup....ordered one the other day and I should be ready to button up the bottom end

