subhuman
-
Posts
26 -
Joined
-
Last visited
Content Type
Profiles
Forums
Blogs
Events
Gallery
Downloads
Store
Everything posted by subhuman
-
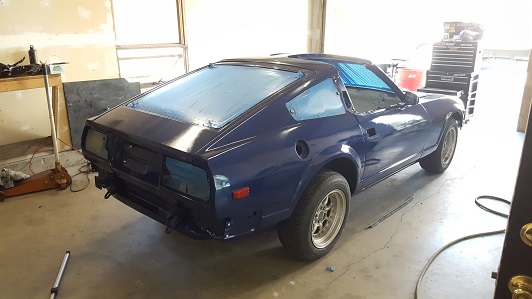
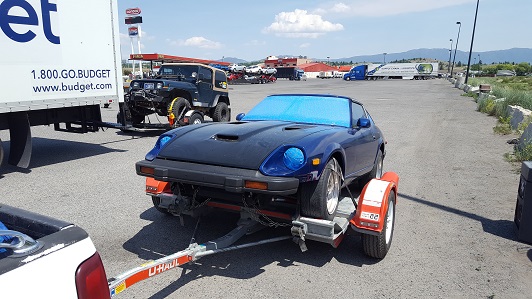
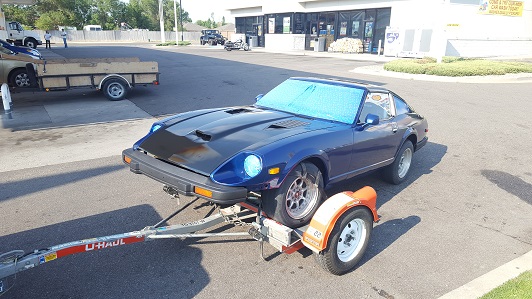
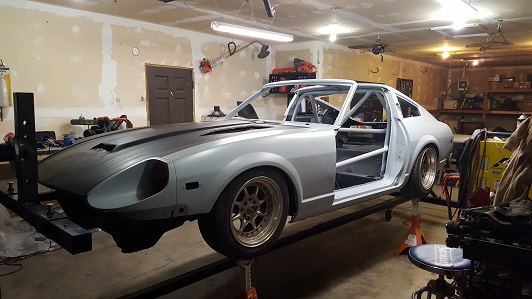
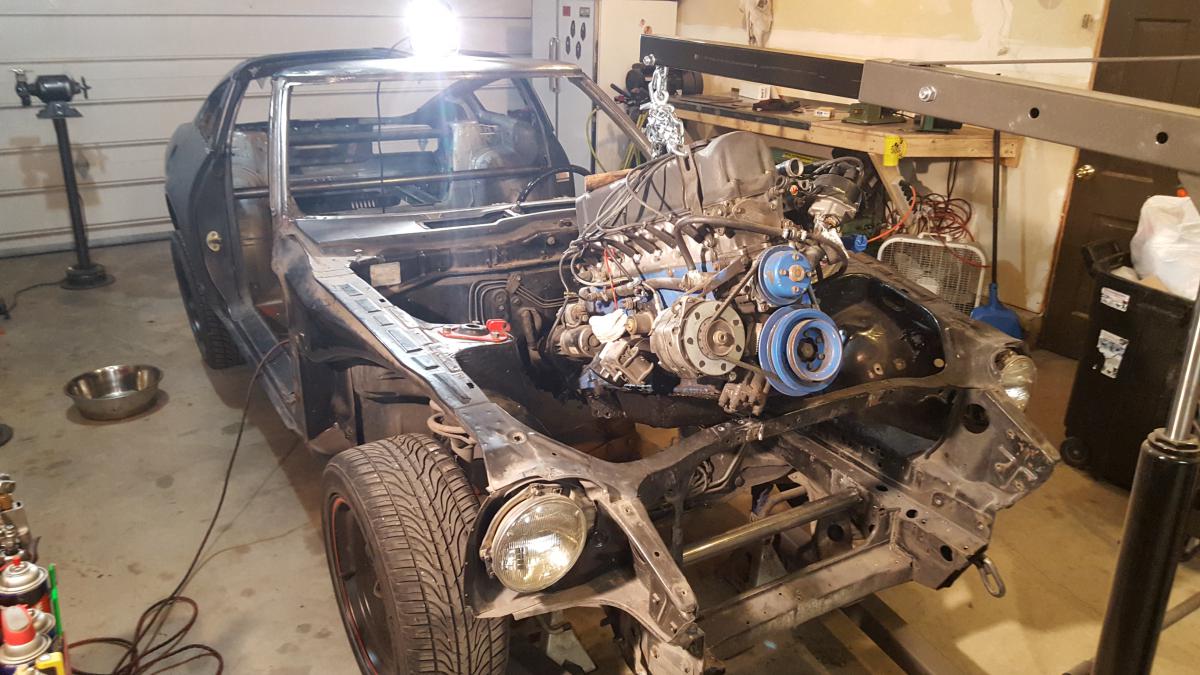
My buddies flew all the way up from TX to drive down with me. Needless to say they were not happy that I was still assembling the car the night before we were set to leave after they had been packing the truck all day. We still left on schedule, couple hours later than they wanted but hey, we made it. Now I just have all the fun work of motor swaps and electrical wiring. it was a crazy experience and I don't think I would trade it for anything else. It got three coats of clear and still needs a final block and polish in a few months. the hood will get a low gloss JDM matte finish.

-
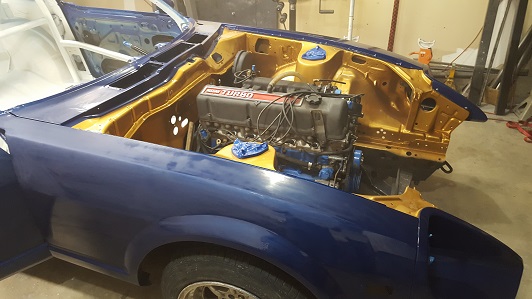
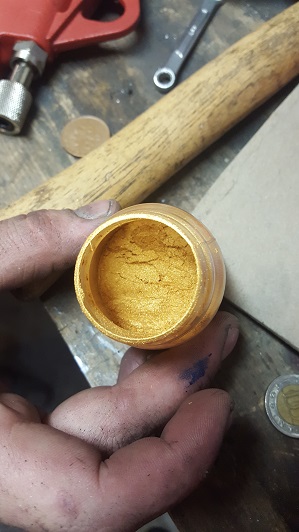
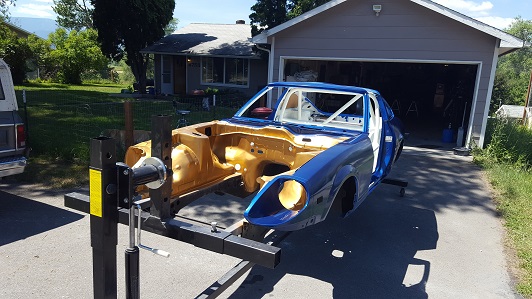
About 2 ounces of gold pearl in with the metalic blue, to tie it into the engine bay. Another ounce or two of white pearl in the clear, because...well, why not?
-
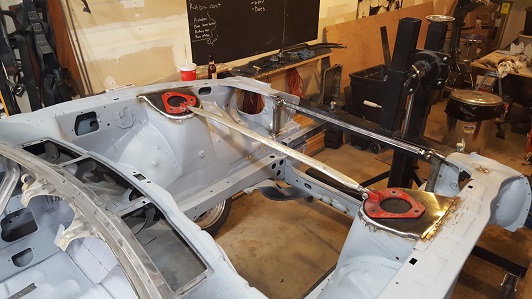
All four strut towers got braced with 1/8" steel plate as well. the car sits so stiff I'm probably going to need a kidney transplant. The Brides are the Philippine/Canadian knock offs.
-
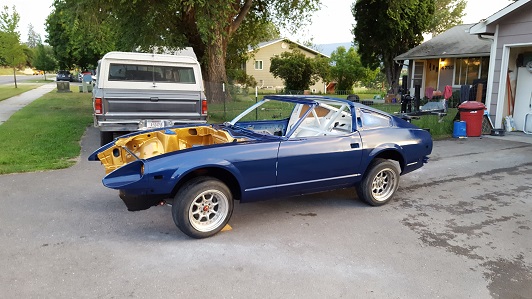
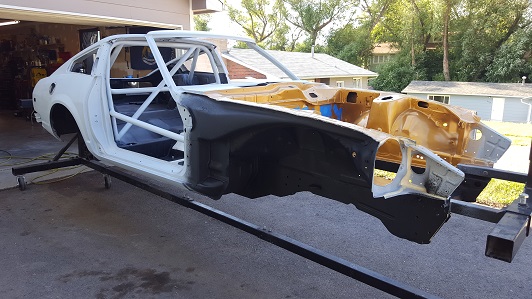
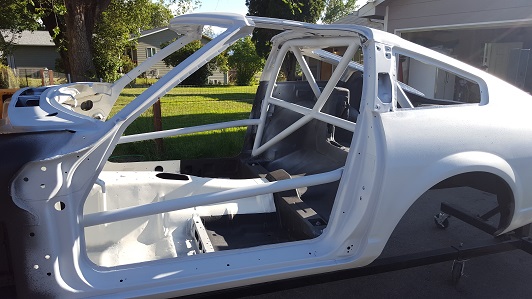
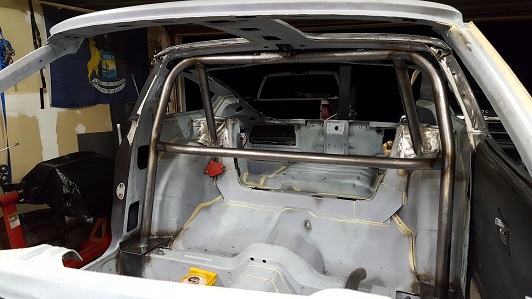
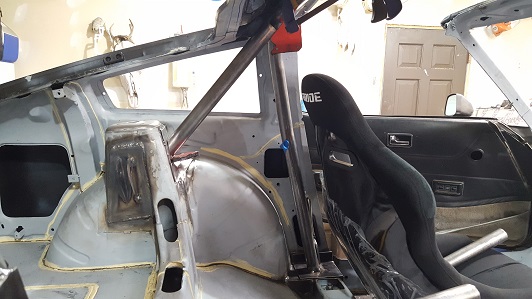
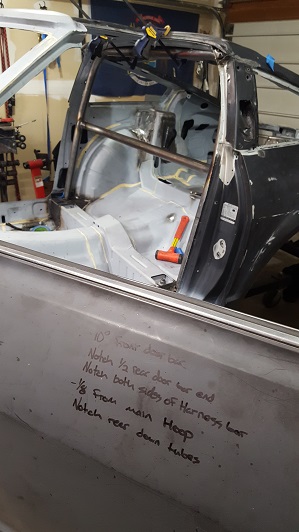
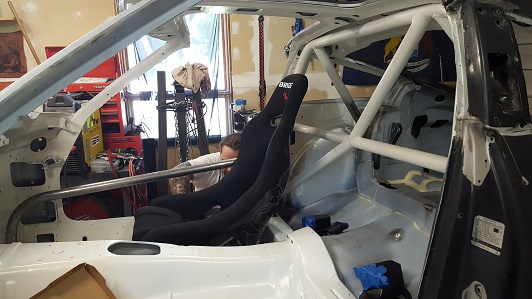
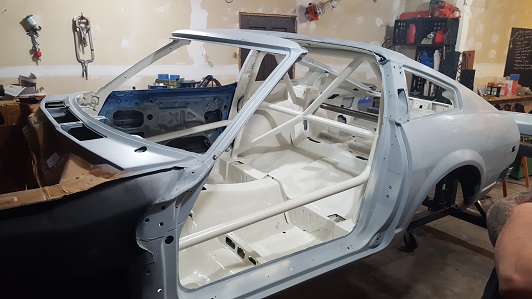
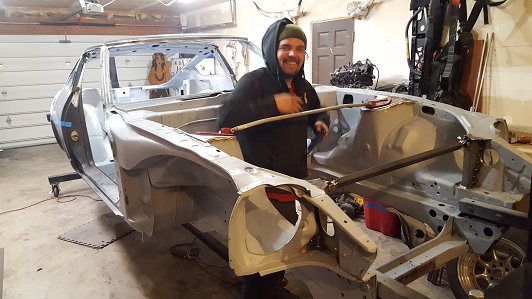
Hey everybody, just checking in. We got moved back to Texas and found a place to live and we can start moving in this weekend!! I honestly don't have much concept of time over the last couple months. We got the 6 point roll bar in and rubberlined the whole underside of the car and under the seats back to the rear valance on the inside(-our weld areas around the plinths). I could not have done this build in 8 months without the help of my buddy Ki. This was the 4th roll bar/cage set up he has done as well as 300+ feet of tig welding and honestly, he even sprayed the car as well. I did all the heating, cutting and hand formed all the floors, plinths and spreader plates and reassembled the car to where she is sitting now. I have learned an immense amount of information through all this and I'm really fortunate to have a friend that just loves cars and hot rod shit as much as I do. OK, so ultimately I'm 6'2" and was sitting level with the top of the roll bar with a helmet on, this was a no go. so we ditched the stock seat sliders and went stationary seat mounts, that netted us 3/4". we still needed to ditch an 1 1/2" so we decided to channel the interior of the roof (we called the nhra and they said it was legal as long as the welds were full surround and could be seen with a mirror for inspection). So we cut the F*%$ out of the roof and made it work. You can see from the pictures how we built the plinths up so we could maintain a even crush on all the spreader plates. the spreaders for the rear down tubes were a huge PITA. again nothing a torch couldn't solve. I believe once the roll bar showed up the first week in June, it took us about 3 1/2 weeks to get it welded in, door and harness bars bent, plinths made spreader plates bent and formed. Ki burnt the torch out on the tig, that took a week for the local boys to get that shit in from Seattle. Last day of work was June 23rd when I put the wife and boy on the plane and we worked 14 hour days for 10 days straight. We dropped it off the rotisserie Thursday June 29th painted it, put it back together on July 3rd and had it loaded on a car dolly the 5th and drove it 2000 miles with 3 coats of fresh clear on it. All that and she held together and only got a couple paint chips. Game plan is to get it wired up and situated with the L28et in it so I can drive it and get the feel for it again while I save up for the intake and fuel management for the Lq4, as well acquiring parts for the brake, suspension and drive line upgrades that it so badly needs. The "LS" build will continue and I will try to post as much as I can to keep this thread alive. If you guys have questions how we did stuff feel free to ask. I made templates for everything and would be willing to send you copies for a nominal fee
-
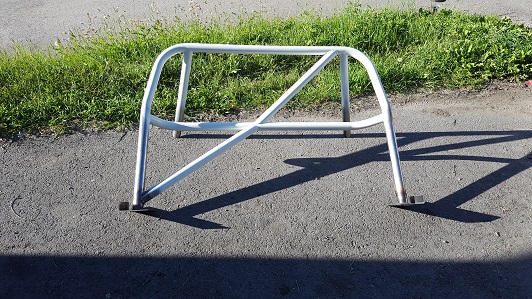
Thanks for the pictures G-Tech! Looking at your set up I should be able to kick that radiator out where I want it, still have to figure out where I'm going to stick that massive Holset though. Dear god I hope I have the motor in it by next spring! I ordered a 6 point roll bar from Chassis Engineering down in Florida, it should be here Friday. They have a pretty sweet template you print off and send them the measurements and they bend it up and ship it to you. I picked it up for $174! + shipping but, hey under 5 bills it's screaming, probably cheaper than you could make it. I'll snap a couple pictures Friday night when it comes in. Best part is, they will keep the measurements on file. So that means...all us S130, 280zx guys n' gals will have a bent to fit source for roll bars!! A buddy and I are running down to Idaho Sunday to pillage a parts car for some odd's n' ends so that will be fun, nothing like road trips and part hunting. Gonna order seats before the weekend as well so we can get the roll bar in when I get back from Washington on the 5th. I need to finish up the plinth's and spreader plates Thursday while my buddy wraps up the welding. Gotta get this sucker painted by the 12th of June. I put the wife and boy on the plane for Texas the 23rd of June, so my window is quickly closing to get the Ol' Girl painted and back on the ground. http://chassisengineering.com/index.php?route=product/category&path=39_292 http://chassisengineering.com/documents/CHASSIS_KIT_FORM.pdf
-
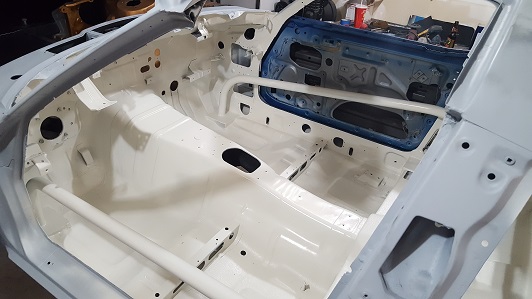
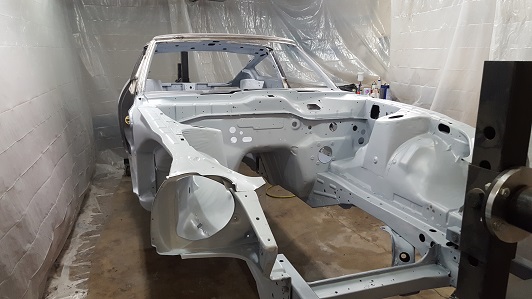
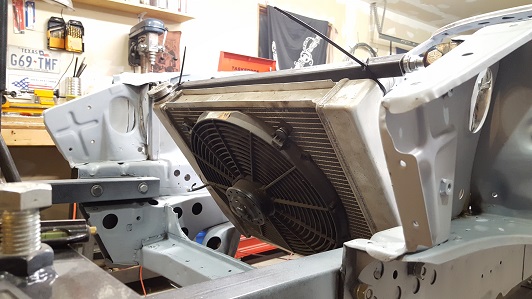
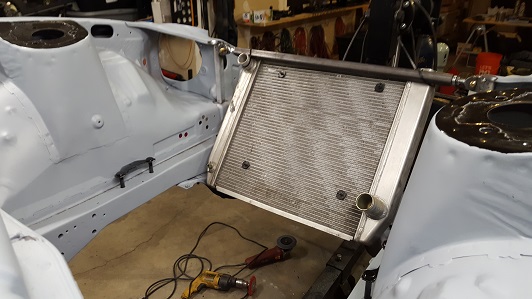
Interior engine bay and underside have been primed with Upol Acid #8 at this point. I have been bouncing back and forth between fabricating the radiator support and Por 15'n all the suspension components, while lathing Aluminum bushings. The radiator gussets, supports and sheet metal are all welded in at this point. We also welded 1/8" plate over the front strut towers, rear will get it too from the bottom though. I picked up some TTT camber plates and everything has been drilled out now, I still need to notch the towers for adjustment but have enough on my plate for the time being. I'll get back around to it later. The front cross member, sub frame and trailing arms, under dash bar, steering column and various odd n' ends all have two coats of Por 15 on them and are ready for re-assembly. I have all new Poly bushings and wheel bearings ready to go in, but that's just an afternoon of work so right now my focus is body work and getting the car blocked and banging some dents out. G-Tech or anyone else...How far over the front cross member does the harmonic balancer hang? I'm using the corvette balancer and only running the alternator and water pump. I really want to do a V mount but the mock up in the pictures are quite extreme, the radiator will fit on the back side as well but I really want that extreme kick. One more for you guys..did you cut the OE transmission tabs out of the tunnel to run the GM transmission? I am assuming so. Some pics would be awesome if some body could throw some up. I need to go home and get some sanding done tonight, I have a long ways to go and a short time to get there. If I get done at a reasonable time I'll try and post some more pictures up. The motor should be out of the machine shop in the next couple weeks !!!!
-
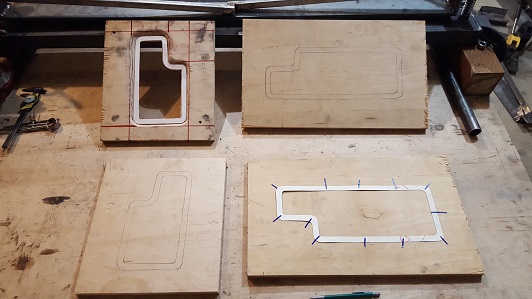
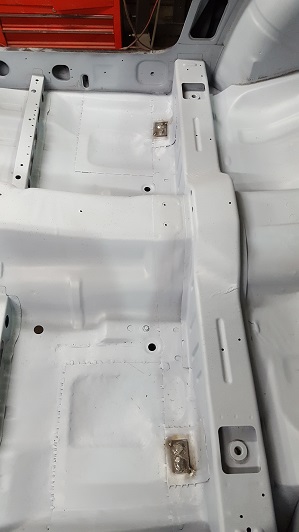
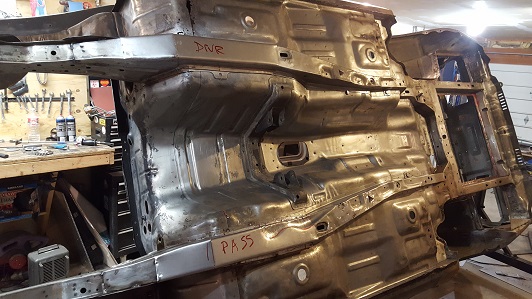
Onto the floors, also a PITA. I made forms out of 3/4" ply, cut them out and routed them. then I screwed them to another piece of ply, clamped them down and using a torch periodically hand pounded them out. If I had a bearing press it would have made the job so much easier, but it was worth the experience I suppose. Regardless The floors are now back in and welded solid, probably way more sturdy than the original OEM stuff. We doubled up over the rear sub frame mounts with 18ga and then I got grade 8 bolts and welded those to some 1/8" flat plate which will get welded to the floor. Onto paint.
-
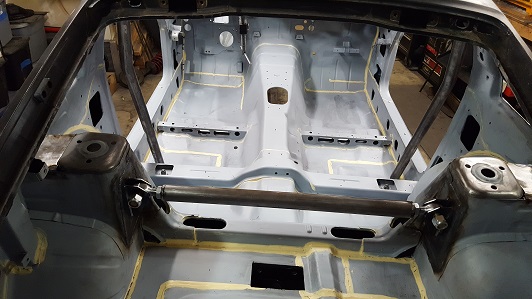
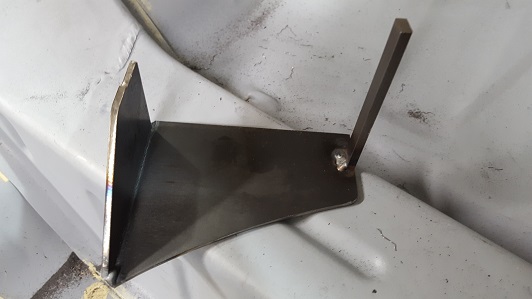
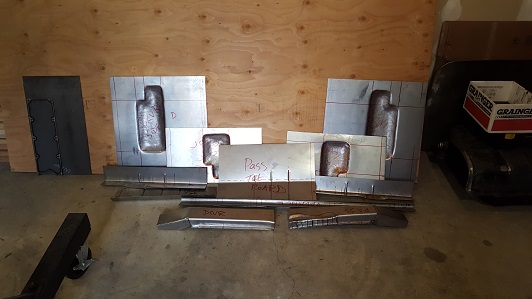
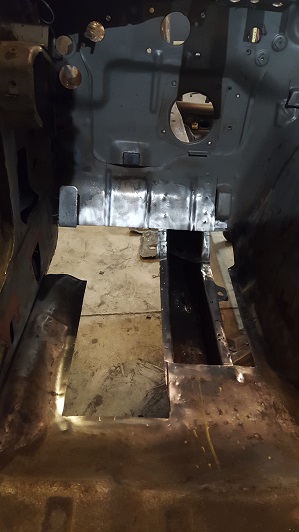
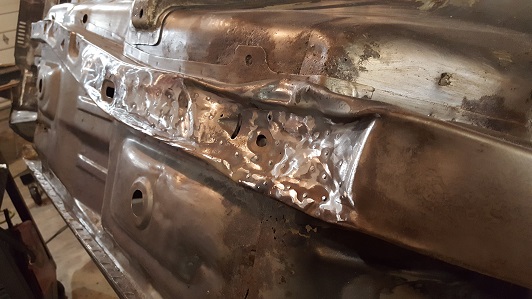
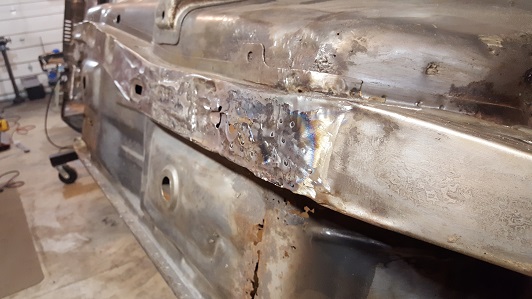
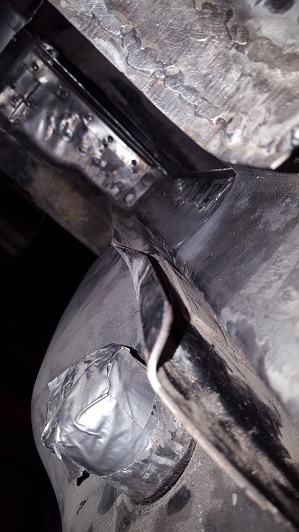
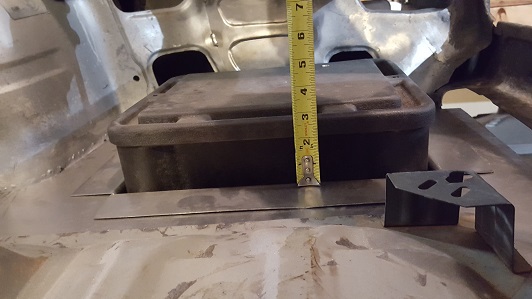
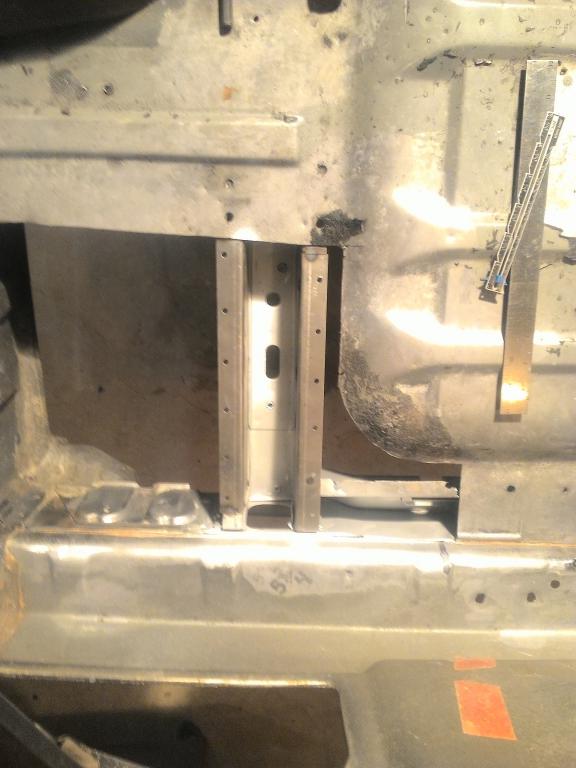
A little status update on my build. Been hauling ass seeing as we head back to Texas July 5th... Before we wrapped the rear floor up I had to address the beat rails and get them situated. Part of the floors got cut out above the rails so I could gain access, I welded a 1/2' bolt to some small pieces of 1/8" flat plate and tacked these to the rail. Then used my slide hammer and 1/2" all thread and a coupler, heated the rail up with the torch and pulled out most of it. What we couldn't get with the slide hammer we used a piece of 3/8 x 3" flat plate and beat them out with the 5lb hammer, it sucked. Next I bent up all the sheaths for the rail, opted to do this instead of cut them out so it preserved the structural integrity of the sub frame. Pictures are self explanatory. I included the measurements so if anybody wants to do this it's there. It took me a dozen tries to get the right measurements, so your welcome. There's some pictures of the rear floor, everything is tied in and back in place, we still have a couple spots to weld it in solid, just waiting on my buddy to get freed up so we can finish buttoning it up.
-
Say G-Tech, I have been eye balling the Dirty dingo motor mounts lately for the S30's I don't see why they wouldn't work in our s130's with a little modification as well. not 100% sure how much you can slide them forward though, but it's a thought. Hooker makes adapter plates as well, I don't know how far they move things forward either though. http://www.dirtydingo.com/shop/product_info.php?products_id=1430 http://www.jegs.com/i/Hooker-Headers/520/12611/10002/-1 Couple different options for modifications.
-
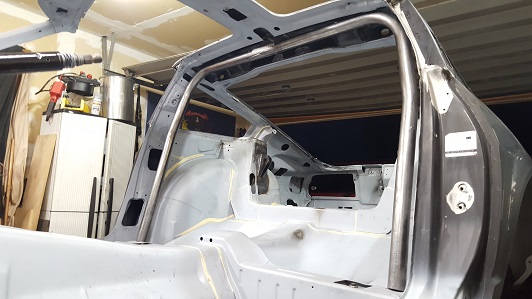
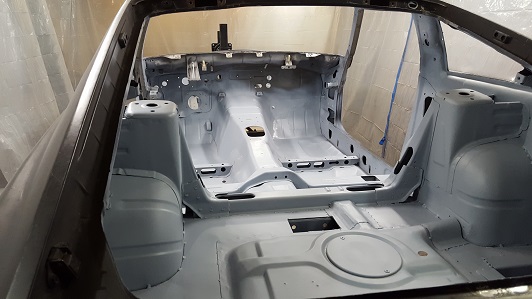
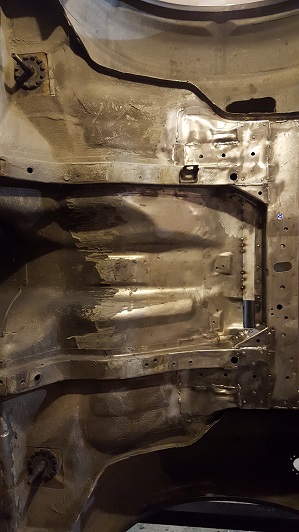
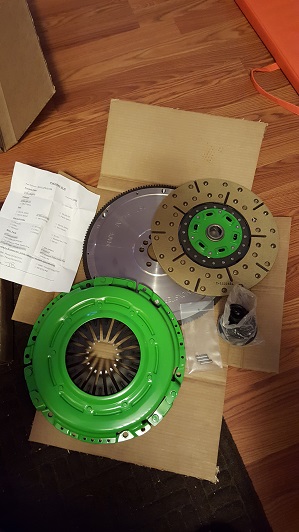
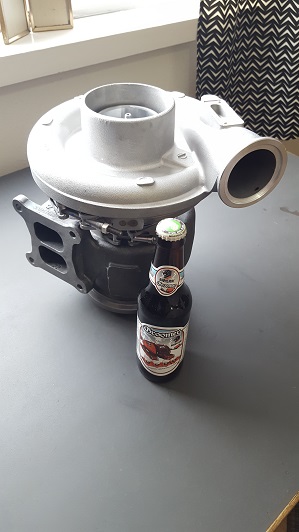
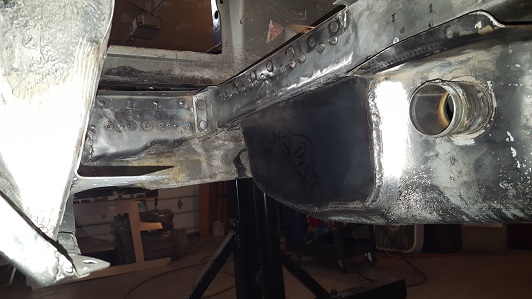
Last week I got the bay stitched up and plug welded all the holes, I need to get the tower knobs cut off and grind the welds flush so I can weld plates in for camber adjustments. I tied the channels into the rear sub frame around the gas tank and added 45*s as well. It was 35 today so I pulled it outside, finished stripping the under coat and bead blasted a bunch of rust off it. Just need to finish cleaning the seams out so I can weld them up and get it all the way down to bare metal. Looks promising as some of the rust I thought was really bad is only kinda bad. I got some -11cc Wiseco pistons ordered for the Lq4 today and will get my H beam Lunati rods ordered tomorrow. I scored a Monster stage II on Ls tech a couple weeks ago so when my rods and pistons come in I can get the rotating assembly balanced!! Block is at the machine shop as well waiting for a .005" cylinder cut and hone. I scored this Holset Hx55 turbo on ebay for a screaming deal to, so parts are coming in and progress is being made. A side note I am keeping the stock 3.622" crank since it was in such good shape. This motor came out of a 99 pick up so it has the long nose crank. I'm going forged internals and just decided to have the machinist cut down the nose .400" so the T56 will bolt right up and I don't have to source another crank. McLeod used to have a trans spacer to use with their flywheel but apparently stopped making it, so I figured this is easier. Well there it is for now. I'll post some more pictures when I get the rear pan in and some more work done. I'm going to get a bunch a of body panels formed then my buddy is gonna come help tig em in. i'm hoping to get the body work wrapped up next month and the motor test fitted before I have to pack for the move back to Texas the end of May.
-
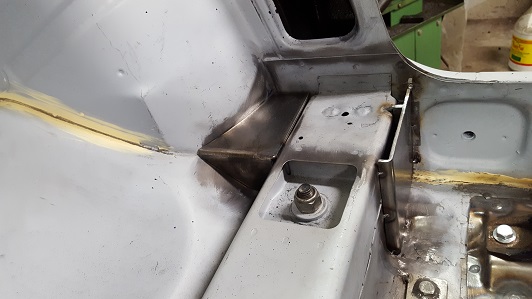
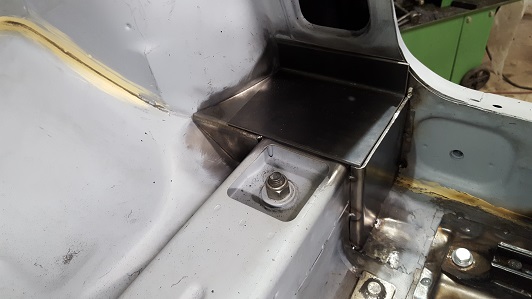
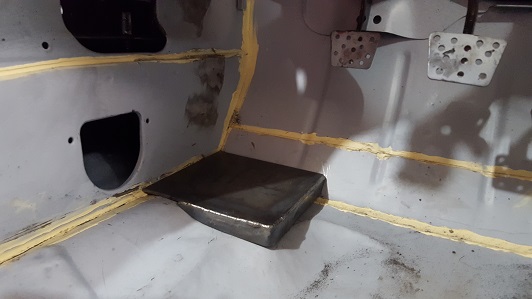
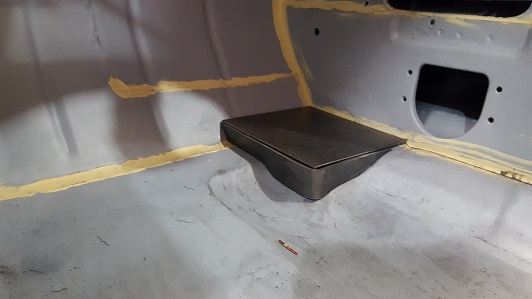
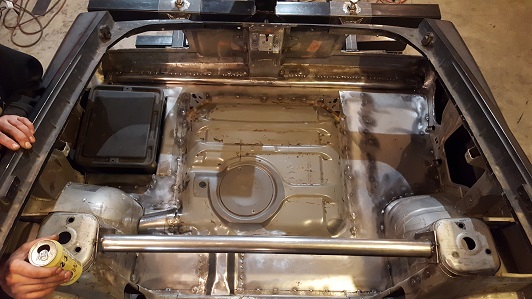
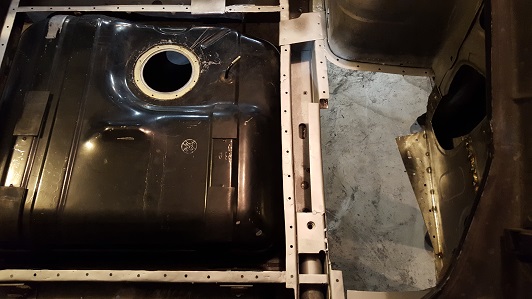
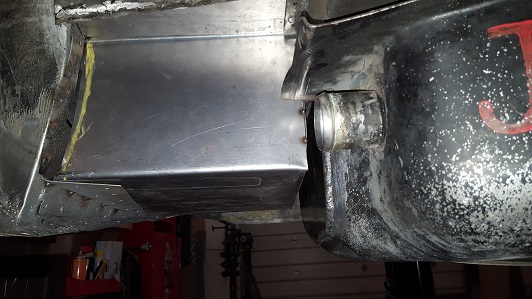
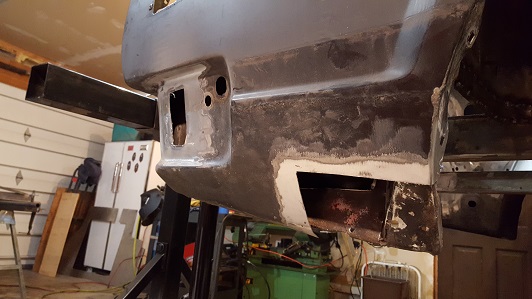
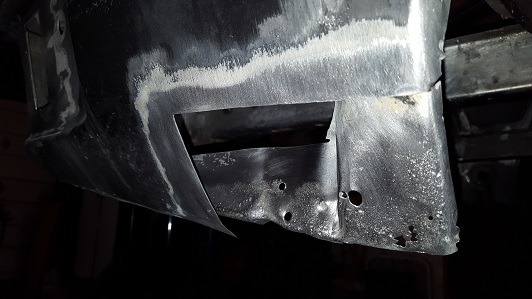
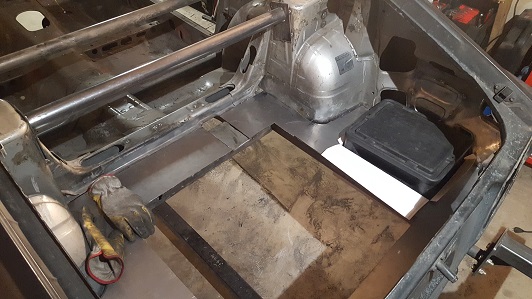
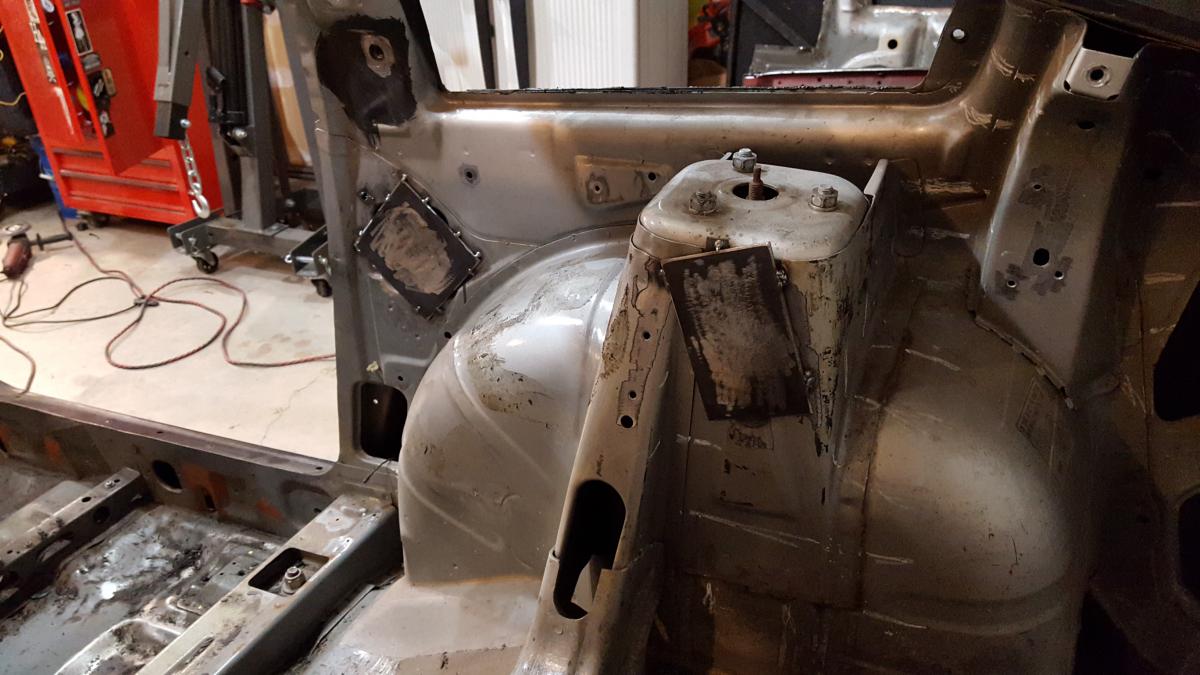
OK so, this is one thing I have found with relocating a full size battery to the back, putting it in a box and then building a tray for it like an anal retentive a*& hole. I had to loose a section of the gas tank. Now, I cut the old spare tire well out because it was pretty rotted anyway and the corner in that wheel well was toast (picture in the previous post). So I basically remade that inner fender wall and put a lip on it so the battery tray will be supported. Now my battery tray sits on the bottom most lip of the rear rocker, as low as I can get it with out it hanging out of the bottom of the car. Now I had to trim the lip off my frame rail because it's so tight with the tray I made (11" wide and I think 13" long), it was quite a bit bigger than the original spare tire well. So I get all of this done get my tank mocked up into my floor and now I can't get my tray in, wtf!! It turns out the tank overhangs the passenger side frame rail quite a bit, which I never noticed because the spare tire well was off set to accommodate it. I was already committed at this point so I took the tank to my buddy and he trimmed off that inch/inch and a half and welded it back up. pressure tested it too 200 psi and it held so here I am, back on track. I can get my tray in and the top of a full size battery sits about 2" off the floor, nice and tight. I don't know how other people did it, but this is the way I decided to do it. I'll run back out to the garage and get a picture of it all mocked up. *edit, added pictures of the tray, battery relocation kit and trimmed tank from a couple different angles.
-
Just realized it's been a couple months since I posted. I'm going to throw a couple posts up since I have a lot of pictures. This is some arduous stuff! I just keep finding rust in between the seams when I take sealer out so it has slowed me down quite a bit. I got into the rear passenger side rocker and it was between layers in the quarter and into the rear valance. A lot of little hand hammered pieces and rust-be-gone flushes down seams and I finally got it under control and I'm almost ready to put the rear pan back in. I have a new battery tray I bent up out of 18ga and tracked down the pressed floor pan that I didn't want to try and hammer out (keep that stock look). I still need to bend the recesses that the fuel lines and tank vent run through, should be getting to that sometime this week.
-
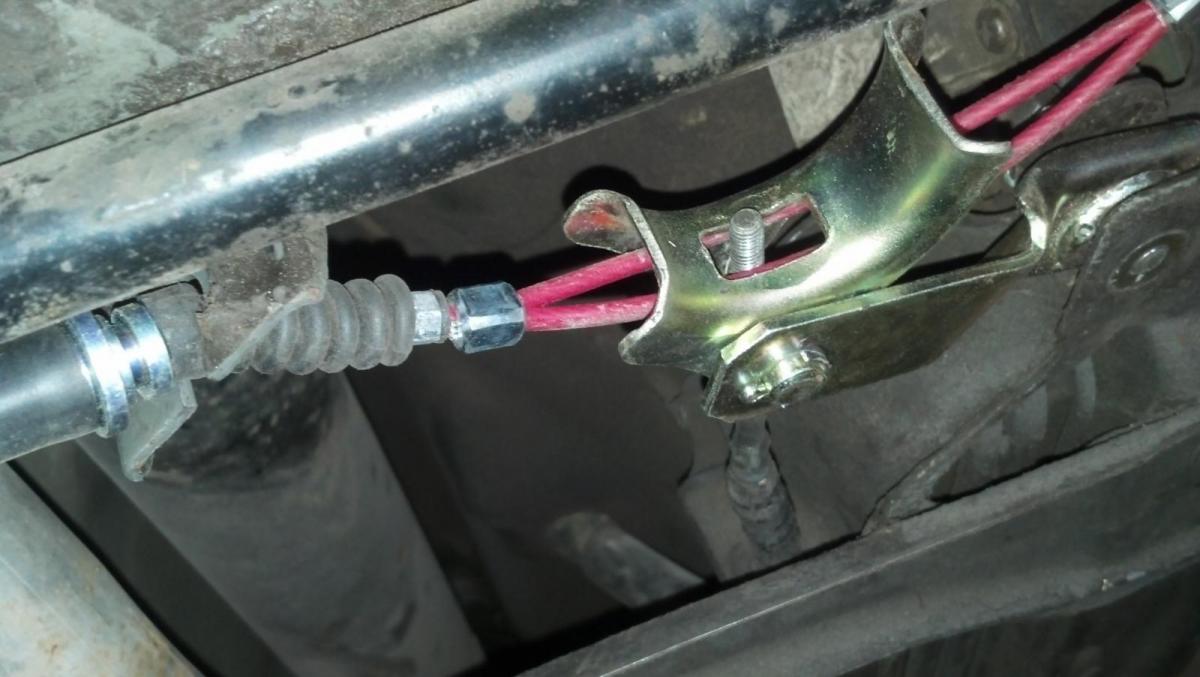
Am I missing a part? confused.. 79 280zx e-brake issue
subhuman replied to ramrod05's topic in S130 Series - 280ZX
I searched, therefore I am. Google 280zx parking brake components.
-
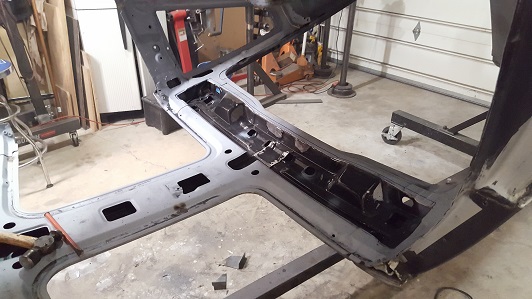
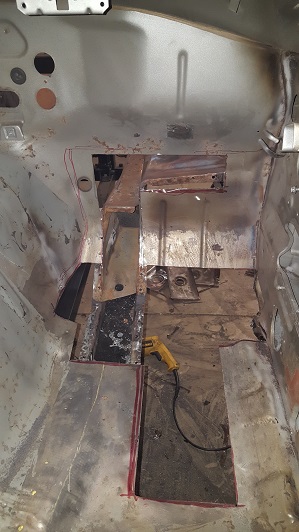
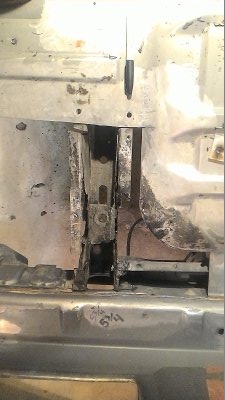
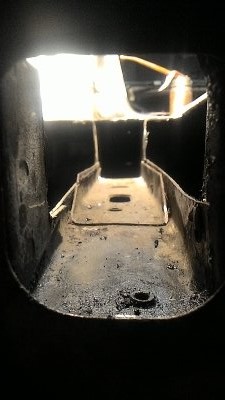
My rear pan above the exhaust was rotted out pretty good and was starting to creep into the inner rear quarter. It wasn't that bad ten years ago, lol. when I got a chunk of the floor out the channel was pretty F'd in the A. The spare tire well was going and the seam under the tail lights as well so it's all out now. I'll bend a couple of 90's and tie the floor pan back into the rear rocker's and hope to have the battery box relocated and the floor back in by Christmas. The toe boards are pretty chewed up as well as the seam behind the seats tie into the K member. The typical area where the channels get crushed needs to be replaced as well. I just hate to weld over my head and figured I would spend the money rather than the time on my back. I have approached this as an investment and I'm a little ocd. When I'm done I just want to thrash it and do maintenance like you said G tech. Here's some pictures of the rot that I cut out.
-
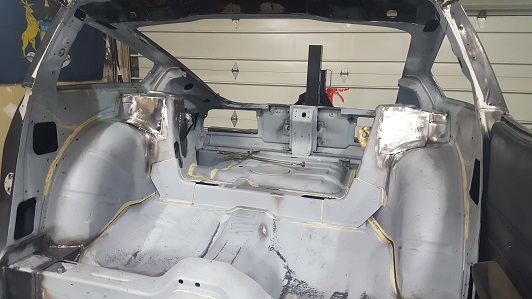
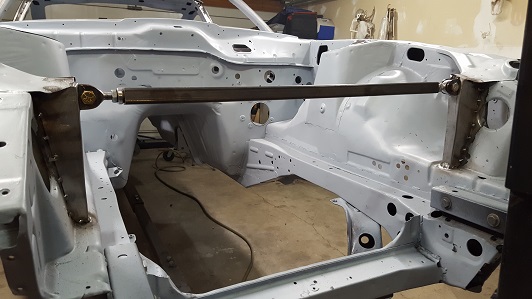
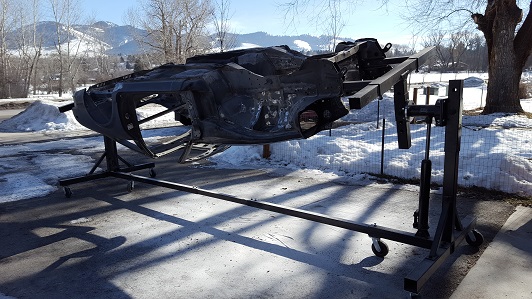
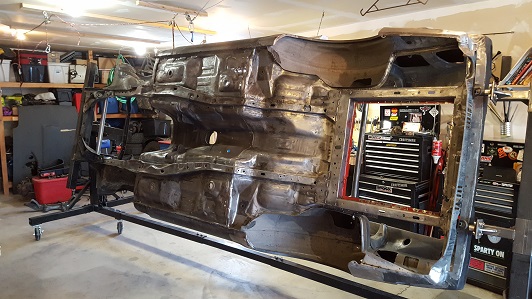
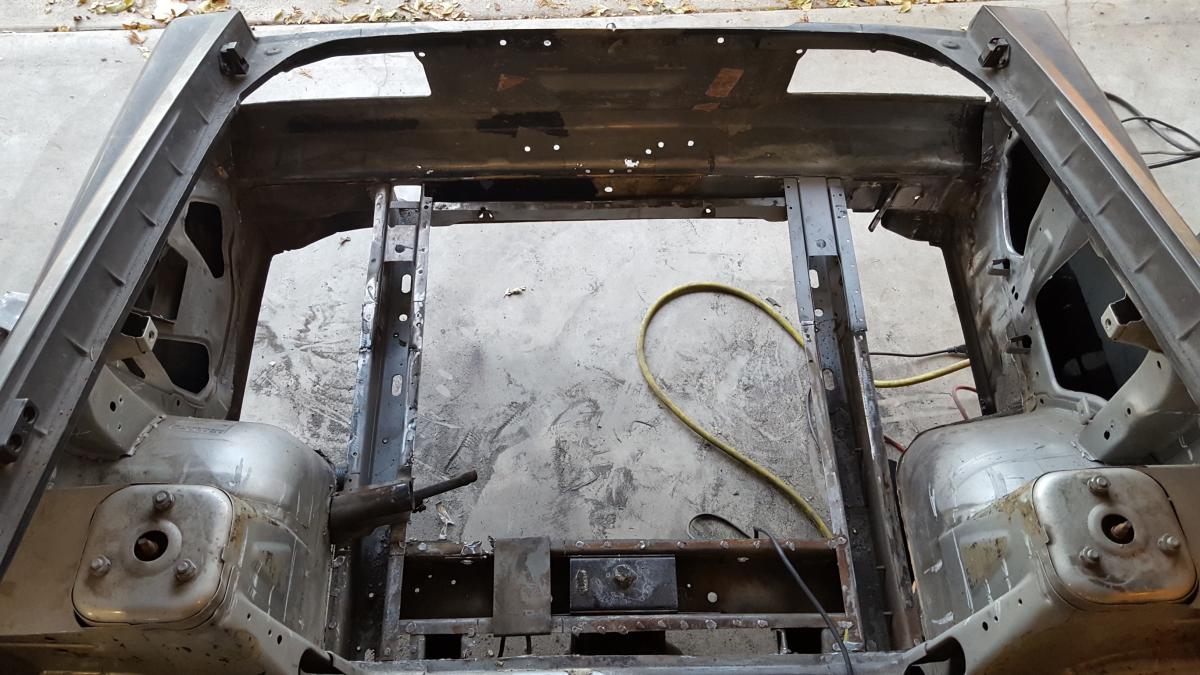
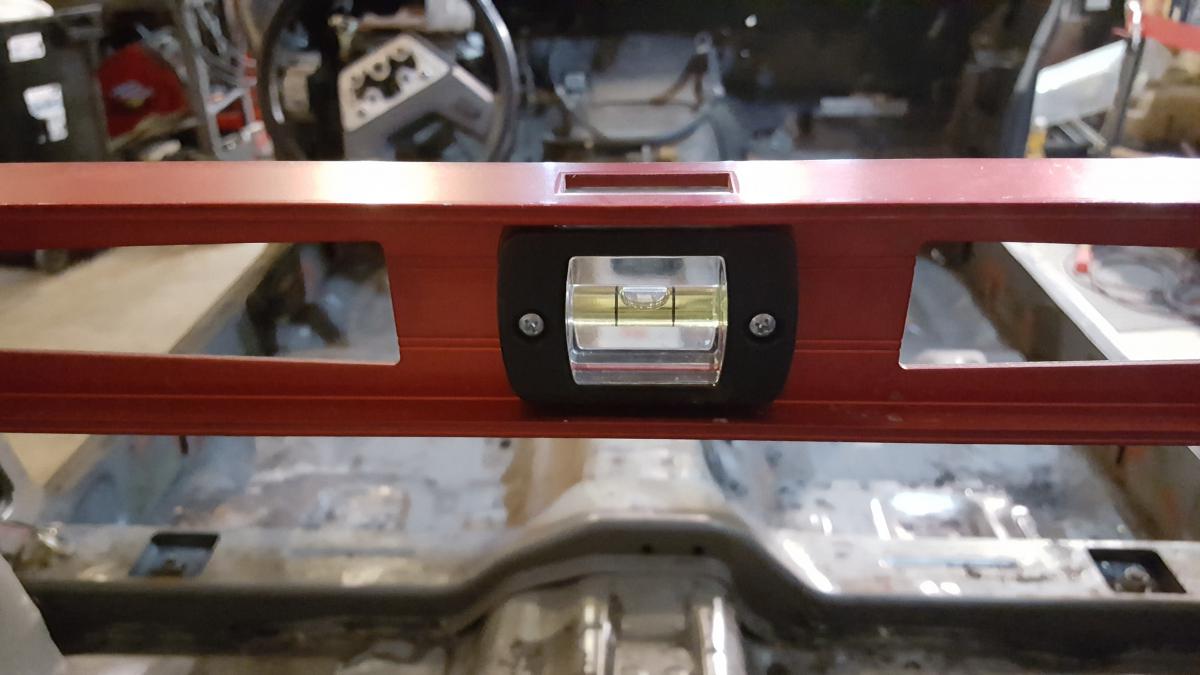
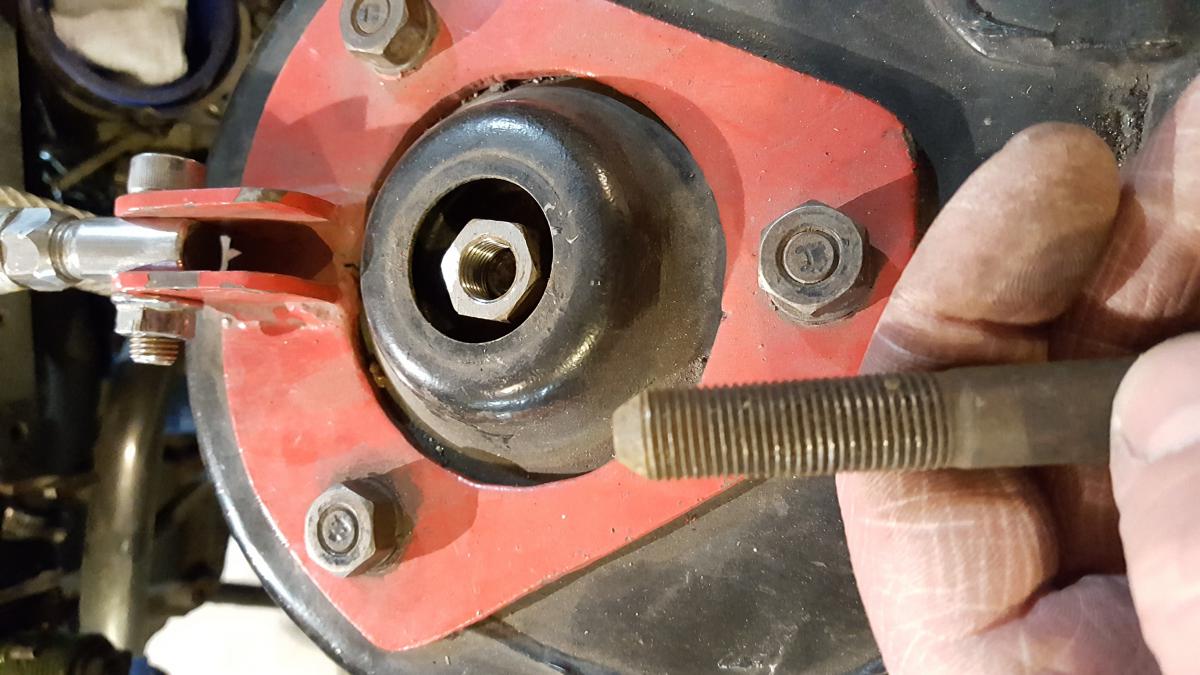
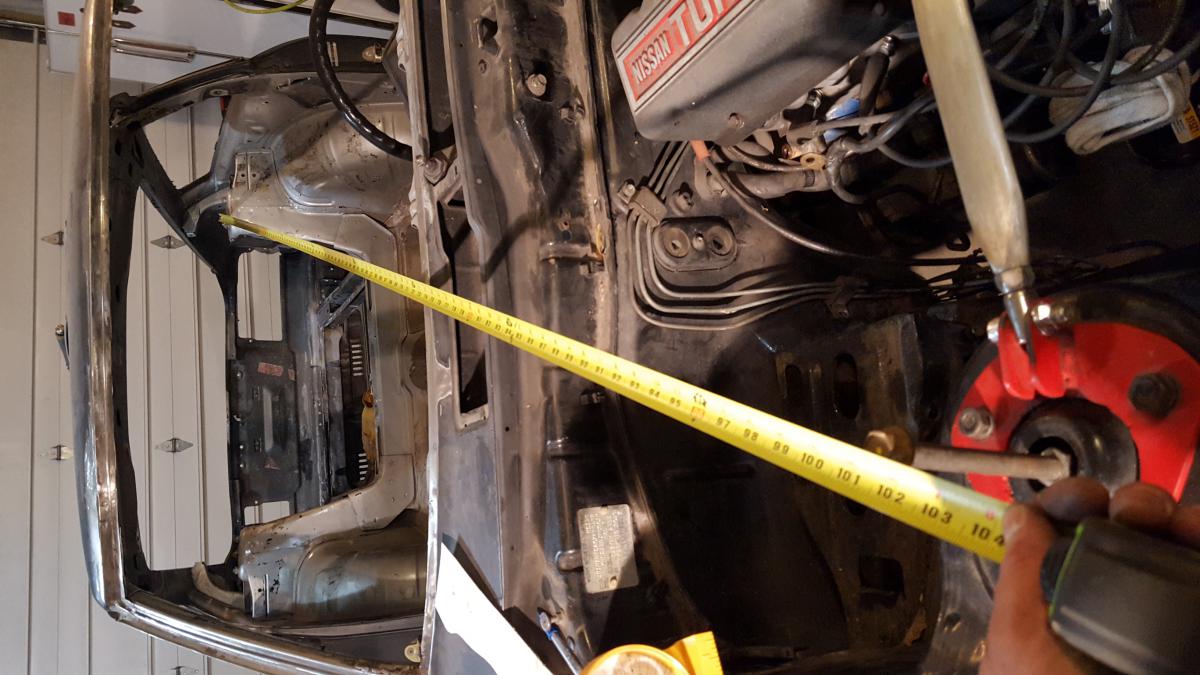
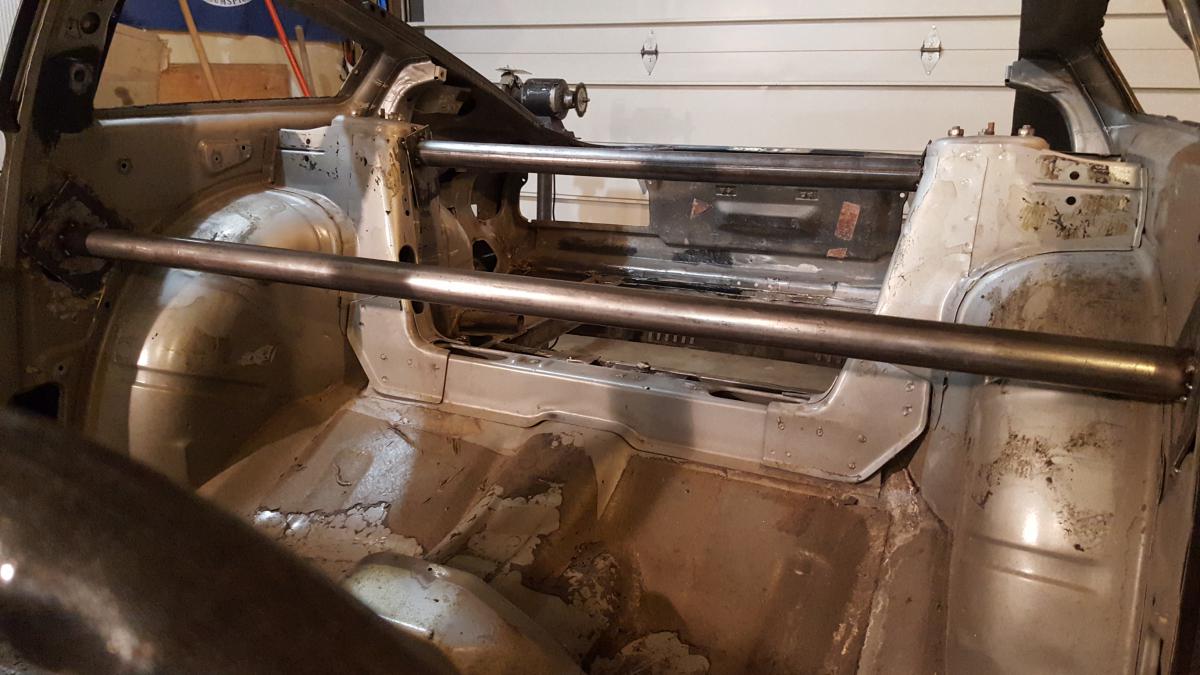
Been busy the last week but I have been taking pictures...So, as far as the cage goes I have been putting some serious thought into tying the front tubes into the towers through the firewall like you have mentioned. I have several ideas bouncing around my head but that's a ways off yet, I really appreciate everyone's input on this it's invaluable. So here I sit, I just ordered a rotisserie earlier this week (sold a old Falcon I worked on all summer and made some $$ so that has helped with this build) it should be in Tuesday or so.I have been slowly cutting rust out of the ass end since March but have been picking up steam since the Falcon is gone. Last week I had cut some 1/8' spreader plates for the temporary cross braces and tacked them in, I also finished getting the doors off in prep for the 'tisserie. Wed night I got the car up on jack stands and leveled off across the front and rear towers. Next I measured across the towers and made sure they were square before I tacked the braces in. Shit gets weird because the front towers sit lower than the rear and the cowl gets in the way. I didn't want to weld a bolt on my struts and F some thing up so I pulled a McGiver...I had some shackle bolts in the bucket from doing a lift on my buddies Jeep laying around (18mm nut, I don't know the thread pitch off the top of my head) and found some 7/16" bolts that matched the thread pitch on the struts. I ran the nut down tight then fed the bolt in and checked the angle between the two struts, they should match (which they did) so I ran with it. Marked center on the bolt (used the same one on both side, less variables) then had the wife help me measure RR to LF, then RF to LR. They came back the same so I was squared up and leveled. I Cut my braces to length and then started tacking (front tower brace was in the front prior to lifting the car), B pillar goes in first, then rear tower, then the front. Then the motor finally came out and boy did it feel good!! I got the whole rear floor pan out two weeks ago and cut some more rust out of the panel under the tail lights tonight. I need to make a run and get some more sheet steel next week so I can start getting the floor back together. I'm going to get a battery relocation kit coming from summit tomorrow. What did you guys use for a support to hold the battery box, just square 3/4" stock? I will try to be religious about posting and I'll just update as I go a long, all comments are welcome and advise is much appreciated, I have lurked around on here for years reading on this forum and it was a huge help when I swapped a turbo motor into this NA car 8 years ago. I figured maybe I could give back somehow on this S130 LS swap.
-
I am on the fence about what to run for a pump but considered welding a sump in the tank, or running duel pumps with the two I already have, kinda redundant I guess if one will do the job. My buddy just got a TIG and I know he's itching to use it. Figured it would need all new gauges, I did a couple of searches for harness delete but didn't turn up much. I was thinking I'm just going to clean up the harness and ditch anything on the body side harness that I don't use since I'm deleting the power windows and the cruise doesn't work any ways. Figured I would keep the clutch master and try to figure out a way to be able to drop the trans with the motor in, might end up beating the tunnel in a little if that's what it takes. Ditched the PS years ago, lol. I just cut the line and looped it, I'm going to clean that up and put new bellows on it while it's out. Throttle is cable driven as well and I might just port that TB then. I finally got he body 99% stripped and the plates for the temporary braces tacked in last night. My buddy is supposed to come help me tomorrow night and get her leveled off so I can brace it up. My father in law bought my old Falcon wagon that I worked on all summer, transport is supposed to pick it up Sunday. Once that thing is gone I'm going to get a rotisserie ordered, and pull the motor on the ZX!
-
Point taken on the cage. One of the reasons I want to stitch weld it is it needs quite a bit of rust cut out of the pans and the rails are collapsed and getting rough. I already replaced a 12" chunk of the channel above the exhaust and have the whole rear floor out right now (i'll try and start uploading some pictures this week, just been busy) I figure it would be easier to get a rotisserie spin her around and deal with it properly (Airplane stripper works great on undercoating btw, just need to let it sit for 15-25 minutes). Figured I would stitch it if I'am that far in and have to strip undercoating anyways, I have the whole rear floor pan out right now so the battery relocation is on my list as well. I have a good 3 core Griffen aluminum radiator that has been cooling the L28ET for the last 5 years, great upgrade. What did you do for fuel lines and a pump? I'm going to run the stock tank (just had it vatted) and braze AN fittings on the sender and run 3/8" hard line feed and use the stock 5/16" (feed) for the return. I was browsing the other night and somebody was saying they went with flex line so there were less fittings. I have an Aeromotive 11540 that is in tank and flows 340 lph at 90 psi, I was thinking about modifying the pick up to run that but I need to do some more research on it. Well, I'm going to start going through some pictures this week and show you where I am at with the body.
-
260 DET, I figured since I was running the iron block and adding extra weight and pushing 500hp that the car would definetly benifit from stitch welding and a 4 point roll bar (if I can find a good deal on an AL block later on I'll swap them out, the vortec was for another project that got sold). Assuming that CG is as far inboard and as low as possible, in your opinion (anybody feel free to jump in here) is seam welding and a roll bar over kill for a 500hp streetable appilcation that will see some minimal/moderate track time? How much HP will the s130 frame handle before it starts to fatigue? Sorry about the hijack G-Tech, like you said "there doesn't seem to be many already done" either that or people are out driving them and not documenting it. When I came across this thread I got really intrigued since I am working on this very thing. Did any of you do a build thread? Maybe throw a link to it up in here as well and try to consolidate some info for other people looking to do this swap. Anybody that is this far down the rabbit hole is prepared to throw time and money at the car, if your not you might want to reconsider. Personally I'm really interested in how everyone stiffened there car up, battery relocation and weight distribution, brakes and suspension being taken into consideration as well. I feel CG and proper engine/ driveline angles are the secondary aspect of this build, tough part is figuring out how your going to drive it and build it around that. what are you guys/gals using your s130 ls swap cars for, race or street? Did every one else already have a SBC in there s130 before deciding to convert to the LS? Personally I did not so I am kinda working from scratch.
-
I have been searching Hybrid and the web for the last week and have found very little info on anything revolving around strengthening the s130 platform specificly. I'll let you guys know what I'm up too (don't mean to jack your thread G-tech, since I am still building this car) Kicker is I already have the iron block 99 6.0 Lq4, so I'm already stuck with this power plant. I did just pick up some 317 aluminum heads, those will get a match port and polish over the winter. LSX/fast style intake, bigger throttle body, valve springs ARP studs and and eventually turbo it. A T56 behined that Ls2 to run the r200 and chromoloy shafts (already has turbo halfshafts from the L28ET swap years ago). I want to be in the 500hp range on pump gas (I can always detune on the street), mainly a weekend driver, auto X on ocassion and run the 1/4 mile. jebus I sound like a newbie. I do realize I absolutly need to get that motor tucked low and as far back as possible. Now, is the 200 # between the two blocks (I realize she will be a little nose heavy) going to make that much of a difference when I start pushing hp #s like that? I have been searching threads for suspension, frame/seam welding, roll cage vs bars all the while trying to figure out A.) How I am going to use this car, and B.) How am I going to stiffen this thing up. I want a street car so I feel a full cage is going to just be dangerous, when we go out for a Friday night cruise. I have the car gutted right now while I deal with the rust and have been making a plan to ditch as much weight as possible. I picked up some manual window regulators and the rear hatch glass got broken, so that will get lexan, stock dash will return. Heater core will stay for cold nights, A/C is gone. I will probably put sound deadner in the front and plan on welding the little body holes closed. From some of the other stuff I have been reading there is a huge problem with the rear trailing arms throwing the tire into the front of the rear wheel well over 400hp, so that will need to be adressed. I have seriously been considering buying a rotisserie so I can have much easier access to the belly when I do the pans and rails, then I can strip the undercoating and seam weld it. I have had this car for 16 years and want to do it right, for the last time. That's a lot of ground I just covered, so long story short I have been trying to figure out how to approach this whole project since I have a tendency to be a little sporadic at times. OK, so let me have it, what do y'all think of all that?
-
Got ya. I see Dirty Dingo sells the adjustable motor mounts as jtr for cheaper. I'll have to start a build thread on mine, cutting the rust out of the floors first. Then I'm going to cage it and stitch weld it. Lots of work before this is done.
-
Very nice! I'm going to put a iron block Lq4 in my 82, trying to get the L28 pulled this week. I'm leaning towards cutting the pan down and getting a crank scrapper, trying to do this on a budget but it usually gets thrown out the window anyway. you said you were using the Jtr mounts. I found these... http://www.randyellisdesign.com/GM-LS-Series-DIY-Caged-Bushing-Tubular-Race-Motor-Mount-Kit_p_85.html These look beefy for the price. Any pictures of the jtr mount installation process? I figured this is going to be one of the biggest hurdles in the build, I'm really curious how other s130 people handled this. Notching the cross member, pan, motor mounts used and set up, cost?
-
Anyone know where to get rear/hatch pans for S130?
subhuman replied to subhuman's topic in S130 Series - 280ZX
Just an update, I did find the pan I needed. I sourced it up on ebay, I bought some manual window regulators for the ZX and asked the guy if he happened to have a pan, he said he was getting ready to cut an 82 up. Sent him a picture and he set me up. He goes by baddoor250 and his name is Russ I believe he is out of AZ, great communication I would recommend hitting him up if you need ZX parts. -
Anyone know where to get rear/hatch pans for S130?
subhuman replied to subhuman's topic in S130 Series - 280ZX
Oh man, don't say that Tony ha ha, apparently I was preoccupied with other matters, it seems I missed some good stuff when I started searching posts/for sale items. I didn't really get back into this car until recently, I was going to restore and sell it but decided to keep it after all this body work is done. Wish I still had all my parts cars. Thanks again rturbo, I will let you know if I source one before you get around to it. -
Anyone know where to get rear/hatch pans for S130?
subhuman replied to subhuman's topic in S130 Series - 280ZX
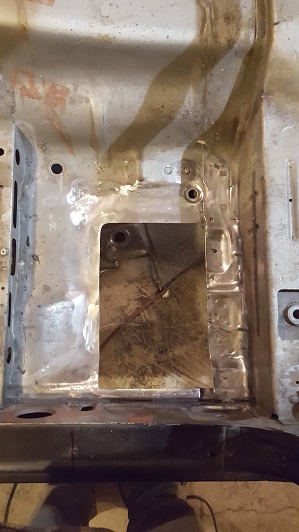
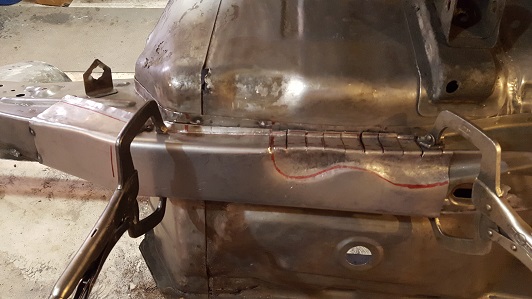
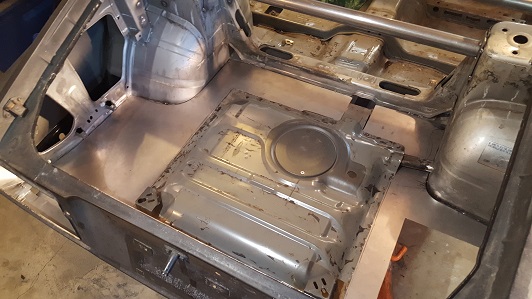
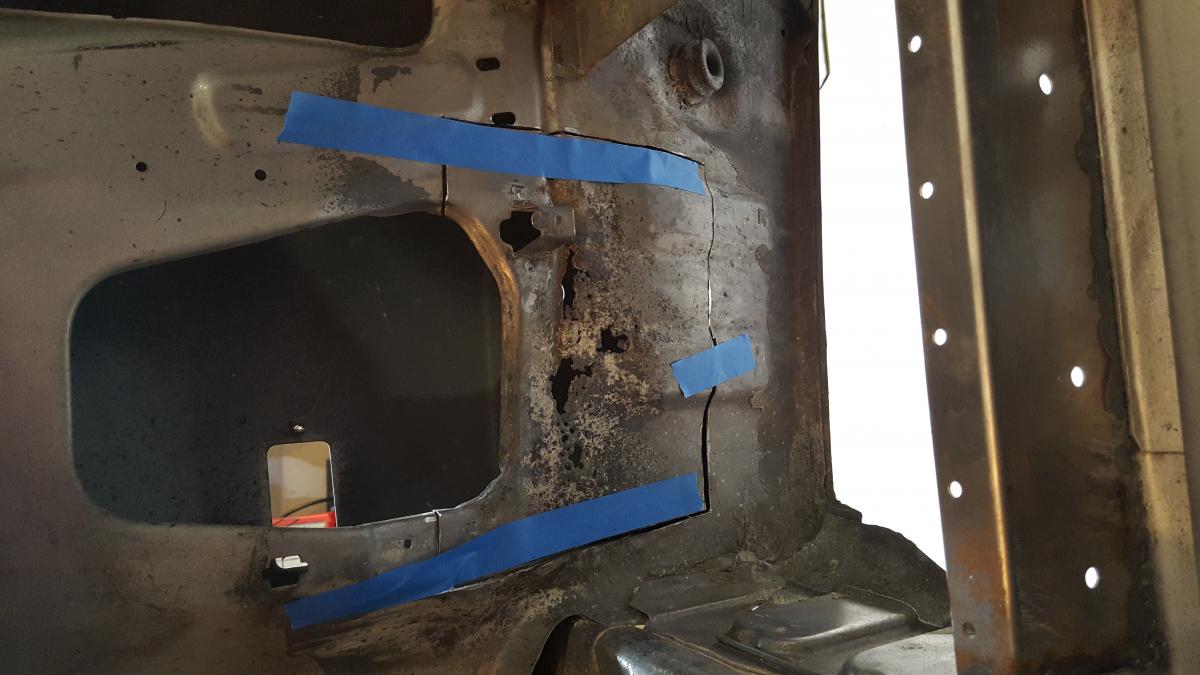
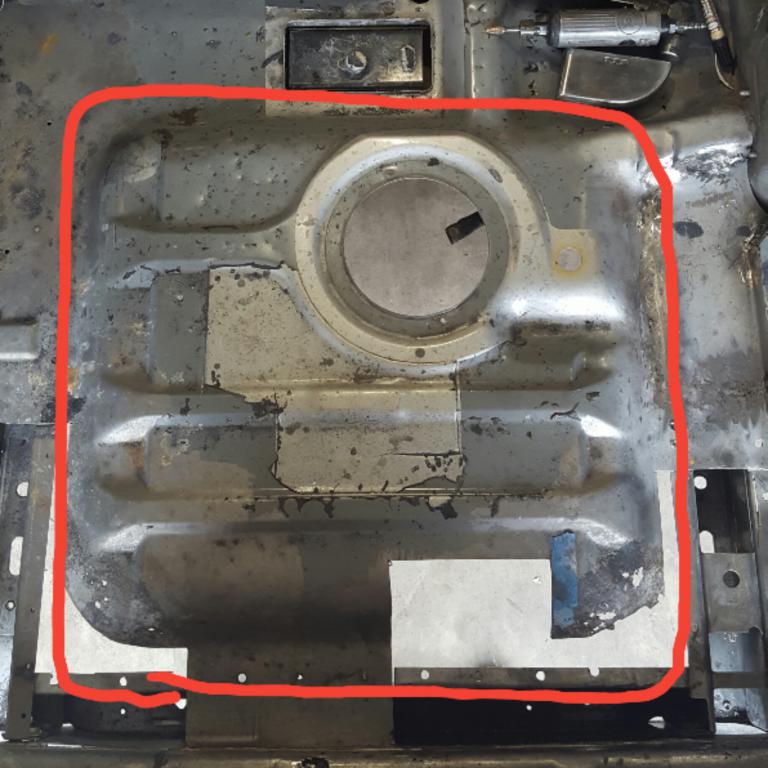
Not in a huge hurry I have other stuff to do, but by the end of September would be nice rturbo. Right now just the "raised" area outlined in red, with about 2" of the surrounding floor with it. So, if you used the closest side of the rectangle subframe mount (top of the picture) as a guideline and ran that all the way around, that should be more than enough material for me to patch it in there. I would be interested in some floor pan and toe boards if you (or some one else) happen('s) to have an awesome set, but not a necessity, I can make those way easier than his rear stamped section. Let me know what *might* be usable, thanks. -
Anyone know where to get rear/hatch pans for S130?
subhuman replied to subhuman's topic in S130 Series - 280ZX
Here's what I'm after, circle is the access port for the sending unit. Trying to get the whole section between the channels, sorry new to the picture upload scene, we'll see how this works.