

ryanabab
-
Posts
98 -
Joined
-
Last visited
Content Type
Profiles
Forums
Blogs
Events
Gallery
Downloads
Store
Everything posted by ryanabab
-
From the album: 240z Build
-
1972 240z Budget Build Long Be Warned!
ryanabab replied to ryanabab's topic in S30 Series - 240z, 260z, 280z
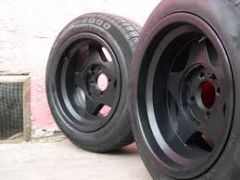
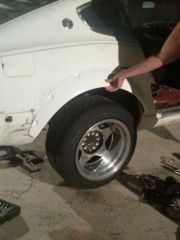
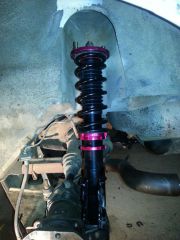
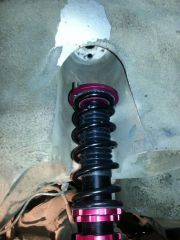
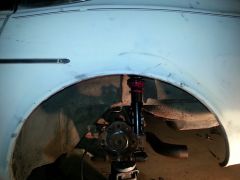
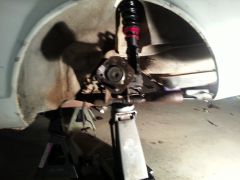
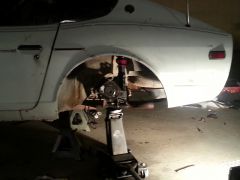
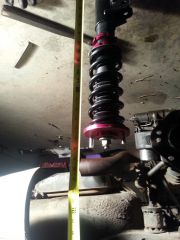
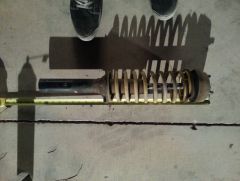
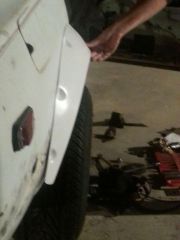
I hope that Reverse and First are shot is not the case! I can attest to first working for about 15 feet. Hoping for Rebuilt and Furious as supercars.. yeah.. no Got some more work done on the car tonight and last night. Actually got the girlfriend to do some car work! So I finally finished the stub axles and they turned out great. Zero play and they spin smooth as butter! Also I got my coil overs in. Yes they are super cheap EMUSA coil overs but for $449 with the extra front brackets include for FREE how could I pass it up, budget build right? Speedyracerparts is the ebay username I bought off of. Ask for Ryan. He's the man. Unfortunately the extra front brackets were forgotten in the shipping order as its an unusual request but no matter they will be here soon enough. The bottoms of these coils slip right over the cut strut tube like a glove!!! I will attest to Jmai86 which I believe was the first person to do this, not sure, but his idea seemed great and cheap. I did not have to get mine pressed on like he mentioned, after I removed the paint to get a good weld the bracket slipped over and fit perfect. Oh I should also mention I did only get the rear right mounted and welded tonight. I also did cut off the old brackets that are used for these if you install on a 240sx. If you want these coil overs they were from an s13 240sx so 1989 is what I ordered them for. I figured while I'm at it I can take a few measurements if anyone wants to do this swap in the future. I believe this is just about as cheap of a coil over option for our cars as you can get. $449 with all the brackets that you need is hard to beat. I believe this will be safe as well, there is no reason that under normal or stressed circumstances that there would be any way the welds would break or fall off so I feel safe recommending this to anyone else. They are essentially the same as a few other kits but with extra brackets you need to cut off. Laid a nice thick bead all the way across and my welds may be ugly but they have never broken. LOTS of practice building and repairing a go kart and friends exhausts. No pics of the welds yet... not sure if I want to show that hahah! I cut my strut tube to 1.4 inches just to have a little extra going into the tube and with the coil over bottomed out on the strut tube it measures 17 inches including the bracket. The stock one measured I believe 22 inches Also just for anyone else's sake that wants to go LOW I put the coil overs as low as they would go (keep in mind the studs were not sticking out past the holes in the top mounting so there is about another .75 ish inch that it can go lower. This thing will get VERY low if you want it to with these coils. Once its all done I will slam it and post pictures as I know being so low you scrape frame on a piece of paper is appealing After I took off the old strut I was able to jack up the suspension with a wheel on and place my wide zg flares on and see what it looked like. The rotors are not back from the machine shop so the wheels will stick out a hair more and fit with less than a fingers width to the flares. I have a few pictures of these I will post soon but in the pictures it looks like they barely stick past the fenders which is NOT the case. -44 offset on a 15x10 definitely has some poke.. thank goodness for these wide fenders or I would have to run a ridiculous amount of camber on pulled and rolled fenders. Which is appealing.. Should be putting the coil overs on the front using my other bracket as soon as I get the rotors back and install the front hubs so I can see how much fender I'm going to be cutting exactly so I can get these flares on!!! I hope this thread helps some people. When I was doing my research a few of the posts were getting old and the pictures no longer remained so if you need any other pictures while everything is apart let me know and I would be happy to oblige. So far I've been able to disc brake convert it and put coil overs on for under $575 not counting grinder blades and a few hours of measuring of course so I'm fairly satisfied. Always looking for new and interesting ways to keep it fun, cheap, and safe. We actually have the EMUSA coil overs on a club car we have as part of our car club at ASU and they seem to do the job. Should be taking that 240sx to the drift event in June with the club if we can get the gas tank replaced in time! -

From the album: 240z Build
-
From the album: 240z Build
-
From the album: 240z Build
-
From the album: 240z Build
-
From the album: 240z Build
-
From the album: 240z Build
-
From the album: 240z Build
-
From the album: 240z Build
-
From the album: 240z Build
-
From the album: 240z Build
-
From the album: 240z Build
-
From the album: 240z Build
-
From the album: 240z Build
-
From the album: 240z Build
-
1972 240z Budget Build Long Be Warned!
ryanabab replied to ryanabab's topic in S30 Series - 240z, 260z, 280z
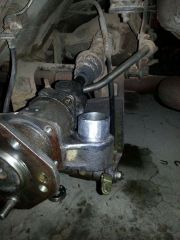
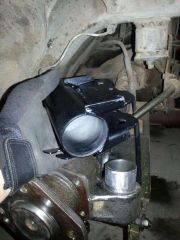
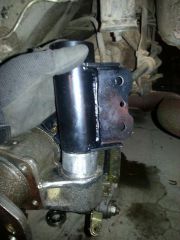
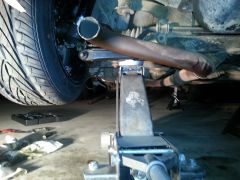
Did some more work on the car tonight. The rear stub axles were being such a NIGHTMARE. First the dust caps wouldn't go on and I forced one and it bent so I'm waiting for a replacement Got one side on and then after I tightened the stub axle all the way the stub axle was almost impossible to turn. So after finding out the dust seal wasn't all the way in and after fixing that it spins perfect! Much more annoying than I had imagined! I hope the fronts are easier! Here are the brake caliper brackets on so you can get an idea of what they look like. This is a very cheap way to get disc brakes. Total cost well under $100 so far. Check your brake lines guys!!!! These things could kill someone! Also got my flares in today from silver mine motorsports and wanted to see how they looked Should have a good look once its low. Have some friends coming in for backup tomorrow so I can get it ready for coil overs! Should have the coil overs in tomorrow and have the rotors getting machined as well tomorrow AND get my other dust cover in so I can finally finish up the rear. Coming together, should be on the road in 3 weeks or less. That is a personal goal just so I can keep myself motivated. Also have been researching AC for the car but I wouldn't do that until I know for sure that I'm keeping the car for a long time. -

From the album: 240z Build
-
From the album: 240z Build
-
From the album: 240z Build
-
From the album: 240z Build
-
1972 240z Budget Build Long Be Warned!
ryanabab replied to ryanabab's topic in S30 Series - 240z, 260z, 280z
Looks like either way it didn't end up being numbers matching. Either way it wouldn't really have meant much to me. Hoping this motor might have some head work or something of that nature.. once its all ready to go I'm going to run it at one of those cheap dyno days for like $35 just to see where I'm at. -
1972 240z Budget Build Long Be Warned!
ryanabab replied to ryanabab's topic in S30 Series - 240z, 260z, 280z
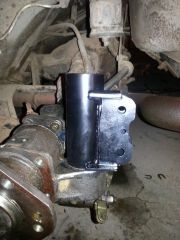
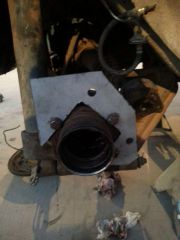
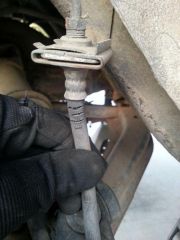
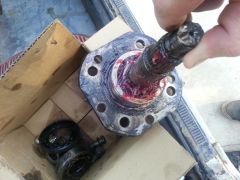
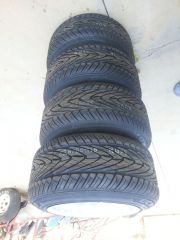
As promised here is a little more info on the car and some progress that has been done. I will be finishing up the rear tonight, except for getting the rotors drilled that will have to wait until shops are open tomorrow. Heres the rear stub axle with the new bearing pressed on and drilled for the new lug pattern. 5 lug here we go! Also got my khumo ecstas mounted and there really isn't too much stretch which I like. Just enough to where the tire will help fill out the flare and wheel well. 225/50/15 if I haven't already mentioned it. Also I was looking around at the engine and found some great news. Apparently at one time the P.O. put on a N47 head! That should come in handy, just checked the casting today and was pleasantly surprised because I was interested in doing that mod. the second picture is l24 followed by a few numbers that do not match the vin numbers so I'm going to assume NOT numbers matching? Eh oh well. I won't feel bad if it blows now! Another thing I did today was check out some of the ac system that was installed on this car by someone. Doesn't look like a sketchy install so I'm going to assume dealer or port installed and not a home job.. Let me know what you think from looking at the pictures! Another thing, where does the compressor mount if the alternator is taking up space on the passenger side of the engine bay? I found 4 bolt holes into the block on the drivers side which looks like a great mounting place for the compressor but all my lines are on the passenger side. I found this thing.. not entirely sure of its purpose... first impulse is to not trust it.. Found RAFAS written on the transmission. Don't know who or what RAFAS is but I like the sound of it. Definitely going to keep that on there. Now onto serious matters. These are the first pictures I took of the disc brake upgrade for the rear and it shows the bracket, crude but effective, and the caliper brackets. I will be welding a bar across to make up for the material that I took away from the bracket. If you google 1985 maxima caliper bracket you will see I cut out the beam connecting the two bolt holes together. But with the added strength from re welding on a new one but up top it will still be safe and cheap. should have both mounted tonight with the stub axles put back together ready to rock and roll once the rotors get redrilled I recently found out it has one of those steering metal things (sorry I really can't remember what they are called, I'm sure excessive heat kills brain cells) to replace the old rubber that might be there. Another mod I was looking into not very seriously but nonetheless it has it and won't need another! Alright thats all for now, I will be working on it tonight and taking some pics. Might pull the valve cover and see what it looks like or try reading a part number on the cam. OH I almost forgot! NONE of the spark plugs were even tight! I noticed that black goo/oil stuff running down the block and loosened all the spark plugs by hand. They looked brand new so I figured why bother checking them.. THANKS HUTCH.. hopefully that might help my over rich situation with some new plugs that are gapped correctly and at least tightened haha. -
From the album: 240z Build
-
From the album: 240z Build