Dat73z
-
Posts
852 -
Joined
-
Last visited
-
Days Won
8
Content Type
Profiles
Forums
Blogs
Events
Gallery
Downloads
Store
Everything posted by Dat73z
-
Thanks @grannyknot 👍
-
Old thread but does anyone have recent experiences with the wilwood 1" mc's? I pulled mine off and it's weeping from the rear. I got maybe 20k miles out of it. I did like the pedal feel with wilwood 4 piston calipers front and rear but I'm debating to go with a 15/16 instead.

-
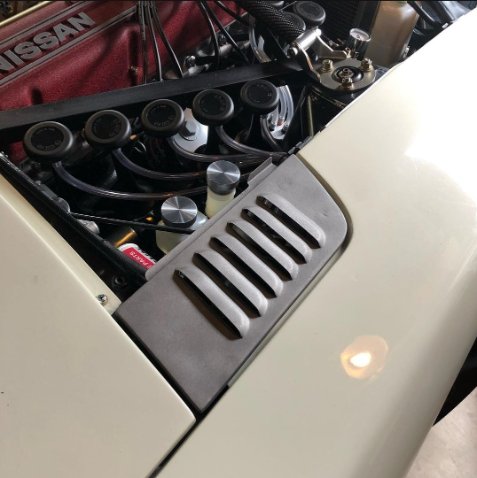
Does anyone know of a vendor that still does louvered inspection lids? I see MSA does a core exchange and Skillard makes some nice ones from AL. Specifically I'm looking for someone who can do 6 vents with dimensions like the pictures below. The ones I've seen on the market today don't quite look right to me. Figured I'd ask before I start calling around. Thanks
-
Just a quick update: Tried a few things but eventually what I found that worked best was gas in a mason jar. After a few hours of soaking the rtv just swells off. Probably not the most cost effective option at $5/gal now but maybe this can help someone.
-
Thabks @Datz44. I am running square setup 15x8 +0 225 50 R888. I'm considering 235 or 245 on 15 if I can find a wheel that will fit over my brakes
-
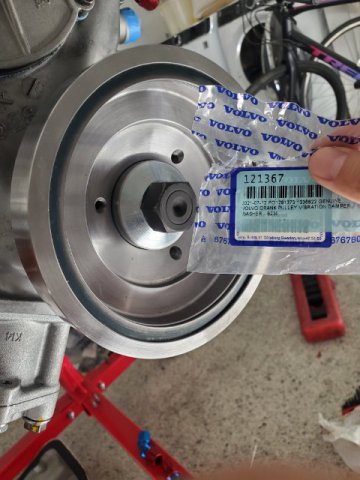
After some delays finally got the BHJ damper in from Rebello and so I mounted it up. I used a Volvo washer turned down to the same OD as the stock 240z crank washer and a Nissan KA bolt. After chasing the crank snout with a bottoming tap my measurements show I have maybe 2-3mm of threads left when using the thicker volvo washer so I won't need to turn the longer KA bolt down. This next couple of weeks the plan is to mount the rest of the accesories and get the full driveline back in the car to start fabricating the exhaust and charge piping.
-
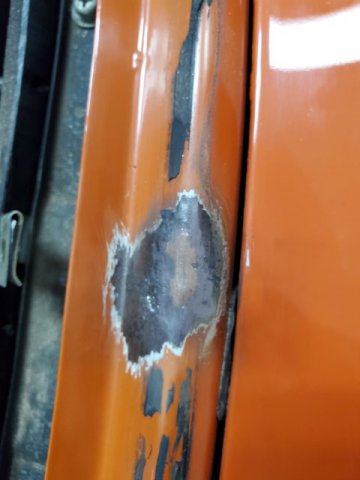
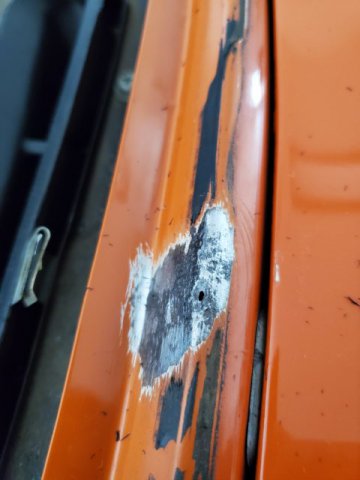
So I finally got around to this. Welding was ok but my grinding skills could definitely use improvement. I really like the way the silicon bronze filler rod flows. At the right temp it's it melts and flows out like butter. With more practice I could probably get the heat affected zone really small. Anyways, after some quick practice tacks and dabs what I found that worked: Focus the torch on the rod not the base material. I laid the rod over the pinholed areas and quick jabs of the foot pedal to build up some tacks (maybe 15-20amps). This was not quite enough heat to flow the rod so after building up the area I focused the torch on the top of the filler and hit it with probably 20-30 amps until the material just started to flow. Some pics below. Now for paint and the next project.
-
Thanks for the replies guys good insights. I've been busy with other projects but am planning to get to this later in the week and will update. With the tig I've welded thin sheetmetal and done repairs before, but never brazing. I'm not planning to melt the base metal so hopefully blowthrough won't be an issue but we will see. Maybe I'll just preheat the area and lay the rod right over the hole then give it a quick jab of the pedal.
-
Looks neat. Do you have any closeups of the surface finish you are able to achieve?
-
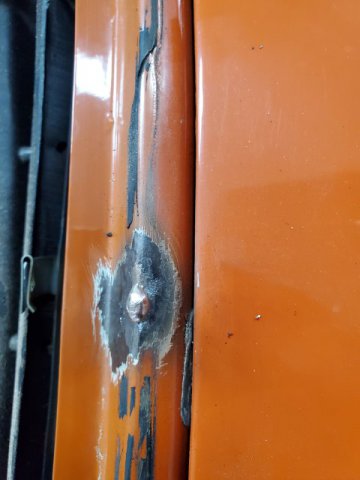
I've been preparing my windshield frame for a new seal and have a couple of minor rust pinholes. I have a tig welder and was contemplating tacking over these areas with er70s since that is what I had. However, I saw some 1/16" silicon bronze filler at the store and thought maybe that would work better since brazing wouldn't require melting the base metal which looks to be quite thin so I picked up some rods. Has anyone brazed over rust pinholes and how did that work out for you? I was thinking of keeping it simple tig brazing, grind down, then epoxy seal and filler over that. Since I would be using the tig I figured I could run maybe 20 amps and prevent distortion, blowing holes, bubbling paont, etc. Just enough heat to open the pores of the base metal and braze in the pinholes. Any holes (no pun intended) in my strategy? Picture attached for the worst of it.
-
Thanks Aydin. It looks like my local O'Reilly's has SEM Rust-Mort so I'll give that a shot. Good tips info on the sill thickness, didn't realize it was so thin. If I find any pinholes I'll hit it with the tig and some filler. Worst case I could always weld in a patch and refinish the area. This was supposed to be a quick R&R but better to do it right I suppose. Never an easy project, oh well 😅
-
I'm preparing my car for a new windshield and seal. Unfortunately I found one spot of rust above the cowl right at the bottom on the windshield. Fortunately the metal is solid and fully covered by the seal. I was planning to just wire wheel, prime and paint but realistically I probably won't be pulling the windshield again for many years. I'm worried if I miss some specs of rust in the pores it will start again. Does anyone have recommendations on a rust converter that works well?
-
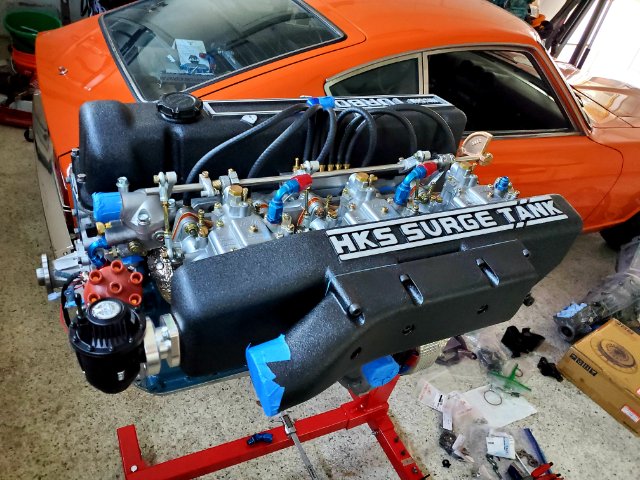
Quick update, been busy with the chassis for this build but for the blowthrough turbo motor mounted the BOV. Feedback from Rebello was this setup needs to vent immediately transitioning off boost when the butterflies close or fuel throws up through the front of the carbs. I guess they experienced some of that on the dyno so maybe the upgraded BOV will help. The last piece I'm waiting for before buttoning up the motor and dropping it in is the BHJ damper. Apparently they were backordered for a long time but mine came in so Rebello will be sending over.
-
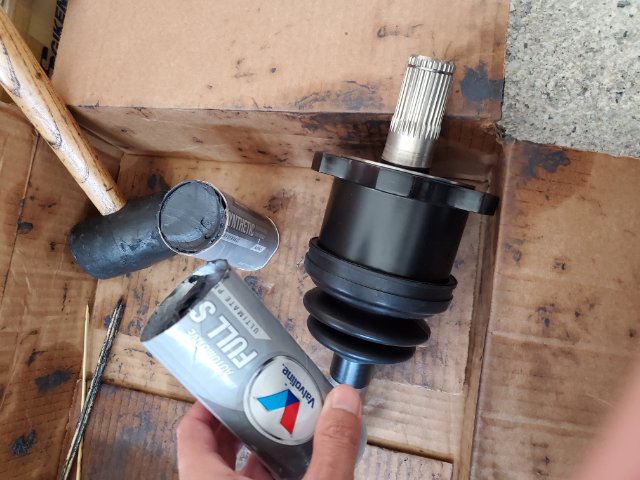
Thanks for the help. I ended up going with the Valvoline generic gray full synthetic. The local parts stores had maybe 6-8 options but only Valvoline and CRC were marked directly on the tube as Extreme Pressure and for use with CVs. Valvoline wasn't cheap at $20 per tube but the CRC was something like 2x the cost for the same volume. FSM for the Infinity Q45 showed 6.5-7oz per CV and each Valvoline tube was around 14oz so I sliced 2 tubes in half with a razor, half a tube for each CV.
-
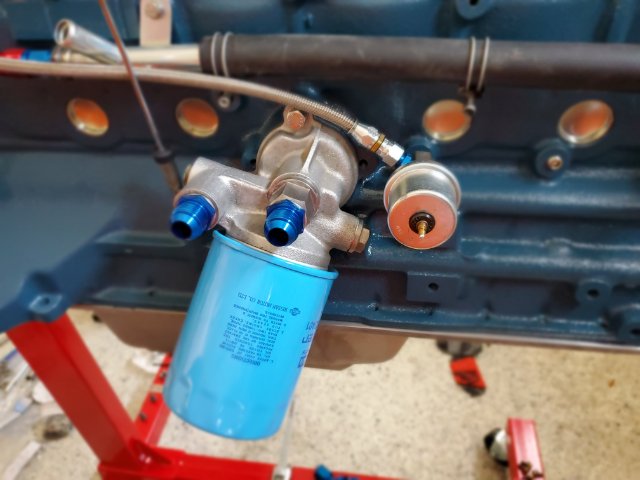
Thanks NewZed, perfect. Yes the oil pressure relief valve in the block has been plugged.
-
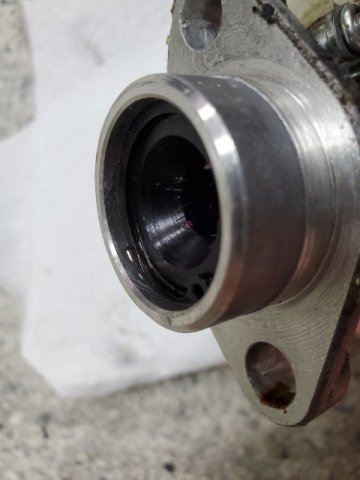
I restored a 280zx oil filter adapter and realize it can mount on the block in 4x orientations. Does anyone know how these were mounted from the factory or the best orientation in the s30 chassis? Here's how I currently have it positioned. Thank you.
-
Thanks Tony and good to see you're still around. I've been putting this off but need to get it done to prep for some welding. Haven't seen any MEK products at all this last few weeks, might still be out there somewhere.
-
No experience with the ZCG CVs but just out of curiosity are you still running the OE stub axles? I'm sure others will chime in just curious on how you're shock loading the rear end in your app as that can be another major failure point. Some people go with axles that eliminate the OE stubs entitely to circumvent this which the ZCG doesn't look to do.
-
Even some 15s will fit with the t3 BBK. I know because I run it. T3 will give you a template to measure the barrel of the wheel to ensure it will clear. Sidewall can also matter if you're running it close as I've found some some brands have beefier sidewalls for the same profile tire than others.
-
Blending the sections may be tough especially if you're going to keep areas single stage and others clear. It sounds like you already invested the $ in some materials though and are willing to put in the time so I'd call whoever mixed the paint for you and ask if what you have specifically will work, what prep to do or if there will be reactions or failures. For trash in the paint try building your own paint booth. Clean and wet the floors, put up plastic sheet and install a fan + filter to pull pressure. I've found this helps but it takes time and $. You'll still get some trash but it'll be better especially for large panels.
-
Great thanks Miles. I really appreciate the details and your experiences. It's really invaluable to have someone such as yourself with info spanning 2 decades back. Hope others can weigh in too.
-
Thanks Miles. I take it you got the precision seals 12 years ago? Or when/what was the date of manufacture?
-
So I managed to get a OE windshield in good condition for a good deal. I know that you can still get good windshield weatherstrip OE Nissan. Does anyone have any recent insight on more cost effective options? Lots of complaints in the archives on the precision seals with gaps along the edges. I saw vintage rubber sells some windshield seals but I wasn't sure if they're just rebranded precision. Sent them an email weeks ago but they never got back so I'll try calling them sometime next week. Any thoughts on what the best option(s) is/are in 2021? Also, not to throw shade but for reference if anyone has insights on what does not currently work that would be great. The complaints on precision for example span 2 decades or more to fix their molds. If they've fixed them or not it would be good to know.
-
Great build thread. Has your car ever been resprayed? If you have the original single stage enamel maybe try buffing a test section first and see how that turns out. It will never be perfect but if the car is straight it'll have some nice survivor patina. Fwiw I was thinking of doing the same or a full respray years ago and realized I had a single stage enamel on the car which went from chalkboard barnfind to glossy barnfind. If I can find some pics I'll PM them to you. Edit: When I got my current Z it looked like a cream orange chalkboard car from neglect for decades. I didn't even bother wetsanding and just hit it with m205 and here is the result 4 or 5 years later after a period of daily commuting, moving, and poor care on my part. Maybe give buffing a shot first.
-
Thanks DuffyMahoney 👍. It's been a long but rewarding project. I took a look at your itb build and it's given me a lot of inspiration. Lots of great attention to detail.