Dat73z
-
Posts
852 -
Joined
-
Last visited
-
Days Won
8
Recent Profile Visitors
11245 profile views


Dat73z's Achievements
")


-
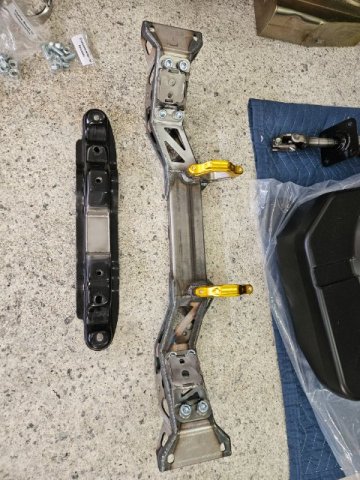
It's been one of the busiest years of my life but the turbo build continues in the background. Since the last update, the circuitry has been mapped out so I visited the chassis to start installing the mil-spec bulkhead and radlok connectors. Generally, the plan is to run Haltech for ignition control, knock detection, etc. and ditch all piggyback systems which I'll probably recycle on another ongoing turbo project. Only the best for the Z 😉. The resto shop is doing a fantastic job with great attention to the details. They've installed the sweet Capital Metal Works full length framerails and started massaging bent OEM sheetmetal back into shape, along with continuing to metalwork other detailed aspects of the chassis.

-
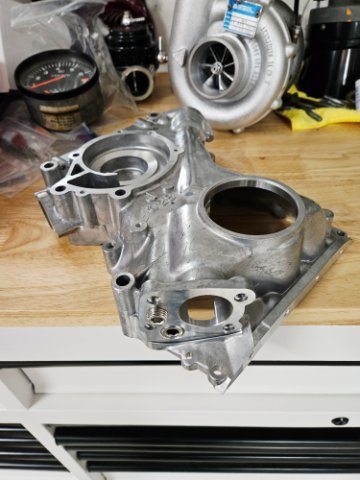
Have been busy with the end of year and splitting time with other project vehicles but called my machinist and found my parts have been ready for the past month. Still going through things but for the engine cover I opted to plug the supply and return holes with NPTF type flush plugs. I've seen the block plugged as well but I figured this allows maximum flexibility on internal/external oil supply and feed without significant motor disassembly. This next month I will need to figure out specifically which mil spec bulkhead connectors I will need as I welded and shaved the firewall harness holes before dropping to car off to the restoration shop. For the turbo build I'm thinking to convert the ignition to crank fire and leave some extra pins for future expansion.
-
I was reminded earlier today about this thread and figured I'd post a quick update. Shell restoration has been moving along and I've been pinging the restoration shop for monthly updates. I just about finished reinforcement/welding on various suspension components so I'd like to get those powdercoated in a chassis/satin black. Fuel system has been completed and placed in storage. Waiting for some parts back from the machine shop for the oil system before I fabricate and weld on that. Busy with other projects too but several irons in the fire to restore my Z.
-
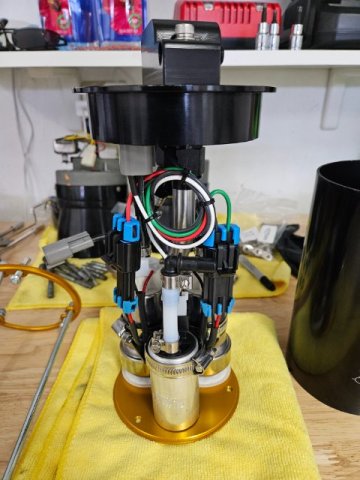
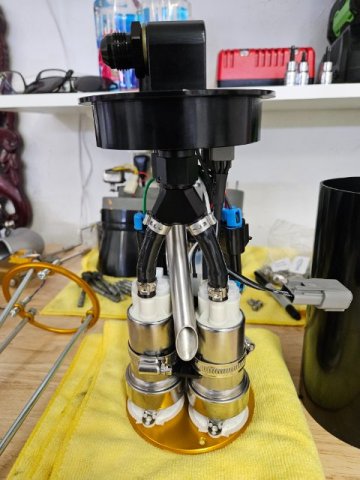
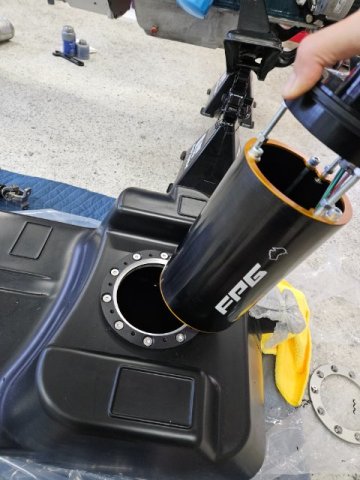
I took a break from the project but recently started getting back into things. I also went to go visit the shell at the bodyshop earlier this month and they're doing a great job. Buttoning a couple of things up, I finished setting up the fuel surge tank. The original FPG setup had some looped fuel lines and other things I wasn't keen on. I ended up doing 10mm nylon hose to a Y block and a -10 SS hardline return into the side of the surge tank away from the wiring. Generally the whole contraption is a pretty tight fit and just about everything needed to be exact/deliberately placed. I've also been working on modifying and welding a bunch of suspension parts. Mostly plating and reinforcement, some aesthetic before sending things off for powdercoat and zinc plating. In the next few weeks I need to figure out some wiring and misc. bracketry before the engine bay gets finished out.
-
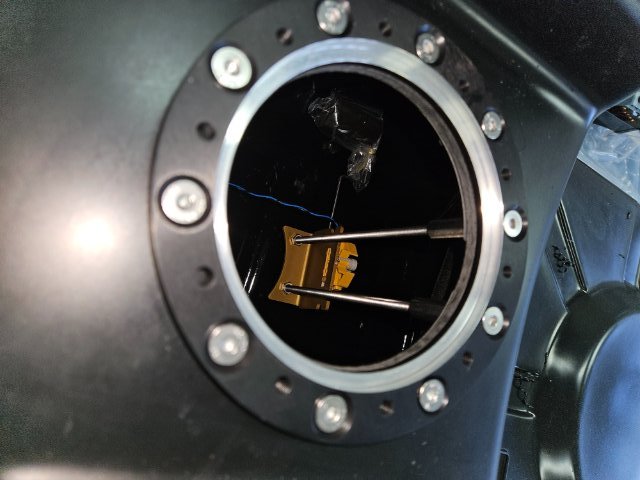
It's been a busy few weeks, but I've recently started back in on the fuel system. Still waiting on some AN fittings to arrive but I think I'll do a -10 SS hardline with a 45 or 90 degree bend directed into the side of the surge tank for the return. The fuel sender arrangement should also work well, having been integrated as part of the surge tank mounting and also top hat connectors. Also, one thing I was not expecting is how expensive submersible fuel safe nylon line is and I suspect it will still need to be replaced every few years. Most of the turbo/wastegate SS fittings and hardline stock have also arrived so I'll be starting back in on that over the fall/winter along with completing the external oil pickup conversion.
-
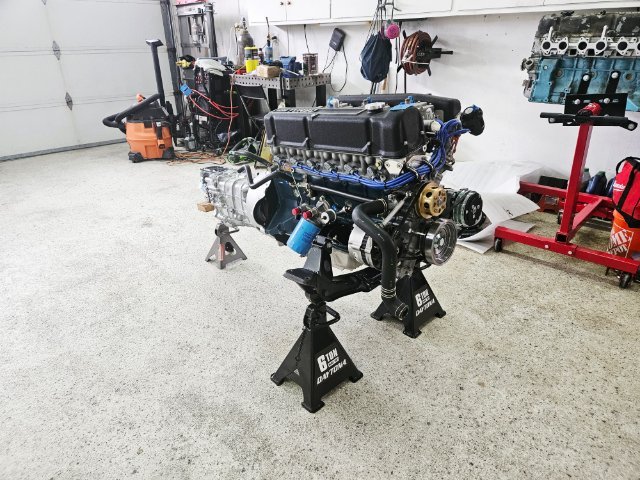
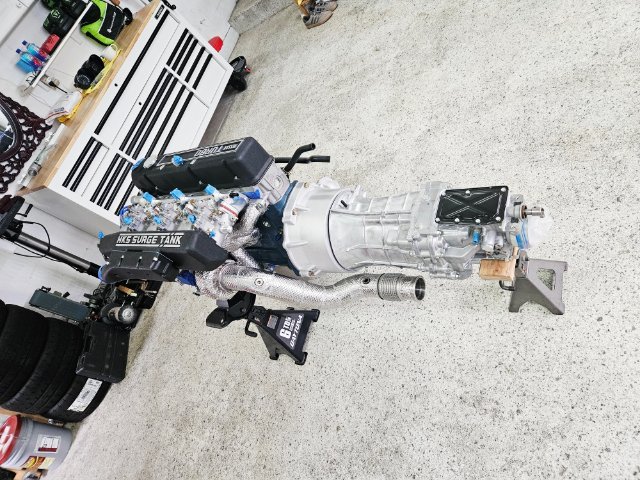
Just some quick updates, after finishing chassis preparations and dropping off the shell for restoration last month I've been organizing my garage and have finally got things in a reasonable enough state to continue work. For the turbo build, the plan is to refabricate all fluid lines as SS hardlines so I've set the engine/transmission to ensure I get all of the angles for drainage and thermal siphon correct. It's really nice to be doing all of this work fully accessible, but I'm going to attempt to ensure the routing I fabricate can be serviced back in the car as well. Also for the driveline, I saw on IG someone had used the same CD bellhousing from Derek which locked up on their clutch when assembled. So I've put in the OSG twin plate and will check if the bellhousing needs any clearancing for the rotating assembly.
-
This has already been done a few years ago. Reach out to Jakub at Datsun Europe, he's running a zf8hp50 behind his sick turbo L and has a few adaptor plates left.
-
Final reference pictures of the rerouted SS -8 and -10 fuel hardline bracketry around the Escort member. I left enough room to run twin -12 but the main choke point is around the massive CD trans. Also for those that asked about the FPG in-tank surge tank bracketry I haven't forgotten have just been busy. The design was finalized along with a custom level sender arrangement and the prototype went for manufacturing a week or two ago so I'll provide more details when I get back to it.
-
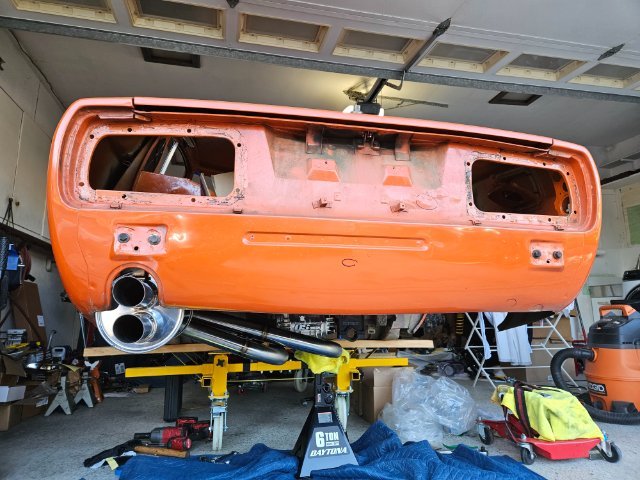
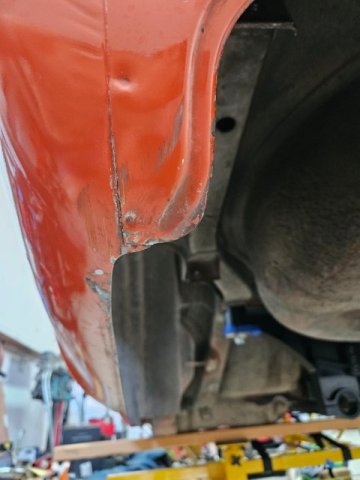
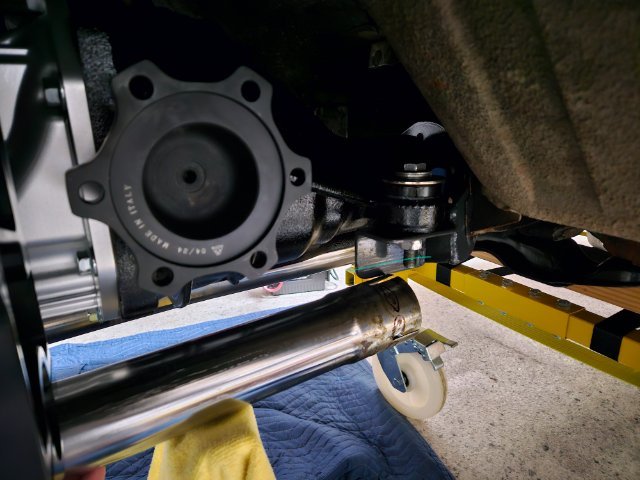
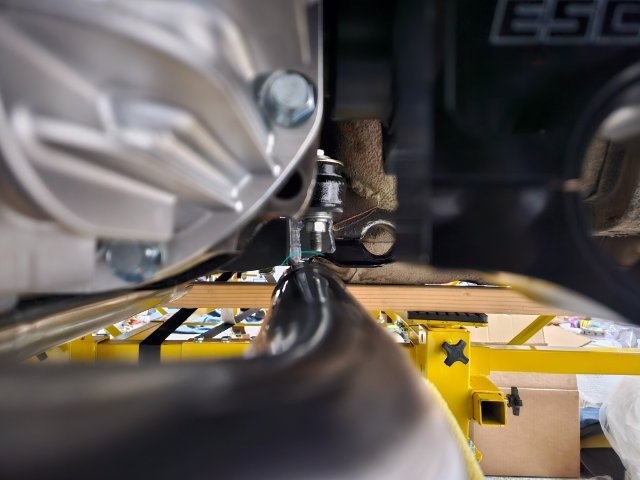
Transport is booked for next week so this weekend has been misc. final prep. Bunch of random bodywork to minimize filler and some fab/welding, but here's some highlights. I finished clearancing the diff front member for the twin 60mm exhaust. I also clearanced the area around the snout as I will be taking VSS signal for the speedhut speedbox. After some further measurement I'll be vbanding the entire exhaust again as I can gain maybe another 1/4-1/2" ground clearance by reconfiguring the angles over the existing slip joint configuration. As is I think it is similar or better clearance around the diff than the 3" pipe I had tucked there before. Re-fit the AL driveshaft and confirmed my suspicion that the Escort member moved the diff forward ~1/2". Not a big deal but need to remember to re-check the axle plunge depth and shorten the DS if necessary when the time comes. Also marked out where the DS interferes with the factory xmember so will plate in and weld that out later. Finally I've been seeing a lot of very very nicely done s30s in person lately to get an idea of bodywork problem areas and things the owners would have done differently. One area was the rear valence around the exhaust, specifically exhaust was fitted later and required trimming of the rear valence on a finished car. So I went ahead and trimmed out the rear valence accounting for exhaust movement and duplicated the shape on the pass side for symmetry. Worked out a bunch of other fine details as well and at the end of the day it's an imperfect 50 year old car but needing to bash things in or cut things out after a bare metal respray would drive me nuts. It's been a journey but I've met some really cool people and seen some absolutely heavy hitter s30 builds this past few weeks.
-
A musician's therapist (The $300 Z)
Dat73z replied to Zetsaz's topic in S30 Series - 240z, 260z, 280z
Did they mount the tires correctly to minimize weights? I've had a couple sets of R comps mounted over the years which have balancing dots on the tire. I've found most shops don't know what the dots are used for 😅 -
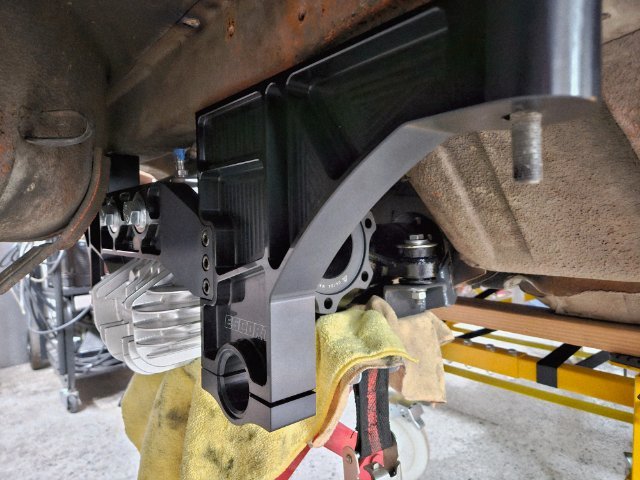
Looking through some old reference videos I found one from a couple years ago on carb sync check, throttle response and engine movement with the new at that time Milkfab engine mounts. You could balance a glass of water on the valve cover on idle and rev 😆. I had played with a few configurations and had it pretty dialed at that point, with an emphasis on driveability and response. I'm hoping when it comes back together the response will be even snappier with the more free flowing Protunerz manifold and vband G Series turbo. 20230207_161111.mp4
-
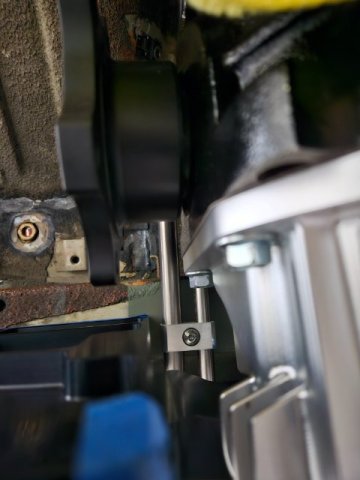
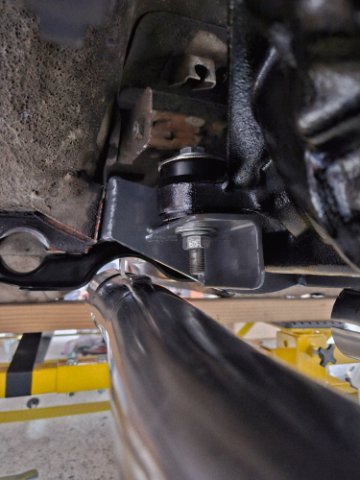
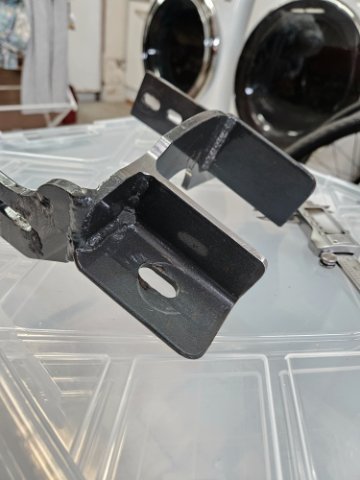
Thanks he's usually around when I'm working on projects but mostly out of frame. Spent a couple weeks recovering from surgury but feeling well enough now to start back in on things. Working through clearancing the rear end for the twin 60mm exhaust tonight I realize I should probably just fully modify everything now versus after the underside gets refinished. I clearanced the t3 r200SN front mount, and while the welds aren't the most aesthetic, I'm fairly impressed as it has full root penetration. Working forward, I had previously clearanced the rear crossmember but I think I want to fully plate it out and weld in some structural reinforcement.
-
A musician's therapist (The $300 Z)
Dat73z replied to Zetsaz's topic in S30 Series - 240z, 260z, 280z
Awesome attention to detail. It's all the small projects that add up and make the build 😁. Do the Resurrected Classics hatch hinge seals follow the curvature of the area and bracket well? I have the vintage rubber seals and they seem slightly too large/bunch up which I don't think trimming would fix. Looking forward to your review of the spare tire as well. I was thinking of getting a full size spare and custom carpet but the hatch of the s30 looks so much cleaner assembled to OE spec imo. -
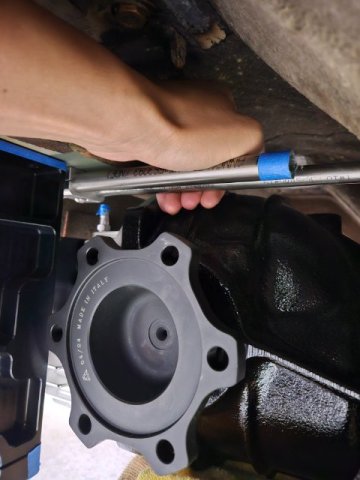
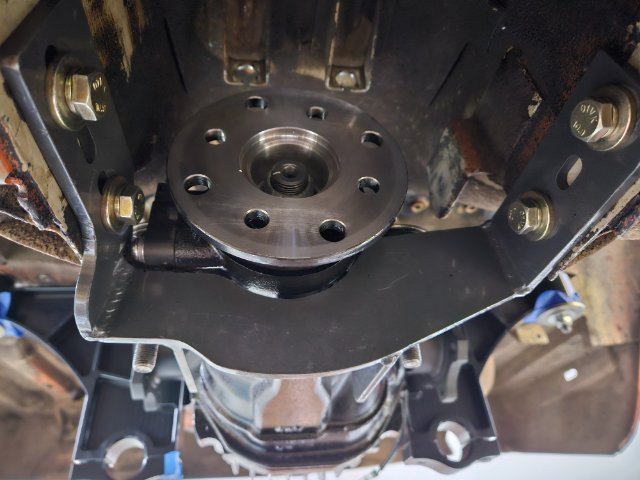
Took a break from the build this past month to focus on family and other projects, but I'm constantly reminded of the Z 😂. Picking up where I left off, the bare chassis is strapped on a body dolly tentatively scheduled to the bodyshop in August and misc. parts have been trickling in for the eventual reassembly. I saw an episode of the new Freiburger and Finnegan show where they brought back the v8 blowthrough turbo Rotsun and found their T3 rear diff mount fasteners coming loose. I have the same T3 mount and have also ran into the same issues as I've posted earlier in the thread. My plan is to drill and safety wire everything, but it was a good reminder that I still needed to check clearances and modify if needed ideally before everything is painted and finished. The diff still bolts up as it should with the nice PTZ rear cover and escort rear member. This weekend I'll mock up the rear section of the twin 60mm exhaust again and see what needs adjusting.
-
I doubt we'll see a resurgence of forum activity. I agree with @Derek, the trend since 2010 or so has been towards short-form social media, soundbytes, instant gratification scrolling, and now AI. Unfortunately e-commerce has basically all but migrated to other platforms as well so it's near impossible to fully unplug if you're looking for parts. We're a small remaining userbase but I think we can at least keep the HybridZ discussion boards alive. Which are good reminders, just put in my donation to HybridZ operating costs and time to put down the phone 😁