

Ken Smith
-
Posts
47 -
Joined
-
Last visited
Content Type
Profiles
Forums
Blogs
Events
Gallery
Downloads
Store
Posts posted by Ken Smith
-
-
I originally went on 4 seasons website and they didn't show that unit. I'll try and order the one in Canada. Thanks........

-
All the receiver/dryer needs is a 1/4" NPT female thread port to screw the switch into. (This port also can be anywhere after the condenser in the liquid line - it doesn't have to be in the receiver, it's just more convenient. (that means a fitting could be silver-soldered into the 3/8 copper tubing))
I've bought a few dryers in the past that have 2 extra threaded ports which could stay capped off or have the cap (plug) removed for a switch installation.
Thanks, I'll start looking for one with the 1/4" NPT female port. I really want to keep it original looking. I have the original Receiver/drier and wonder if it can be
checked to see if it is still good. Was supposedly just removed from a closed system as all the other components I bought from a salvaged 75 280z. Thanks again for your help.
-
Firstly, it's not actually a low pressure switch. It's on the liquid (high pressure) line of the A/C system and it is in fact a high-pressure switch. It breaks the electrical circuit to the compressor if the liquid line pressure is too high. There is no "low pressure" protection in these early Z factory systems.
Secondly, I know you'd love to just put in a stock replacement that won't require any modification - after all, then it's just "un-bolt one and bolt another one in" - but you're not likely to find a stock replacement. I've been that route...
You're probably going to need to find a replacement that will still be available years from now and re-do at least part of the liquid line routing to fit the new one. There are multiple products available that you could substitute that also have provisions (ports) for your threaded pressure switch.
The liquid lines are made from standard refrigeration tubing and use standard flare fittings. Coming from a plumbing and HVAC background, this is pretty simple stuff for me. I can understand that it can be daunting for some though. Still, any refrigeration shop worth their salt (or HVAC tech as a side job) should be able to handle the liquid line modification. Completely new copper refrigeration tubing can be easily formed and flared to fit the new part... And possibly re-forming (bending) the existing tubing could be all that's required.
Do you happen to know which ones will work with the high pressure switch? I'm more concerned with the fittings especially for the pressure switch. I didn't see anything available that has the switch and I don't know if they are all adaptable. Thanks....
-
I have an a/c system for my 1975 280z that is a factory type that cam out of another 75 280z. I've been told that I should replace the receiver drier since it is 40 years old and probably no good. Problem is it has the low pressure switch and all the new ones do not have this provision along with the same fittings for the copper tubing. I did find a few places that say they have the correct replacement but after trying to buy one they are out of stock. None of the dealers have them either. Anyone have a solution other than swapping out for aftermarket and trying to retro fit the copper lines? Also way to add a low pressure switch that will work with the factory harness? I'm open to suggestions but if you have done this I am all ears.......thanks
-
The problem with the dryer replacement is the connections. They don't line up with the old dryer and the pressure switch is non-existent. Maybe there is a different way to hook up the pressure switch? My a/c system is not in the car as my 75 never had a/c so I am going by all the parts I collected and also the diagram of how they should fit including Nissan part numbers. I have never had any experience with either r12 or r134a. Nor installing a/c in a car. This is all new to me but starting to learn. I would like to keep it original if possible but I don't want to sacrifice cooling. I did do the Kia blower upgrade and was told I need to replace the dryer and try to find a larger condenser. Thanks....
-
Ya... Didn't help...
My 1974 260Z has the original A/C hard lines - all "flare" type fittings. They didn't use "o" rings for the engine bay connections. 1975 and 1976 280Z's were the same. I converted mine to 134a before I put it on the road after the turbo swap - 8 years ago. I didn't make any other changes to the stock A/C system. No "o" rings, didn't need "o" rings in any of the liquid lines or suction lines. The only "o" rings you'll find in the stock system during those years are in the compressor and expansion valve. Being an old-school plumber, I've always preferred a flare connection as a seal over the "o" ring connections they introduced with the ZX series...
The only issue I have with leaving the hard lines is the receiver/dryer need replacing so I will not be able to find one that works with the existing fittings and lines.
-
?????
Due to new 0-ring fittings.....
-
My 75 has them also. Many have said you can just remove them and save some weight. I guess if you feel a difference you could just re-install them.
-
Just get the ones from MSA. I have them and they are nice. Also you will need the conversion brackets.
-
I am doing the factory air in my 75 also. The receiver/drier in no longer available so I will try and find a suitable replacement. Most don't have the electrical pressure connection so makes it difficult. I am also going to convert to r134a since r12 is expensive and hard to find in California. I already replaced the fan/blower motor with the Kia one which I got new from Ebay. Also all new under dash ducting. Just hoping the stock compressor, evaporator, and vacuum is all good. On the fence with replacing the condenser. Not sure there is room to go much bigger. I did add the fan shroud and plan on a pusher up front if the stock fan doesn't do the job. I am guessing with changing to r134a I will need to ditch all the hard lines and replace with new soft lines. Think I will send all my components to an A/C shop to check them before installing. Good luck with yours and post how it goes......
-
Is there an easy way to get them mounted back on the car with the double lipped seal.
I used a piece of cord to pull the inner seal inwards but it was still a struggle!
Good question......
-
I got one window done but no shims.
-
Perfect....thanks!
-
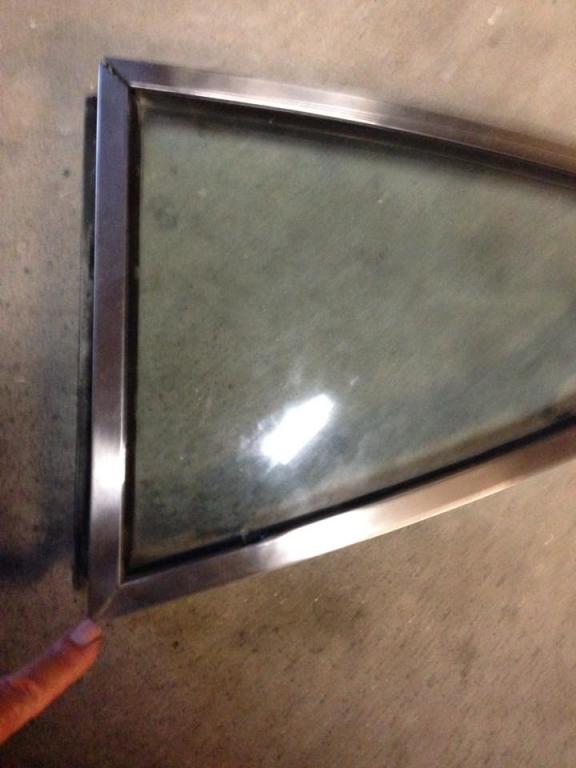
I have the quarter window out but can't get the stainless steel frame to open up to remove the glass. I got the 4 screws at the front vertical portion and the 2 screws at the rear but nothing wants to break loose. The rubber is hard as a rock so I tried soaking it in hot water and soap overnight but still won't budge. Any tricks to getting it apart? I have all new rubber if I can get the frame to come apart. Thanks......
-
Sorry, guess I didn't get my mouse over the correct forum. I did get the 2 screws out after removing the 4 screws. Total of 6 screws. The rear does have an insert that the 2 screws came out of. No rust anywhere, just really hard rubber. Wonder if the internal bracket at the rear slides out?
-
I have the quarter window out but can't get the stainless steel frame to open up to remove the glass. I got the 4 screws at the front vertical portion and the 2 screws at the rear but nothing wants to break loose. The rubber is hard as a rock so I tried soaking it in hot water and soap overnight but still won't budge. Any tricks to getting it apart? I have all new rubber if I can get the frame to come apart. Thanks......
-
I ordered the window parts from z car source on september 09.After a couple of e-mails and couple of phone calls,still no delivery on october 15.I would look elsewhere for these parts.Poor service.
That's funny. I got mine from them in about 7 or 8 days due to the weekend and Columbus day. Might want to be a little patient. They are well worth the money. Plus, you can call them and they explain how to install them. Very nice people.
-
Removed old staples and rubber. New rubber from Z Car Source. Used T50 #506 staples. Drilled out holes just enough to fit staples. Starting at rear and working forward inserting staples and using flat head screwdriver push staple in hard with thumb and hold it while bending end of staple with screwdriver. Takes awhile but works great. This is what Z Car Source advised me to do.
-
I didn't find or use staples... Hence the " " around "staples". Stiff wire of an appropriate size to go through the holes - cut and bent to facilitate it's use as "staples".
I considered some type of adhesive as well. However, after I finished, the squeegee was held in place very well and there's little force would cause it to become dislodged in normal usage. I don't think the rubber would ever detach as long as the "staples" are in place. Plus, I thought about adhesive and the next time it has to be done. It will be much easier not to fight adhesive and clean adhesive off parts should it need to be redone.
I ended up calling Z car source where I bought the rubber from. They told me to drill out the holes with a bit just a tiny bit bigger than the hole and use T50 #506 staples. Then push them in with a flat head screwdriver and bend them over with needle nose pliers. I'll post how that works out. I hope I won't have to replace them again. My staples were originals and had lots of rust and it was a pain to remove them.
-
Ya, but you're not going to like it...
The original staples are pretty tough - stainless or hardened steel. They had to be to punch through the stainless molding and metal backing plate. I tried to unbend them with the thought of maybe re-using the original staples. wrong... They are extremely difficult to straighten and many just break while you're struggling to do so.
I ended up cutting off the curled end of the staples with my dremel cutting wheel so I could remove them. At this point you really need a pneumatic stapler to reassemble. I don't - so I used the existing holes and fashioned my own "staples" to put the new rubber strips on the metal framework. Definitely not as awesome as the original fasteners, but I can always re-do them at any point should they not hold.
I am about to do the same project and have removed the staples but the holes for the staples are round and my staples are not round. Where did you find staples and what size did you use? Also, thinking of gluing the new rubber to the removed metal strip, then pushing the staples through the rubber before trying to attach to the molding. Ideas? Thanks....
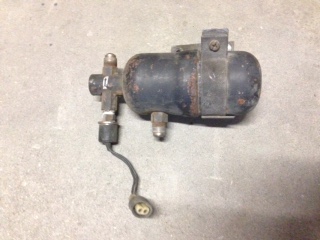
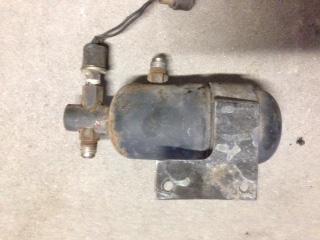

Need a receiver/drier for 1975 280z factory a/c that fits.....
in S30 Series - 240z, 260z, 280z
Posted · Edited by Ken Smith
I didn't know that. R12 I believe is hard to find as I live in California and I think it's probably illegal here. Or very expensive at best.
Any ideas on a pressure switch that will work with original type drier? If I can get R12 for a fair price I understand it actually is better
than R134. If that's the case I will stick with the R12.