

ubergumgum
-
Posts
49 -
Joined
-
Last visited
-
Days Won
5
Content Type
Profiles
Forums
Blogs
Events
Gallery
Downloads
Store
Posts posted by ubergumgum
-
-
On 6/26/2020 at 3:48 PM, ZT-R said:
i might bite if it where CF
he will sell them in carbon fiber, don´t know when they will be available
here is his website https://www.industrygarage.com/ , he recently announced that he will make most body panels in carbon aswell
-
only good write up on brake change i seen is KatoKid on the Viczar.com he did a full front and rear R33 Gts-t swap, including booster and master, to make the car legal in austraila with his M3 swap
heres a link if anyone is interested
https://www.viczcar.com/forums/topic/13582-r33-gts-t-calipers-onto-a-240now-completed/
-
I know its possible to remove, but currently i see it as extra security considering i have gotten the ews to work with the "original tumbler from the datsun". The bmw tumbler doesn't need to be used to start the car but i need the key sitting in the tumble to make sure the EWS is working.
Dont know if any of you guys seen the Kato Kids BMW M3 on the viczcar . com but he keept the orignial EWS and left the key in the glowbox to keep original computer and security.
https://www.viczcar.com/forums/topic/4654-kato-kids-bmw-m3-powered-71-240z/
-
Well i haven't updated in awhile, been very busy with finishing school and working on my car.
As a student i dont have the best economy and haven't been able to purchase more gas for my welder, so i decided to put the car down on the ground and start trail fitting the engine. start making progress on things i already have laying around such as suspension components.
Some of you might say, go standalone, but i will keep the bmw computer from economical reasons. I will also use the entire bmw wiring harness as I don't want to chop up my original harness because i have the matching numbers engine and want to keep it possible to return to original. So i have started to thin out the bmw wiring harness to make it lighter and removing all the parts i don't need. My biggest worry using the bmw wiring harness was the EWS (security system) I don't really want to remove it as that can be a big problem. I also want to keep all the original controls for lighting and ignition, and such, so far i got the datsun ignition switch to work with the bmw harness.
But after thinning out about 1/3 of all the wires I went to try and crank the car, (when the EWS is not working the starter wont get any signal) and it still cranks 🥳
Sorry about the big format.
-
i would guess the dash is just flocked, and and that looks alot like alacantra
-
Found a site for downloading the FSM that I have never seen before, with a lot of nice information, link below
-
 2
2
-
-
yee i can vouch for it not needing bracing, i don't really dare to climb in to mine but no bracing.
and yes i would definitely remove the glas before the rotisserie
-
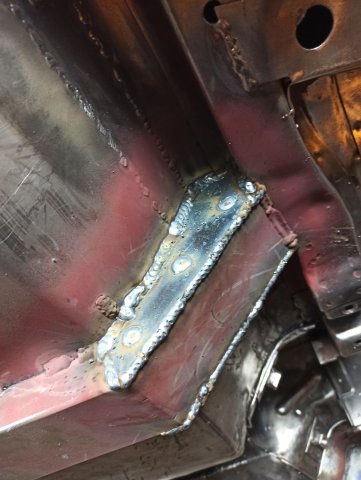
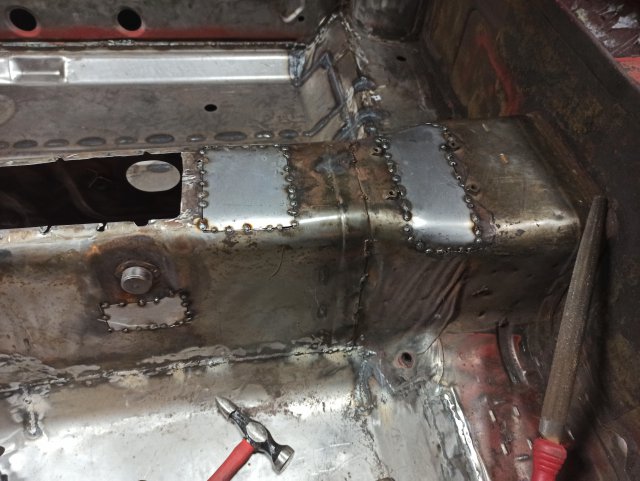
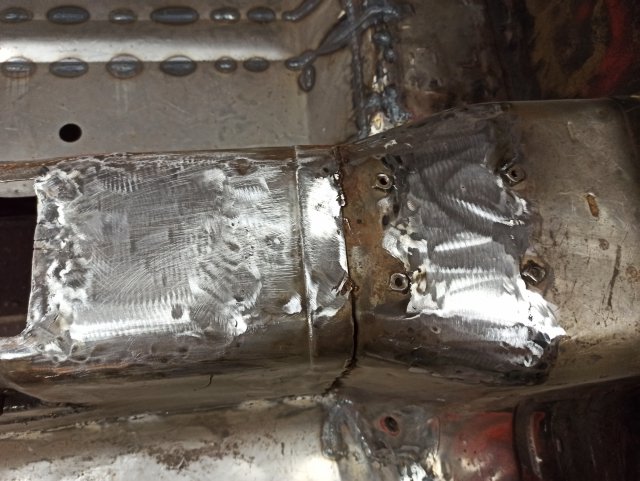
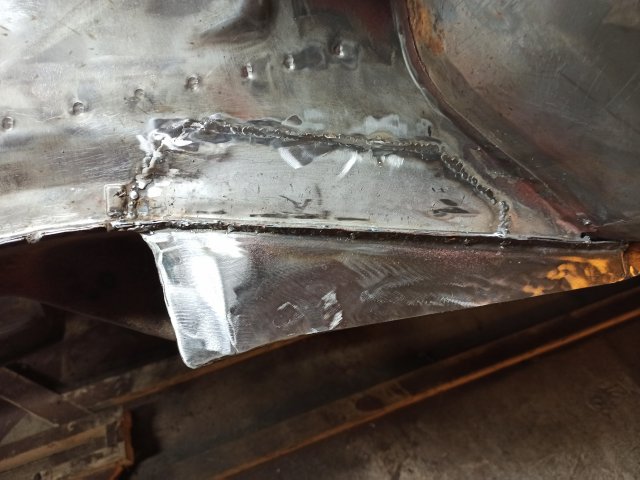
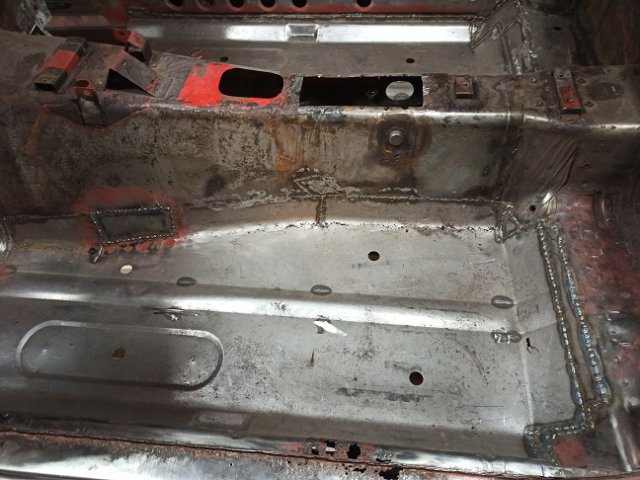
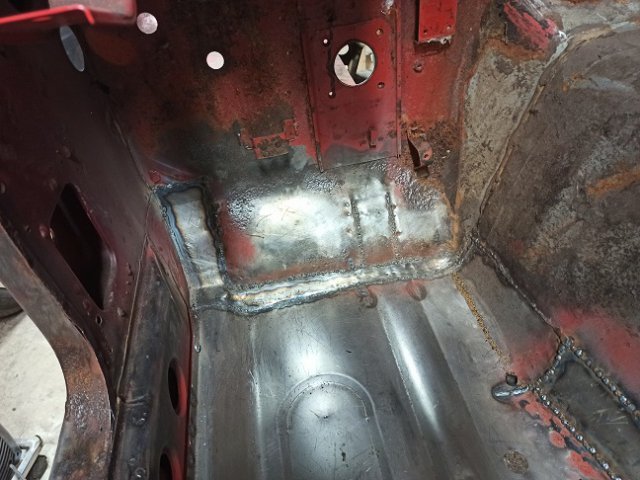
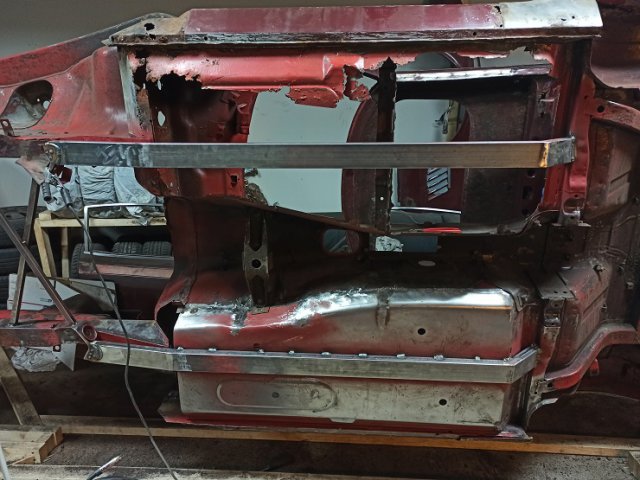
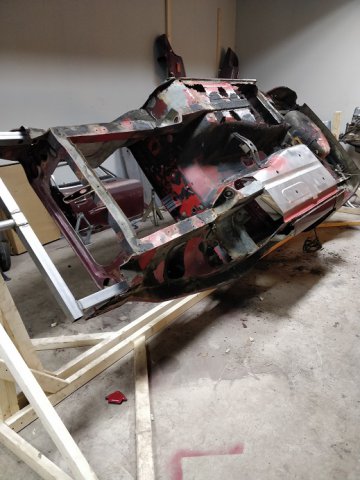
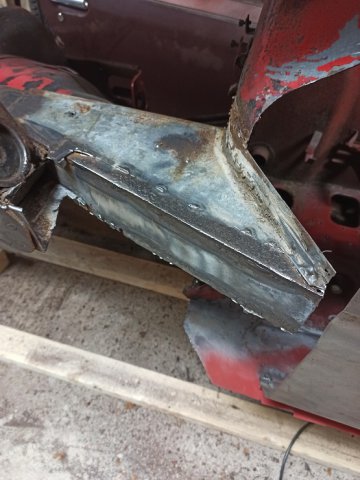
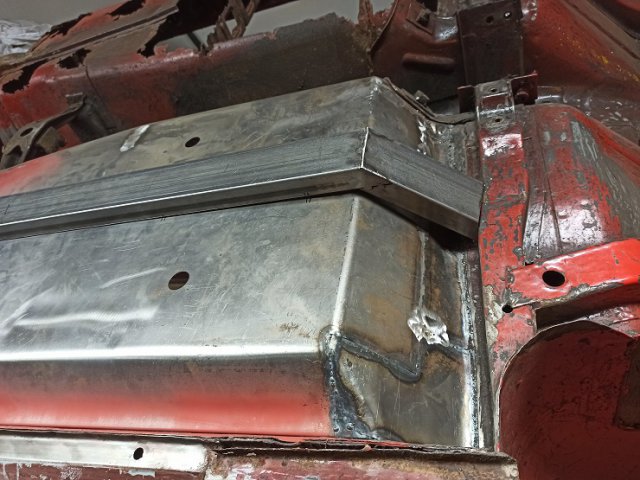
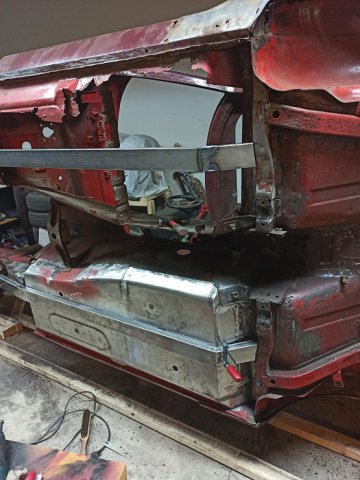
Got some more done on the car, finished up the rear of the framelegs endplates, i also went over some of my floor welds that needed it.

and some cleaning up of my welds, still some left to do but my angelgrinder wont fit
i also cleaned up the front inner plates
then i turned my attention to the center console area,
-
 1
1
-
-
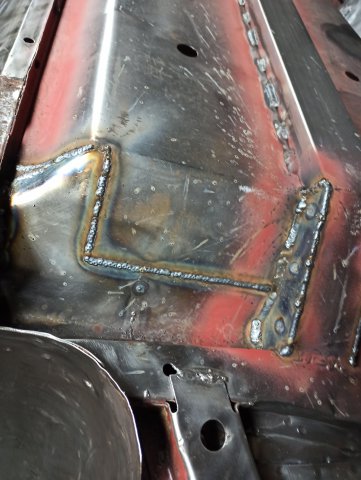
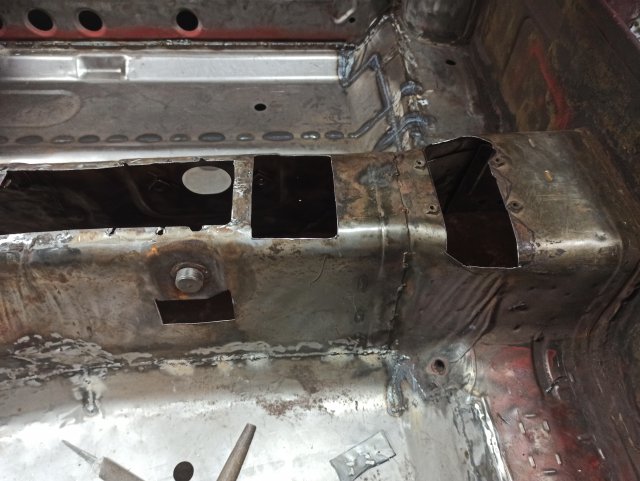
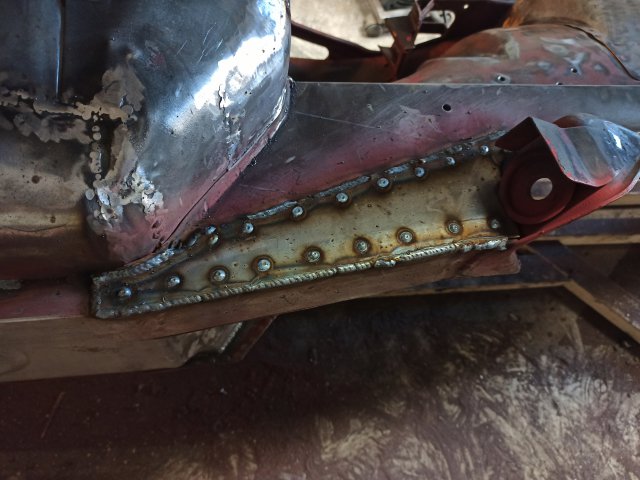
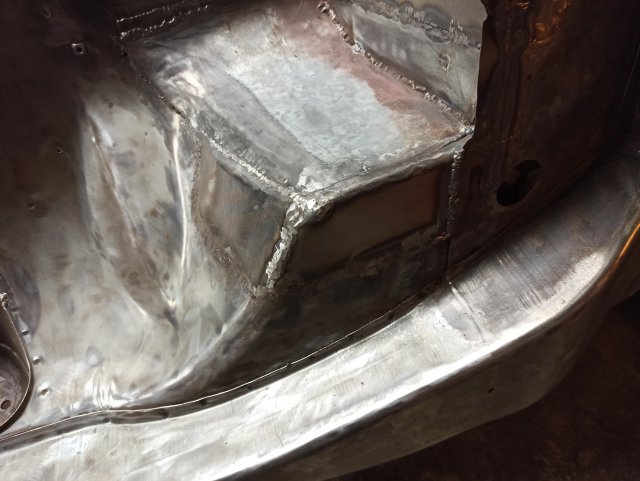
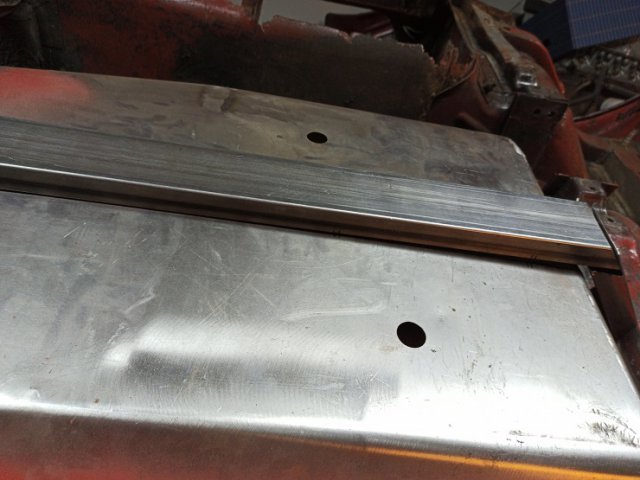
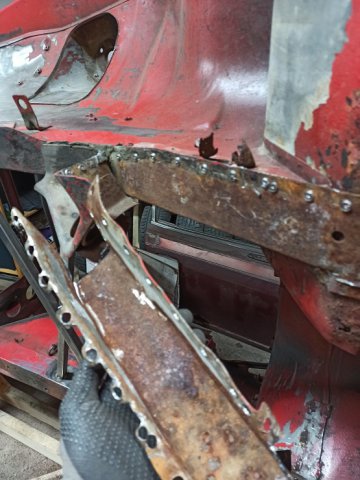
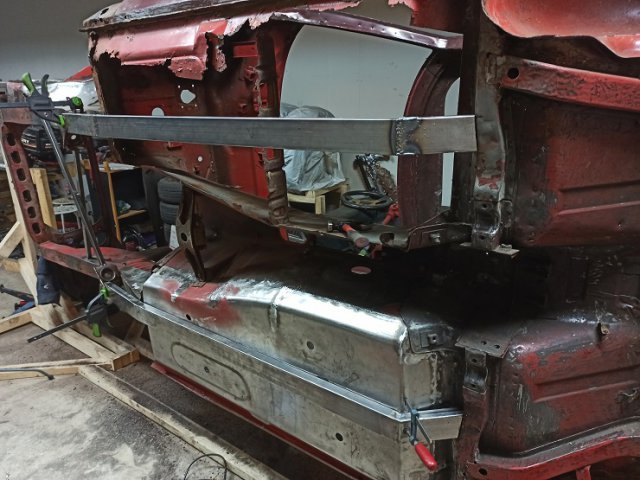
since the last update, i finished up the front of the frame legs and the area on the driver side above the frame leg
welded upp the last of the battery tray area
and started finishing up the area where the fuel filler neck usually goes as mine will be behind the numberplate
-
you can get the technical update of the m52 it has a aluminium block with iron sleeves
-
Considering the fiat 124 is a mx5 (ND) with different panels, why not go for the mx5, should be cheaper and make custom front end and rear end so it doesn't look so much like a fiat 124 with a datsun roofline? it would be a mx5 underneath anyway, just more personal?
-
1
-
-
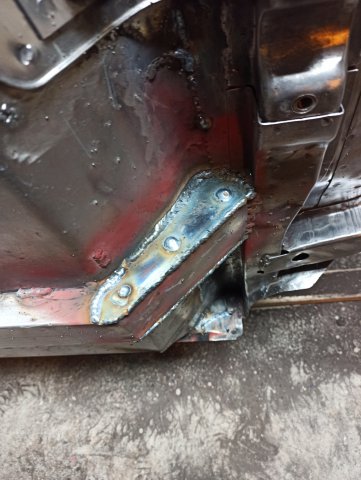
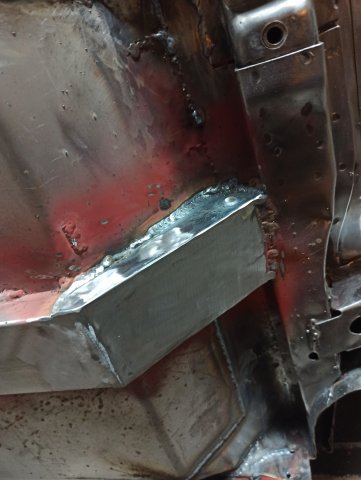
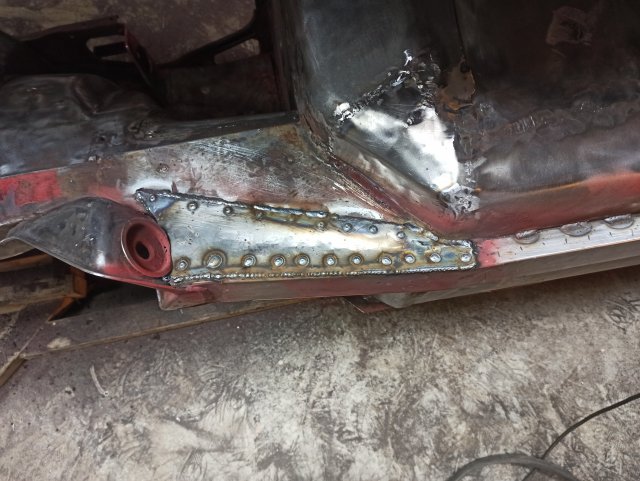
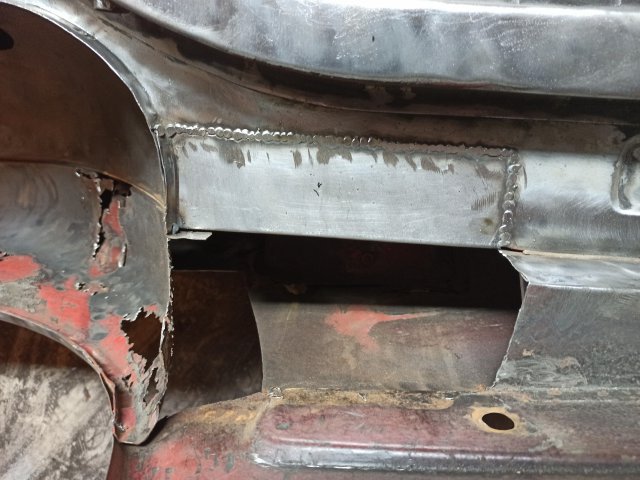
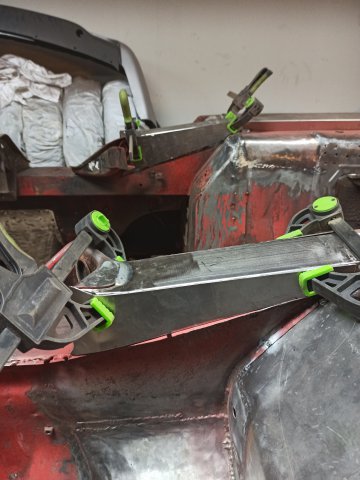
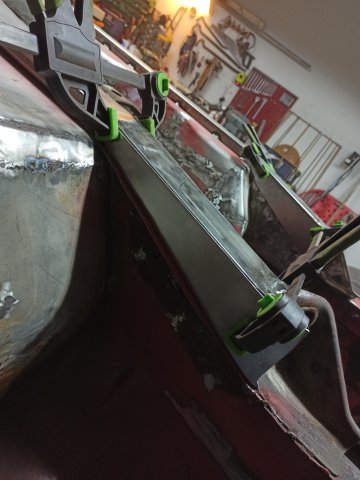
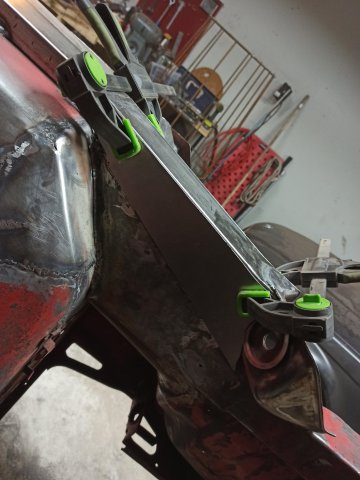
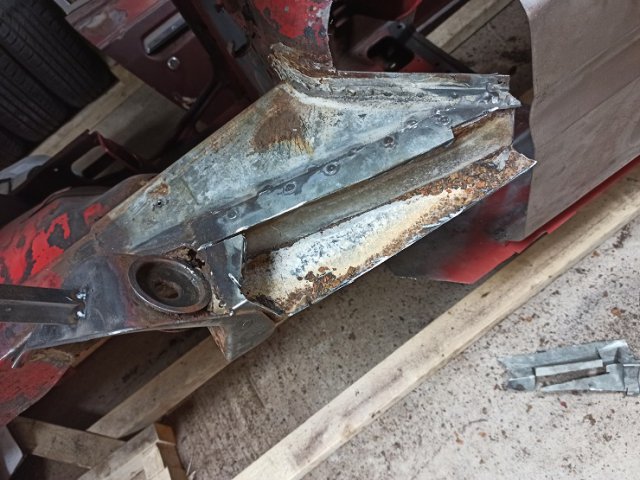
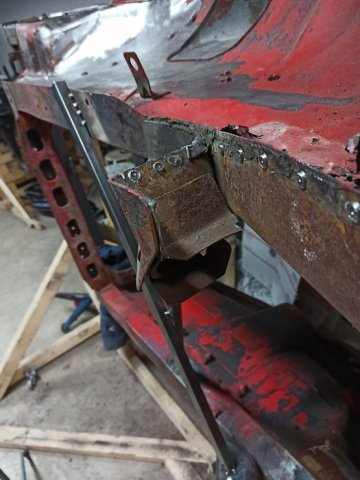
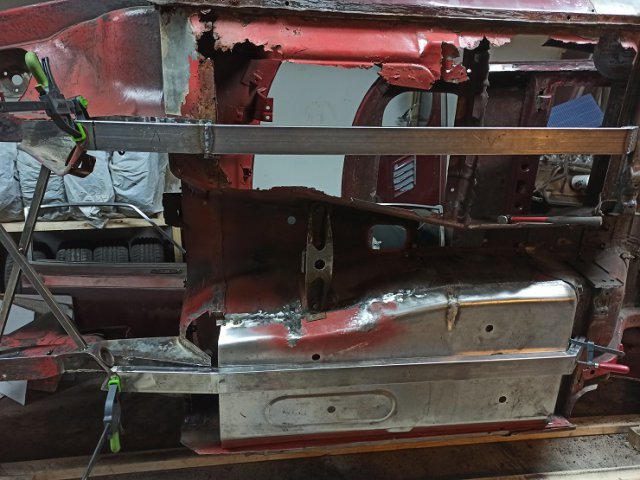
Made the parts for the battery tray area, need to welded in the last part.
also finished the plates that will tie my new framerails to the old ones in the enginebay
-
1
-
-
On 1/29/2020 at 3:25 PM, ETI2K said:
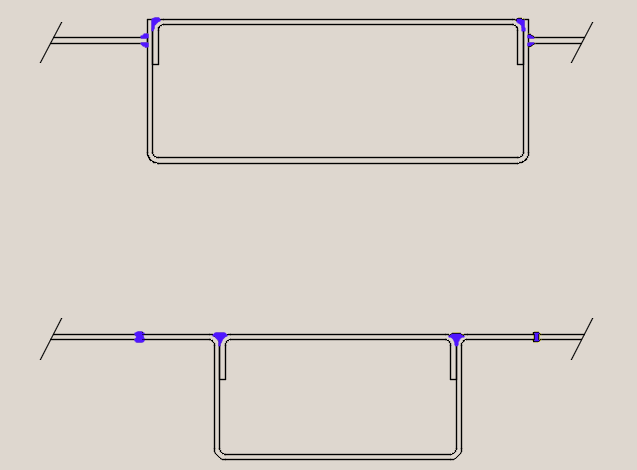
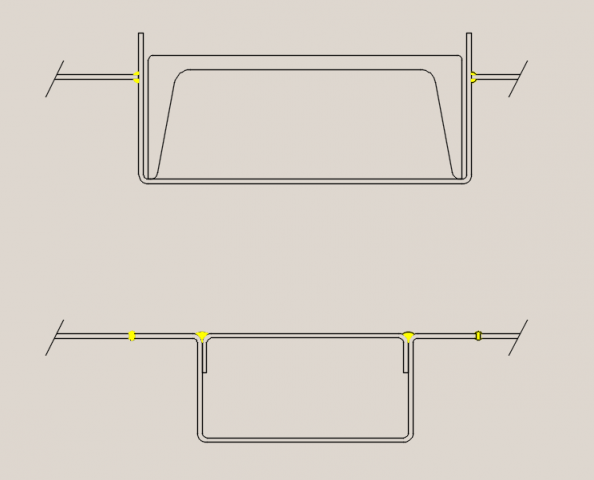
When I replaced my frame rails I cut out the section of floor that included the frame rail flanges, making the opening 4.25" wide. I then had stainless frame rails made with tops (see drawing - as-is at top, new design at bottom) and welded them in, but I'm not really liking them now, so I will likely redo them. The rails and tops are each u-shaped with one fitting inside the other. I welded the edges of the floor pan to the sides of the frame rails because the OEM pans are not flat and I couldn't figure an easy way to deal the changes in height - in other words, I could not figure out to butt weld the pan to rail flanges. This resulted in the side of the frame rails protruding above the floor by about 1/2". After welding (continuous by joining all stitches) I ground off the protrusions, but they still are about .25" above the floor.
The reason I am redoing them is I ended them the way the originals ended, so no tie-in to the rear frame; and the tie-in at the front is completely cocked up because the new rails are wider than the members to which they need to be attached.
On the next go, I'll have them made to the factory width, extend them to the rear frame area, and include flanges of the sides that reach out to the floor pan edges. This means I will have to flatten the area of the floor where they meet so I can get good butt welds. My primary objective in all of this is to avoid faces of two pieces of carbon steel being pinched together in any way by plug or spot weld in order to avoid rusting at the weld (even with weld-through primers - not 100% on-board with how they hold up over time after having burned off at the weld site).
Can you post pics of your rear-mounted sway bar, and also, how are you tying in the new rails at the front?
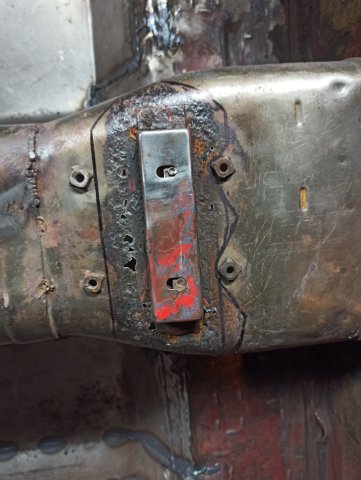
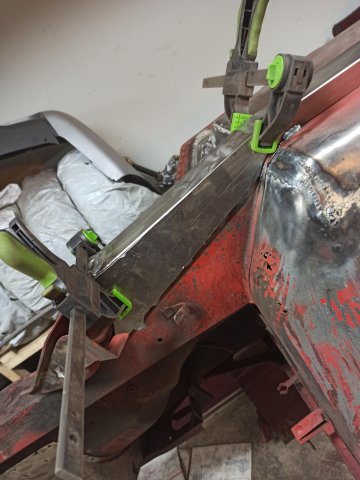
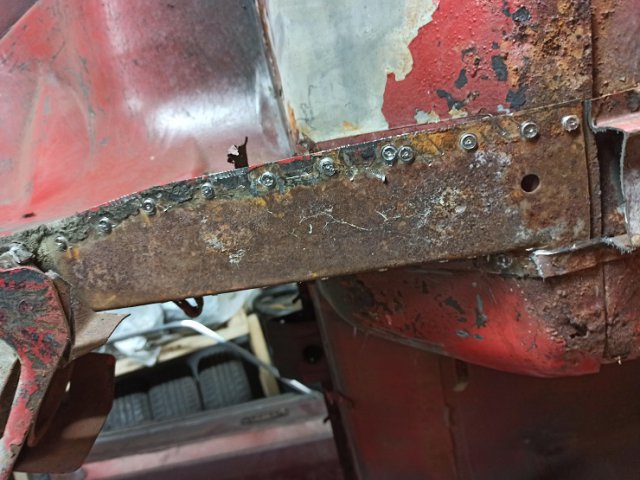
You asked how i will tie my new framerails to the old in the front, made the plates just need to get some gas for my welder before i burn them in.
you also asked about my rear swaybar, its connected to the part that holds the rear control arms in the rear part by the mustache bar. Can take a picture when i mount the swaybar.
Some pictures of the plates. they need some bending to sit flush but almost finished, made them out of 1.5mm sheet metal
-
1 hour ago, Ironhead said:
To help with the impatience (which I have as well) you can cool the metal with compressed air after each small amount of welding. This keeps heat from building in the panels and allows you to move forward much faster.
yee most likely what i will do, will still wait as long as possible to weld the outer panels. still have a lot of rust left before i get there
-
alrigt sounds like they might be worth trying, sent an email to the company asking if they can offer the coilovers with a lower spring rate
Will update when i get an answer
-
9 minutes ago, grannyknot said:
I don't know how I missed this thread, just found it now and a treat to read all the way through. Big project to tackle, good on you, we have to save those rusty ones! Excellent work you are doing, I especially like the BMW engine.
My first rotisserie was made of wood but no where near as nice as yours.
Are you going to leave the custom antenna hole? I think that is what the old hot rodders called Frenching.
Thank you! and no the antena hole is going, but I want to wait to weld the outer panels for as long as possible, I'm a bit worried about warping them as i dont have the patience for welding that slow.
Got to say i love your car as well, and it have been some of my inspiration! Looking forward to seeing your completed!
-
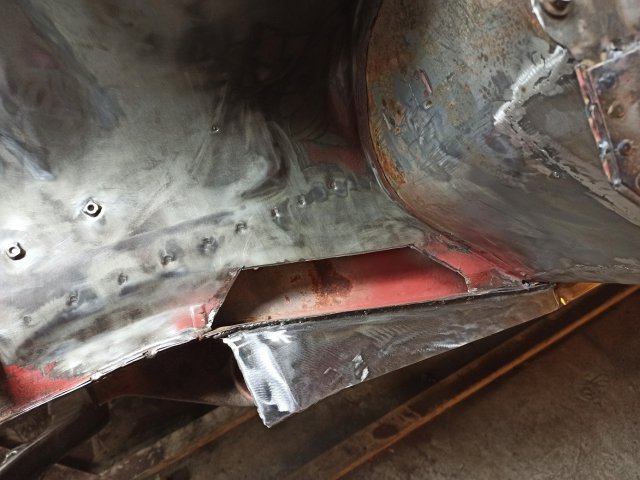
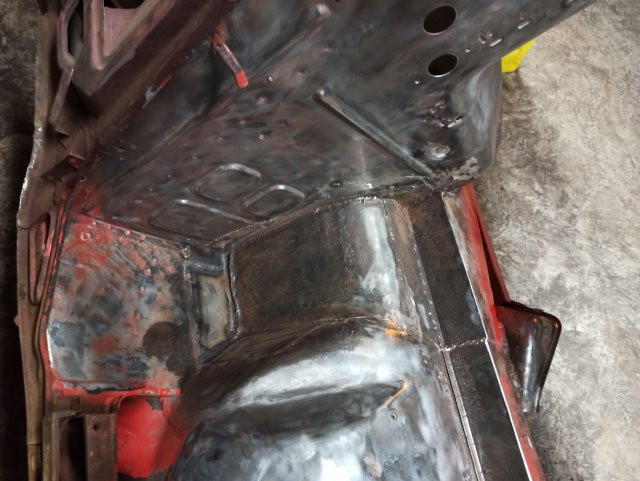
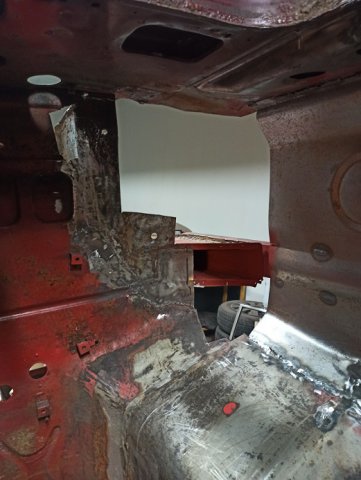
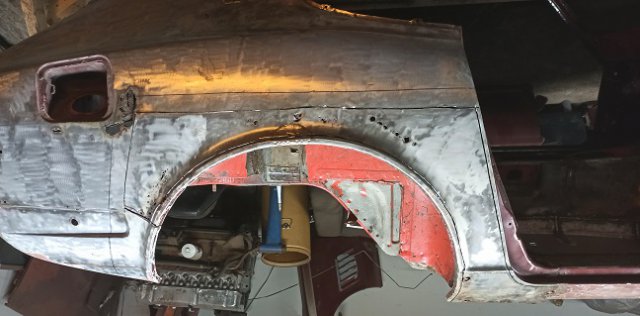
Almost finished the passenger side floor, will finish the battery tray area next.
-
If it is aluminium threaded tube it would not work but would doubt TÜV would approve them being aluminum, and the fact that they are TÜV approved makes them seem more legit, at least to me.
6 hours ago, walkerbk said:never heard of them but they sound to be the same as the BC coilover. If you dont want to spend the money on the BC coilover ones, buy the CR Racing ones. They are again, a knock off version of the BC Coilovers but are around $800 and have been around a little longer than D2 Racing.
The spring rate does seem a little high.
I believe the aluminum construction they are talking about is the threaded tube. The main body is steel as you cannot weld aluminum to steel (you can braze but it is much weaker).
Sure i could buy the CR racing ones but they would cost the same as BC after import cost from the states to europe.
-
Hi guys, been searching around for coilovers and found theas D2 coilovers, anyone tried them?
Everything seems to be right and they are a lot cheaper then BC racing ones.
Link to the coilovers: https://www.driftshop.com/d2-racing-street-coilovers-datsun-240z-260z-280z.html
-
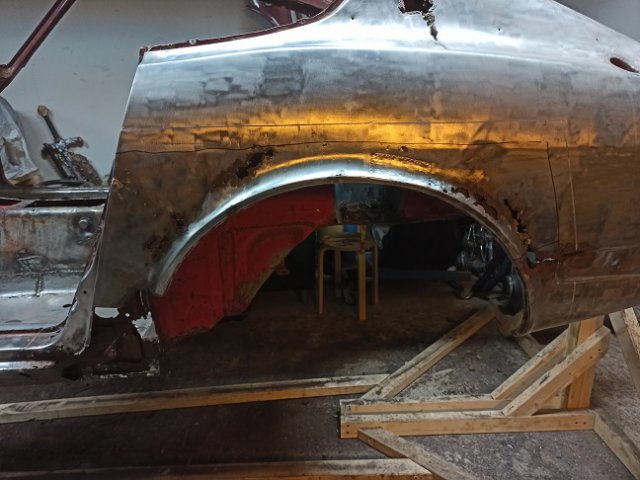
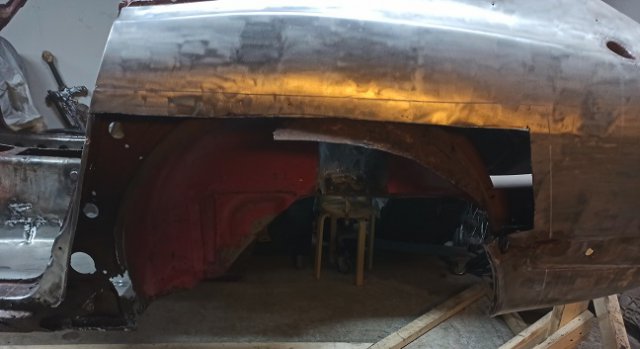
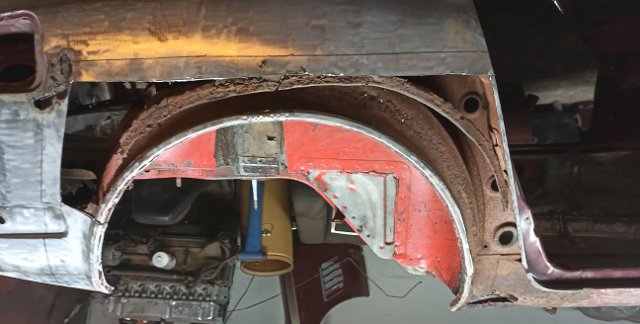
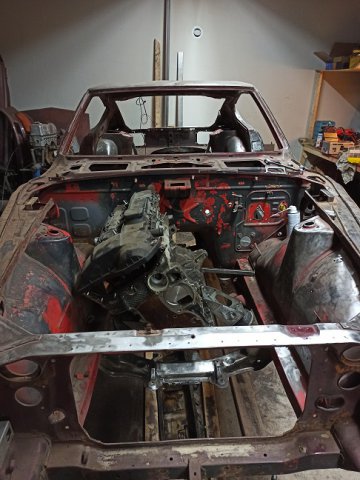
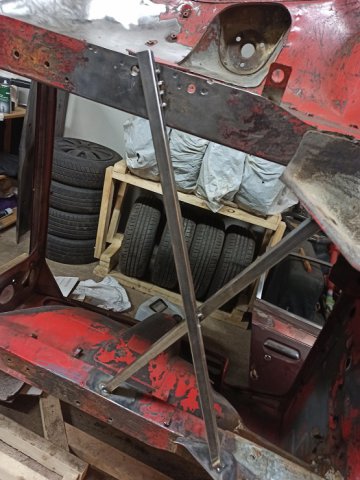
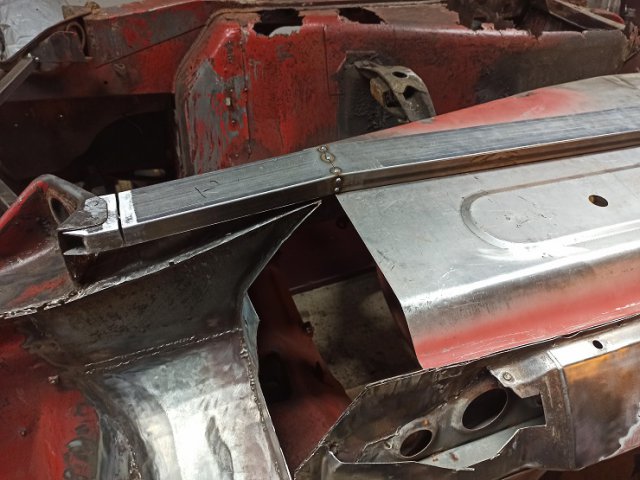
Since the last update i have striped the rest of the smaller parts of the chassi making it entirely ready for blasting, just need the company im trying to work with tell me when it´s time. I also 98% finished welding the driver side floor, and going to start tackling the passenger side in the coming weeks. I also cut out the rear arches to make sure the blasting will take as much area as possible.
And then i mocked up the scrap engine i have laying around just to get a feeling about how it will look. Special thanks to Ron Tyler @RTz as he designed and made an open file for the mounts.
-
sounds like an awsome deal, get some pictures of it so we can check it out

-
I know its a big project, but it's coming along god, and it feels better for me rescue a car that needs it instead of buying one that rust free.
And yes you could think it would have lived all its life in southern sweden, 😂
Today i go the frame rails welded in, well atleast started welding it in, next on the list is prepping to put in the driver side floor and patching up the front of the passenger floor.
-
Hi guys, since my last update I have been cadet on a ship and haven't had much time to work. But I'm started getting back at it, especially considering my girlfriend is leaving for 6 months to be a cadet on ships, i will get a lot done.
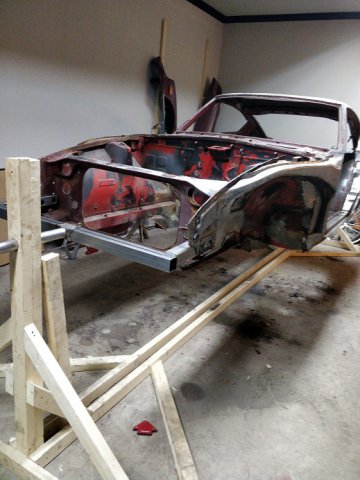
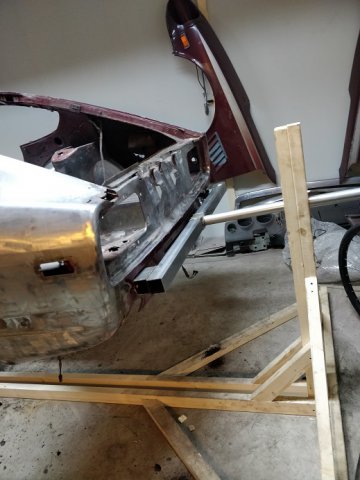
I made a rotisserie from wood and some steel, as it was cheaper and the chassi doesn't way that much, (lifted one end with engine crane and the other by hand with my friend.)
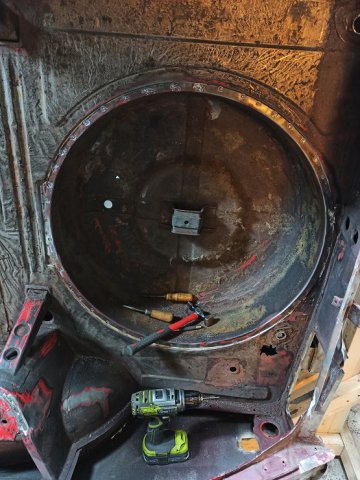
I cut out the spare wheel tub, have decided to make a lite bigger fuel tank and a flat floor.
And I have almost finished making my own frame rails as I wanted some more strength by having the rails connected to the rear part of the chassi, and partly to make the floors land in the same place. And for those of you whom are curios my rear swaybar goes behind the dif, came that way when i bought it.
I also decided that i will be changing the drive line to something more modern, to be more precise i bought a bmw e46 323i, which means i got the m52b25tub engine, and the reason for getting this engine and not the 2.8l one or the s52 m3 engine is that I live in sweden and the law say i can change the power of a car by 20% form my cars specific power, and I do want the car to be fully legal, even if I will be making more power than the bmw made stock.
thanks for reading, and i will try to update more the coming months as i finish things on the car!
-
10 hours ago, grannyknot said:
You should know that when you finish off the rails with extensions going right to the sub frame at the back, sometimes you'll will have difficulty with a forward mounted rear sway bar. It can rub or you may need spacers to bring it down away from the bar, a sway bar that goes around the back works fine.
My car acctually have a rear mounted swaybar from when i bought it.
-
1
-


New flares and airdam option
in Body Kits & Paint
Posted
For those interested industrygarage is adding the carbon fibre flares to his website tomorrow